- Company Articles
- Industry articles
- Industry standards
- Design Software for 2040 National Standard Profile Structures: Tools & Tips

Design Software for 2040 National Standard Profile Structures: Tools & Tips
Related Product
2040 National Standard Profile
45° external bending joint, used for 45° external connection of two aluminum pipes.
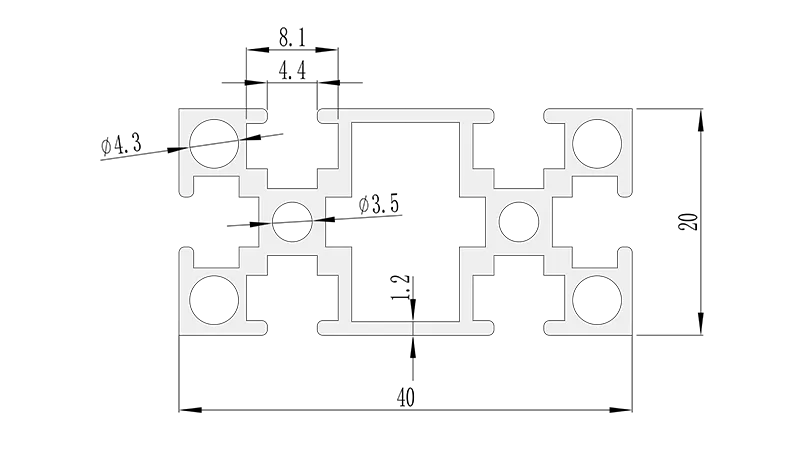
Walk into any modern workshop, manufacturing facility, or even a tech-savvy garage, and you'll likely spot a common thread: aluminum extrusion profiles. These unassuming metal rails, with their T-slot grooves and modular design, are the backbone of everything from workbenches to assembly lines. Among them, the 2040 national standard profile stands out as a workhorse. Measuring 20mm by 40mm, it's the Goldilocks of the extrusion world—not too bulky for small projects, not too flimsy for heavy-duty tasks. But here's the catch: while 2040 profiles are inherently versatile, turning them into a functional, efficient structure (say, a custom workbench or a lean system for material flow) requires more than just cutting pipes and twisting joints. It demands precision, foresight, and the right design software to bring your vision to life. In this guide, we'll explore the tools that make 2040 profile design seamless, share pro tips to avoid common pitfalls, and show you how integrating aluminum profile accessories can transform a basic frame into a productivity powerhouse.
Understanding 2040 National Standard Profiles: More Than Just Metal Rails
Before diving into software, let's ground ourselves in why the 2040 national standard profile is such a big deal. First, the "national standard" label isn't just red tape—it ensures consistency. Whether you buy from one supplier or another, a 2040 profile adheres to strict dimensional tolerances, meaning T-slots align, accessories fit, and parts are interchangeable. This uniformity is a designer's dream; you won't waste hours sanding a pipe to fit a joint or returning a batch of mismatched rails.
Material-wise, most 2040 profiles are made from 6063-T5 aluminum alloy—a blend prized for its strength-to-weight ratio, corrosion resistance, and machinability. It's light enough to move around (hello, mobile workbenches!) but tough enough to support tools, materials, and even small machinery. And those T-slots? They're the secret sauce. Running along the length of the profile, they let you attach accessories—brackets, shelves, casters, you name it—without drilling or welding. Need to reconfigure your setup? Just loosen a bolt, slide the accessory, and retighten. It's flexibility personified, which is why 2040 profiles are a staple in lean systems, where adaptability is key to reducing waste and boosting workflow.
Common applications? You name it. From simple workbenches in home garages to complex material racks in factories, 2040 profiles shine. They're also popular in automation setups, where their precision makes them ideal for mounting sensors, guides, and conveyor components. And because they're compatible with a vast ecosystem of aluminum profile accessories—think end caps to hide sharp edges, hinges for foldable structures, or casters for mobility—they grow with your needs. A basic frame today could become a fully loaded workstation tomorrow, no redesign required.
Top Design Software Tools for 2040 Profile Structures
Designing with 2040 profiles isn't about sketching on the back of a napkin (though we've all been there). To create structures that are safe, efficient, and buildable, you need software that can handle 3D modeling, test load capacities, and even generate a bill of materials (BOM) for parts like aluminum profile accessories. Below, we've broken down the top tools, from professional-grade powerhouses to user-friendly options for beginners.
| Software Name | Key Features for 2040 Profiles | Best For | Price Range |
|---|---|---|---|
| SolidWorks | Parametric modeling, built-in aluminum extrusion libraries, FEA simulation for load testing, and BOM auto-generation. | Professional engineers, complex assemblies (e.g., multi-level material racks or automated workstations). | $3,995–$10,995/year (subscription) |
| AutoCAD | 2D drafting with precision, custom block libraries for 2040 profiles and accessories, and DWG compatibility for collaboration. | Drafters, teams focused on 2D blueprints (e.g., workshop layouts or simple lean system designs). | $1,775/year (subscription) |
| SketchUp Pro | Intuitive 3D modeling, access to 3D Warehouse (thousands of pre-made 2040 profile and accessory models), and real-time rendering. | DIY enthusiasts, small businesses, or anyone new to 3D design (e.g., building a home workshop workbench). | $299/year (subscription) or $695 (perpetual license) |
| Item Engineering Tool | Specialized for aluminum profiles (including 2040 national standard), drag-and-drop design, and instant BOM with supplier links. | Lean system designers, those using Item-brand profiles, or projects requiring quick turnaround. | Free (with a free Item account) |
SolidWorks: The Heavyweight Champion for Complex Projects
If you're designing a 2040 profile structure that needs to handle heavy loads—say, a material rack B (3 row and 3 floor) for storing bulky components—SolidWorks is worth the investment. Its parametric modeling feature is a game-changer: tweak a dimension (e.g., shorten a rail by 10cm), and the entire model updates automatically, including dependent parts like joints or shelves. This saves hours of manual rework, especially when iterating on designs.
What really sets SolidWorks apart for 2040 profiles is its extensive library of aluminum extrusion models. Most versions come pre-loaded with national standard profiles, including 2040, and you can download custom libraries from suppliers if needed. Need to test if your workbench can support a 50kg tool? Use the built-in Finite Element Analysis (FEA) tool to simulate stress points—no more guessing if a joint will buckle under pressure. And when you're ready to build, SolidWorks generates a detailed BOM, listing every 2040 rail, aluminum profile accessory (like end caps or hinges), and fastener you'll need. It even includes part numbers, so ordering from your supplier is a breeze.
SketchUp Pro: The User-Friendly Underdog
Not everyone needs the firepower of SolidWorks. If you're a small business owner building a single workbench or a hobbyist designing a garage organizer, SketchUp Pro is your best friend. Its interface is so intuitive that even someone with no CAD experience can start modeling in minutes. The magic lies in the 3D Warehouse—a massive online library where users share models, including hundreds of 2040 profile variations and aluminum profile accessories. Need a 2040 rail with a specific wall thickness? Search "2040 national standard profile" and download a ready-to-use model. Forgot to add casters? Grab a pre-made caster wheel model and drop it into your design.
SketchUp's real-time rendering also helps with visualization. Want to see how a yellow plastic roller track guide rail (a common accessory for material flow) would look on your workbench? Apply colors and textures, then orbit around the model to check angles. It's not just about looks, though—SketchUp's "Dimensions" tool lets you measure distances between parts, ensuring your 2040 rails align perfectly with accessories like roller track connectors. And when you're done, export your design as a PDF or image to share with your team or supplier.
Essential Tips for Efficient 2040 Profile Design
Even with the best software, designing with 2040 profiles can trip you up. Here are pro tips to keep your project on track, from start to finish.
1. Start with the End in Mind (and Model It)
It sounds obvious, but many designers jump into modeling without defining the structure's purpose. Is this a workbench for assembly? A material rack for storing parts? A lean system for moving products between stations? Each use case has different requirements. For example, a workbench might need a flat top (like workbench E, a single-deck design without casters), while a lean system could require roller tracks for smooth material flow. Define your goals first—load capacity, size, mobility, accessory needs—and model accordingly. In SolidWorks, you can even create "configurations" to test variations: Will adding casters affect stability? What if you swap a steel roller track for an aluminum one? Test these scenarios in the software before cutting a single pipe.
2. Leverage Libraries (Don't Reinvent the Wheel)
There's no need to model 2040 profiles or aluminum profile accessories from scratch. Most software tools (SolidWorks, SketchUp, AutoCAD) have built-in or downloadable libraries with pre-made models. For example, the Item Engineering Tool includes every 2040 profile variant, joint, caster, and roller track you could need. Using these libraries saves time and ensures accuracy—supplier-provided models are dimensionally precise, so you won't end up with a joint that's 1mm too small for your rail.
3. Think About Accessory Integration Early
Aluminum profile accessories are what turn a frame into a functional structure—but they're easy to overlook until it's too late. For example, if you're designing a workbench and plan to add a tool rail later, you'll need T-slots in the right position to mount it. Or, if you want to attach a roller track for material flow, you'll need to account for the track's height and how it connects to the 2040 profile (hint: roller track placon mounts are essential here). Model accessories alongside your 2040 rails from the start. In SolidWorks, use "mates" to lock accessories into place, ensuring they align with T-slots and don't interfere with other parts. This prevents "oops" moments, like realizing your caster wheels block the roller track you just installed.
4. Test Loads and Stress Points
A 2040 profile might look sturdy, but overloading it can lead to bending, warping, or even collapse. Most professional software tools let you simulate loads to avoid this. In SolidWorks, use the Simulation add-on to apply weights (e.g., 30kg on a workbench top) and see where stress accumulates. You might find that adding a cross-brace or upgrading to a thicker-walled 2040 profile (yes, there are variants!) is necessary. Even if you're using SketchUp, you can manually calculate loads using the profile's specs (most 2040 profiles have a load capacity of 50–100kg per linear meter, depending on support spacing). When in doubt, over-engineer slightly—better to have a structure that's too strong than one that fails.
5. Keep It Modular (Because Change Happens)
One of the biggest advantages of 2040 profiles is their modularity—so why design a rigid structure? Use software to plan for future changes. For example, if you're building a material rack, leave extra T-slots open for adding shelves later. If you're designing a workbench, model it with removable panels so you can swap in a new top if the old one gets damaged. In AutoCAD, use layers to separate components (e.g., "frame," "accessories," "casters") so you can toggle parts on and off when reconfiguring. This flexibility is why 2040 profiles are so popular in lean systems—they adapt as your workflow changes, and your design should too.
Integrating Aluminum Profile Accessories: The Details That Make the Difference
You've modeled your 2040 frame, tested the loads, and finalized the design. Now it's time to think about accessories—the small parts that turn a static structure into a dynamic tool. Aluminum profile accessories are like the punctuation in a sentence: they might seem minor, but they make the whole thing make sense. Let's break down key accessories and how to design for them.
Joints: The Glue That Holds It All Together
Joints connect 2040 profiles, and choosing the right one is critical. For fixed angles (like the corners of a workbench), use 90° aluminum pipe joints. For adjustable structures, internal rotary aluminum joints let you pivot rails as needed. When modeling joints in software, pay attention to their dimensions—some joints have offset legs that affect how profiles align. In SolidWorks, use "interference detection" to ensure joints don't overlap with T-slots (a common mistake that blocks accessory mounting). And don't forget to include joint fasteners (like bolts and nuts) in your BOM—they're easy to overlook, but you can't build without them.
Roller Tracks: For Smooth Material Flow
If your structure involves moving materials (e.g., a lean system for assembly lines), roller tracks are a must. Plastic roller track guide rails (available in yellow or grey) are affordable and work well for light loads, while aluminum guide rails (like type A or B) are better for heavy-duty use. When designing, model the roller track's height and spacing to ensure materials glide smoothly. For example, stainless steel swivel roller balls (1 inch) are great for small parts, while 40 steel roller tracks with yellow wheels handle larger bins. Use roller track placon mounts to attach tracks to 2040 profiles—these brackets come in "high," "flat," or "center support" variants, so choose based on your track's position. In SketchUp, you can download pre-made roller track models from the 3D Warehouse to test fit.
Casters: Mobility Without Compromise
Want your workbench or material rack to move? Add casters—but not just any casters. Swivel stem casters with brakes are ideal for workbenches, as they lock in place when needed. For heavier loads, go with flat rigid castor wheels for stability. When modeling, position casters at the corners of your structure to distribute weight evenly. In SolidWorks, simulate the structure with casters to check for tipping (a common issue if the center of gravity is too high). Also, account for caster height—adding 50mm casters will raise your entire structure, which might affect how it interacts with other equipment (like conveyor belts).
Real-World Example: Designing a Custom Workbench with 2040 Profiles
Let's put this all together with a real-world example: designing a workbench for a small electronics assembly shop. The goal? A sturdy, mobile workbench with a flat top, a material rack for parts, and roller tracks for moving PCBs between stations. Here's how the process would play out with SketchUp Pro:
Step 1: Define requirements. The workbench needs to be 1200mm long, workbench E (single deck) style, with casters for mobility. It should have a material rack B (3 rows, 3 floors) on one side and a 40 steel roller track (yellow wheels) on the other for PCB flow. Load capacity: 100kg on the top deck, 50kg per shelf on the material rack.
Step 2: Model the frame. Download a 2040 national standard profile model from 3D Warehouse. Use SketchUp's "Push/Pull" tool to cut rails to length (1200mm for the top, 800mm for the legs). Connect them with 90° aluminum pipe joints, positioning joints 50mm from the ends for stability.
Step 3: Add accessories. drop in caster wheels (swivel stem with brakes) at the leg bottoms. For the material rack B, model 2040 rails as shelves, connected with three-way aluminum joints. Add the roller track using roller track placon mounts for aluminum profiles (flat style) to attach it to the workbench frame. Test alignment with the "Tape Measure" tool to ensure the roller track is level.
Step 4: Test and iterate. Use SketchUp's "Section Plane" tool to cut the model and check for hidden interference (e.g., a caster blocking the roller track). Adjust the material rack height to ensure shelves are easy to reach. Finally, generate a BOM listing all parts: 2040 profiles, joints, casters, roller track, and aluminum profile accessories like end caps for the rail ends.
The result? A workbench that's not just functional but optimized for the shop's workflow—all thanks to software that turned a vague idea into a precise plan.
Troubleshooting Common Design Challenges
Even with careful planning, you might hit snags. Here's how to fix three common issues:
Problem: T-slots Don't Align with Accessories
Solution: Most 2040 profiles have T-slots spaced 20mm apart (center-to-center). When adding accessories like hinges or brackets, align their mounting holes with these slots. In software, use grid snapping (available in SolidWorks and SketchUp) to lock accessories to slot positions. If an accessory doesn't fit, check the profile's T-slot width—some 2040 variants have 6mm slots, others 8mm. Adjust your accessory choice accordingly.
Problem: Structure Wobbles (Even with Casters Locked)
Solution: Wobble usually comes from insufficient bracing or uneven weight distribution. In software, add diagonal cross-braces (using shorter 2040 rails and 45° joints) to stiffen the frame. If the structure is tall, lower the center of gravity by moving heavy accessories (like material racks) closer to the ground. Test stability by simulating a slight push in SolidWorks—if the model tilts more than 5°, add bracing.
Problem: BOM is Incomplete (Missing Accessories)
Solution: Use software with auto-BOM generation (SolidWorks, Item Engineering Tool) to avoid missing parts. In SketchUp, create a "components list" and manually add accessories like bolts, nuts, and end caps—even small parts add up. When in doubt, consult your supplier's catalog; most list recommended accessories for 2040 profiles (e.g., "for every 2040 rail, you'll need 2 end caps and 4 joints").
Conclusion: Design Smarter, Build Better with 2040 Profiles
Designing with 2040 national standard profiles isn't just about creating a structure—it's about creating a solution. Whether you're building a workbench for your garage or a lean system for a factory, the right software turns guesswork into precision, and aluminum profile accessories turn frames into tools. By starting with clear goals, leveraging libraries, testing loads, and integrating accessories early, you'll avoid the headaches that come with trial-and-error building. And remember: the 2040 profile's modularity means your design isn't set in stone. Today's workbench could be tomorrow's material rack, and with software, adapting it is as simple as tweaking a model. So fire up your CAD tool, grab a 2040 profile model, and start designing—your next big project is just a few clicks away.