- Company Articles
- Industry articles
- Industry standards
- Flexible Workstations: 3060 National Standard Profile A Configuration Tips

Flexible Workstations: 3060 National Standard Profile A Configuration Tips
Related Product
3060 National Standard Profile A
Workbench, production line, logistic rack, warehouse rack Industry: Manufacturer workshop, Automobile, Electronic, Assembling, logistic
In today's fast-paced manufacturing and assembly environments, the ability to adapt is everything. Whether you're running a small electronics workshop or a large-scale production line, the days of rigid, one-size-fits-all workstations are long gone. Modern operations demand flexibility—workspaces that can evolve with changing product designs, fluctuating order volumes, and shifting team needs. Enter the 3060 National Standard Profile A: a versatile aluminum extrusion solution that's quietly revolutionizing how we build and reconfigure workstations. In this guide, we'll dive into the nuts and bolts of configuring flexible workstations using this profile, exploring why it's become a go-to choice for lean system enthusiasts and production managers alike.
Understanding 3060 National Standard Profile A: The Backbone of Flexible Workstations
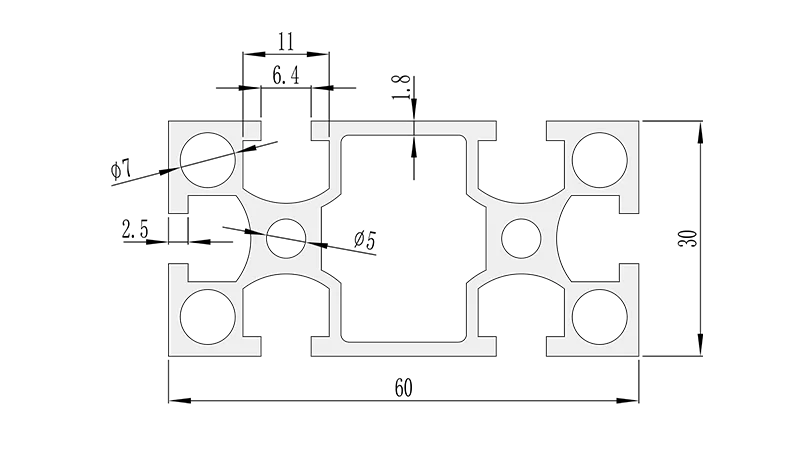
Before we jump into configuration tips, let's start with the basics: What exactly is 3060 National Standard Profile A, and why does it matter for your workstation? At its core, this profile is a type of aluminum extrusion—meaning it's formed by pushing heated aluminum through a die to create a specific cross-sectional shape. The "3060" refers to its dimensions: 30mm in width and 60mm in height, making it a mid-sized profile that strikes a balance between strength and versatility. The "National Standard" label ensures consistency in dimensions and T-slot specifications, so you can mix and match accessories from different suppliers without compatibility headaches.
What truly sets the 3060 Profile A apart is its T-slot design. Running along its length are grooves (or "T-slots") that allow for easy attachment of accessories—think connectors, brackets, shelves, and even roller tracks—without the need for welding or drilling. This design is a game-changer for flexibility: if you need to add a shelf, reposition a tool holder, or even completely redesign the workstation layout, you can do it in hours (or minutes) instead of days. And because it's aluminum, it's lightweight enough to move around (with the right casters, of course) but strong enough to support heavy equipment, components, and materials.
To put its versatility in perspective, let's compare it to other common aluminum profiles. The table below breaks down key differences between 3030, 3060, and 4040 profiles—three of the most widely used options in workstation design:
| Profile Type | Dimensions (WxH, mm) | Typical Material Thickness (mm) | Estimated Max Load Capacity (kg/m) | Best For |
|---|---|---|---|---|
| 3030 National Standard | 30x30 | 1.5–2.0 | 150–200 | Light-duty workstations, shelving, small carts |
| 3060 National Standard Profile A | 30x60 | 2.0–2.5 | 250–350 | Medium-duty workstations, assembly lines, material racks |
| 4040 National Standard | 40x40 | 2.0–3.0 | 300–400 | Heavy-duty workstations, industrial machinery frames |
As you can see, the 3060 Profile A hits a sweet spot. It's not as bulky as the 4040, which makes it easier to maneuver and less likely to overcomplicate small workspaces, but it's sturdier than the 3030, making it suitable for medium-duty tasks like assembling small appliances, electronics, or automotive components. Its 60mm height also provides extra surface area for T-slots, meaning you can attach more accessories along its length—perfect for building multi-functional workstations.
Essential Aluminum Profile Accessories for 3060 Configuration
A profile is only as good as the accessories that bring it to life. The 3060 Profile A's T-slot design works with a wide range of aluminum profile accessories, but some are absolute must-haves for building a functional workstation. Let's walk through the key players:
Connectors: The Glue That Holds It All Together
Connectors are what allow you to join 3060 profiles at different angles, creating the frame of your workstation. The most common types include:
- 90° Aluminum Profile Connector : Ideal for building square or rectangular frames (think the legs and rails of a workbench). These connectors slide into the T-slots and are secured with bolts, creating a tight, rigid joint.
- 45° Aluminum Profile Connector : Useful for angled structures, like sloped work surfaces or inclined roller tracks that help materials flow downward by gravity.
- 3-Way Aluminum Profile Connector : Perfect for adding a vertical support or a crossbeam to reinforce the frame. For example, if you're building a workstation with a shelf, a 3-way connector can join the vertical leg, horizontal rail, and shelf support in one spot.
Pro tip: Opt for "drop-in" connectors when possible. These slide into the T-slot from the end of the profile, making them easier to adjust than "through" connectors, which require drilling holes. This small choice will save you time when reconfiguring later.
End Caps: Safety and Finishing Touches
Ever run your hand along a metal profile and gotten a sharp edge? Not fun. That's where 3060 aluminum profile end caps come in. These plastic or rubber caps snap onto the ends of the profile, covering sharp edges and preventing dust, debris, or small parts from getting stuck inside the T-slots. They're a small accessory, but they make a big difference in safety and workstation longevity.
Gusset Plates: Adding Strength Without Bulk
For workstations that need to support heavy loads (like a bench holding a 50kg assembly tool), gusset plates are a must. These flat, triangular plates attach to the corners of the frame (where two profiles meet at 90°) and distribute weight more evenly, reducing stress on the connectors. Look for gusset alp 3030/3060 models—they're specifically designed for 30-series profiles and won't add unnecessary weight.
Roller Tracks: Streamlining Material Flow
If your workstation is part of an assembly line or involves moving materials from one point to another, roller tracks are a game-changer. These tracks mount directly to the 3060 profile (using T-slot bolts) and feature small wheels that let bins, trays, or components glide smoothly across the surface. For example, you could mount a roller track along the back edge of your workstation to receive incoming parts, or along the front to send finished assemblies to the next station. Just make sure to choose a roller track that's compatible with the profile's T-slot spacing—most suppliers list this in their product specs.
Step-by-Step: Building Your 3060 Profile A Workstation
Now that we've covered the "what" and "why," let's get into the "how." Below is a step-by-step guide to configuring a basic flexible workstation using 3060 National Standard Profile A. We'll focus on a simple assembly bench, but the principles apply to almost any layout.
Step 1: Define Your Workstation's Purpose and Layout
Before you start cutting profiles, ask: What will this workstation be used for? Will it hold tools, assemble products, or serve as a packing station? How much space do you have? Sketching a rough layout (even on a napkin) will help you determine the dimensions of the frame, where to place shelves, and whether you need extras like roller tracks or casters.
Example: Let's say we're building an assembly workstation for small circuit boards. The operator needs a flat work surface (800mm wide x 600mm deep), a shelf for tools (150mm above the work surface), and a roller track on the right side to feed in component trays. We'll also add casters so the workstation can be moved for cleaning or reconfiguration.
Step 2: Gather Materials and Tools
For our example workstation, you'll need:
- 3060 National Standard Profile A: 4 pieces (1000mm long for the legs), 4 pieces (800mm long for the top frame), 4 pieces (600mm long for the depth rails), and 2 pieces (600mm long for the shelf supports).
- 90° aluminum profile connectors: 16 (4 per corner of the main frame and shelf).
- 3060 aluminum profile end caps: 16 (one for each end of the profiles).
- Gusset alp 3060 plates: 8 (2 per main frame corner for added strength).
- Worktop: A 800x600mm plywood or aluminum sheet (thickness 18–25mm).
- Roller track: 1 piece (800mm long) with mounting brackets.
- Casters: 4 swivel casters with brakes (rated for at least 50kg each).
- Tools: Hex key set (for tightening connectors), measuring tape, pencil, miter saw (or hacksaw with a metal-cutting blade), deburring tool (to smooth cut edges).
Step 3: Cut and Prepare the Profiles
Measure and mark each profile according to your layout, then cut them to length. If you're using a miter saw, clamp the profile securely to avoid bending. After cutting, use a deburring tool to remove sharp edges—this is crucial for safety and ensures end caps will fit properly. Wipe down the profiles with a dry cloth to remove aluminum shavings.
Step 4: Assemble the Frame
Start with the main frame: Lay out the 800mm (width) and 600mm (depth) profiles on a flat surface to form a rectangle. Attach 90° connectors at each corner, sliding them into the T-slots and tightening the bolts with a hex key. Repeat to build a second rectangle (this will be the bottom frame, where the casters attach). Then, connect the two rectangles with the 1000mm legs, using 90° connectors at the top and bottom of each leg. Add gusset plates to the top frame corners for extra stability.
Pro tip: Tighten the connectors just enough to hold the frame together during assembly—you can fully tighten them once the frame is square. To check if the frame is square, measure the diagonals: they should be equal in length.
Step 5: Add the Shelf and Worktop
Mount the shelf supports (600mm profiles) to the legs using 90° connectors, positioning them 150mm below the top frame. Then, attach the 600mm depth rails between the supports to form the shelf frame. Cut a plywood or aluminum sheet to fit the top frame and shelf, then secure them using T-slot bolts (drill small holes in the worktop if needed to feed the bolts through).
Step 6: Install Roller Track and Casters
Attach the roller track to the right side of the top frame using T-slot bolts and mounting brackets. Make sure it's level so trays glide smoothly. Finally, screw the casters into the bottom frame (most casters come with mounting plates that fit 3060 profiles). Lock the brakes to keep the workstation steady during use.
Step 7: Finish with End Caps and Test
Snap the end caps onto all exposed profile ends. Give the workstation a gentle shake to check for wobbles—if it moves, tighten any loose connectors. Test the roller track by sliding a component tray along it; it should move freely without sticking. Unlock the casters and push the workstation around to ensure it rolls smoothly.
Customization Tips: Making Your Workstation Work for You
The beauty of 3060 Profile A is that it's endlessly customizable. Here are a few ideas to tailor your workstation to specific needs:
Add Tool Racks and Holders
Use short 3060 profiles and 45° connectors to build vertical tool racks along the back of the workstation. You can also attach magnetic tool holders or plastic bins (using T-slot brackets) to keep screwdrivers, pliers, and small parts within arm's reach.
Incorporate ESD Protection (For Electronics Work)
If you're working with sensitive electronics (like circuit boards), upgrade to an ESD workbench top and add grounding straps. Some 3060 profiles even come with conductive coatings—check with your supplier for ESD-compatible options.
Integrate Lighting
Mount LED light strips under the shelf (using T-slot clips) to illuminate the work surface. This is especially helpful for detailed assembly tasks and reduces eye strain during long shifts.
Go Mobile (or Stationary)
If you need the workstation to stay put, replace casters with adjustable leveling feet. These screw into the bottom of the legs and let you stabilize the workstation on uneven floors—a must for precision work like soldering or measuring.
Maintaining Your 3060 Profile A Workstation: Longevity Tips
A well-maintained workstation will last for years (even decades). Here's how to keep yours in top shape:
- Clean Regularly : Wipe down the profiles and worktop with a damp cloth weekly to remove dust, oil, and debris. For stubborn grime, use a mild detergent (avoid abrasive cleaners, which can scratch the aluminum).
- Tighten Connectors Quarterly : Over time, vibrations from use can loosen connectors. A quick check with a hex key every few months will prevent wobbles and extend the life of the frame.
- replace Worn Parts Promptly : If a caster wheel starts to squeak or a roller track wheel gets stuck, replace it ASAP. Waiting can lead to uneven wear on other components.
- Protect from Corrosion : While aluminum is naturally corrosion-resistant, if you're using the workstation in a humid or chemical-heavy environment, consider applying a clear protective coating to the profiles.
Why 3060 Profile A Fits the Lean System Mold
If you're familiar with lean manufacturing principles—focused on minimizing waste, maximizing efficiency, and continuous improvement—you'll recognize why the 3060 Profile A is such a natural fit. Lean systems thrive on adaptability, and this profile delivers that in spades. Unlike fixed workstations (which are a form of "waste" when they sit unused or underused), a 3060-based workstation can be reconfigured to handle new tasks, repurposed for different product lines, or even disassembled and rebuilt when production needs change. This reduces the need to buy new equipment, saving time and money in the long run.
Take, for example, a small manufacturer that switches from assembling smartphones to smartwatches. A fixed workstation designed for phones might be too large, with tool holders spaced too far apart. With a 3060 workstation, the operator can simply reposition the shelf, adjust the roller track, and swap out tool holders—all in an hour. No need to wait for a new workstation to be built or delivered. That's lean thinking in action.
Final Thoughts: Investing in Flexibility
At the end of the day, configuring a workstation with 3060 National Standard Profile A isn't just about putting together metal and accessories—it's about investing in flexibility. In a world where production demands change faster than ever, the ability to adapt your workspace quickly can mean the difference between falling behind and staying ahead. Whether you're building a single assembly bench or outfitting an entire factory floor, the 3060 profile's combination of strength, versatility, and ease of use makes it a smart choice.
So, grab your measuring tape, sketch out that layout, and start building. The next time your production needs shift, you'll be glad you did.