- Company Articles
- Industry articles
- Industry standards
- Material Rack B Construction with 3060 National Standard Profile A: Best Practices

Material Rack B Construction with 3060 National Standard Profile A: Best Practices
Related Product
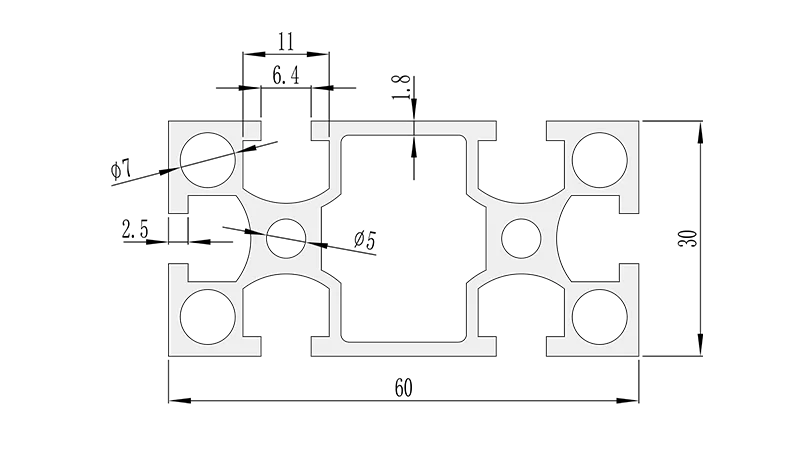
3060 National Standard Profile A
Workbench, production line, logistic rack, warehouse rack Industry: Manufacturer workshop, Automobile, Electronic, Assembling, logistic
Walk into any (efficient) workshop, warehouse, or production facility, and you'll quickly spot the unsung heroes of organization: material racks. They're not just metal and bolts—they're the backbone of a smooth workflow, the quiet enforcers of order, and the secret to keeping teams focused on what matters most: creating, building, and delivering. Among the countless rack designs out there, one stands out for its versatility and reliability: Material Rack B (3 row and 3 floor) . And when it comes to building a rack that's sturdy, customizable, and built to last, there's no better foundation than 3060 National Standard Profile A aluminum extrusion. In this guide, we'll dive into the art of constructing Material Rack B with 3060 profiles, sharing best practices, pro tips, and everything you need to know to build a rack that doesn't just store materials—it elevates your entire operation.
Why Material Rack B (3 Row and 3 Floor) Matters
Before we pick up a single tool, let's talk about why Material Rack B has become a staple in workshops worldwide. With its 3-row, 3-floor design, it strikes the perfect balance between vertical space utilization and accessibility. Unlike flimsy wire shelves or oversized industrial racks that waste floor space, this rack is engineered to hold a variety of materials—from small components to bulkier items—without forcing you to stretch, bend, or hunt for what you need. Whether you're storing raw materials, work-in-progress parts, or finished goods, each row and floor acts as a dedicated zone, reducing clutter and cutting down on the time spent searching for inventory. And when paired with 3060 National Standard Profile A, it becomes more than a rack; it's a flexible system that grows with your needs.
The Case for 3060 National Standard Profile A
Aluminum extrusion profiles come in all shapes and sizes, but 3060 National Standard Profile A isn't just a random choice—it's a strategic one. Let's break down why it's ideal for Material Rack B:
- Strength meets lightweight : 3060 profiles (measuring 30mm in width and 60mm in height) offer exceptional load-bearing capacity thanks to their hollow, ribbed design. Yet, aluminum's natural lightness makes the rack easy to assemble, reposition, and even modify later—no need for heavy machinery or a team of lifters.
- Precision engineering : As a "national standard" profile, 3060 A adheres to strict dimensional tolerances. That means every cut, every connector, and every accessory is designed to fit perfectly, eliminating the frustration of mismatched parts and wobbly joints.
- Corrosion resistance : Unlike steel, aluminum forms a protective oxide layer that resists rust and corrosion. This is a game-changer in humid environments, like food processing facilities or coastal warehouses, where moisture can turn other materials into a maintenance headache.
- Customization at its core : The T-slot design of 3060 profiles is a genius detail. It lets you slide in aluminum profile accessories —like brackets, shelves, and even tool holders—anywhere along the length of the profile, no drilling required. Want to add a label holder? A wire management clip? It's as simple as sliding it into the slot and tightening a screw.
In short, 3060 National Standard Profile A isn't just a material—it's a blank canvas for building a rack that fits your space, your materials, and your workflow.
Planning: The First (and Most Critical) Step
You wouldn't build a house without blueprints, and the same logic applies to Material Rack B. Rushing into assembly might save time upfront, but it often leads to wobbly frames, wasted materials, or a rack that doesn't actually fit your space. Here's how to plan like a pro:
1. Measure Twice, Cut Once (Literally)
Start by mapping your space. Grab a tape measure and note:
- Available floor space : Width, depth, and height. Don't forget to account for clearance—you'll need at least 18 inches of space around the rack for easy access, and if you're installing it near a door or walkway, ensure it doesn't block traffic.
- Ceiling height : Material Rack B (3 row and 3 floor) typically stands around 180-200cm tall, but adjust based on your storage needs. If you're stacking tall items, factor that in to avoid hitting the ceiling.
- Doorways and elevators : If you're building the rack in a workshop and need to move it later (or if you're assembling it in a tight space), measure doorways, hallways, and elevator openings to ensure the disassembled profiles can fit through.
2. Define Your Load Capacity
How much weight will each shelf hold? A 3-row, 3-floor rack means 9 shelves total (3 rows × 3 floors), and each shelf's capacity depends on two things: the thickness of the 3060 profiles (most 3060 A profiles have a wall thickness of 1.5-2.0mm) and the spacing between vertical supports. As a general rule, 3060 profiles with a 2.0mm wall can safely hold 50-80kg per linear meter when supported every 60cm. For heavier loads (think metal parts or bulk materials), reduce the distance between vertical posts or add cross-braces for extra stability.
Pro tip: Overestimate slightly. It's better to build a rack that can handle 100kg per shelf than to worry about overloading it later. Your future self (and your materials) will thank you.
3. Sketch Your Design
Grab a pencil and paper (or use a free design tool like SketchUp) and draft your rack. Label the dimensions of each 3060 profile: vertical posts, horizontal beams, and shelf supports. For Material Rack B, a standard layout might look like this:
- Vertical posts: 4 pieces, each 180cm tall (for the main frame).
- Horizontal beams: 8 pieces (4 for the front, 4 for the back), each matching your desired depth (e.g., 60cm).
- Shelf supports: 12 pieces (4 per floor, 3 floors), each the same depth as the horizontal beams.
- Cross-braces: 4-6 pieces (diagonal or horizontal) to reinforce the frame and prevent swaying.
Don't forget to mark where aluminum profile accessories will go—like connectors, end caps, or shelf brackets. This sketch will become your shopping list and assembly guide.
Materials and Tools: Gather Your Arsenal
Now that you've planned, it's time to gather your materials. Using high-quality parts is non-negotiable—cheap connectors or flimsy profiles will turn your rack into a safety hazard. Here's what you'll need, organized by category:
| Category | Items | Why You Need Them |
|---|---|---|
| Main Structure | 3060 National Standard Profile A (lengths per your sketch), 3030 National Standard Profile A (for cross-braces, optional) | 3060 for vertical posts and horizontal beams; 3030 for lighter cross-braces to save weight. |
| Aluminum Profile Accessories | 90° aluminum profile connectors, 135° aluminum profile connectors, T-slot nuts, hex bolts (M5 or M6), 3060 aluminum profile end caps | Connectors join profiles at corners; T-slot nuts and bolts secure accessories to T-slots; end caps cover sharp edges for safety. |
| Shelving | Aluminum honeycomb panels, plywood, or steel mesh (cut to shelf size) | Honeycomb panels are lightweight and strong; plywood adds a solid surface; mesh allows visibility of stored items. |
| Stability & Mobility | Adjustable leveling feet, caster wheel (optional, for mobile racks) | Leveling feet keep the rack steady on uneven floors; casters let you roll the rack if needed (use locking casters for safety). |
| Tools | Hex key set (M5/M6), hacksaw or miter saw (with aluminum-cutting blade), deburring tool, tape measure, carpenter's square, level, pencil, rubber mallet | Hex keys tighten bolts; a miter saw ensures straight cuts; deburring tool removes sharp edges from cut profiles. |
Pro tip: Buy 10% extra profiles and accessories. Cuts go wrong, connectors get lost, and you might decide to add a shelf later. It's cheaper to have spares than to pause mid-project for a restock.
Step-by-Step Construction: Building Your Material Rack B
With your plan, materials, and tools ready, it's time to build. Follow these steps, and you'll have a sturdy, professional-grade rack in no time.
Step 1: Cut Profiles to Length
Start by cutting your 3060 National Standard Profile A to the lengths in your sketch. If you're using a miter saw, clamp the profile to a workbench to prevent it from shifting. For straight cuts, mark the length with a pencil and use a carpenter's square to draw a straight line across the profile. When cutting, go slow—aluminum is soft, but rushing can lead to jagged edges. After cutting, use a deburring tool to smooth the ends; sharp edges are a safety risk and can damage accessories.
Pro tip: Label each cut profile with masking tape (e.g., "Vertical Post – Front Left") to avoid mix-ups during assembly.
Step 2: Assemble the Frame (Vertical Posts + Horizontal Beams)
Lay out your vertical posts and horizontal beams on a flat surface (a clean floor works well). Start by building the two side frames:
- Take two vertical posts (e.g., 180cm tall) and two horizontal beams (e.g., 60cm long). Attach a 90° aluminum profile connector to each end of the horizontal beam.
- Slide the connectors onto the vertical posts, aligning them with your desired height (e.g., 60cm from the bottom for the first floor). Tighten the hex bolts with a hex key—snug, but not so tight you strip the threads.
- Repeat to build the second side frame. Now you have two "ladder" shapes: vertical posts connected by horizontal beams at the top, middle, and bottom.
Next, connect the two side frames with horizontal beams to form a rectangular frame. Place the side frames parallel to each other, then attach horizontal beams across the front and back. Use a carpenter's square to check that the frame is square (all corners are 90°). If it's not, adjust the beams until the diagonals of the frame are equal in length—this is a foolproof way to ensure squareness.
Step 3: Add Cross-Braces for Stability
A rectangular frame is strong, but it can still sway side-to-side. Cross-braces fix that. Cut 3030 National Standard Profile A into diagonal pieces (measure the distance between two corners of the frame, then cut to length). Attach them to the vertical posts using 135° aluminum profile connectors, forming an "X" on the back and front of the rack. This distributes weight evenly and prevents the frame from twisting under load.
Step 4: Install Shelf Supports
Now it's time to add the supports for your shelves. For each floor (3 total), attach shelf supports (3060 or 3030 profiles) between the front and back horizontal beams. Space them evenly—typically 30-40cm apart—to ensure shelves don't sag. Use T-slot nuts and bolts to secure the supports to the beams; this lets you adjust their position later if you need to store larger items.
Step 5: Add Shelves and Accessories
Lay your shelf material (honeycomb panels, plywood, etc.) on top of the shelf supports. Secure them with small bolts or clips (check your aluminum profile accessories for shelf-specific brackets). Then, add finishing touches:
- 3060 aluminum profile end caps : Snap these onto the ends of all profiles to cover sharp edges and give the rack a clean, professional look.
- Adjustable leveling feet : Screw these into the bottom of the vertical posts. Turn them to level the rack if your floor is uneven—this prevents wobbling and ensures even weight distribution.
- Caster wheels (optional) : If you want a mobile rack, replace two leveling feet with locking casters (position them diagonally for stability). This is great for workshops where you need to move materials closer to workstations.
Step 6: Test and Tweak
Before loading the rack, give it a test. Push gently on the sides to check for swaying—if it moves, tighten the connectors or add more cross-braces. Place a few heavy boxes on the shelves to test load capacity; if the shelves sag, add more supports. Better to catch issues now than after you've loaded it with expensive materials.
Best Practices: Make It Last (and Work Harder)
Building the rack is just the start—keeping it in top shape ensures it serves you for years. Here are our top best practices:
1. Stick to Genuine Aluminum Profile Accessories
It's tempting to save money with generic connectors or off-brand T-slot nuts, but they rarely fit 3060 National Standard Profile A perfectly. Loose connections lead to wobbly frames, and over time, this can stress the profiles and cause failure. Invest in accessories from the same supplier as your profiles—they're engineered to work together, and the extra cost is worth the peace of mind.
2. Distribute Weight Wisely
Heavier items belong on the bottom shelves—this lowers the rack's center of gravity, making it more stable. Lighter items go on top. Avoid overloading a single shelf or piling materials near the edge (this causes uneven stress). If you're unsure, label shelves with weight limits—your team will thank you for the clarity.
3. Inspect and Tighten Regularly
Aluminum profiles and connectors can loosen over time, especially in busy workshops with vibrations from machinery. Schedule a monthly check: walk around the rack, wiggle the shelves, and tighten any loose bolts or connectors. This takes 10 minutes and prevents major issues down the line.
4. Protect Against Moisture (Even Indoors)
While 3060 aluminum profiles are corrosion-resistant, they're not immune to extreme moisture (e.g., in food processing or car washes). Wipe up spills immediately, and if you're in a humid area, consider applying a clear protective coating to the profiles. This adds an extra layer of defense against rust and discoloration.
5. Think Long-Term: Design for Adaptability
Your storage needs will change—maybe you'll add new materials, expand your workshop, or need to reconfigure your layout. The beauty of 3060 National Standard Profile A is its modularity. Use T-slot accessories instead of welding, and avoid cutting profiles shorter than necessary. That way, you can disassemble, modify, or expand the rack later without starting from scratch.
Troubleshooting: Fix Common Issues
Even with careful planning, issues can pop up. Here's how to solve the most common problems:
Problem: The Rack Wobbles
Causes
: Loose connectors, uneven floor, missing cross-braces.
Solution
: Tighten all bolts and connectors first. If it still wobbles, check with a level—if the rack is uneven, adjust the leveling feet. Add cross-braces to the sides or back for extra stability.
Problem: Shelves Sag Under Load
Causes
: Shelf supports are too far apart, shelf material is too thin.
Solution
: Add more shelf supports (space them 25-30cm apart instead of 40cm). If using plywood, switch to a thicker sheet (18mm instead of 12mm) or add a layer of aluminum honeycomb panel for reinforcement.
Problem: Aluminum Profile Accessories Don't Fit
Causes
: Using non-standard accessories, profiles are bent or damaged.
Solution
: Double-check that accessories are designed for 3060 National Standard Profile A. If profiles are bent, replace them—even a small bend can throw off connections.
Problem: The Rack Is Too Short/Tall
Causes
: Miscalculated vertical post length during planning.
Solution
: If it's too short, add extension pieces using 3060 profiles and straight connectors. If it's too tall, you'll need to cut the vertical posts (this is why measuring twice is critical!).
Final Thoughts: More Than a Rack—A Workflow Upgrade
Building Material Rack B with 3060 National Standard Profile A isn't just about storing materials. It's about creating a workspace that works with you—reducing stress, saving time, and making every task a little easier. When you invest in quality materials like 3060 profiles and genuine aluminum profile accessories, you're not just building a rack; you're building a foundation for efficiency that will grow with your business.
So grab your sketch, gather your tools, and start building. The next time you walk into your workshop, you'll smile when you see that rack—sturdy, organized, and ready to help you do your best work. And isn't that what every great tool is for?