- Company Articles
- Industry articles
- Industry standards
- Material Rack Design with 2020 EU Standard Aluminum Profile: Space-Saving Tips

Material Rack Design with 2020 EU Standard Aluminum Profile: Space-Saving Tips
Related Product
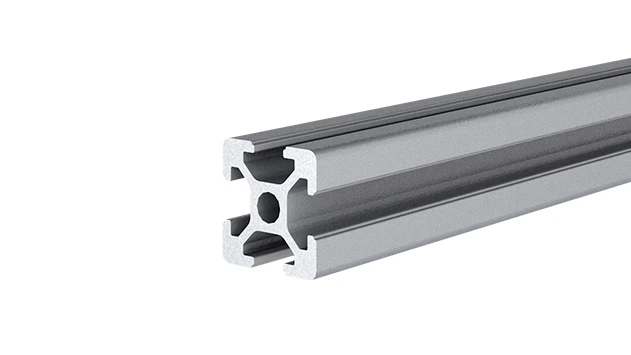
2020 EU Standard Aluminum Profile
2020 is a 2.00 x 2.00CM fractional 20 series square extrusion T-slot profile with four open T-slots, one on each 2.00 face. The profile has align-a-grooves to assist in aligning connecting profiles.
The Hidden Cost of Wasted Space in Your Workshop
Let's face it: running a workshop or production facility means juggling a million moving parts—literally. From raw materials and tools to finished products and packaging, every square inch of space matters. Yet, I've walked into so many workshops where the first thing that hits you is the chaos: materials stacked haphazardly, tools scattered on workbenches, and racks that seem to take up more room than the items they're supposed to store. It's not just messy; it's costly. Wasted space translates to slower workflows, frustrated employees, and even lost revenue when you can't expand production because there's no room to grow.
One manufacturer I worked with last year was a perfect example. They'd been using heavy, fixed steel racks for years. These racks were sturdy, sure, but they were also immovable, hard to adjust, and—worst of all—took up 40% of their floor space with shelves that were either too deep, too shallow, or spaced so far apart they might as well have been empty. When they added a new product line, they realized they didn't have room to store the new components. Their first thought? Renting more warehouse space. But that's a band-aid, not a solution. The real problem was their storage system wasn't working with their space—it was working against it.
That's where the 2020 EU standard aluminum profile comes in. Over the past decade, I've seen this material revolutionize how workshops approach storage. Lightweight but surprisingly strong, modular enough to adapt to any need, and designed with space efficiency in mind, it's not just a material—it's a smarter way to think about how you use every inch of your workshop. In this article, we're going to dive into how to design a material rack using 2020 EU standard aluminum profile that saves space, streamlines your workflow, and grows with your business. And yes, we'll even get into the nitty-gritty of accessories, case studies, and maintenance to make sure your rack doesn't just look good on day one, but keeps performing for years.
Why 2020 EU Standard Aluminum Profile? It's Not Just About the Metal
Before we jump into design tips, let's talk about why the 2020 EU standard aluminum profile is the unsung hero of space-saving storage. When most people think of aluminum, they picture flimsy soda cans or lightweight foil. But industrial aluminum profiles—especially those meeting EU standards—are a different beast. The 2020 designation refers to the profile's dimensions: 20mm by 20mm, a sweet spot that balances strength and versatility. But it's not just the size that makes it special; it's the way it's engineered.
First, it's lightweight. Compared to steel, aluminum is about 30% lighter, which means you can build taller racks without worrying about structural stress or needing heavy machinery to move them. That's a game-changer for small workshops where floor space is at a premium—you can stack vertically without sacrificing stability. Second, it's modular. The T-slot design (those grooves running along the length of the profile) means you can attach shelves, brackets, or accessories anywhere along the length, no drilling or welding required. Need an extra shelf? Slide in an aluminum profile accessory like a 90° connector, tighten a bolt, and you're done. No more cutting steel or hiring a welder. Third, it's durable. EU standards ensure the aluminum is anodized, which resists corrosion and scratches—perfect for workshops where spills, dust, or humidity are part of the daily grind. Unlike wood, it won't warp or rot; unlike untreated steel, it won't rust. And because it's so easy to clean, it keeps your workspace looking professional, which might not seem like a space-saver, but a clutter-free environment actually makes your shop feel bigger.
But here's the real kicker: it's cost-effective in the long run. Steel racks might be cheaper upfront, but they're hard to modify. If your storage needs change (and they will), you either live with a rack that doesn't fit or buy a whole new one. With 2020 aluminum profiles, you can reconfigure the same rack a dozen times. Add a shelf here, shorten a section there, or even take it apart and rebuild it in a new location. One auto parts supplier I advised saved over $10,000 in three years by reusing their aluminum racks instead of buying new ones every time their inventory changed. That's space-saving and budget-friendly—win-win.

Core Space-Saving Design Principles: Think Vertical, Think Modular
Designing a space-saving material rack isn't just about slapping some shelves together. It's about thinking intentionally about how you use height, depth, and flexibility. Let's break down the key principles that will make your 2020 aluminum profile rack a space-saving star.
1. Go Vertical—Your Ceiling Is Your Friend
Most workshops treat storage like it's a horizontal game: "How much can we fit along the walls?" But the vertical space above your head is often completely unused. The 2020 aluminum profile is lightweight enough to build racks up to 6-8 feet tall (depending on load) without needing expensive reinforcements. For example, instead of a 4-foot tall rack with 3 shelves, build an 8-foot tall rack with 6 shelves. You're doubling your storage capacity without adding an inch to your footprint. Just make sure you're using the right aluminum profile accessories to secure the rack to the wall or ceiling if it's extra tall—safety first! A client in the electronics industry did this and stored twice as many circuit boards in the same corner of their workshop. Their employees no longer had to walk across the shop to grab parts; everything was within arm's reach, saving time and space.
2. Modular Shelving: Only Use the Space You Need (For Now)
One of the biggest mistakes I see is overbuilding racks. You buy a rack with 10 shelves because you "might need them someday," but for the first year, 5 of those shelves are empty. That's wasted vertical space (the gaps between shelves are too big) and wasted potential. Instead, start with a basic frame and add shelves as you need them. The 2020 aluminum profile's T-slot design makes this a breeze. Use aluminum profile connectors to attach shelves at adjustable heights—12 inches apart for small parts, 24 inches for bulkier items. And because the profiles are lightweight, you can even make some shelves removable. A furniture manufacturer I worked with does this: during their busy season, they add 3 extra shelves to their material rack to store fabric rolls; in the slow season, they take those shelves down and use the space for a temporary workbench. It's like having a storage system that adapts to your calendar.
3. Accessibility = Space Efficiency
Here's a counterintuitive thought: a rack that's hard to access is a space waster. If employees have to move other items to reach what they need, they'll start leaving things on the floor "temporarily," which turns into permanent clutter. So when designing your rack, prioritize accessibility. Use pull-out shelves (with lightweight aluminum roller tracks, another great accessory) so you don't have to reach deep into the rack. Angle shelves slightly downward for small parts, so everything is visible at a glance. And group items by how often they're used: keep daily-use tools at eye level, seasonal items up top, and rarely used supplies at the bottom. A bakery that switched to this system cut down on "floor storage" by 75%—no more flour bags stacked next to the mixer because they couldn't reach the top shelf of their old rack.
4. Mobile Storage: Take the Rack to the Work, Not the Work to the Rack
Fixed racks are a relic of the past. If your rack can't move, you're stuck storing it in one spot, even if that spot isn't where the work is happening. Adding casters (yes, aluminum profile-compatible casters are a thing!) to your 2020 aluminum rack turns it into a mobile storage unit. Suddenly, you can roll tools right to the assembly line, then tuck the rack back into a corner when you're done. A medical device assembler I know uses mobile aluminum racks to store components for each product line. Instead of having a separate rack for each line, they roll the relevant rack to the workstation, saving 25% of their floor space. Just make sure to use locking casters—you don't want your rack wandering off mid-shift!
Step-by-Step Design Guide: Build Your Rack in a Weekend
Ready to build your own space-saving material rack with 2020 EU standard aluminum profile? Don't worry—you don't need to be a DIY expert. This process is so straightforward, I've seen first-time builders put together a basic rack in under 4 hours. Let's break it down step by step.
Step 1: Assess Your Needs (Measure Twice, Cut Once—But with Aluminum, You Might Not Even Cut)
Start by asking: What will you store? How heavy are the items? How often do you need to access them? And—most importantly—how much space do you have to work with? Grab a tape measure and map out the area where the rack will go. Note ceiling height, nearby doors or windows, and any obstacles (like electrical outlets or pipes). Then, list your items and their dimensions. A box of screws might need a 12x12-inch shelf, while a power tool might need 24x18 inches. Don't forget to account for vertical space—measure how high you can safely reach (or how high a ladder can go if needed). Pro tip: Draw a rough sketch on graph paper, with 1 square = 1 foot. It doesn't have to be perfect, but it will help you visualize the rack before you buy materials.
Step 2: Choose Your Components (Stick to the Basics, Then Add Extras)
For a standard material rack, you'll need: 2020 EU standard aluminum profile (get lengths in 1m, 2m, or 3m—you can cut them with a hacksaw or miter saw if needed), aluminum profile accessories (connectors, end caps, shelf brackets), shelves (plywood, metal, or even aluminum honeycomb panels for extra lightness), and casters (if you want mobility). Let's say you're building a 6-foot tall, 3-foot wide rack with 5 shelves. You'll need 4 vertical posts (6ft each), 8 horizontal beams (3ft each for the top and bottom, plus 3ft for the shelf supports), 20 shelf brackets (4 per shelf), 16 connectors (4 per corner), and 5 shelves cut to 3ft x 1.5ft. If you're unsure about load capacity, check the specs: 2020 aluminum profiles can typically hold 50-75 lbs per linear foot, so a 3ft shelf can safely hold 150-225 lbs—plenty for most workshop items.
Step 3: Assemble the Frame (No Welding, Just Bolts and Connectors)
Start by building the vertical frames: attach the horizontal beams to the vertical posts using 90° aluminum profile connectors. Most connectors use T-slot bolts, which slide into the profile's grooves and tighten with a hex key—no drilling required. Once you have two side frames, connect them with horizontal beams across the top, bottom, and middle for stability. Tighten all bolts snugly, but not so tight you strip the threads. Now you have a basic cube frame. Pro tip: Use a level to make sure the frame is straight—wobbly racks waste space because you can't stack items as high without worrying about them falling.
Step 4: Add Shelves and Accessories (Make It Work for You)
Slide the shelf brackets into the T-slots at your desired heights—remember, you can adjust these later! Attach the shelves to the brackets with screws (if using wood) or more T-slot bolts (if using metal). Now, add the extras: aluminum profile rubber strip along shelf edges to prevent items from sliding off and reduce noise when placing things down. If you're using casters, attach them to the bottom posts with caster mounting brackets (another handy aluminum profile accessory). And don't forget end caps—they cover the ends of the profiles, preventing snags on clothing or boxes and giving the rack a finished look. One woodworker I helped added small hooks (using T-slot nuts) to the sides of his rack for hanging tools, turning unused vertical space into storage for hammers, tape measures, and extension cords. Genius!
Step 5: Test and Tweak (Your Rack Should Grow with You)
Once the rack is built, load it with your items and see how it feels. Is everything easy to reach? Are the shelves spaced evenly? If a shelf is too high, loosen the brackets and slide them down. If you need an extra shelf, grab a few more brackets and a piece of plywood—no need to rebuild the whole thing. Remember, the beauty of aluminum profiles is flexibility. A year from now, if you start storing larger items, you can remove a shelf or two. If you move to a bigger workshop, take the rack apart and rebuild it in the new space. It's storage that evolves with your business.
Case Study: Material Rack B (3 Row and 3 Floor) – A Real-World Space Saver
Let's put all this theory into practice with a real example: Material Rack B (3 row and 3 floor). This is a popular design among small to medium manufacturers because it's compact, versatile, and specifically engineered to maximize vertical space. I helped a electronics assembly plant implement this rack last year, and the results were impressive—they reduced their storage footprint by 35% while actually increasing their storage capacity. Here's how it worked for them.
The plant needed to store small electronic components (resistors, capacitors, circuit boards) in bins, plus larger items like power supplies and cables. Their old setup was a mishmash of plastic bins on the floor and a single steel shelf unit that was so deep, they could never see what was in the back. We designed Material Rack B to have 3 vertical rows (each 2 feet wide) and 3 horizontal floors (each 5 feet tall), with adjustable shelves in between. The frame was built with 2020 EU standard aluminum profile, with vertical posts spaced 2 feet apart to keep the rack stable but not bulky. Each floor had 3 shelves, and we added plastic roller track guide rails (grey, to match their workshop's color scheme) on the middle shelf of each row, so bins could slide out easily—no more digging to reach the back.
One of the smartest features was using aluminum profile rubber strip along the shelf edges. The components were small, and bins had a tendency to slide around—especially when employees were in a hurry. The rubber strip kept the bins in place, which might not sound like a space-saver, but it meant they could stack bins closer together without worrying about them tipping over. They also added aluminum guide rail A along the front of each shelf, creating a lip that prevented bins from falling off when sliding them out. And because the rack was modular, they could adjust shelf heights: the bottom floor had taller shelves for the power supplies, the middle floor had medium shelves for circuit boards, and the top floor had short shelves for small bins of resistors. No wasted space between shelves—each inch was used.
The results? Before, they were using 120 square feet of floor space for storage. After installing two Material Rack B units (side by side), they stored the same amount of inventory in just 78 square feet. That freed up 42 square feet—enough space to add a new assembly station, which increased their production output by 15%. Employees also reported spending 20% less time searching for parts, because everything was visible and easy to reach. And because the rack was built with 2020 aluminum profile, when they added a new component line six months later, they simply added two more shelves to the top floor—no need for a new rack.
Key Takeaway: Material Rack B (3 row and 3 floor) works because it's designed around the items it stores, not the other way around. By combining 2020 aluminum profile's modularity with space-saving accessories like roller tracks and rubber strips, it turns wasted vertical and horizontal space into functional storage. And because it's so easy to customize, it's a solution that grows with your business.
Must-Have Accessories: Small Parts That Make a Big Difference
You could build a basic rack with just 2020 aluminum profiles and shelves, but the right accessories are what take it from "good" to "space-saving superhero." These small parts add functionality, durability, and even more flexibility. Let's break down the ones you shouldn't skip.
Aluminum Profile Accessories: Connectors, End Caps, and Brackets
These are the "glue" that holds your rack together, but they're also where the modular magic happens. 90° aluminum profile connectors are a must for joining vertical and horizontal posts—look for ones with reinforced corners for extra strength. If you need to build at an angle, 45° aluminum profile connectors work great for corner racks. End caps are small, but they're important: they cover the sharp ends of the profiles, preventing scratches on items (or hands!) and keeping dust out of the T-slots. Shelf brackets come in all shapes—L-shaped, T-shaped, or even adjustable ones that let you tilt shelves slightly. I always recommend getting a few extra connectors and brackets—you never know when you'll want to add a shelf or extend the rack later.
Aluminum Profile Rubber Strip: Quiet, Safe, and Space-Efficient
You might not think of rubber strip as a space-saver, but hear me out. When you place a bin or box on a metal shelf, it slides around—so you have to leave extra space between items to prevent them from bumping into each other. Aluminum profile rubber strip adds friction, so items stay put. That means you can stack bins closer together, using every inch of shelf space. It also reduces noise (no more clanging when bins are placed down), which makes the workshop feel calmer—and a calm workspace is a more efficient workspace. Plus, it protects delicate items (like electronics or glassware) from scratches. One bakery I worked with used rubber strip on their flour bin shelves, and they were able to fit 3 more bins per shelf because the bins didn't slide around. That's 3 extra bins per shelf, 5 shelves per rack—15 more bins total, with zero extra floor space.
Casters and Roller Tracks: Mobility = Space Flexibility
Casters are a game-changer if you're tight on space. A rack on wheels can be pushed against the wall when not in use, then rolled into the workspace when needed. Look for swivel casters with brakes—they lock in place when you're loading/unloading, so the rack doesn't move. For shelves where you store frequently used items, add roller tracks (like plastic roller track guide rail yellow or grey). These let you slide bins or boxes out without lifting, so you can place the rack closer to the wall (since you don't need extra space to reach around it). A mechanic shop I advised added roller tracks to their tool rack, and they were able to push the rack 6 inches closer to the wall—over time, those 6 inches added up to enough space for a tool chest they'd been storing in the hallway.
Comparison Table: Traditional Racks vs. 2020 Aluminum Profile Racks
| Feature | Traditional Steel/Wood Racks | 2020 EU Standard Aluminum Profile Racks |
|---|---|---|
| Floor Space Used (per 100 sq ft of storage) | 150-200 sq ft (bulky, fixed design) | 80-120 sq ft (vertical, modular design) |
| Load Capacity (per shelf) | 200-300 lbs (steel), 50-100 lbs (wood) | 150-250 lbs (aluminum, with proper brackets) |
| Assembly Time | 4-6 hours (requires tools, welding, or heavy lifting) | 2-4 hours (no welding, lightweight components) |
| Reconfigurability | Low (hard to modify; often requires rebuilding) | High (easily add/remove shelves, adjust heights) |
| Long-Term Cost | High (need to replace when needs change) | Low (reuse components for new designs) |
| Space Flexibility | Low (fixed in place, hard to move) | High (casters for mobility, modular for relocation) |
Maintenance Tips: Keep Your Rack Working Like New
Your 2020 EU standard aluminum profile rack is built to last, but like any tool, it needs a little love to keep performing at its best. The good news? Maintenance is simple—no special tools or expensive products required. Here's how to keep it space-saving and efficient for years.
First, clean it regularly. Aluminum is resistant to rust, but dust and grime can build up in the T-slots, making it harder to adjust brackets or add new accessories. Once a month, wipe down the profiles with a damp cloth and mild soap (avoid abrasive cleaners—they can scratch the anodized finish). For T-slots, use a small brush (like a toothbrush) to dislodge dust, then vacuum it up. A clean rack is also easier to inspect—you'll spot loose bolts or damaged accessories faster.
Second, tighten the joints. Over time, vibrations from moving items or rolling the rack (if it has casters) can loosen connectors. Every three months, go around the rack with a hex key and gently tighten all bolts. You don't need to crank them—just snug them up until they don't wiggle. Loose joints can make the rack wobbly, which means you can't stack items as high (wasting vertical space). One warehouse manager I know skipped this step, and their rack started leaning—they had to remove the top two shelves to prevent it from tipping over, losing 40% of their storage capacity until they fixed it.
Third, inspect accessories. Check aluminum profile rubber strip for cracks or wear—if it's peeling, replace it (it's cheap and easy to slide into the T-slot). Look at casters: are the wheels worn? Do they roll smoothly? replace worn casters immediately—sticky wheels make the rack hard to move, so you'll leave it in one spot even when it's not needed, wasting space. And if you're using roller tracks, clean the rollers with a dry cloth to remove dust—gunked-up rollers make sliding bins harder, which leads to employees leaving bins on the floor.
Finally, reconfigure as needed. Your storage needs will change—embrace it! If you notice a shelf is always empty, remove it and use the space for taller items. If a section is overcrowded, add a shelf or split the rack into two smaller units. The worst thing you can do is let the rack become "just another fixture" that you never update. Set a reminder every 6 months to reassess: What's working? What's not? A quick 15-minute check can save you hours of frustration and keep your space optimized.
Conclusion: Your Space-Saving Journey Starts with the Right Rack
Wasted space in your workshop isn't just a nuisance—it's a barrier to growth. But it doesn't have to be that way. The 2020 EU standard aluminum profile material rack is more than just a storage solution; it's a mindset shift. It's about designing your space around your needs, not the other way around. It's about using vertical space, embracing modularity, and building a system that grows with your business.
From the lightweight, durable aluminum profiles to the small but mighty accessories like aluminum profile rubber strip and roller tracks, every component is designed to save space. And the best part? It's accessible to everyone—whether you're a one-person shop or a large manufacturer. You don't need a big budget or advanced DIY skills; you just need a willingness to rethink how you use your space.
So, what are you waiting for? Grab that tape measure, sketch out your ideal rack, and start small. Build a basic unit, test it, tweak it, and watch as your workshop transforms from cluttered and cramped to organized and efficient. Remember, the goal isn't just to save space—it's to create a workspace that makes you excited to come to work, where every tool and material has a place, and where growth isn't limited by how much floor space you have. With 2020 EU standard aluminum profile, the sky's the limit (or, more accurately, the ceiling is—so build up!).