- Company Articles
- Industry articles
- Industry standards
- 10 Tools Every Workshop Needs for Working with 2040 EU Standard Aluminum Profile

10 Tools Every Workshop Needs for Working with 2040 EU Standard Aluminum Profile
Related Product
2040 EU Standard Aluminum Profile
2040 is a 2.00 x 4.00CM fractional 20 series square extrusion T-slot profile with four open T-slots, two side with 2.00cm face, the other side with 4.00cm face. The profile has align-a-grooves to assist in aligning connecting profiles.
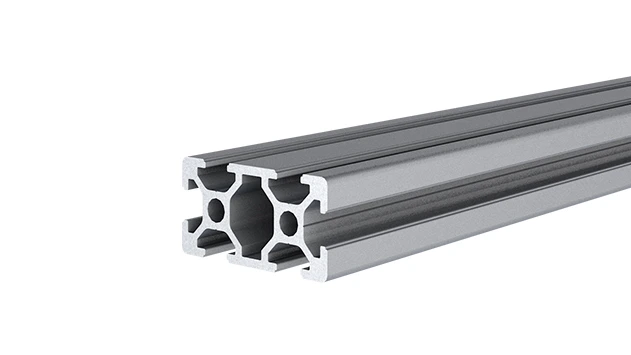
Walk into any modern workshop—whether it's a small garage setup, a bustling manufacturing floor, or a tech startup's prototyping lab—and you'll likely spot one common workhorse: the 2040 EU standard aluminum extrusion profile. Sleek, strong, and surprisingly versatile, this aluminum profile has become the backbone of everything from custom workbenches and material racks to conveyor systems and assembly stations. Its T-slot design, precision engineering, and compatibility with a huge range of aluminum profile accessories make it a favorite for anyone who values flexibility and durability. But here's the thing: even the best 2040 aluminum extrusion profile is only as good as the tools you use to work with it. Without the right gear, assembling a simple storage rack can turn into a frustrating afternoon of stripped bolts, misaligned joints, and wobbly structures. That's why we've put together this guide to the 10 essential tools every workshop needs to master 2040 aluminum profile. Whether you're a seasoned fabricator or just starting to dip your toes into modular workspaces, these tools will save you time, reduce headaches, and help you build structures that stand the test of time.
1. T-Slot Allen Key Set: The "Swiss Army Knife" of Aluminum Profile Assembly
Let's start with the basics: if you're working with 2040 EU standard aluminum profile, you're going to spend a lot of time tightening bolts into T-slots. And for that, nothing beats a high-quality T-slot Allen key set. Unlike generic hex keys, these tools are designed specifically for the narrow, recessed T-slots in aluminum extrusion profiles. They feature a long, thin shaft that reaches deep into the slot and a comfortable grip to prevent hand fatigue during repetitive use.
Why does this matter? Imagine trying to assemble a workbench using a standard Allen key that's too short to reach the bolt head buried in the T-slot. You'd end up angling the key awkwardly, stripping the bolt, or worse, damaging the profile's anodized finish. A good T-slot set solves this with shafts that are precisely sized for 2040 profiles (most commonly 5mm or 6mm for M5/M6 bolts) and often come with ball-end tips, which let you tighten bolts at a slight angle—handy when space is tight, like when attaching aluminum guide rail a to a vertical frame.
Pro Tip:
Look for sets with both standard and ball-end keys, and opt for ones with a rubberized grip. Trust us, after spending an hour assembling a material rack with 50+ bolts, your hands will thank you. Avoid cheap, soft steel keys—they'll bend or strip, turning a quick job into a nightmare.
2. Aluminum Profile Cutting Saw: Precision Cuts for Perfect Fits
At some point, you're going to need to cut your 2040 aluminum profile to length. Maybe you're building a workbench that needs a 120cm top rail, or a roller track system that requires 80cm sections. Whatever the case, a hacksaw might work in a pinch, but if you want clean, square cuts that don't leave jagged edges or warped ends, you need a dedicated aluminum profile cutting saw. These saws are designed to slice through aluminum extrusion profiles with minimal effort, thanks to fine-toothed blades (at least 14 teeth per inch) that reduce friction and prevent the metal from melting or gumming up the blade.
There are a few options here: a miter saw with an aluminum-cutting blade is great for large workshops, offering adjustable angles for 45° or 90° cuts. For smaller spaces, a circular saw with a carbide-tipped aluminum blade works well—just clamp the profile securely to a workbench to avoid vibration. We once visited a startup that tried to cut 2040 profiles with a wood-cutting saw blade. The result? The blade grabbed the aluminum, bent the profile, and left such rough edges that their aluminum profile accessories (like corner brackets) wouldn't seat properly. They ended up wasting three profiles before investing in a proper aluminum blade. Don't make that mistake.
Pro Tip:
Always wear eye protection and hearing protection when cutting aluminum—it throws off sharp chips, and the saw can be loud. After cutting, use a deburring tool (more on that next!) to clean up the edges.

3. Deburring Tool: Smooth Edges for Safety and Functionality
You've cut your 2040 profile to length—great! But before you start assembling, there's one crucial step: deburring. Cutting aluminum leaves behind sharp burrs, both on the outside of the profile and inside the T-slots. These burrs aren't just a safety hazard (they'll slice through gloves or skin in seconds); they can also prevent aluminum profile accessories from sliding into place. Imagine trying to insert a nut into a T-slot only to have it catch on a jagged burr—that's a recipe for frustration.
A deburring tool is a simple, handheld device with a sharp, rotating blade that shaves off these burrs. For 2040 profiles, you'll want a tool with both an external deburring head (for the outer edges) and an internal head (for the T-slots). Run the external head along the cut end at a 45° angle to round off sharp corners, then flip to the internal head to clean out the slot. The result? A smooth, safe profile that's ready for assembly. We've seen workshops skip this step to save time, only to have employees complain about cuts or spend extra minutes wrestling with stuck bolts. Deburring takes 30 seconds per profile—don't skip it.
4. Digital Profile Measuring Tape: Measure Twice, Cut Once (and Save Money)
Here's a golden rule of workshop work: measure twice, cut once. Nowhere is this truer than with 2040 EU standard aluminum profile, which isn't cheap. A single 3-meter length of high-quality 2040 profile can cost upwards of $20—waste one or two due to bad measurements, and suddenly your project budget takes a hit. That's why a reliable digital profile measuring tape is a must-have. Unlike traditional cloth tapes, digital tapes offer precise readings (often down to 0.1mm) and a lockable blade to prevent slipping during measurements. Look for one with a magnetic end—it'll stick to the aluminum profile, freeing up your other hand to hold the tape steady.
When measuring for a project—say, a workbench with a 150cm width—start by marking the length on the profile with a pencil. Then, double-check the measurement by running the tape from the opposite end. If the two marks don't line up, you know you made a mistake. We once helped a friend build a roller track system where he misread the tape and cut all his profiles 5cm too short. The track ended up being too narrow for his parts bins, and he had to order new profiles. A $20 digital tape would have saved him $100 and a week of waiting for replacements.
5. Heavy-Duty Corner Brackets & Connectors: The "Glue" of Aluminum Profile Structures
If 2040 aluminum profile is the "bones" of your workshop structures, then aluminum profile accessories like corner brackets and connectors are the "muscles" that hold everything together. These small but mighty components come in all shapes and sizes—90° L-brackets for right angles, T-joints for branching structures, and even 45° brackets for sloped designs. But not all brackets are created equal. Cheap plastic brackets might work for lightweight projects, but for anything that holds tools, parts, or machinery, you need heavy-duty metal brackets (preferably aluminum or steel) with reinforced corners and high-load ratings.
For example, when building a workbench that will hold a 50kg drill press, using flimsy plastic L-brackets is a disaster waiting to happen. The brackets will flex under the weight, causing the workbench to wobble and potentially collapse. Instead, opt for aluminum 90° brackets with M6 bolts—they'll distribute the weight evenly and keep the structure rigid. When shopping for brackets, check the load capacity (most good ones list it in kg) and make sure they're compatible with 2040 profile (some are designed for smaller 2020 or larger 4080 profiles). A quick test: if the bracket feels lightweight or bends when you squeeze it, skip it.
6. Workbench Assembly Kit: Build a Sturdy Foundation in Hours, Not Days
A workbench is the heart of any workshop, and with 2040 EU standard aluminum profile, you can build one that's custom-sized, modular, and built to last. But sourcing individual parts—profiles, brackets, a tabletop, casters—can be time-consuming. That's where a workbench assembly kit comes in. These kits include pre-cut 2040 profiles (in lengths optimized for common workbench sizes), heavy-duty corner brackets, a durable tabletop (often aluminum honeycomb or plywood), and even casters for mobility. Some kits even throw in extras like tool rails or shelf brackets.
The beauty of these kits is that they take the guesswork out of assembly. Instead of calculating how many brackets you need or whether the tabletop will fit the frame, you can follow step-by-step instructions and have a functional workbench in 2-3 hours. We recently helped a small electronics shop set up a workbench using a kit, and they were shocked at how easy it was. The frame was square, the casters rolled smoothly, and the whole thing felt rock-solid—even with a soldering station, oscilloscope, and parts bins on top. If you're new to aluminum profile, a workbench kit is a great way to get hands-on experience without the stress of designing from scratch.
7. Roller Track Installation Tool: Smooth Material Flow for Efficient Workflows
Roller tracks are a game-changer for workshops that move parts or materials between stations. Whether you're conveying circuit boards down an assembly line or sliding bins of screws from one workbench to another, a well-installed roller track system saves time and reduces manual lifting. But installing roller track on 2040 aluminum profile requires precision—if the track is even slightly uneven, materials will get stuck or slide too slowly. That's where a roller track installation tool comes in.
These tools typically include an alignment guide (to ensure the track is straight) and a set of connector clips (like roller track placon mount for rail connection) that secure the track to the aluminum profile. The alignment guide is a long, straight edge that you clamp to the profile, then use to line up each section of roller track. The connector clips, which slide into the T-slots of the 2040 profile, hold the track at the perfect height and angle. We once visited a manufacturing plant where the roller track was installed "by eye"—the result was a system where parts would randomly jam, slowing down production. After they invested in an installation tool and re-aligned the track, jams dropped by 90%.
Pro Tip:
When installing roller track, slope it slightly (about 1-2°) to let gravity help materials slide. Use a level to check the slope—too steep, and parts will crash into the end; too flat, and they won't move.
8. Spirit Level: Keep Your Structures Square and Stable
A wobbly workbench or a leaning material rack isn't just annoying—it's dangerous. If a rack holding heavy parts tips over, it could damage equipment or injure someone. That's why a spirit level is non-negotiable when working with 2040 aluminum profile. This simple tool uses a bubble in a liquid-filled tube to show if a surface is horizontal (level) or vertical (plumb). For most workshop projects, a 24-inch (60cm) spirit level works best—it's long enough to span the width of 2040 profile but short enough to maneuver in tight spaces.
Here's how to use it: when assembling a frame (say, the legs of a workbench), hold the level vertically against the profile to check if it's plumb (the bubble should be centered between the two lines). Then, hold it horizontally across the top rails to check if they're level. If the bubble is off-center, adjust the feet (using adjustable leveling feet—another essential accessory!) until it's centered. Repeat this for every joint and rail—taking the time to get it right now will prevent headaches later. We once built a material rack without checking level, and within a month, the uneven weight caused one leg to bend. A $15 spirit level would have saved us from rebuilding the entire rack.
9. Drill & Tap Set: Custom Holes for Unique Projects
Most aluminum profile accessories are designed to fit into T-slots, but every now and then, you'll need a custom hole—maybe to mount a monitor arm on your workbench or attach a specialty bracket that doesn't use T-slots. For that, a drill & tap set is essential. These sets include drill bits (to make the hole) and taps (to cut threads into the hole, so you can screw in bolts). For 2040 aluminum profile, use high-speed steel (HSS) or cobalt drill bits—they're tough enough to cut through aluminum without dulling quickly.
Here's a quick tutorial: first, mark the hole location with a center punch (to prevent the drill from slipping). Then, drill a pilot hole (smaller than the final size) using a slow drill speed—aluminum heats up quickly, so go slow and apply light pressure. Once the pilot hole is done, switch to the final drill bit size. Finally, use the tap to cut threads: insert the tap into the hole, turn it clockwise a quarter-turn, then counter-clockwise a eighth-turn to break off chips. Repeat until the tap is fully threaded. Wipe away chips with a cloth, and you're done! Just be careful not to over-tighten the tap—aluminum is soft, and you can strip the threads if you push too hard.
10. Storage Organizer for Aluminum Profile Accessories: Keep the Small Stuff from Disappearing
Last but certainly not least: a storage organizer for your aluminum profile accessories. If you've ever spent 20 minutes hunting for a single 90° bracket or a pack of M5 bolts, you know how frustrating disorganization can be. Aluminum profile accessories—brackets, bolts, nuts, end caps, roller track connectors—are small, easy to lose, and essential for assembly. A dedicated organizer keeps them sorted, visible, and easy to find.
Look for a organizer with clear plastic drawers or bins, so you can see what's inside without opening each one. Label the drawers by accessory type (e.g., "90° Brackets," "M6 Nuts," "End Caps") and size. For smaller items like bolts and washers, use divided bins to separate different sizes. We converted an old tool chest into an accessory organizer by adding plastic drawer dividers—it cost $20 and cut our setup time for projects in half. No more digging through a jumbled box of parts!
Working with 2040 EU standard aluminum profile is one of the most rewarding aspects of modern workshop design. It lets you build custom, modular structures that adapt to your needs—whether you're expanding your workspace, adding new tools, or reconfiguring for a new project. But to unlock its full potential, you need the right tools. From T-slot Allen keys that tighten bolts with precision to storage organizers that keep your accessories within reach, each tool on this list plays a vital role in making your projects smoother, safer, and more successful.
Remember, investing in quality tools isn't a luxury—it's a smart business decision. A good T-slot Allen key set might cost $30, but it'll prevent stripped bolts that could ruin a $50 profile. A digital measuring tape saves you from wasting material, and a spirit level ensures your structures are safe and stable. Whether you're a hobbyist building a garage workbench or a manufacturer setting up an assembly line, these tools will help you get the job done right the first time. So stock your workshop, grab your 2040 profile, and start building—your dream workspace is just a few bolts (and the right tools) away.