- Company Articles
- Industry articles
- Industry standards
- 2020 EU Standard Aluminum Profile: Load Capacity Calculation for Structural Design

2020 EU Standard Aluminum Profile: Load Capacity Calculation for Structural Design
Related Product
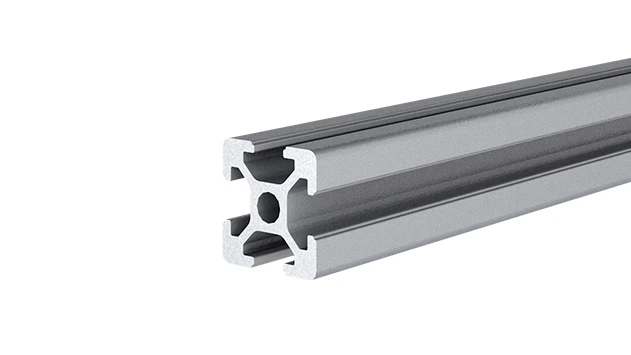
2020 EU Standard Aluminum Profile
2020 is a 2.00 x 2.00CM fractional 20 series square extrusion T-slot profile with four open T-slots, one on each 2.00 face. The profile has align-a-grooves to assist in aligning connecting profiles.
Introduction: The Backbone of Modern Workspaces
Walk into any manufacturing facility, workshop, or even a tech startup's office, and you'll likely spot a familiar sight: sleek, modular structures holding tools, components, or equipment. Chances are, many of these structures are built with 2020 EU standard aluminum profile —a unsung hero in the world of industrial and commercial design. Lightweight yet surprisingly strong, this aluminum extrusion profile has become a go-to choice for everything from workbenches and material racks to assembly lines and display stands. But here's the thing: while its modularity and versatility make it easy to assemble, there's a critical question that often gets overlooked in the rush to build: How much weight can it actually hold?
Load capacity isn't just a technical detail—it's the difference between a sturdy workbench that lasts for years and a wobbly structure that risks injury, downtime, or costly replacements. Whether you're a small business owner building a workbench for your garage, a factory manager designing a material handling system, or a DIY enthusiast crafting custom storage, understanding how to calculate the load capacity of 2020 EU standard aluminum profiles is essential. In this guide, we'll break down the basics of load capacity, the factors that influence it, and walk through practical calculations to ensure your next project is both safe and efficient.
Why Load Capacity Matters: More Than Just Numbers
Let's start with the obvious: safety. A structure that collapses under its intended load isn't just an inconvenience—it's a hazard. Imagine a workbench holding heavy machinery suddenly buckling, or a material rack loaded with components crashing to the floor. The risks to workers, equipment, and even product quality are real. But load capacity is about more than avoiding accidents; it's about optimizing performance.
Overestimating load capacity can lead to overengineering—using thicker profiles or more supports than necessary, driving up costs. Underestimating it, on the other hand, leads to frequent repairs, replacements, and downtime. For example, a small electronics manufacturer using a 2020 profile workbench to assemble circuit boards might unknowingly overload it with tools and components, causing the surface to sag over time. This not only affects workflow but could even damage sensitive parts. By getting load capacity right, you strike a balance between safety, durability, and cost-effectiveness.

Key Factors Influencing Load Capacity of 2020 EU Standard Aluminum Profiles
Calculating load capacity isn't a one-size-fits-all equation. It depends on a mix of material properties, design choices, and real-world conditions. Let's break down the most critical factors:
1. Material Composition: The Aluminum Alloy Story
Not all aluminum is created equal. 2020 EU standard profiles are typically made from 6063-T5 aluminum alloy—a popular choice for its excellent combination of strength, corrosion resistance, and workability. The "T5" temper means it's been artificially aged to enhance hardness without losing ductility. This alloy has a yield strength of around 110 MPa (megapascals) and a modulus of elasticity (stiffness) of 69 GPa (gigapascals). Why does this matter? Yield strength tells us the maximum stress the material can handle before permanent deformation (like bending or warping) sets in. Modulus of elasticity tells us how much it will flex under load. So, even if two profiles look identical, using a lower-grade alloy could drastically reduce load capacity.
2. Profile Dimensions: Size and Shape Matter
The 2020 profile gets its name from its cross-section: 20mm by 20mm. But within that, wall thickness varies—common options are 1.2mm, 1.5mm, or 2.0mm. Thicker walls mean higher moment of inertia (I), a measure of a structure's resistance to bending. For a square profile like 2020, the moment of inertia about the x or y-axis is calculated as I = (b*h³ - (b-2t)*(h-2t)³)/12, where b and h are the outer dimensions (20mm each), and t is wall thickness. A 2020 profile with 2.0mm walls will have a higher I than one with 1.2mm walls, making it stiffer and able to carry more load.
Don't forget the T-slot design, a hallmark of aluminum extrusion profiles. Those slots are great for attaching aluminum profile accessories like brackets, connectors, and panels, but they also slightly reduce the cross-sectional area. While this effect is minimal for most designs, it's worth noting when calculating precise load limits.
3. Structural Design: Supports, Spans, and Connections
Even the strongest profile will fail if poorly supported. The span (distance between supports) is critical. A profile supported at both ends (simply supported) will bend more under load than one with additional supports in the middle. For example, a 2020 rail spanning 1 meter between two legs will carry less weight than the same rail with a support in the center (reducing the span to 0.5 meters). The type of connections also plays a role—using high-quality corner brackets or T-slot nuts (common aluminum profile accessories ) ensures load is distributed evenly, while loose or flimsy connections can create weak points.
4. Loading Conditions: Static vs. Dynamic, Uniform vs. Point Loads
How the load is applied matters as much as how much weight there is. A static load (like a box sitting on a shelf) is easier to calculate than a dynamic load (like tools being placed and removed repeatedly). Dynamic loads often require a safety factor to account for sudden impacts or vibrations. Similarly, a uniform load (weight spread evenly across the profile, like a sheet of plywood on a workbench) is gentler than a point load (weight concentrated in one spot, like a heavy tool in the middle of a shelf). Point loads create higher bending stresses, so they usually lower the maximum safe load.
Step-by-Step Load Capacity Calculation
Now, let's put this into practice. We'll walk through calculating the maximum safe load for a simple structure: a workbench with a 2020 aluminum profile frame. For this example, we'll focus on a horizontal rail (the "beam") supporting the workbench top, simply supported at both ends (by legs made of 2020 profiles), with a uniform load (the workbench top and whatever is placed on it).
Step 1: Define the Variables
Let's list out our knowns and unknowns:
- Profile: 2020 EU standard, 6063-T5, wall thickness (t) = 1.5mm
- Span (L) = 800mm (distance between legs)
- Load type: Uniformly distributed load (w, in N/m)
- Material properties: Yield strength (σ_yield) = 110 MPa, Modulus of elasticity (E) = 69 GPa
- Safety factor (SF) = 2.0 (industry standard for static loads; higher for dynamic loads)
Step 2: Calculate Moment of Inertia (I)
For our 20x20mm profile with 1.5mm walls:
I = (b*h³ - (b-2t)*(h-2t)³)/12
b = h = 20mm, t = 1.5mm, so (b-2t) = 20 - 3 = 17mm, (h-2t) = 17mm
I = (20*20³ - 17*17³)/12 = (20*8000 - 17*4913)/12 = (160,000 - 83,521)/12 = 76,479/12 ≈ 6373 mm⁴
Step 3: Determine Maximum Allowable Bending Stress
We can't exceed the yield strength, so we divide by our safety factor: σ_allow = σ_yield / SF = 110 MPa / 2 = 55 MPa (or 55 N/mm²).
Step 4: Calculate Maximum Bending Moment (M_max)
For a simply supported beam with uniform load, M_max = (w*L²)/8, where w is load per unit length (N/m), and L is span in meters (0.8m here). But we also know that bending stress σ = (M*c)/I, where c is the distance from the neutral axis to the outer fiber (c = h/2 = 10mm for 20mm height). Rearranging to solve for M: M_max = (σ_allow * I)/c.
M_max = (55 N/mm² * 6373 mm⁴) / 10 mm ≈ 350,515 N·mm = 350.5 N·m
Step 5: Solve for Maximum Uniform Load (w)
Using M_max = (w*L²)/8, rearrange for w: w = (8*M_max)/L²
w = (8 * 350.5 N·m) / (0.8m)² = 2804 / 0.64 ≈ 4381 N/m
Convert N/m to kg/m (since weight is often measured in kg): 1 N = 0.10197 kg, so w ≈ 4381 * 0.10197 ≈ 447 kg/m. But wait—this is the load per meter of beam. If our workbench top is 600mm wide (0.6m), the total load per meter of span is 447 kg/m * 0.6m ≈ 268 kg. That seems high, right? Remember, this is for a single 2020 beam. Most workbenches use multiple beams (e.g., two parallel rails), so total load capacity would be higher. But we also need to check deflection to ensure the bench doesn't sag too much.
Step 6: Check Deflection Limits
Even if the beam doesn't fail, excessive deflection (sag) can be a problem—no one wants a workbench that dips in the middle. A common limit is L/200 (span divided by 200). For L=800mm, maximum allowable deflection (δ_allow) = 800/200 = 4mm.
Deflection for a uniformly loaded simply supported beam is δ = (5*w*L⁴)/(384*E*I). Let's plug in our numbers (convert E to N/mm²: 69 GPa = 69,000 N/mm²):
δ = (5 * 4381 N/m * (0.8m)⁴) / (384 * 69,000 N/mm² * 6373 mm⁴)
First, convert L to mm: 0.8m = 800mm, so L⁴ = (800)^4 = 409,600,000,000 mm⁴. Convert w to N/mm: 4381 N/m = 4.381 N/mm.
δ = (5 * 4.381 N/mm * 409,600,000,000 mm⁴) / (384 * 69,000 N/mm² * 6373 mm⁴) ≈ (8.96e12) / (1.68e11) ≈ 53.3mm. That's way over our 4mm limit! So, deflection, not bending stress, is the limiting factor here.
To fix this, we can either shorten the span, add more supports, or use a thicker-walled profile. If we switch to a 2020 profile with 2.0mm walls (I ≈ 8500 mm⁴), recalculating deflection gives δ ≈ 39.5mm—still too much. Adding a center support (span = 400mm) reduces δ to ~2.1mm, which is within limits. Moral of the story: always check both stress and deflection!
Practical Table: Load Capacity Estimates for Common 2020 Profiles
To save you from crunching numbers every time, here's a quick reference table for 2020 EU standard profiles under uniform static load, with a safety factor of 2 and deflection limit L/200. All spans are in mm, and load capacity is in kg per meter of beam (for single span, simply supported):
| Wall Thickness (mm) | Span (mm) | Max Load (kg/m) – Stress Limited | Max Load (kg/m) – Deflection Limited | Controlling Factor |
|---|---|---|---|---|
| 1.2 | 400 | 1120 | 280 | Deflection |
| 1.2 | 600 | 500 | 78 | Deflection |
| 1.5 | 400 | 1490 | 370 | Deflection |
| 1.5 | 600 | 660 | 103 | Deflection |
| 2.0 | 400 | 1980 | 490 | Deflection |
| 2.0 | 600 | 880 | 136 | Deflection |
Note: These are estimates. Always verify with detailed calculations for your specific application.
Common Mistakes to Avoid
Even with calculations, it's easy to slip up. Here are some pitfalls to watch for:
- Ignoring accessories: Aluminum profile accessories like brackets and connectors add strength, but using cheap or mismatched ones can weaken the structure. A loose T-slot nut can reduce load capacity by 30% or more.
- Overlooking dynamic loads: If your workbench will have tools dropped on it or parts sliding across, add a safety factor of 3–4 instead of 2.
- Forgetting end caps: While aluminum profile end caps don't directly affect load capacity, they prevent debris from getting stuck in T-slots, which can wear down connections over time.
- Assuming symmetry: A profile loaded along its weak axis (e.g., a 20x20 profile used as a vertical column vs. horizontal beam) has different load capacities. Always align the profile's strongest axis with the main load direction.
Best Practices for Maximizing Load Capacity
Want to get the most out of your 2020 profiles? Follow these tips:
- Optimize span length: Shorter spans mean higher load capacity. Adding intermediate supports (like a center brace on a workbench) is often cheaper than upgrading to thicker profiles.
- Use the right accessories: Invest in high-quality connectors, brackets, and corner codes. Look for accessories made from the same alloy as the profile for compatibility.
- Distribute loads evenly: Avoid point loads by using a solid top (plywood, aluminum honeycomb panel) to spread weight across multiple profiles.
- Test before full deployment: Build a small prototype and load-test it gradually. A few extra hours of testing can save weeks of headaches later.
Conclusion: Building with Confidence
2020 EU standard aluminum profile is a versatile, cost-effective solution for countless structural projects. But its true potential lies in understanding how to calculate and optimize load capacity. By considering material properties, profile dimensions, structural design, and real-world conditions, you can build workbenches, racks, and systems that are safe, durable, and efficient. Remember: it's not just about the numbers—it's about creating spaces where people and processes can thrive without worrying about the structure beneath them. So, grab your calculator, check those deflection limits, and build something that lasts.