- Company Articles
- Industry articles
- Industry standards
- 2040 National Standard Profile for Material Racks: Design Tips & Best Practices

2040 National Standard Profile for Material Racks: Design Tips & Best Practices
Related Product
2040 National Standard Profile
45° external bending joint, used for 45° external connection of two aluminum pipes.
Picture this: It's 9 a.m. on a Monday at a mid-sized electronics assembly plant. The production line is supposed to be running at full speed, but instead, workers are clustered around a jumble of metal shelves. A critical component for today's order—small circuit boards—has gone missing. "I swear I put them on the top shelf yesterday," says Maria, the lead assembler, frustration edging her voice. Across the floor, Juan is wrestling with a heavy plastic bin, trying to yank it free from a overcrowded rack. "These shelves were never built for this weight," he mutters, as a wheel on the bottom shelf gives a loud creak. Sound familiar? For too many facilities, disorganized, flimsy material storage isn't just a daily headache—it's a silent killer of efficiency, morale, and profits.
But what if there was a way to build material racks that actually work with your team, not against them? Racks that adapt to your changing needs, hold up under heavy loads, and make finding (and storing) materials as easy as reaching for a tool on your workbench? That's where the 2040 National Standard Profile comes in. This unassuming aluminum extrusion has quietly revolutionized how manufacturers, warehouses, and workshops approach storage. Let's explore why it's become a go-to choice, and how you can leverage it to design material racks that transform chaos into calm.
What Is the 2040 National Standard Profile, Anyway?
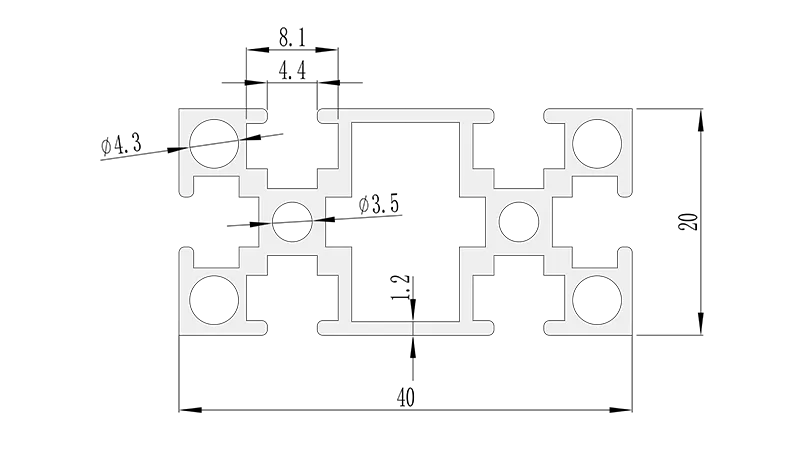
Before we dive into design tips, let's get clear on the basics: What exactly is a 2040 National Standard Profile? At its core, it's a type of aluminum extrusion profile —a long, hollow beam made by forcing heated aluminum through a die to create a specific cross-sectional shape. The "2040" refers to its dimensions: 20mm in width and 40mm in height. Simple, right? But don't let its simplicity fool you. This profile is a workhorse, and its popularity stems from three key strengths:
- Strength meets lightweight: Aluminum is naturally strong yet much lighter than steel, making 2040 profiles easy to handle during assembly while still supporting heavy loads (we're talking up to 150kg per linear meter, depending on the setup).
- Modular by design: The profile's T-slot design—longitudinal grooves along its length—lets you attach aluminum profile accessories (like connectors, brackets, and shelves) anywhere along the beam, no drilling required. This means you can tweak, expand, or reconfigure your rack in minutes, not days.
- Durable and low-maintenance: Aluminum resists rust and corrosion, and its smooth surface is easy to clean—perfect for environments where dust, moisture, or chemicals are present. Unlike painted steel, it won't chip or fade over time.
Think of it as the Lego brick of industrial storage: simple on its own, but infinitely versatile when combined with the right accessories. And when it comes to material racks, that versatility is a game-changer.
Design Tips: Building a 2040 Profile Material Rack That Works Harder for You
Designing a material rack with 2040 profiles isn't just about slapping together some beams and shelves. It's about creating a system that fits your space, your materials, and your team's workflow. Here are five actionable tips to get it right:
1. Start with Load Capacity in Mind (Yes, Even the "Small Stuff")
The first rule of rack design? Know what you're storing. A box of screws weighs next to nothing, but a bin of metal castings? That could easily hit 50kg or more. The 2040 profile is strong, but overloading it is a recipe for sagging shelves and safety risks. Here's how to calculate:
First, list your materials and their weights. Then, factor in dynamic load —the force when someone pulls a bin off the shelf or bumps the rack with a trolley. As a general rule, aim for a safety margin of 30% (e.g., if your max load per shelf is 100kg, design for 130kg). For heavier items, pair 2040 profiles with support brackets or double up the vertical beams. And don't forget the connections: a strong profile won't help if your aluminum profile accessories (like angle codes or gussets) are flimsy. Opt for high-quality, reinforced connectors—they're worth the small extra cost.
2. Optimize Accessibility: Make Every Shelf Easy to Reach
What's the point of a well-organized rack if your team has to climb, stretch, or kneel to grab materials? Poor accessibility leads to wasted time and strained muscles. When designing your rack, keep these ergonomic principles in mind:
Pro Tip: The "golden zone" for material storage is between knee and shoulder height—this is where items are easiest to reach without bending or stretching. Reserve lower shelves for heavy, rarely used items (like spare tools) and upper shelves for lightweight, seasonal materials (think holiday packaging or backup supplies). For frequently accessed items, use roller track strips along the shelf edges—they let bins glide forward with a gentle push, so workers don't have to reach deep into the rack.
If your rack is tall (over 1.8m), add a step stool or platform—never expect workers to stand on shelves or chairs. And if space allows, design the rack to be accessible from both sides (just make sure there's at least 80cm of clearance for aisles).
3. Use Modularity to Future-Proof Your Rack
Your storage needs won't stay the same forever. A new product line might mean bulkier materials; a seasonal rush could require extra shelves. The 2040 profile's T-slot design shines here, but you have to plan for flexibility from the start. Here's how:
- Choose adjustable shelves: Use sliding shelf brackets or clamp-on supports instead of fixed shelves. This lets you raise or lower shelves in seconds as materials change.
- Leave room to expand: Bolt the rack's base to the floor (if permanent) or use heavy-duty casters (if mobile), but leave extra space on the sides or top for adding modules later. For example, a material rack b (3 row and 3 floor) —a common 3-tier, 3-column design—can easily grow to 4 floors by adding another 2040 beam and shelf brackets.
- Mix and match accessories: Need to hang tools? Add hook strips using T-slot nuts. Storing long items like pipes or cables? Use horizontal beam extensions with end caps. The right aluminum profile accessories turn a basic rack into a multi-functional storage system.
4. Don't Overlook the Little Details (They Make a Big Difference)
It's easy to focus on the big stuff—beams, shelves, load capacity—but the small details often determine whether your rack is a joy or a frustration to use. Here are a few to prioritize:
- End caps: Cover exposed ends of 2040 profiles with plastic or aluminum end caps to prevent snags on clothing or materials, and to keep dust out of the T-slots.
- Labeling: Use magnetic or clip-on labels on each shelf (the T-slots make attaching them a breeze). Clear labels mean no more "Where do these screws go?" debates.
- Edge protection: For shelves holding fragile items (like glass components or electronics), add rubber strip inserts to the T-slots to prevent scratches or slips.
5. Think About Mobility (If You Need It)
Not all material racks need to stay in one place. If your team moves supplies between workstations (e.g., from a warehouse to an assembly line), consider adding casters to your 2040 rack. Look for heavy-duty swivel casters with brakes—they'll let you move the rack smoothly (even when loaded) and lock it in place when stationary. Just make sure the rack's base is wide enough to prevent tipping (a good rule: base width should be at least 1/3 of the rack's height).
Best Practices: Avoid These Common Mistakes
Even with the right design tips, it's easy to trip up on common pitfalls. Here's what to watch out for:
- Overlooking weight distribution: Placing all heavy items on one side of the rack can cause it to lean or tip. Spread weight evenly, and keep heavier items on lower shelves.
- Skipping the planning phase: Don't start cutting profiles until you've drawn a detailed sketch (or used a 3D modeling tool). Measure your space twice—account for doorways, ceiling height, and nearby equipment.
- Using cheap accessories: A $2 plastic connector might save money upfront, but it'll warp or break under load, leaving you with a wobbly rack. Invest in metal or reinforced nylon accessories from a reputable aluminum profile supplier .
- Ignoring maintenance: Check connections monthly—tighten loose bolts, replace worn casters, and clean out dust from T-slots. A little upkeep goes a long way in extending your rack's life.
Comparing Profiles: Why 2040 Stands Out
Wondering how the 2040 National Standard Profile stacks up against other common profiles? Let's break it down:
| Profile Type | Dimensions (WxH, mm) | Typical Load Capacity (kg/m) | Best For | Key Limitation |
|---|---|---|---|---|
| 2040 National Standard Profile | 20x40 | 100-150 | Medium-duty material racks, workbenches, shelving for tools/parts | Not ideal for extremely heavy loads (over 200kg per shelf) |
| 3030 National Standard Profile | 30x30 | 80-120 | Light-duty racks, small parts storage, mobile trolleys | Narrower design limits shelf width for bulky items |
| 4040 EU Standard Profile | 40x40 | 180-250 | Heavy-duty storage, industrial racks, machine guards | Heavier and bulkier; overkill for small to medium loads |
As you can see, the 2040 profile hits a sweet spot: strong enough for most material storage needs, yet lightweight and compact enough to fit in tight spaces. It's the Goldilocks of aluminum profiles—just right for the majority of workshops and warehouses.
Real-World Example: Building Material Rack B (3 Row and 3 Floor)
Let's put this all into practice with a common scenario: building a material rack b (3 row and 3 floor) —a popular 3-column, 3-tier design used in electronics and automotive parts storage. Here's how it comes together with 2040 profiles:
- Frame assembly: Start with four vertical 2040 profiles (height: 1800mm) as the rack's legs. Connect them with horizontal 2040 beams (length: 1200mm) at the top, middle, and bottom using 90° angle codes and T-slot bolts for stability.
- Shelving: Add three horizontal shelves per column, using sliding shelf brackets inserted into the vertical profiles' T-slots. Space shelves 500mm apart to fit standard plastic bins. For extra support, add cross-braces between the vertical legs using 45° connectors.
- Accessories: Install roller track strips along the front edge of each shelf to let bins slide forward easily. Add end caps to all exposed profile ends, and label each shelf with magnetic tags.
- Mobility (optional): Attach four heavy-duty casters (two with brakes) to the base frame for easy movement between workstations.
The result? A sturdy, flexible rack that holds up to 120kg per shelf, fits through standard doorways, and can be reconfigured in minutes if storage needs change. No more wrestling with bins or hunting for lost parts—just smooth, efficient access to everything your team needs.
Final Thoughts: Invest in Storage That Grows With You
At the end of the day, a material rack isn't just a piece of furniture—it's an investment in your team's productivity, safety, and sanity. The 2040 National Standard Profile, with its strength, modularity, and durability, makes that investment smarter. By following these design tips and best practices, you'll build racks that don't just store materials—they support your workflow, adapt to your needs, and stand the test of time.
So, the next time you walk into your facility and see that jumble of disorganized shelves, remember: there's a better way. Grab a 2040 profile, a handful of quality accessories, and start building storage that works as hard as your team does. Your future self (and your bottom line) will thank you.