- Company Articles
- Industry articles
- Industry standards
- 2040 National Standard Profile Joints: Types, Compatibility & Installation Techniques

2040 National Standard Profile Joints: Types, Compatibility & Installation Techniques
Related Product
2040 National Standard Profile
45° external bending joint, used for 45° external connection of two aluminum pipes.
Walk into any modern manufacturing facility, warehouse, or workshop these days, and you'll likely spot something common: sleek, silver structures holding up workbenches, guiding conveyor belts, or organizing tools. Chances are, those structures are built from aluminum profiles—and if they're designed for flexibility and efficiency, there's a good bet they include 2040 national standard profiles. But what makes these profiles so essential? It's not just the profiles themselves; it's the unsung heroes connecting them: the joints. In this guide, we're diving deep into 2040 national standard profile joints—exploring their types, how they work with other aluminum profile accessories, and the step-by-step techniques to install them like a pro. Whether you're a small business owner building a custom workbench or a production manager optimizing your assembly line, understanding these joints will transform how you think about workspace design.
What Exactly Is a 2040 National Standard Profile?
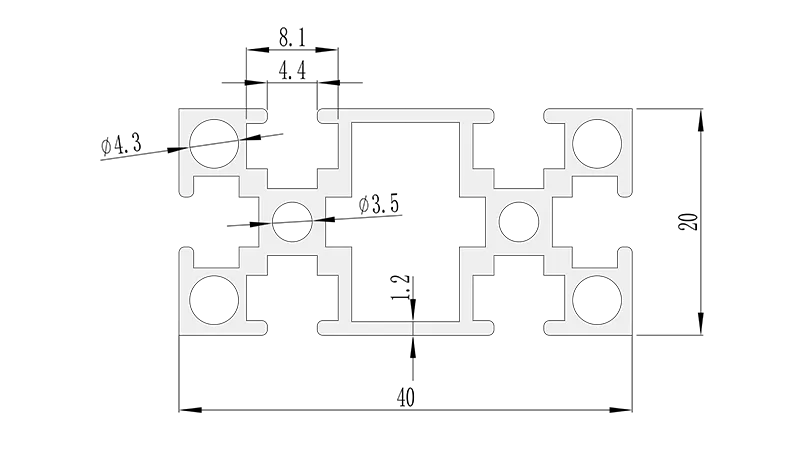
Before we jump into joints, let's get clear on the star of the show: the 2040 national standard profile. If you're new to aluminum profiles, think of them as the building blocks of modular industrial furniture and equipment. Unlike rigid steel frames or one-size-fits-all shelving, these profiles are designed to be lightweight, strong, and infinitely adaptable. The "2040" in the name refers to their dimensions: 20mm in width and 40mm in height. That might sound small, but don't let the size fool you—these profiles punch above their weight, thanks to their hollow, rectangular cross-section and internal T-slots. Those T-slots are where the magic happens: they let you slide in bolts, nuts, and, yes, joints to connect profiles at any angle, creating everything from simple shelves to complex assembly stations.
Most 2040 national standard profiles are made from 6063-T5 aluminum alloy, a material chosen for its perfect balance of strength, corrosion resistance, and machinability. The surface is usually anodized, giving it a smooth, matte finish that resists scratches and wear—ideal for busy factory floors where durability matters. And because they're "national standard," you don't have to worry about compatibility issues between brands; a 2040 profile from one supplier will work with accessories from another, which is a huge win for anyone building or expanding a system over time.
The Heart of the System: Types of 2040 Profile Joints
If profiles are the bones of your structure, joints are the ligaments—they hold everything together while allowing for movement and flexibility. The right joint can turn a pile of aluminum bars into a sturdy workbench, a mobile trolley, or a material rack. Let's break down the most common types of aluminum profile connectors you'll encounter when working with 2040 profiles, and when to use each one.
1. Angle Connectors: The Workhorses of 90°, 45°, and 135° Joints
Angle connectors are the most basic and widely used joints, designed to connect two profiles at a fixed angle. For 2040 profiles, the three most common angles are 90°, 45°, and 135°—each serving a specific purpose.
- 90° Aluminum Profile Connector : Think of this as the "cornerstone" of profile assembly. It's used when you need two profiles to meet at a right angle, like the corners of a workbench or the legs of a shelving unit. Most 90° connectors are L-shaped, with holes or T-slot channels that align with the T-slots in the 2040 profile. They're typically secured with M5 bolts and T-nuts, which slide into the T-slots for a tight, wobble-free fit. Pro tip: Look for "strengthened" 90° connectors if you're building something that will hold heavy loads—these have thicker walls or reinforcing ribs to prevent bending.
- 45° Aluminum Profile Connector : When you need a slope or a diagonal brace, this is your go-to. Imagine building a material rack where the top shelf tilts slightly to make grabbing items easier—that's where a 45° connector shines. They're also useful for adding bracing to square structures, increasing stability without adding bulk. Installation is similar to 90° connectors, but you'll need to double-check the angle alignment before tightening the bolts to avoid a lopsided result.
- 135° Aluminum Profile Connector : Less common but incredibly useful for "offset" corners. For example, if you're building a U-shaped workbench where the sides extend beyond the back, a 135° connector can create a smooth, angled transition instead of a sharp corner. They're also handy for building protective barriers or machine guards where a gentle angle is safer than a right angle.
2. Multi-Way Connectors: For When One Angle Isn't Enough
Sometimes, you need to connect more than two profiles at once—and that's where multi-way connectors come in. These joints let you branch out in multiple directions, making them perfect for complex structures like modular shelving or workstations with integrated tool holders.
- Aluminum Profile 3-Way Connector : As the name suggests, this connector joins three profiles, usually in a T-shape or Y-shape. Picture a workbench where a vertical support post splits into two horizontal shelves—you'd use a 3-way connector at the split point. Some 3-way connectors are adjustable, letting you set the angle between the branches (e.g., 90°/90° for a T-shape, or 60°/60° for a Y-shape), while others are fixed. For 2040 profiles, look for 3-way connectors with reinforced centers to handle the extra load from three directions.
- 4-Way and 5-Way Connectors : These are less common but useful for highly customized setups. A 4-way connector might be used to build a cube-shaped frame, with one profile coming from each direction (up, down, left, right). 5-way connectors add a vertical profile to the mix, creating a central hub for multiple horizontal branches—think of a tool cart with shelves extending in all directions. Keep in mind that the more branches a connector has, the more important it is to distribute weight evenly; overloading one arm can strain the joint and weaken the entire structure.
3. Slide-In and Flange Connectors: For Hidden Strength and Clean Lines
Not all joints are meant to be visible. Slide-in connectors (also called "internal" connectors) fit inside the hollow of the 2040 profile, creating a seamless joint with no external hardware. They're perfect for applications where aesthetics matter, like display stands or office furniture. Flange connectors, on the other hand, attach to the outside of the profile with a flat "flange" that bolts onto the surface, making them easy to install but more visible.
For example, if you're building a workbench with a clean, modern look, slide-in connectors would keep the corners smooth and free of bulky hardware. But if you need to quickly assemble and disassemble a structure (like a temporary event booth), flange connectors might be better—they're faster to install and don't require precise alignment of T-slots.
| Joint Type | Angle/Configuration | Best For | Installation Difficulty |
|---|---|---|---|
| 90° Aluminum Profile Connector | Right angle (90°) | Workbench corners, shelf edges | Easy (basic tools needed) |
| 45° Aluminum Profile Connector | Acute angle (45°) | Sloped shelves, diagonal bracing | Moderate (requires angle alignment) |
| 135° Aluminum Profile Connector | Obtuse angle (135°) | Offset corners, barriers | Moderate |
| Aluminum Profile 3-Way Connector | T-shape or Y-shape | Branching shelves, support posts | Moderate (multiple bolts to tighten) |
| Slide-In Connector | Variable (90°, 180°, etc.) | Clean, seamless structures | Advanced (requires precise T-slot alignment) |
Compatibility: Making Sure Your Joints Play Well with Others
One of the biggest advantages of using 2040 national standard profiles is that they're designed to work with a wide range of aluminum profile accessories—not just joints. But compatibility isn't automatic; you need to pay attention to a few key details to ensure your system holds together and functions as intended.
Matching Joints to Profile Size
First and foremost: not all joints are created equal. A joint designed for a 3030 profile (30mm x 30mm) won't fit a 2040 profile, and vice versa. Always check the product specifications to make sure the joint is labeled for "2040" or "20x40" profiles. Some manufacturers use universal joints that can adjust to different sizes, but these are less common and often less strong than size-specific joints. When in doubt, stick to joints explicitly rated for 2040 profiles—your structure's stability depends on it.
Bolts, Nuts, and T-Slot Compatibility
Joints don't work alone—they rely on bolts and nuts to secure them to the profiles. For 2040 national standard profiles, the T-slots are typically sized for M5 bolts (5mm diameter), which is the industry standard. Most joints will come with pre-drilled holes that align with these T-slots, but it's worth double-checking: a joint with M6 holes won't work with M5 bolts, and forcing it could strip the T-slots or crack the joint.
T-nuts are another critical accessory here. These small, T-shaped nuts slide into the T-slots of the profile, providing a secure anchor for the bolts that hold the joint in place. For 2040 profiles, choose "drop-in" T-nuts (which can be inserted from the end of the profile) or "spring" T-nuts (which can be inserted through the T-slot opening) depending on your installation needs. Pro tip: Apply a small amount of thread locker to the bolts before tightening—this prevents them from loosening over time due to vibration, which is common in manufacturing environments.
Mixing and Matching with Other Profile Sizes
What if you want to connect a 2040 profile to a smaller 2020 profile or a larger 3060 profile? It's possible, but you'll need an adapter joint. These are special connectors with one side designed for 2040 and the other for the second profile size. For example, a 2040-to-2020 adapter would let you build a shelf with 2040 supports and lighter 2020 crossbars, saving weight without sacrificing strength. Just make sure the adapter is rated for the load you'll be putting on the connection—adapters are often the weakest point in mixed-size systems.
Installation Techniques: From Pile of Parts to Finished Structure
Installing 2040 profile joints might seem intimidating at first, but with the right tools and a little patience, it's a straightforward process. Let's walk through a step-by-step guide to assembling a basic structure—a small workbench, for example—using 2040 profiles and 90° aluminum profile connectors. By the end, you'll have the skills to tackle more complex projects.
Step 1: Gather Your Tools and Materials
Before you start, make sure you have everything you need:
- 2040 national standard profiles (cut to your desired lengths—most suppliers will cut them for you, or you can use a hacksaw or miter saw with a metal-cutting blade)
- 90° aluminum profile connectors (one for each corner of your workbench)
- M5 bolts (length depends on the joint thickness—typically 12mm or 16mm)
- M5 T-nuts (one for each bolt)
- Hex key set (most M5 bolts use a 4mm hex key)
- Tape measure and pencil (for marking)
- Square (to ensure 90° angles)
- Level (to check for flatness)
- Rubber mallet (for gently tapping joints into place)
Step 2: Mark the Profile for Joint Placement
Lay out your profiles on a flat surface—this will be your workbench top, legs, and aprons (the horizontal supports between the legs). For a simple workbench, you'll need:
- 2 long profiles (the top and bottom aprons, e.g., 1200mm each)
- 2 short profiles (the side aprons, e.g., 600mm each)
- 4 leg profiles (e.g., 800mm each)
Take one of the long aprons and measure in from each end—this is where the legs will attach. Mark the position of the 90° connectors: typically, the joint will sit so that the leg profile is centered on the apron. For example, if the leg is 20mm wide (the width of the 2040 profile), mark a line 10mm from the end of the apron—this centers the leg on the apron's width.
Step 3: insert T-Nuts into the Profiles
Slide T-nuts into the T-slots of the apron and leg profiles, aligning them with your marks. For the apron, the T-nuts should be positioned where the bolts will pass through the 90° connector. For drop-in T-nuts, you'll need to slide them in from the end of the profile and then move them to the marked position. For spring T-nuts, push them into the T-slot opening until they lock into place.
Step 4: Attach the 90° Connectors
Place the 90° connector at the marked position on the apron, aligning its holes with the T-nuts in the apron. insert an M5 bolt through each hole in the connector and into the T-nut, then hand-tighten until the bolt is snug. Repeat this for the leg profile, attaching the other side of the 90° connector to the leg. At this point, the joint should hold the two profiles together loosely—we'll tighten everything later.
Step 5: Assemble the Frame and Check for Square
Once all four corner joints are loosely assembled, you'll have a rectangular frame with legs. Now, use your square to check that all corners are 90°—if not, gently tap the profiles with a rubber mallet to adjust. A quick way to verify squareness is to measure the diagonals of the frame: if they're equal, the frame is square; if not, adjust until they are. This step is crucial—an out-of-square frame will lead to a wobbly workbench and uneven surfaces.
Step 6: Tighten the Bolts and Secure the Joints
With the frame square, use your hex key to fully tighten the bolts. Aim for a snug fit—over-tightening can strip the T-nuts or crack the joint, while under-tightening will leave the frame wobbly. A good rule of thumb is to tighten until you feel resistance, then give the hex key a quarter-turn more. If you're using thread locker, this is when it will set, creating a permanent bond that resists loosening.
Step 7: Add the Workbench Top and Final Checks
Finally, attach the workbench top (which could be another 2040 frame with a plywood or aluminum panel) using additional 90° connectors or angle brackets. Use a level to ensure the top is flat, adjusting the legs if necessary (some legs come with adjustable feet for this purpose). Give the entire structure a gentle shake to test for stability—if it wobbles, check the tightness of the joints and re-square the frame if needed.
Real-World Applications: From Workbenches to Material Racks
Now that we've covered the "how," let's talk about the "why." What can you actually build with 2040 national standard profiles and aluminum profile connectors? The possibilities are nearly endless, but here are a few common applications that highlight their versatility.
Custom Workbenches: Tailored to Your Workflow
A workbench is the center of any assembly or repair operation, and off-the-shelf models rarely fit perfectly. With 2040 profiles and 90° connectors, you can build a workbench that's exactly the right height, width, and depth for your team. Add a pegboard on one side using 45° connectors for tool storage, or a shelf underneath using 3-way connectors for parts bins. If you need to move it around, attach casters (another aluminum profile accessory) to the legs—just make sure to use heavy-duty caster mounts and lockable wheels for safety.
Case in point: A local electronics manufacturer was struggling with a one-size-fits-all workbench that left their technicians cramped. By switching to a custom 2040-based workbench with adjustable height (using telescoping profiles and locking pins) and integrated ESD (electrostatic discharge) protection (via conductive joints and a grounded top), they reduced assembly errors by 20% and improved technician satisfaction. The best part? When they introduced a new, larger product, they simply added an extension using 135° connectors and extra 2040 profiles—no need to buy a whole new bench.
Material Racks: Organized, Accessible, and Adaptable
Material racks are another area where 2040 profiles shine. Whether you need to store boxes, tools, or raw materials, a custom rack built with 2040 profiles and 3-way connectors can be designed to fit your space and load requirements. For example, a material rack B (3 row and 3 floor) configuration—common in warehouses—can be built by connecting vertical 2040 posts with horizontal crossbars using 90° connectors, then adding shelves at different heights with 3-way connectors. If you need to adjust the shelf heights later, just loosen the bolts, move the connectors, and retighten—no drilling or cutting required.
A furniture manufacturer I worked with used this approach to solve a storage nightmare. Their old wooden racks were warping under the weight of fabric rolls, and adjusting shelf heights meant sawing new holes. By switching to 2040 profiles and aluminum profile accessories, they built racks that could support heavier loads, adjusted shelf heights in minutes, and even added roller tracks (another accessory) to make loading and unloading fabric rolls easier. The result? A 30% reduction in time spent retrieving materials and zero more warped racks.
Troubleshooting Common Joint Issues
Even with careful installation, you might run into issues with your 2040 profile joints. Here are the most common problems and how to fix them.
Loose Joints: When the Structure Wobbles
Loose joints are the most frequent issue, usually caused by bolts that have vibrated loose over time. The fix is simple: tighten the bolts with a hex key. If they loosen again quickly, apply thread locker to the bolts (remove them first, clean the threads, apply thread locker, then reinsert and tighten). For joints that see extreme vibration (like those near heavy machinery), consider using lock washers or "nyloc" nuts (nuts with a nylon insert that grips the bolt threads).
Misaligned Joints: When Profiles Don't Meet Properly
If two profiles aren't meeting at the correct angle (e.g., a 90° joint that's slightly off), it's often due to misaligned T-nuts or bolts that were tightened too early. To fix this, loosen the bolts, realign the profiles using a square, then retighten. If the joint itself is bent or warped (rare, but possible with cheap materials), replace it—never try to bend a joint back into shape, as this weakens the metal.
Stripped T-Slots or Bolt Holes: When the Threads Give Out
Stripped T-slots or bolt holes are usually caused by over-tightening or using the wrong size bolts. If a T-slot is stripped, you can sometimes salvage it by moving the T-nut to a new position along the profile. For stripped bolt holes in a joint, replace the joint—damaged threads can't be repaired, and a joint with stripped holes won't hold securely.
Maintenance Tips: Keeping Your Joints Strong for Years
Like any equipment, 2040 profile structures need regular maintenance to stay in top shape. Here's how to keep your joints (and the rest of the system) working well for years:
- Inspect Regularly : Check joints monthly for looseness, corrosion, or damage. Pay extra attention to joints near moving parts or in high-traffic areas—these wear faster.
- Clean as Needed : Wipe down profiles and joints with a damp cloth to remove dust, oil, or debris. For stubborn grime, use a mild detergent—avoid harsh chemicals that can damage the anodized finish.
- Tighten Loose Bolts : As mentioned earlier, vibration can loosen bolts over time. A quick tightening session every few months prevents bigger issues down the line.
- replace Worn Parts : If a joint is cracked, bent, or has stripped threads, replace it immediately. Most aluminum profile accessories are inexpensive, and replacing a joint is far cheaper than repairing a collapsed structure.
Final Thoughts: Why 2040 Profile Joints Matter
At the end of the day, 2040 national standard profile joints might seem like small, components—but they're the reason aluminum profile systems are so popular in manufacturing, warehousing, and beyond. They turn rigid materials into flexible, adaptable structures that can grow and change with your business. Whether you're building a simple workbench or a complex assembly line, choosing the right joint, installing it properly, and maintaining it regularly will ensure your structure is strong, stable, and ready for whatever the future brings.
So the next time you walk into a factory or workshop, take a closer look at those aluminum frames. Chances are, you'll see 2040 profiles and aluminum profile connectors hard at work—quietly holding everything together, one joint at a time.