- Company Articles
- Industry articles
- Industry standards
- 2040 National Standard Profile Load Capacity: What Manufacturers Need to Know

2040 National Standard Profile Load Capacity: What Manufacturers Need to Know
Related Product
2040 National Standard Profile
45° external bending joint, used for 45° external connection of two aluminum pipes.
Introduction: The Backbone of Modern Manufacturing
Walk into any modern factory, warehouse, or production facility, and you'll likely spot them: sleek, modular structures holding up workbenches, material racks, assembly lines, and even automated systems. Chances are, many of these structures are built with aluminum extrusion profiles—and among the most versatile and widely used is the 2040 national standard profile. But here's the thing: while these profiles might look similar at first glance, their ability to bear weight—their load capacity—can make or break your operations.
For manufacturers, load capacity isn't just a technical specification; it's about safety, efficiency, and avoiding costly downtime. Imagine a workbench in your assembly line that sags under the weight of tools and components, or a material rack that buckles when stock is loaded. These aren't just minor inconveniences—they risk employee safety, delay production, and erode trust in your processes. That's why understanding the load capacity of 2040 national standard profiles isn't optional; it's essential.
In this article, we'll dive deep into what makes 2040 profiles tick, the factors that influence their load capacity, how to test it, and why getting it right matters for your lean system and bottom line. Whether you're setting up a new production line, upgrading existing workbenches, or troubleshooting stability issues, this guide will break down the jargon and give you actionable insights. Let's start by getting clear on what a 2040 national standard profile actually is.
What Is a 2040 National Standard Profile, Anyway?
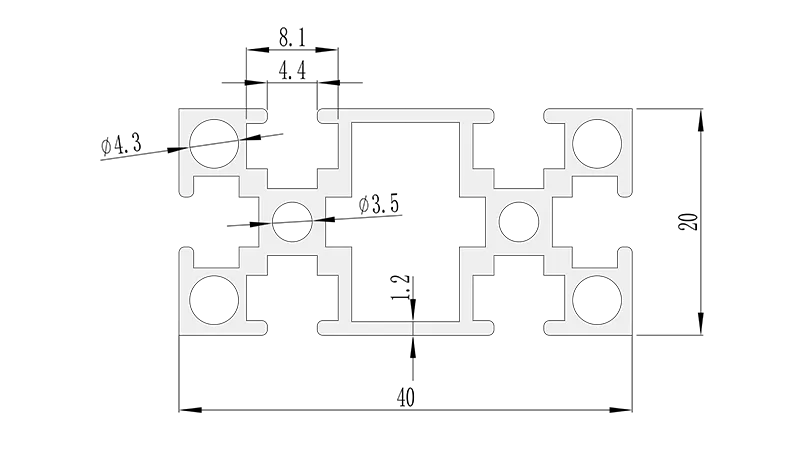
First off, let's decode the name: "2040" refers to the profile's cross-sectional dimensions, measuring 20mm in width and 40mm in height. It's part of the broader family of aluminum extrusion profiles—products made by forcing heated aluminum alloy through a die to create consistent, custom shapes. The "national standard" tag means it adheres to specific size, material, and quality guidelines set by national regulatory bodies, ensuring compatibility and reliability across suppliers.
Why aluminum? Unlike steel, aluminum is lightweight yet surprisingly strong, resistant to corrosion, and easy to machine. When extruded into profiles like the 2040, it becomes a modular building block. Thanks to its T-slot design—those grooves running along its length—you can attach accessories like brackets, panels, and shelves without welding. This modularity is why 2040 profiles are everywhere: from workbenches and material racks to machine guards and automated conveyor systems.
But not all 2040 profiles are created equal. Even within the "national standard" category, variations in wall thickness, alloy type, and manufacturing quality can drastically affect performance. For example, a 2040 profile with a 1.2mm wall thickness will behave very differently under load than one with a 2.0mm wall. And that's where load capacity comes in.
Key Factors That Shape Load Capacity
Load capacity—the maximum weight a profile can support without deforming or failing—isn't a one-size-fits-all number. It's a dynamic metric influenced by several factors. Let's break them down so you can make smarter choices for your facility.
1. Material Thickness: The Foundation of Strength
The wall thickness of the 2040 profile is the single biggest factor in its load capacity. Thicker walls mean more material to distribute weight, which translates to higher strength. Most 2040 national standard profiles come in wall thicknesses ranging from 1.0mm to 2.5mm, with 1.2mm, 1.5mm, and 2.0mm being the most common in manufacturing.
For example, a 2040 profile with a 1.2mm wall might safely support 50kg over a 500mm span, but push that span to 1500mm, and the capacity could drop to 20kg or less. Upgrading to a 2.0mm wall? That same 1500mm span might handle 45kg or more. The difference is stark, and it's why thickness should be your first consideration.
2. Alloy Type: Aluminum's Hidden Strength
Aluminum alloys are mixtures of aluminum and other metals (like magnesium, silicon, or copper) to enhance properties like strength, ductility, or corrosion resistance. For 2040 profiles, the most common alloys are 6061 and 6063. 6061 is stronger and more heat-treatable, making it ideal for heavy-load applications. 6063, while slightly less strong, offers better surface finish and is easier to extrude, making it popular for aesthetic or lighter-duty uses.
Don't assume all "aluminum" profiles are the same. A 6061 2040 profile with a 1.5mm wall will outperform a 6063 profile of the same thickness under heavy loads. Always check the alloy specification—your supplier should provide this upfront.
3. Span Length: The Longer the Span, the Less It Can Hold
Span length—the distance between two supports (like brackets or frames)—is critical. Even the strongest profile will sag if the span is too long. Think of it like a diving board: a short board (500mm span) can hold more weight than a long one (2000mm span) because there's less leverage pulling it down.
As a general rule, load capacity decreases exponentially as span length increases. For instance, doubling the span might reduce capacity by 70% or more. That's why engineers often add intermediate supports (like extra brackets) to shorten spans and boost overall load capacity.
4. Connection Quality: It's All in the Joints
You could have the thickest, strongest 2040 profile, but if your connections are weak, the whole structure will fail. Aluminum profile accessories—like corner codes, T-slot nuts, and bolts—play a huge role here. A loose bolt or a flimsy bracket can create stress points, causing the profile to bend or twist under load.
For example, using cheap plastic brackets instead of metal ones might save a few dollars upfront, but they'll compress or crack under heavy weight, reducing the profile's effective load capacity. Similarly, over-tightening bolts can strip T-slots, weakening the connection over time. It's a balancing act: the right accessories, installed correctly, distribute weight evenly across the profile.
5. Environmental Factors: Heat, Cold, and Corrosion
Your facility's environment matters too. Aluminum handles most conditions well, but extreme heat can soften the metal, lowering its load capacity temporarily. In cold environments, while aluminum retains strength, accessories like plastic brackets or rubber gaskets might become brittle, affecting connections.
Corrosion is another concern, especially in humid or chemical-exposed areas. Even with aluminum's natural oxide layer, prolonged exposure to moisture or chemicals can weaken the material over time. In these cases, choosing anodized or powder-coated 2040 profiles (or stainless steel accessories) can extend lifespan and maintain load capacity.
Testing Load Capacity: How to Verify Performance
So, you've selected a 2040 profile with the right thickness and alloy—now how do you know it will actually perform as claimed? Load capacity testing is the answer, and it's not as complicated as it sounds. Here's what manufacturers need to know.
Industry Standards: The Benchmark for Reliability
Most suppliers provide load capacity data based on industry standards, such as those set by the Aluminum Association or national testing bodies. These standards outline test methods, including how to apply weight (static vs. dynamic), span length, and acceptable deflection limits (how much bending is "safe").
Static load testing is the most common: the profile is mounted between two supports, and weight is applied gradually until the profile deflects by a certain amount (usually 1/200th of the span length, per industry norms). For example, a 1000mm span would have a deflection limit of 5mm. If the profile bends more than that under a given weight, it's exceeded its safe load capacity.
Dynamic load testing, on the other hand, simulates real-world conditions where weight is added or removed repeatedly (like workers placing tools on a workbench). This tests fatigue resistance—how well the profile holds up over time under varying loads.
Third-Party Certification: Trust but Verify
Not all supplier data is created equal. Some may exaggerate load capacities to win sales, so third-party certification is a must. Look for profiles tested by independent labs that follow ISO or national standards. A certificate should include details like wall thickness, alloy, span length, and maximum load capacity—so you can compare apples to apples.
But even with certification, it's smart to conduct in-house tests for your specific use case. For example, if you're building a workbench with a 2040 top frame, mount the profile as you would in your facility, add weight incrementally (using sandbags, metal plates, etc.), and measure deflection with a ruler or laser level. This real-world test accounts for variables like accessory type and installation quality that lab tests might not capture.
Pro Tip: Always test with a safety margin. If your calculations say you need a load capacity of 50kg, choose a profile rated for at least 75kg. This buffer accounts for unexpected loads (e.g., a worker leaning on the workbench) and wear over time.
Real-World Applications: From Workbenches to Lean Systems
Enough theory—let's talk about how load capacity plays out on the factory floor. Here are two common scenarios where 2040 national standard profiles shine, and how getting load capacity right makes all the difference.
1. Workbenches: The Heart of Assembly Lines
Workbenches are where the magic happens—where components are assembled, inspected, and packaged. A typical workbench might hold tools (drills, screwdrivers), fixtures, and ongoing work (e.g., circuit boards, mechanical parts). Depending on the industry, total weight can range from 30kg (light electronics) to 150kg+ (heavy machinery components).
For a workbench frame built with 2040 profiles, the key is to balance span and thickness. Let's say you're designing a 1800mm-long workbench with a wooden top. Using 2040 profiles with 1.2mm walls for the front and back rails (spanning 1800mm between legs) might seem cost-effective, but under a 100kg load, those rails could sag 10mm or more—enough to misalign tools or strain workers. Upgrade to 1.5mm walls, and the sag drops to 5mm, well within safe limits.
Add accessories like under-shelf brackets (to hold tool drawers) or side panels, and you'll need to account for their weight too. A 20kg tool drawer mounted halfway along a 1800mm rail adds stress to the middle of the span, so the profile's load capacity must account for both the top weight and the accessories.
2. Material Racks in Lean Systems
Lean manufacturing thrives on efficiency—minimizing waste, streamlining workflows, and keeping materials within arm's reach. Material racks built with 2040 profiles are a cornerstone of this, holding raw materials, WIP (work-in-progress), and finished goods.
Take a 3-tier material rack for automotive parts. Each tier might hold 80kg of components, with 3 tiers totaling 240kg. The vertical posts (2040 profiles) must support this weight, but the horizontal rails (also 2040) must span between posts without bending. If the posts are 1200mm apart, using 2.0mm wall 2040 rails ensures each tier can handle 80kg with minimal deflection. Pair that with heavy-duty aluminum profile accessories like 90° corner codes and reinforced brackets, and the rack becomes a stable, reliable part of your lean system.
But here's a common pitfall: overloading the top tier. Workers might pile extra materials on the top shelf, assuming "higher is better." But the top rails have the same span as the lower ones—exceeding their load capacity can cause the entire rack to lean or collapse. Clear labeling (e.g., "Max Load: 80kg per Tier") and training are just as important as choosing the right profile.
Load Capacity by the Numbers: A Practical Table
To put these concepts into concrete terms, let's look at a load capacity table for 2040 national standard profiles with different wall thicknesses, spanning common lengths, and with/without reinforced accessories. All values are in kilograms (kg) and assume a static load, 6063 alloy, and standard room temperature.
| Wall Thickness | Span Length | Load Capacity (No Accessories) | Load Capacity (With Metal Brackets + Reinforced Joints) | Maximum Deflection (mm) |
|---|---|---|---|---|
| 1.2mm | 500mm | 65kg | 85kg | 2.5mm |
| 1.2mm | 1000mm | 30kg | 45kg | 5.0mm |
| 1.2mm | 1500mm | 15kg | 25kg | 7.5mm |
| 1.5mm | 500mm | 90kg | 120kg | 2.0mm |
| 1.5mm | 1000mm | 45kg | 65kg | 4.0mm |
| 1.5mm | 1500mm | 25kg | 40kg | 6.0mm |
| 2.0mm | 500mm | 130kg | 170kg | 1.5mm |
| 2.0mm | 1000mm | 70kg | 100kg | 3.0mm |
| 2.0mm | 1500mm | 40kg | 60kg | 4.5mm |
Note: These are general guidelines. Always consult your supplier for exact load ratings based on your specific profile and application.
Common Mistakes to Avoid
Even with the best intentions, manufacturers often stumble when it comes to load capacity. Here are the top mistakes to watch for—and how to fix them.
Mistake #1: Underestimating Total Weight
It's easy to calculate the weight of the "main" item (e.g., a 50kg worktop) but forget the little things: tools, cables, bins, even the weight of the profile itself. A workbench might start with a 50kg top, but add a 15kg tool organizer, 10kg of cables, and 5kg of ongoing work, and suddenly you're at 80kg—well above the 65kg capacity of a 1.2mm profile over 1000mm.
Fix: Create a "weight checklist" for each structure, including the profile, accessories, and all items that will rest on it. Add 20% to the total for a safety buffer.
Mistake #2: Ignoring Dynamic Loads
Static load capacity (weight sitting still) is important, but dynamic loads (weight being moved, dropped, or vibrated) are often more stressful. For example, a worker placing a 20kg component on a material rack isn't just adding 20kg—they might drop it slightly, creating a 30kg impact load. Over time, these impacts weaken the profile.
Fix: If your application involves dynamic loads, choose a profile with 30-50% higher static load capacity than your calculated dynamic load. Add rubber mats or shock-absorbing accessories to reduce impact.
Mistake #3: Using the Wrong Accessories
Skimping on accessories is a false economy. Plastic T-slot nuts might work for light loads, but under heavy weight, they'll deform, allowing the bolt to slip. Similarly, using "universal" brackets instead of profile-specific ones can create uneven stress points.
Fix: Invest in high-quality aluminum profile accessories designed for 2040 national standard profiles. Look for metal brackets, stainless steel T-slot nuts, and reinforced corner codes. Your supplier should be able to recommend the right accessories for your load.
Mistake #4: Overlooking Span in Custom Structures
When designing custom structures (e.g., a U-shaped assembly line with 2040 rails), it's tempting to extend spans to reduce the number of support legs. But longer spans mean lower load capacity, and even thick profiles have limits. A 2040 profile with 2.0mm walls might handle 70kg over 1000mm, but at 2000mm, capacity drops to 20kg—hardly enough for most applications.
Fix: Keep spans under 1500mm for 2040 profiles (even with thick walls). If you need longer spans, add intermediate supports or switch to a larger profile (e.g., 3030 or 4040) for the main structural rails.
Choosing the Right 2040 Profile for Your Needs
With all this in mind, how do you select the perfect 2040 national standard profile for your project? Here's a step-by-step process to guide you:
Step 1: Calculate Total Load
List all items that will be supported by the profile (structure, accessories, materials) and add their weights. Include dynamic loads if applicable. Add a 20% safety buffer.
Step 2: Determine Span Length
Measure the distance between supports (e.g., legs, wall mounts) for the profile. Keep spans as short as possible to maximize load capacity.
Step 3: Match Thickness to Load and Span
Use the table above (or your supplier's data) to find a wall thickness that meets your total load at your span length. For example, 100kg total load over 1000mm span? A 2.0mm wall profile with reinforced accessories will work.
Step 4: select Accessories
Choose metal brackets, bolts, and connectors rated for your load. Avoid plastic accessories for heavy applications. Ask your supplier for compatibility charts—some accessories are only rated for certain profile thicknesses.
Step 5: Test Before Full Deployment
Build a small prototype (e.g., a section of the workbench or rack) and test it with the total load (plus buffer). Measure deflection with a straightedge or laser level. If it sags more than 1/200th of the span, upgrade the profile or shorten the span.
Conclusion: Load Capacity as a Foundation for Success
The 2040 national standard profile is more than just a piece of aluminum—it's a building block that shapes the efficiency, safety, and reliability of your manufacturing operations. Its load capacity isn't a technical afterthought; it's the foundation upon which your workbenches, racks, and lean systems stand. By understanding the factors that influence load capacity—thickness, span, accessories, and environment—you can design structures that don't just meet your needs today, but grow with your business tomorrow.
Remember, the goal isn't to over-engineer (using 2.5mm walls for every application wastes money) but to balance strength, cost, and functionality. With the right profile, accessories, and planning, you'll avoid downtime, keep workers safe, and build a production floor that's ready to tackle whatever comes next.
So, the next time you're designing a workbench or material rack, take a moment to think about load capacity. Your future self—and your bottom line—will thank you.