- Company Articles
- Industry articles
- Industry standards
- 3030 National Standard Profile A Cutting Guide: Tools & Techniques for Manufacturers

3030 National Standard Profile A Cutting Guide: Tools & Techniques for Manufacturers
Related Product
3030 National Standard Profile A
Workbench, production line, logistic rack, warehouse rack Industry: Manufacturer workshop, Automobile, Electronic, Assembling, logistic
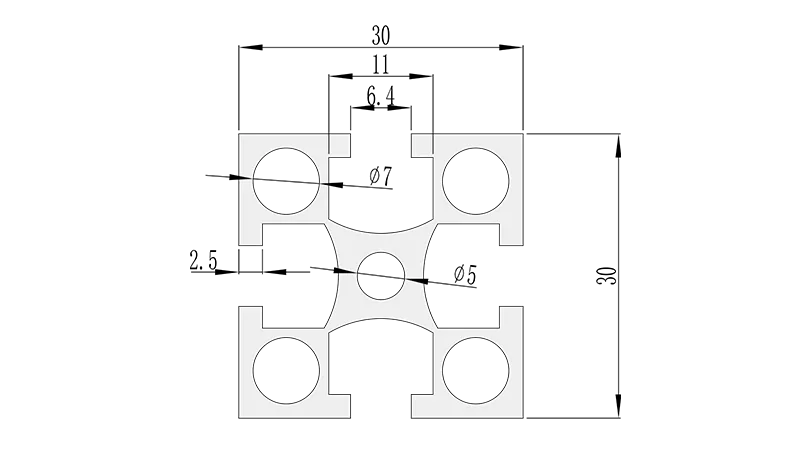
In the world of manufacturing, where every component counts, few materials are as workhorse-like as aluminum extrusion profiles. Lightweight yet surprisingly strong, they form the backbone of assembly lines, workstations, and storage systems. Among these, the 3030 National Standard Profile A stands out—a 30x30mm aluminum extrusion profile that's become a staple in workshops worldwide. Whether you're building a sturdy workbench, a modular material rack, or integrating it into a lean system, one thing is non-negotiable: precision cutting. A poorly cut profile doesn't just look unprofessional; it can derail assembly, compromise structural integrity, and waste both time and materials. In this guide, we'll walk through everything manufacturers need to know to cut 3030 National Standard Profile A like a pro—from choosing the right tools to mastering techniques that ensure every cut fits perfectly with aluminum profile accessories and beyond.
Understanding 3030 National Standard Profile A: Why It Matters
Before diving into cutting, let's take a moment to appreciate why this profile is so widely used. The 3030 National Standard Profile A is an aluminum extrusion profile, meaning it's formed by forcing heated aluminum through a die to create its distinct cross-section. Measuring 30mm by 30mm, it strikes a sweet spot between strength and versatility—light enough to handle manually (unlike steel) but rigid enough to support heavy loads, whether it's a workbench stacked with tools or a material rack holding boxes of components.
What makes it a favorite in manufacturing? Its T-slot design. Those grooves running along its length are like built-in connection points, allowing it to pair seamlessly with aluminum profile accessories such as 90° connectors, end caps, and brackets. Need to build a quick workstation? Screw a tabletop to the slots. Assembling a flow rack? Slide in roller tracks and secure them with T-slot bolts. This flexibility is why it's a cornerstone of lean system setups—manufacturers can reconfigure layouts on the fly without welding or drilling new holes.
But here's the catch: all that versatility hinges on precise cuts. Imagine trying to attach a 3030 aluminum profile end cap to a profile with a jagged, uneven edge—it won't sit flush, leaving gaps that collect dust or weaken the joint. Or worse, a 45° cut that's off by just 2° might mean a diagonal brace refuses to align with its connector, turning a 10-minute assembly into a frustrating hour of adjustments. For manufacturers, where time is money, sloppy cuts aren't just annoying—they're costly.
Essential Tools for Cutting 3030 National Standard Profile A
The right tool for the job depends on your production volume, budget, and precision needs. Let's break down the most common options, from budget-friendly hand tools to high-tech CNC cutters, so you can pick what works best for your shop.
| Tool Type | Best For | Precision Level | Speed | Initial Cost |
|---|---|---|---|---|
| Hacksaw | Small batches, on-site repairs, tight spaces | Moderate (depends on skill) | Slow (5-10 minutes per cut) | Low ($15-$30) |
| Miter Saw | Medium batches, 90°/45° cuts, repetitive lengths | High (±0.5° accuracy) | Fast (30 seconds per cut) | Medium ($200-$600) |
| Bandsaw | Large batches, thick profiles, curved cuts | High (±0.3° accuracy) | Medium (1-2 minutes per cut) | High ($1,000-$5,000) |
| CNC Cutter | Mass production, complex angles, custom lengths | Very High (±0.1° accuracy) | Very Fast (10-15 seconds per cut) | Very High ($10,000+) |
1. Hacksaw: The Budget Workhorse
If you're just starting out or only need to cut a handful of profiles, a hacksaw is a solid choice. It's portable, requires no electricity, and costs next to nothing. But don't let the low price fool you—with the right blade and technique, it can produce clean cuts.
Blade choice is critical here. Aluminum is soft, so a blade with too few teeth will tear the metal instead of cutting it. Opt for a 32-teeth-per-inch (TPI) blade labeled for non-ferrous metals—these have finer teeth that slice through aluminum without clogging. Avoid steel blades, which can leave burrs or overheat the profile.
2. Miter Saw: The Go-To for Medium Volume
For most small to medium manufacturers, a miter saw is the sweet spot. It balances speed, precision, and cost, making it ideal for cutting 3030 profiles in batches. Look for a compound miter saw, which lets you adjust both the miter (horizontal angle) and bevel (vertical angle)—perfect for those 45° cuts needed for corner brackets.
Again, blade selection matters. A 10-inch or 12-inch blade with 60-80 TPI is best for aluminum. Avoid using the same blade you use for wood—it will gum up quickly with aluminum chips. Some manufacturers swear by carbide-tipped blades, which stay sharp longer, though they're pricier. Pro tip: Apply a little cutting fluid to the blade to reduce friction and heat—this keeps the cut smoother and extends blade life.
3. CNC Cutter: The Industrial Powerhouse
If you're churning out hundreds of profiles daily, a CNC cutter is worth the investment. These computer-controlled machines can cut, drill, and even notch profiles with pinpoint accuracy, ensuring every piece is identical. They're especially useful for complex cuts—think custom angles or slots for specialized aluminum profile accessories.
But CNC isn't just about speed. It reduces human error: once programmed, the machine repeats cuts flawlessly, which is crucial for lean system setups where consistency is key. Just remember: CNC requires skilled operators to program and maintain the machine, so factor in training costs if you're new to the technology.
Step-by-Step Cutting Techniques for Perfect Results
No matter which tool you use, the basics of cutting 3030 National Standard Profile A follow the same principles: measure twice, cut once, secure the workpiece, and finish the edges. Let's break down the process for the two most common tools: miter saw and hacksaw.
Technique 1: Using a Miter Saw
- Measure and mark: Use a tape measure to mark your desired length on the profile. For straight cuts, use a combination square to draw a line across the profile—hold the square tight against the edge to ensure the line is perpendicular. For angles, use a protractor or the saw's built-in angle guide to mark the cut line.
- Secure the profile: Clamp the profile firmly to the saw's fence. Never hold it by hand—even a slight slip can lead to a crooked cut or injury. Use soft-jawed clamps to avoid marring the aluminum's finish.
- Set up the saw: Adjust the miter and bevel angles as needed. Double-check with a digital angle finder if you're chasing precision. Load the aluminum-specific blade and tighten it securely.
- Cut: Start the saw and let the blade reach full speed before lowering it into the profile. Apply gentle, steady pressure—don't force the blade. Let the blade do the work to avoid bending the profile.
- Deburr: After cutting, use a deburring tool or fine-grit sandpaper to smooth the edges. Aluminum cuts often leave sharp burrs that can cut hands or prevent accessories like end caps from fitting. Run the deburring tool along both the inside and outside of the cut for a clean finish.
Technique 2: Using a Hacksaw
- Mark and clamp: Same as with the miter saw—measure, mark with a square, and clamp the profile to a workbench. The more secure it is, the straighter the cut.
- Start the cut: Hold the hacksaw at a 45° angle to the profile. Use slow, short strokes to start the cut, focusing on following the marked line. Let the weight of the saw do most of the work—pressing too hard will tire you out and lead to a wobbly cut.
- Maintain rhythm: Once the cut is started, switch to longer, smoother strokes. Keep the blade perpendicular to the profile to avoid angling off course. If the blade gets stuck, back it up slightly to clear chips before continuing.
- Finish carefully: As you near the end of the cut, slow down—applying too much pressure here can cause the profile to bend or the blade to snap. Support the free end with your hand to prevent it from dropping and damaging the cut.
- Deburr: Same as above—use a deburring tool or sandpaper to smooth edges. Hacksaw cuts often have more burrs than miter saw cuts, so take extra time here.
Safety First: Protecting Your Team and Workspace
Cutting aluminum might seem less intimidating than cutting steel, but it still comes with risks. Aluminum chips are sharp, cutting tools spin at high speeds, and dust can irritate lungs. Here's how to keep your team safe:
Personal Protective Equipment (PPE)
Never skip PPE. At minimum, everyone cutting profiles should wear:
- Safety glasses or goggles to block flying chips.
- Work gloves (cut-resistant for handling deburred profiles).
- Ear protection (especially with miter saws or CNC machines, which are loud).
- A dust mask or respirator if cutting dry (aluminum dust isn't toxic, but it can irritate airways).
Workspace Safety
Keep your cutting area clean and organized. Sweep up aluminum chips regularly—they're slippery and can cause trips. If using a power tool, ensure the cord is out of the way to avoid tripping. For CNC machines, install a dust collection system to keep the air clean and prevent chips from building up on the table.
Also, secure your workpiece properly. A profile that shifts mid-cut can ruin the cut or kick back, injuring the operator. Use clamps, vises, or dedicated fixtures—never rely on hand pressure alone.
Tool Maintenance
Dull blades are dangerous blades. They require more force to cut, increasing the risk of slips, and produce rougher cuts with more burrs. Inspect blades regularly for dullness or damage, and replace them when needed. Keep tools clean—wipe down saw tables and remove built-up aluminum chips, which can interfere with cutting accuracy.
Troubleshooting Common Cutting Issues
Even with the best tools, things can go wrong. Here's how to fix common cutting problems:
Problem: Ragged, Uneven Cuts
**Causes:** Dull blade, incorrect blade TPI, or feeding the profile too fast. **Fix:** replace the blade with a fresh, aluminum-specific one (60-80 TPI). Slow down the feed rate—let the blade cut at its own pace. If using a hacksaw, check that the blade is tensioned properly—loose blades wobble, causing uneven cuts.
Problem: Bent or Distorted Profiles
**Causes:** Inadequate clamping, forcing the blade, or cutting too close to the clamp (which can stress the metal). **Fix:** Use more clamps to secure the profile along its length, not just at the cut point. Avoid forcing the blade—let it cut freely. Leave at least 2-3 inches between the clamp and the cut line to reduce stress.
Problem: Excessive Burrs
**Causes:** Dull blade, low TPI, or cutting dry (no lubricant). **Fix:** Sharpen or replace the blade. Use a higher TPI blade (80 instead of 60). Apply cutting fluid to reduce friction and heat, which minimizes burr formation. Post-cut, spend extra time deburring with a dedicated tool—run it along the edge at a 45° angle to shave off burrs cleanly.
From Cut to Assembly: Making It All Come Together
Once you've mastered cutting 3030 National Standard Profile A, the next step is assembly—and precise cuts make this a breeze. Let's say you're building a lean pipe workbench using 3030 profiles, 90° aluminum profile connectors, and an aluminum honeycomb panel top. With clean, square cuts, each vertical leg will stand straight, each horizontal rail will align perfectly, and the connectors will tighten down without gaps. The result? A sturdy workbench that stays stable under heavy tools, all because you took the time to cut each profile right.
Or consider a material rack B (3 row and 3 floor) for storing components. Each shelf support needs to be exactly 600mm long to fit between the vertical posts. A 1mm error in length might not seem like much, but multiply that across 12 supports, and the shelves could tilt, risking damaged inventory. Precise cuts eliminate this risk, ensuring the rack is level and secure.
Conclusion: Cutting for Success in Manufacturing
Cutting 3030 National Standard Profile A might seem like a simple task, but it's a cornerstone of efficient, high-quality manufacturing. Whether you're using a hacksaw for small jobs or a CNC cutter for mass production, the principles remain the same: measure carefully, secure the workpiece, use the right tools, and prioritize safety. When you get the cuts right, everything else follows—faster assembly, fewer reworks, and products that stand the test of time.
Remember, the 3030 profile is more than just a piece of aluminum—it's a building block for your lean system, your workbenches, and your reputation as a manufacturer. Invest the time to train your team, maintain your tools, and refine your techniques. Your production line (and your bottom line) will thank you.