- Company Articles
- Industry articles
- Industry standards
- 3060 EU Standard Aluminum Profile: Machinability Tips for Custom Fabrication

3060 EU Standard Aluminum Profile: Machinability Tips for Custom Fabrication
Related Product
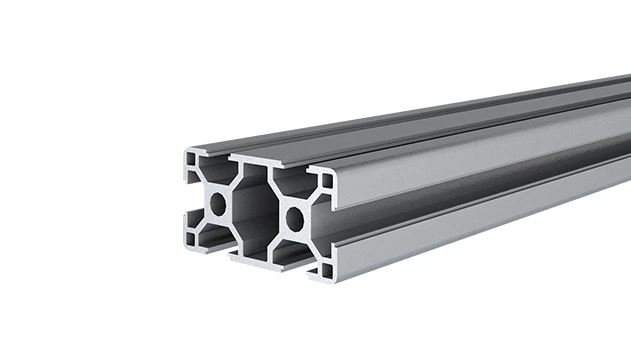
3060 EU Standard Aluminum Profile
3060 is a 3.00 x 6.00CM fractional 30 series square extrusion T-slot profile with four open T-slots, two side with 3.00cm face, two side with 6.0cm face. The profile has align-a-grooves to assist in aligning connecting profiles.
Turning raw aluminum into functional, professional-grade projects—one cut, drill, and joint at a time
Introduction: Why 3060 Aluminum Profile Deserves a Spot in Your Workshop
If you've ever walked through a manufacturing plant, a busy workshop, or even a well-organized garage, chances are you've seen aluminum profiles hard at work. They're the unsung heroes behind sturdy workbenches, sleek material racks, and efficient conveyor systems. But not all aluminum profiles are created equal—and if you're into custom fabrication, the 3060 EU standard aluminum profile might just become your new favorite material.
Let's start with the basics: the "3060" in its name refers to its dimensions—30mm in width and 60mm in height. It's part of the EU standard aluminum extrusion profile family, which means it's engineered to strict tolerances for consistency and compatibility with a wide range of aluminum profile accessories. Unlike generic aluminum tubes, this profile features T-slots along its length, those handy grooves that let you slide in brackets, fasteners, or even custom components without drilling extra holes. Think of it as a modular building block for your projects—versatile enough to adapt to almost any design, yet robust enough to handle real-world use.
But here's the thing: buying a length of 3060 profile is easy. Turning it into something useful—a custom workbench for your garage, a specialized material rack for your small business, or a one-of-a-kind conveyor guide—requires machinability. That's where this guide comes in. Whether you're a hobbyist tackling your first project or a seasoned fabricator looking to refine your process, mastering how to cut, drill, join, and finish 3060 aluminum profile will take your work from "homemade" to "professional grade."
In the sections ahead, we'll break down everything you need to know: from understanding the profile's unique properties to choosing the right tools, avoiding common mistakes, and even walking through a real-world case study. By the end, you'll not only have the technical know-how to machine 3060 aluminum with confidence—you'll also see why it's become a go-to for makers who refuse to compromise on quality or flexibility.
Understanding the Material: What Makes 3060 Aluminum Profile Tick?
Before you fire up the saw or pick up a drill, it helps to know what you're working with. Aluminum extrusion profile like the 3060 isn't just a chunk of metal—it's a carefully engineered material with properties that directly impact how it machines. Let's break down the key characteristics that make this profile both a joy and a challenge to work with.
Alloy Composition: The Sweet Spot for Machinability
Most 3060 EU standard profiles are made from 6063 aluminum alloy, often called "architectural aluminum" for its balance of strength, corrosion resistance, and workability. Unlike harder alloys like 6061 (which is great for structural parts but tough on tools), 6063 is softer and more ductile—think of it as the "user-friendly" sibling. It's typically supplied in a T5 or T6 temper, which means it's been heat-treated to enhance strength without making it brittle. For fabricators, this translates to cleaner cuts, fewer cracks during drilling, and easier bending (if your project calls for it).
Thermal Conductivity: A Double-Edged Sword
Aluminum is a champion at conducting heat, and 3060 profile is no exception. On one hand, this is a plus: during machining, heat from cutting or drilling dissipates quickly, reducing the risk of warping the profile. On the other hand, that same heat can transfer to your tools, dulling blades or bits faster if you're not careful. Ever noticed how a saw blade gets hot enough to burn your fingers after cutting aluminum? That's the thermal conductivity at work. The fix? Slow down the feed rate, use lubrication, and keep an eye on tool temperature—your bits (and your hands) will thank you.
T-Slots and Surface Finish: Precision Matters
One of the 3060's biggest selling points is its T-slots, which are extruded right into the profile during manufacturing. These slots are designed to accept standard aluminum profile accessories like T-nuts, brackets, and end caps, but their precision is a double-edged sword. If you cut the profile crookedly or drill holes off-center, those slots won't line up, and suddenly your "modular" project becomes a frustrating puzzle. The good news? With the right techniques, you can keep those slots aligned and your accessories fitting like they were made for each other (which, technically, they were).
Pro Tip:
Always check the profile's surface finish before starting. EU standard profiles should have a smooth, consistent texture with no dents, scratches, or rough edges. A flawed surface can throw off measurements or cause tools to catch during machining—save yourself the hassle and inspect before you cut!

Essential Tools: What You'll Need to Machine 3060 Profile Like a Pro
You wouldn't try to paint a masterpiece with a sponge, right? Machining 3060 aluminum profile is no different—having the right tools makes all the difference between a clean, precise project and a frustrating mess. Let's walk through the must-haves for your workshop, plus a few "nice-to-haves" that'll level up your game.
Cutting Tools: Chopping Through Aluminum Without the Headaches
Cutting is usually the first step in any project, and 3060 profile demands tools that can slice through aluminum without bending, cracking, or leaving ragged edges. Here are your main options:
- Bandsaw: A vertical bandsaw with a bi-metal blade (10-14 teeth per inch, or TPI) is a workhorse for straight cuts. The slower speed reduces heat buildup, and the fine teeth leave a smooth finish. Just make sure to clamp the profile securely—aluminum has a tendency to "walk" during cutting if it's not held tight.
- Circular Saw: Great for quick cuts or when you're working on-site. Look for a carbide-tipped blade designed specifically for aluminum (again, 10-14 TPI). Avoid using wood blades—they'll gum up and leave jagged edges. Pro move: spray the blade with cutting fluid or even WD-40 to reduce friction.
- Laser Cutter: If you have access to one, a laser cutter is perfect for intricate shapes or when you need ultra-precise cuts. It's expensive, but the finish is unmatched—no burrs, no heat distortion, just clean edges. Ideal for custom projects where aesthetics matter as much as function.
Drilling Tools: Making Holes That Fit (and Stay Put)
Drilling 3060 profile is all about control. The T-slots mean you might not need to drill as many holes, but when you do, you want them straight and the right size. Here's what you need:
- Drill Bits: High-speed steel (HSS) bits work for occasional use, but carbide-tipped bits are worth the investment if you're machining multiple profiles. Look for bits with a 118-degree point angle—they're designed to bite into aluminum without skidding. For larger holes, step bits are a lifesaver—no need to switch bits for each size.
- Drill Press: A bench drill press is better than a handheld drill for accuracy, especially when drilling perpendicular to the profile. Use a depth stop to ensure consistent hole depths, and always start with a pilot hole (smaller diameter than your final bit) to prevent the bit from wandering.
Finishing Tools: From Rough Cut to Ready-to-Use
Even the cleanest cut leaves burrs—those sharp, ragged edges that can slice fingers and ruin the look of your project. Don't skip finishing:
- Deburring Tool: A simple hand deburring tool with a replaceable blade is a must. Run it along the cut edges and T-slots to smooth out burrs. For internal burrs (like in drilled holes), use a countersink bit or a deburring brush.
- Sandpaper and Files: For larger burrs or to round edges, 120-240 grit sandpaper (aluminum oxide) works well. A mill file can shape corners, but go easy—aluminum is soft, and it's easy to overdo it.
| Tool Type | Best For | Speed | Finish Quality | Cost (Approx.) |
|---|---|---|---|---|
| Bandsaw (Bi-Metal Blade) | Straight, long cuts | Slow | Very Smooth | $200-$800 (entry to mid-range saws) |
| Circular Saw (Carbide Blade) | Quick cuts, on-site work | Fast | Smooth (with care) | $100-$300 (saw + blade) |
| Laser Cutter | Intricate shapes, precision cuts | Medium | Flawless | $5,000+ (industrial grade) |
| Carbide Drill Bits | Clean, accurate holes | Medium | No burrs (with pilot holes) | $15-$50 (set of 10) |
Tip 1: Mastering Precision Cutting—Because "Close Enough" Rarely Is
Cutting might seem straightforward, but even a tiny mistake—a cut that's 1mm off, or a profile that bends during cutting—can throw off your entire project. Here's how to nail it every time.
Measure Twice, Cut Once (Yes, It's a Cliché for a Reason)
Start by marking your cut line with a fine-tipped marker or a scribe. Use a speed square or a straightedge to ensure the line is perpendicular to the profile's length—even a slight angle can make T-slots misalign when joining pieces. If you're cutting multiple profiles to the same length, create a simple jig: clamp a block of wood to your workbench at the desired length, then butt the profile against it before cutting. This ensures every piece is identical—no more "oops, that one's 2mm shorter" moments.
Clamping: Your Secret Weapon Against Sloppy Cuts
Aluminum is soft, so if it moves during cutting, the blade will push it around, resulting in a curved or jagged cut. Invest in good clamps—C-clamps, bar clamps, or even quick-release clamps—to hold the profile firmly to your workbench. For extra stability, place a scrap piece of wood under the profile to prevent it from vibrating. And don't skimp on clamp placement: position them as close to the cut line as possible (but not so close they get in the blade's way).
Deburring: The Step That Makes Your Project Look Professional
Even the cleanest cut leaves burrs—those tiny, sharp metal flakes along the edge. Ignore them, and you'll end up with a project that feels "homemade" instead of "professional." Grab your deburring tool and run it along both the outside and inside edges of the cut. For the T-slots, use a small file or a deburring brush to clean out any aluminum shavings—they can jam up accessories later if left inside. Pro tip: if you're short on time, a quick pass with 120-grit sandpaper wrapped around a block will smooth things out, but a deburring tool gives a cleaner finish.
Common Mistake to Avoid:
Rushing the cut. It's tempting to push the saw blade through quickly to save time, but this generates heat, which can melt the aluminum and clog the blade. Let the tool do the work—apply gentle, consistent pressure, and let the blade's teeth slice through the metal at their own pace.
Tip 2: Drilling Holes That Actually Fit Your Hardware
Drilling holes in 3060 profile is a bit like playing darts: aim carefully, or you'll miss the target. Whether you're adding a mounting hole for a bracket or drilling through the T-slot to attach a custom component, precision is key. Here's how to do it right.
Pilot Holes: Small Holes, Big Impact
Never drill a large hole directly into aluminum without starting with a pilot hole. Pilot holes (usually 1/8-inch or smaller) guide the larger bit, preventing it from skidding across the surface. They also reduce the risk of the profile cracking—aluminum can split if the bit tries to bite too much material at once. For best results, start with a pilot hole, then step up to larger bits until you reach the desired size. For example, to drill a 1/4-inch hole, start with a 1/8-inch pilot, then a 3/16-inch bit, then finish with 1/4-inch.
Speed and Feed Rate: Slow and Steady Wins the Race
Aluminum isn't steel—drilling too fast will generate heat, which can dull your bit and cause the aluminum to "gum up" around the hole. Aim for a drill speed of 1,000-2,000 RPM for small bits (up to 1/4 inch) and 500-1,000 RPM for larger bits. If you're using a drill press, adjust the speed using the pulley system; for a handheld drill, use the variable speed trigger and keep it on the lower end. And don't forget to back the bit out periodically to clear chips—aluminum shavings can get stuck in the flutes, increasing friction and heat.
Lubrication: Your Bit's Best Friend
Cutting fluid isn't just for industrial shops—it's a game-changer for DIY projects too. A few drops of cutting fluid (or even WD-40, if you're in a pinch) reduces friction between the bit and the aluminum, keeping both cooler and extending bit life. Apply it directly to the bit before drilling, and reapply if you notice the bit getting hot (you'll feel it through the drill handle). Avoid using water—it can cause the aluminum to oxidize, leaving ugly stains.
Using T-Slots to Your Advantage
Remember those T-slots we talked about earlier? They're not just for sliding in accessories—they can save you from drilling extra holes. If you need to attach a bracket or a shelf, slide a T-nut into the slot, then tighten a bolt through the bracket and into the T-nut. No drilling required! This is especially handy for projects where you might want to reposition components later—no filling holes or starting over.
Tip 3: Joining Profiles Like a Pro—No Welding Required
You've cut your profiles to size and drilled the necessary holes—now it's time to put them together. The beauty of 3060 aluminum extrusion profile is that you don't need to be a welding expert to create strong, durable joints. With the right aluminum profile accessories, you can build structures that are both rigid and easy to disassemble (if needed).
Mechanical Fastening: The Tried-and-True Method
Mechanical fastening uses screws, brackets, and corner codes to hold profiles together. It's simple, affordable, and perfect for most projects. Here are the key accessories to know:
- Corner Codes: These L-shaped brackets fit into the T-slots of two perpendicular profiles, creating a 90-degree joint. They come in various sizes—make sure to get ones designed for 3060 profile. Tighten the screws evenly to avoid warping the profile.
- Flange Brackets: For joining profiles in a straight line (like extending a workbench), flange brackets bridge the gap between two ends. They're reinforced for extra strength, making them ideal for load-bearing applications.
- T-Nuts and Bolts: T-nuts slide into the T-slot and lock in place when you tighten a bolt through them. They're great for attaching shelves, casters, or custom components without drilling through the profile.
Adhesive Bonding: When You Want a Seamless Look
If you're after a clean, weld-like finish (without the heat or skill required for welding), structural adhesives can work wonders. Look for an adhesive designed for aluminum, like epoxy or polyurethane-based formulas. The key is surface preparation: sand the bonding area with 120-grit sandpaper to rough it up, then clean with rubbing alcohol to remove oil and debris. Apply a thin, even layer of adhesive, clamp the joint tightly, and let it cure for at least 24 hours. Note: adhesives work best for non-load-bearing joints or as a supplement to mechanical fastening, not as the sole method for heavy structures.
Aluminum Guide Rail A: Adding Precision to Sliding Components
For projects that need sliding parts—like a workbench with adjustable shelves or a material rack with sliding bins—aluminum guide rail A is a game-changer. This accessory mounts to the T-slots of your 3060 profile, creating a smooth track for rollers or slides. It's pre-drilled for easy installation and compatible with standard roller bearings, making it perfect for adding movement to static structures. Pro tip: align the guide rail using a straightedge before tightening the screws to ensure smooth, wobble-free sliding.
Pro Move:
For extra rigidity, add diagonal bracing using smaller aluminum profiles (like 2020 or 3030). Braces prevent the structure from swaying under load, turning a "wobbly" frame into one that can handle heavy tools or materials.
Case Study: Building a Custom Workbench with 3060 Profile
From Raw Profile to Workbench: A Step-by-Step Example
Let's put all these tips into practice with a real-world project: a custom workbench using 3060 EU standard aluminum profile. This workbench will be 120cm long, 60cm deep, and 85cm tall, with a plywood top and a lower shelf for storage.
Step 1: Gathering Materials
We'll need:
- 4 lengths of 3060 aluminum profile (120cm for the top and bottom rails)
- 4 lengths of 3060 profile (85cm for the legs)
- 2 lengths of 3060 profile (60cm for the shelf supports)
- Aluminum profile accessories: 8 corner codes, 16 T-nuts, 16 M5 bolts, 4 aluminum guide rail A (for the shelf)
- Plywood top (120cm x 60cm, 18mm thick)
- Casters (optional, for mobility)
Step 2: Cutting the Profiles
Using a circular saw with a carbide blade, cut the profiles to the lengths listed above. Use a speed square to mark straight lines, and clamp each profile to the workbench before cutting. After cutting, deburr all edges with a deburring tool—no one wants to scratch their forearms on sharp aluminum!
Step 3: Drilling and Prepping for Casters (Optional)
If adding casters, drill holes in the bottom of the leg profiles using a 1/4-inch drill bit (with a pilot hole first). Attach the casters using T-nuts and bolts—this makes them easy to replace if they wear out.
Step 4: Assembling the Frame
Start by building the two end frames: each frame consists of two 85cm legs and two 60cm shelf supports (top and bottom). Use corner codes to join the legs to the supports—slide T-nuts into the T-slots, position the corner codes, and tighten the bolts with a hex key. Once both end frames are assembled, connect them with the 12cm top and bottom rails, again using corner codes. Check for square by measuring the diagonals—they should be equal if the frame is straight.
Step 5: Adding the Shelf with Aluminum Guide Rail A
Mount aluminum guide rail A to the inside of the leg profiles at the desired shelf height. Slide roller bearings into the guide rails, then place the plywood shelf on top. The guide rails let the shelf slide in and out, making it easy to access tools or materials stored underneath.
Step 6: Attaching the Top
Finally, place the plywood top on the frame and secure it using T-nuts and bolts through the top rails. For extra stability, add adhesive between the plywood and the aluminum rails—this prevents the top from shifting during use.
The Result?
A sturdy, modular workbench that's easy to adjust or expand. The 3060 profile handles the weight of tools and materials, while the aluminum guide rail A makes the shelf functional and smooth. Best of all, if you need to move it, just add casters—or take it apart entirely for storage.
Troubleshooting: Fixing Common Mistakes (Because We've All Been There)
Even with the best tips, things can go wrong. Here's how to fix the most common issues when machining 3060 aluminum profile.
Problem: The Saw Blade Keeps Getting Stuck
Cause: Dull blade, too few teeth, or pushing too hard. Solution: replace the blade with a sharp, bi-metal or carbide-tipped one (10-14 TPI). Let the blade cut at its own pace—gentle pressure is key. If the blade still sticks, spray with cutting fluid to reduce friction.
Problem: Holes Are Crooked or Oversized
Cause: No pilot hole, or the drill bit wandered. Solution: Always start with a pilot hole. If the bit still wanders, use a center punch to make a small indentation before drilling—that gives the bit a starting point. For oversized holes, try using a larger T-nut or adding a washer to take up the slack.
Problem: Joints Are Wobbly
Cause: Loose bolts, missing corner codes, or under-tightened fasteners. Solution: Tighten all bolts evenly—don't over-tighten one side first, as this can warp the profile. Add diagonal bracing or extra brackets for load-bearing joints. If using T-nuts, make sure they're fully seated in the T-slot before tightening.
Problem: Aluminum Shavings Are Everywhere (and Sticking to Everything)
Cause: Aluminum shavings are sticky and static-prone. Solution: Use a magnet to collect metal shavings (they're not magnetic, but the magnet can still gather them in a pile). Wipe down the profile with a dry cloth after machining—this removes loose shavings before they can scratch the surface.
Conclusion: Your Turn to Build Something Great
Machining 3060 EU standard aluminum profile isn't rocket science, but it does require patience, the right tools, and a willingness to learn from mistakes. Whether you're building a workbench, a material rack, or a custom conveyor system, the tips in this guide will help you turn raw aluminum into projects that are functional, durable, and even a little bit impressive.
Remember: the key is to start small. Practice cutting and drilling on scrap pieces before tackling your main project. Invest in quality tools—they'll pay for themselves in cleaner cuts and fewer headaches. And don't forget to experiment with aluminum profile accessories like corner codes and aluminum guide rail A—they'll open up a world of design possibilities.
So grab a length of 3060 profile, fire up your saw, and start building. The next time someone asks, "Did you make that yourself?" you can smile and say, "Yep—and it's built to last."