- Company Articles
- Industry articles
- Industry standards
- 4040B EU Standard Aluminum Profile Manufacturing: Extrusion & Anodization Process Explained

4040B EU Standard Aluminum Profile Manufacturing: Extrusion & Anodization Process Explained
Related Product
4040B EU Standard Aluminum Profile
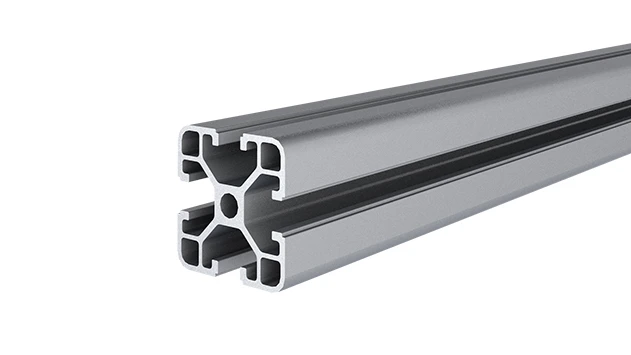
4040B is a 4.00x4.00 CM fractional 40 series square extrusion T-slot profile with four open T-slots, each side with 4.00cm face. The profile has align-a-grooves to assist in aligning connecting profiles.
Walk into any modern factory, warehouse, or even a tech startup's assembly line, and you'll likely spot a familiar sight: sleek, silver frames holding up workbenches, material racks, or conveyor systems. Chances are, those frames are made of aluminum profiles—specifically, the kind that meets strict EU standards. Among these, the 4040B EU standard aluminum profile stands out as a workhorse, prized for its strength, versatility, and precision. But have you ever wondered how this unassuming piece of metal goes from a solid block to a critical component in industrial setups? Today, we're pulling back the curtain on its manufacturing journey, focusing on two key processes: extrusion and anodization. Let's dive in.
What is 4040B EU Standard Aluminum Profile, Anyway?
Before we get to the "how," let's clarify the "what." The 4040B is a type of aluminum extrusion profile—a term that simply means it's formed by pushing molten aluminum through a custom die to create a specific cross-sectional shape. The "4040" refers to its dimensions: roughly 40mm by 40mm, making it a medium-sized profile ideal for balancing strength and weight. The "B" denotes a specific design variant, often with T-slots (those grooves running along its length) that allow easy attachment of aluminum profile accessories like brackets, end caps, or connectors. And "EU standard"? That's the stamp of approval, ensuring it meets strict criteria for dimensional accuracy, material quality, and safety—no cutting corners here.
Why does this matter? For manufacturers, using EU-standard profiles like the 4040B means consistency. Whether you're building a workbench in Germany or a material rack in France, the same profile will fit the same accessories, reducing assembly headaches and downtime. For end-users, it means durability—these profiles are built to withstand the rigors of daily industrial use, from heavy loads to constant adjustments.
The Extrusion Process: From Billet to Profile
Extrusion is where the magic begins. Think of it like squeezing toothpaste out of a tube—except instead of minty gel, we're pushing aluminum alloy, and instead of a round opening, we're using a precision-engineered die to shape it. Let's break down the steps.
Step 1: Billet Preparation – The Raw Material
It all starts with a billet—a solid, cylindrical block of aluminum alloy. For 4040B profiles, manufacturers typically use 6063 aluminum alloy, a popular choice for extrusion because it's lightweight, corrosion-resistant, and easy to shape. But not just any billet will do. The alloy must be carefully mixed to meet EU standards, with precise amounts of magnesium and silicon to ensure strength. Once the alloy is cast into billets (usually 6-12 meters long), they're cut into shorter lengths (around 1-2 meters) for easier handling. Next, the billet's surface is cleaned to remove oxides or impurities—any dirt here could ruin the final profile's finish.
Step 2: Heating – Softening the Alloy
Aluminum is strong at room temperature, but to extrude it, we need to make it malleable. The billet is loaded into a furnace and heated to around 480-520°C (about 900-970°F). This temperature is critical: too low, and the aluminum won't flow through the die; too high, and it could weaken the alloy or cause surface defects. Think of it like warming chocolate—soft enough to mold, but not so hot it melts into a puddle. The billet stays in the furnace until it reaches uniform temperature, ensuring consistent flow during extrusion.
Step 3: Extrusion – Shaping the Profile
Now comes the star of the show: the extrusion press. The heated billet is placed into a cylindrical container, and a hydraulic ram pushes it forward with immense force—up to thousands of tons. At the end of the container is the die, a custom-made steel tool with a 4040B-shaped opening. As the billet is compressed, it flows through the die's opening, taking on the 4040B's signature square cross-section with T-slots. It's a bit like using a cookie cutter, but in reverse: instead of cutting into the dough, the dough (aluminum) is forced through the cutter (die).
The die itself is a marvel of engineering. It must be machined to micron-level precision to ensure the 4040B's dimensions are exact—even a 0.1mm (deviation) could mean it won't fit standard aluminum profile accessories later. To prevent overheating, the die is cooled with water during extrusion. As the aluminum exits the die, it emerges as a long, continuous profile, still hot and slightly malleable.
Step 4: Cooling, Stretching, and Cutting
Fresh out of the die, the profile is soft and prone to warping. To fix this, it's guided through a cooling table, where fans or water sprays rapidly lower its temperature. Once cool enough to handle but still slightly flexible, it's moved to a stretching machine. Here, clamps grip both ends of the profile and pull gently—just enough to straighten it and (eliminate) internal stresses. This step is crucial for ensuring the profile remains straight over time, even under load.
Finally, the continuous profile is cut into standard lengths (usually 3-6 meters) using a circular saw or laser cutter. The cut ends are deburred to remove sharp edges, and the profiles are stacked for the next phase: anodization.
| Stage | Purpose | Temperature Range (°C) | Duration | Key Equipment |
|---|---|---|---|---|
| Billet Preparation | Ensure alloy purity and uniform size | Room temp | 1-2 hours (cleaning/cutting) | Alloy mixer, saw, surface cleaner |
| Heating | Softens alloy for extrusion | 480-520 | 30-60 mins | Gas or electric furnace |
| Extrusion | Shapes aluminum into 4040B cross-section | 450-500 (exit temp) | Seconds per meter | Hydraulic press, custom die |
| Cooling & Stretching | Hardens profile and corrects straightness | 20-50 (after cooling) | 5-10 mins (cooling); 1-2 mins (stretching) | Cooling table, stretching machine |
| Cutting & Deburring | Creates standard-length profiles with safe edges | Room temp | 1-2 mins per cut | Circular saw, deburring tool |

The Anodization Process: Enhancing Durability and Aesthetics
At this point, the 4040B profile is strong and shaped, but its surface is still raw aluminum—prone to scratches, corrosion, and dulling. That's where anodization comes in. This electrochemical process adds a protective oxide layer to the surface, making the profile more durable, corrosion-resistant, and even customizable in color. Here's how it works.
Step 1: Pre-Treatment – Cleaning the Canvas
Anodization only works on a clean surface, so the profiles first go through a rigorous cleaning routine. They're dipped in a degreasing solution to remove oils, dirt, or leftover cutting fluids from extrusion. Next, they're etched in a weak acid (usually sulfuric or phosphoric) to dissolve any surface oxides and create a micro-rough texture. This texture helps the oxide layer adhere better later. Finally, they're rinsed thoroughly to remove all traces of acid—any residue here could ruin the anodization.
Step 2: Anodizing – Building the Oxide Layer
Now, the profiles are suspended in a tank filled with an electrolyte solution—typically sulfuric acid. They're connected to the positive terminal of a power supply (anode), while lead plates in the tank act as the negative terminal (cathode). When electricity flows, a chemical reaction occurs: the aluminum at the surface oxidizes, forming aluminum oxide (Al₂O₃). This oxide isn't just a coating; it's integrated into the metal itself, so it won't peel or chip like paint.
The thickness of the oxide layer depends on the voltage and duration of the process. For EU-standard profiles like the 4040B, a thickness of 10-20 micrometers is common—enough to withstand daily wear and tear. During anodization, the T-slots and edges are carefully monitored to ensure uniform coverage; no spot is left unprotected.
Step 3: Coloring (Optional) – Adding Personality
While natural silver is the most common finish, anodized profiles can be colored for aesthetic or functional reasons (e.g., color-coding work zones). This is done by immersing the freshly anodized profile in a dye bath. The porous oxide layer acts like a sponge, absorbing the dye molecules. After coloring, the profiles are sealed to lock in the color and close the pores, making the surface smooth and stain-resistant. Popular colors include black, blue, or even custom shades, though for industrial use, natural silver remains the top choice for its timeless look and visibility of dirt (easy to clean!).
Step 4: Sealing – Locking in Protection
Whether colored or natural, the final step is sealing. The profiles are dipped in boiling deionized water or a nickel acetate solution, which causes the aluminum oxide to hydrate and expand, closing the pores in the oxide layer. This makes the surface non-porous, resistant to water and chemicals, and easy to clean. After sealing, the profiles are dried and inspected one last time before being packaged.
Quality Control: Ensuring EU Standards
Manufacturing 4040B profiles isn't just about following steps—it's about meeting EU standards. At every stage, quality control (QC) checks are performed to catch issues early. For example, after extrusion, each profile is measured with calipers or laser scanners to ensure its 40mm x 40mm dimensions are within ±0.1mm of the standard. Surface inspections check for scratches, dents, or uneven cooling marks. During anodization, the oxide layer thickness is tested using a eddy current meter, and adhesion tests ensure the layer won't peel.
Perhaps most importantly, EU standards require material traceability. Each batch of 4040B profiles can be traced back to the original billet, including alloy composition and extrusion parameters. This transparency gives manufacturers confidence that the profiles will perform as expected—no surprises when assembling a workbench or material rack.
Applications: Where 4040B Profiles Shine
Now that we understand how it's made, let's talk about why it matters. The 4040B profile's versatility makes it a staple in industries ranging from automotive to electronics. Here are a few common uses:
Workbenches: The Backbone of Assembly Lines
Walk into any electronics assembly plant, and you'll see workbenches built with 4040B profiles. These workbenches need to be sturdy enough to hold tools, components, and even heavy equipment, but also flexible—workers might need to add shelves, lighting, or ESD (electrostatic discharge) mats. The T-slots in 4040B profiles make this easy: aluminum profile accessories like brackets or clamps can be slid into the slots and tightened, no drilling required. A model like Workbench E (single deck, without casters) relies on 4040B frames for stability, ensuring it stays level even when loaded with circuit boards or machinery parts.
Material Racks: Organizing with Precision
Material Rack B, a 3-row, 3-floor storage solution, is another common application. Its shelves need to support boxes of parts, raw materials, or finished products without bending. 4040B profiles provide the strength here, while their uniform size ensures each shelf is level and aligned. Add aluminum guide rail A— a T-slot compatible rail—and you've got a system where bins slide smoothly, reducing the effort needed to retrieve items.
Conveyors and Automation Systems
In automated factories, conveyor systems rely on 4040B profiles for their frames. The profiles' rigidity ensures the conveyor stays aligned, even when moving heavy loads, while their light weight keeps energy costs low. T-slots allow easy mounting of motors, sensors, or roller tracks, making it simple to customize the conveyor for specific products—whether it's moving small electronic components or larger automotive parts.
Conclusion: More Than Just Metal
The 4040B EU standard aluminum profile may look simple, but its journey from billet to workbench is a testament to precision engineering and strict quality control. Extrusion shapes it into a functional form, while anodization transforms it into a durable, long-lasting component. Together, these processes create a profile that meets EU standards, ensuring consistency, safety, and reliability for manufacturers and end-users alike.
Next time you see a workbench, material rack, or conveyor system, take a closer look. Chances are, you're looking at the result of thousands of hours of innovation—all packed into a 40mm x 40mm piece of aluminum. And that, in a nutshell, is the story of the 4040B: not just metal, but the backbone of modern industry.