- Company Articles
- Industry articles
- Industry standards
- 4040C EU Standard Aluminum Profile Fastening Methods: Bolts, Rivets & Hidden Connections

4040C EU Standard Aluminum Profile Fastening Methods: Bolts, Rivets & Hidden Connections
Related Product
4040C EU Standard Aluminum Profile
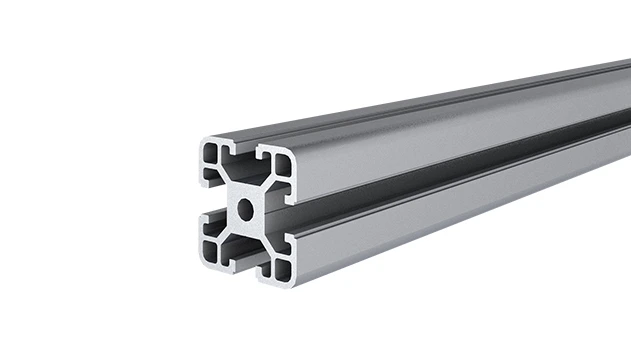
4040C is a 4.00x4.00 CM fractional 40 series square extrusion T-slot profile with four open T-slots, each side with 4.00cm face. The profile has align-a-grooves to assist in aligning connecting profiles.
Walk into any modern factory, workshop, or even a sleek retail display, and you'll likely spot the unsung heroes of industrial design: aluminum profiles. These versatile, lightweight structures form the backbone of workbenches, material racks, conveyor systems, and everything in between. But here's the thing—even the sturdiest aluminum extrusion profile is only as good as the connections holding it together. Whether you're building a heavy-duty assembly line or a minimalist workstation, choosing the right fastening method can make or break your project's durability, functionality, and even its aesthetic appeal.
Today, we're diving deep into three fundamental fastening methods for the 4040C EU Standard Aluminum Profile: bolts, rivets, and hidden connections. We'll break down how each works, when to use them, and why they matter. Along the way, we'll touch on aluminum profile accessories that elevate these connections, and even compare their pros and cons to help you make the best choice for your next project. Let's get started.
Why Fastening Matters: The Backbone of Aluminum Profile Projects
Before we jump into the methods themselves, let's take a moment to appreciate why fastening is so critical. Aluminum profiles—especially the 4040C EU standard—are prized for their strength-to-weight ratio, corrosion resistance, and modularity. They're designed to be cut, drilled, and connected in endless configurations, but without secure, reliable joints, all that flexibility goes out the window. A loose bolt can turn a sturdy workbench into a wobbly hazard; a weak rivet might cause a material rack to collapse under load; and a poorly executed hidden connection could ruin the clean look of a retail display.
Fastening methods also impact more than just structural integrity. They affect how easy your project is to assemble, disassemble (if needed), and maintain. They even influence costs, both upfront (for tools and materials) and long-term (for repairs or modifications). So, whether you're a seasoned manufacturer or a DIY enthusiast, understanding the ins and outs of bolts, rivets, and hidden connections is key to building something that lasts.
1. Bolts: The Workhorses of Aluminum Profile Connections
When most people think of fastening metal, bolts are usually the first thing that comes to mind—and for good reason. Bolts are versatile, strong, and relatively easy to install, making them a go-to choice for everything from heavy machinery to simple shelving units. Let's break down why bolts are so popular, the different types you'll encounter, and how to use them effectively with 4040C aluminum profiles.
What Makes Bolts a Top Choice?
Bolts excel in scenarios where you need a secure, removable connection. Unlike some other methods (we're looking at you, rivets), bolts can be tightened, loosened, and re-tightened as needed, making them ideal for projects that might require adjustments or disassembly down the line. They're also incredibly strong—when paired with the right nuts and washers, a properly torqued bolt can handle significant loads, which is why they're often used in structural applications like frame supports or heavy-duty workbenches.
Another advantage? Compatibility. The 4040C EU Standard Aluminum Profile features T-slots—longitudinal grooves running along its length—that are specifically designed to work with bolt-based aluminum profile accessories. These slots allow bolts to slide into place, making it easy to position connections exactly where you need them, even after the profile is cut to size.
Common Bolt Types for Aluminum Profiles
Not all bolts are created equal, and choosing the right type can make a big difference in performance. Here are the most common bolts you'll use with 4040C profiles:
T-Slot Bolts
T-slot bolts are purpose-built for aluminum profiles. As the name suggests, their heads are shaped like a "T," allowing them to slide into the T-slot of the profile and lock into place when tightened. They're available in various lengths and thread sizes, but for 4040C profiles (which typically have a slot width of 8mm), M5, M6, or M8 bolts are standard. T-slot bolts are perfect for connecting cross-members, brackets, or accessories like shelves or panels—just slide the bolt into the slot, position your component, and tighten the nut.
Socket Head Cap Screws
Socket head cap screws (SHCS) are another staple in aluminum profile projects. These bolts have a cylindrical head with a recessed socket (usually hex or Torx) and are designed to sit flush or slightly below the surface of the profile when installed. This makes them a great choice for applications where you want a low-profile, clean look, or where protruding bolt heads might get in the way (like on conveyor rails or workbench edges). SHCS are often used with drop-in nuts or slot nuts, which fit into the T-slot and provide a threaded surface for the bolt to grip.
Hex Bolts
Hex bolts (or hex head bolts) are the classic, all-purpose fasteners you'll find in most toolboxes. They have a six-sided head that's tightened with a wrench, making them easy to install with basic tools. While they're not as low-profile as SHCS, hex bolts are incredibly strong and affordable, making them a good choice for non-visible connections or heavy-load applications. When using hex bolts with aluminum profiles, you'll often pair them with T-slot nuts or angle brackets to secure them in place.
Installing Bolts: Tips for a Secure Connection
Installing bolts with 4040C aluminum profiles might seem straightforward, but there are a few tricks to ensure a tight, long-lasting joint:
- Choose the right size: Match the bolt diameter to the T-slot width (e.g., M6 bolts for 8mm slots) and length to the thickness of the components you're connecting. A bolt that's too short won't grip properly; one that's too long will stick out and look messy.
- Use washers: Always add a washer between the bolt head/nut and the aluminum profile. Washers distribute pressure, preventing the bolt from digging into the soft aluminum and reducing the risk of damage or loosening over time.
- Torque properly: Over-tightening can strip the threads or warp the profile; under-tightening leads to loose joints. Check the bolt manufacturer's torque specifications, and use a torque wrench if possible. For most aluminum profile applications, hand-tightening with a wrench (until snug, but not forced) is sufficient.
- Consider material compatibility: Aluminum and steel bolts can react chemically (a process called galvanic corrosion) if they're in contact with moisture. To prevent this, use stainless steel bolts or coat steel bolts with anti-corrosion lubricant. Alternatively, opt for aluminum bolts for a fully compatible (though slightly weaker) connection.

2. Rivets: Permanent Strength in a Small Package
While bolts are all about flexibility, rivets are the go-to for permanent connections. Once installed, rivets create a strong, fixed joint that's resistant to vibration and loosening—making them ideal for applications where you never want the connection to come apart. Let's explore how rivets work, when to use them, and how they stack up against bolts for 4040C aluminum profile projects.
What Are Rivets, and When Should You Use Them?
Rivets are cylindrical fasteners with a head on one end and a "tail" on the other. To install a rivet, you drill a hole through the materials you want to join, insert the rivet, and then deform the tail (using a rivet gun or hammer) to create a second head. This traps the materials between the two heads, creating a permanent bond. Unlike bolts, rivets can't be removed without drilling them out, so they're best for projects that don't require disassembly.
So, when is a rivet the right choice? Think about applications with constant vibration, like conveyor systems or machinery frames, where bolts might loosen over time. Rivets also shine in lightweight projects where adding nuts and washers would add unnecessary bulk, or in situations where you only have access to one side of the joint (more on that later). They're also cost-effective for high-volume production, as they can be installed quickly with simple tools.
Common Rivet Types for Aluminum Profiles
Like bolts, there are several types of rivets, each suited to different tasks. Here are the most common ones you'll use with aluminum extrusion profiles:
Blind Rivets (Pop Rivets)
Blind rivets (often called "pop rivets") are the most user-friendly option for DIYers and small-scale projects. They consist of a hollow rivet body and a mandrel (a thin metal rod) that runs through the center. To install, you drill a hole, insert the rivet, and use a rivet gun to pull the mandrel. This deforms the rivet body, expanding it to create a second head on the "blind" side (the side you can't reach). Once set, the mandrel snaps off, leaving a secure joint.
Blind rivets are perfect for aluminum profiles because they're easy to install with minimal tools, and they work well in tight spaces or when only one side of the joint is accessible. However, they're not as strong as solid rivets, so they're best for light to medium loads—think attaching panels to a frame or securing lightweight accessories.
Solid Rivets
Solid rivets are the old-school, heavy-duty option. They're a single piece of metal (usually aluminum, steel, or copper) with a pre-formed head on one end. To install, you drill a hole, insert the rivet, and then hammer or press the tail to form a second head. This requires access to both sides of the joint and more skill than blind rivets, but the result is an incredibly strong, vibration-resistant connection.
Solid rivets are ideal for structural applications with heavy loads, like connecting the legs of a workbench or the rails of a material rack. They're also more durable than blind rivets, making them a good choice for outdoor or high-wear environments.
Structural Rivets
Structural rivets (sometimes called "bulb-tite" or "multi-grip" rivets) bridge the gap between blind and solid rivets. They're designed to handle higher loads than standard blind rivets, thanks to a stronger mandrel and a wider grip range (meaning they can join materials of varying thicknesses). They're installed like blind rivets but provide a more robust connection, making them a popular choice for industrial aluminum profile projects where permanence and strength are key.
Installing Rivets: A Step-by-Step Guide
Installing rivets might seem intimidating, but with the right tools, it's a straightforward process. Here's a quick overview for blind rivets (the most common type for DIY and small projects):
- Drill the hole: Use a drill bit slightly larger than the rivet body (check the rivet packaging for size recommendations) to drill a clean hole through both aluminum profiles (or the profile and the component you're attaching).
- insert the rivet: Push the rivet through the hole until the head is flush against the surface.
- Load the rivet gun: Place the mandrel (the thin rod) into the jaws of the rivet gun and squeeze the handles. This pulls the mandrel, deforming the rivet body until it expands and clamps the materials together. Keep squeezing until the mandrel snaps off.
- Check the joint: The rivet should be tight, with no gaps between the materials. If it's loose, the hole might have been too large, or the rivet was the wrong size.
For solid rivets, the process is similar, but you'll need a rivet set (a tool that fits over the tail) and a hammer or rivet gun to form the second head. It takes a bit more practice to get the head evenly formed, but the result is worth it for high-strength applications.
3. Hidden Connections: Sleek, Clean, and Functional
Sometimes, you don't want your fasteners to steal the show. Whether you're building a modern workbench, a retail display, or a medical cart, visible bolts or rivets can clutter the design and take away from the profile's clean, industrial look. That's where hidden connections come in. These clever fastening methods tuck the hardware out of sight, creating a seamless, professional finish—without sacrificing strength.
What Are Hidden Connections?
Hidden connections (also called "concealed" or "invisible" connections) are designed to secure aluminum profiles without exposing the fasteners. They use the profile's T-slots, internal channels, or specialized aluminum profile accessories to hide bolts, nuts, or brackets from view. The result is a sleek, unbroken surface that looks polished and intentional.
But hidden connections aren't just about aesthetics. They also improve safety by eliminating protruding hardware that could catch on clothing or tools, and they make cleaning easier (no crevices for dust or debris to build up). For these reasons, they're especially popular in industries where appearance and hygiene matter—like food processing, pharmaceuticals, or retail.
Popular Hidden Connection Types for 4040C Profiles
Hidden connections come in many forms, each with its own strengths and best-use scenarios. Here are a few of the most common ones you'll encounter:
Slot Nuts and drop-In Nuts
Slot nuts (also called "T-nuts") and drop-in nuts are simple but effective hidden fasteners. They're designed to slide into the T-slot of the aluminum profile, where they lock into place when a bolt is tightened. The bolt itself can then be inserted through a hole in the connecting component (like a panel or another profile), and threaded into the slot nut—hiding the nut entirely inside the T-slot.
Slot nuts are great for connecting perpendicular profiles or attaching accessories like shelves or brackets. They're easy to install (just slide them into the slot) and reusable, making them a flexible choice for projects that might need adjustments.
90° Aluminum Profile Connectors
For joining two 4040C profiles at a right angle (like the corners of a frame), 90° aluminum profile connectors are a game-changer. These specialized brackets fit inside the T-slots of the profiles, creating a clean, flush corner with no visible hardware. They're typically secured with bolts or set screws that tighten against the slot walls, holding the profiles firmly in place.
90° connectors are perfect for frames, workbenches, or any structure where clean lines are important. They come in various styles, including L-shaped brackets, corner cubes, and even adjustable versions that allow for slight angle modifications.
Cam Locks and Toggle Bolts
Cam locks and toggle bolts are another hidden fastening option, though they're less common with aluminum profiles. Cam locks use a rotating cam mechanism inside the profile to grip a bolt or pin, while toggle bolts expand inside the T-slot when tightened. Both create a strong, hidden connection, but they're often more expensive and require specialized tools than slot nuts or connectors.
When to Choose Hidden Connections
Hidden connections are ideal when:
- Aesthetics matter: If your project will be visible (like a retail display or office furniture), hidden connections keep the focus on the design, not the hardware.
- Safety is a concern: In busy workshops or public spaces, protruding bolts or rivets can be a hazard. Hidden connections eliminate snags and injuries.
- Cleaning is important: Smooth, unbroken surfaces are easier to wipe down, making hidden connections a must in food, medical, or lab environments.
That said, hidden connections do have drawbacks. They're often more expensive than bolts or rivets, and some types (like specialized corner brackets) are less flexible for last-minute adjustments. They also require more precise drilling and alignment, so they're better suited for projects where you've planned the design carefully upfront.
Comparing the Three Methods: Which Is Right for You?
By now, you might be wondering: "Bolts, rivets, hidden connections—how do I choose?" The answer depends on your project's specific needs. To help you decide, let's compare the three methods across key factors like strength, installation difficulty, aesthetics, and more.
| Factor | Bolts | Rivets | Hidden Connections |
|---|---|---|---|
| Strength | High (especially with proper torque and washers) | High (solid rivets) to medium (blind rivets) | Medium to high (depends on type; 90° connectors are strong) |
| Installation Difficulty | Easy to moderate (basic tools needed) | Moderate (blind rivets) to hard (solid rivets, requires skill) | Moderate to hard (precision drilling/alignment needed) |
| Aesthetics | Exposed hardware (can look industrial or cluttered) | Small, visible heads (less cluttered than bolts but still visible) | Minimal or no visible hardware (clean, sleek look) |
| Reusability | High (easily removed and re-tightened) | Low (permanent; must be drilled out to remove) | Medium (some types are reusable, others require replacement) |
| Cost | Low to medium (affordable hardware, basic tools) | Low (inexpensive rivets, simple tools for blind rivets) | Medium to high (specialized accessories and tools) |
| Best For | Removable joints, heavy loads, adjustable projects | Permanent joints, light to heavy loads, tight spaces | Visible projects, safety-focused environments, clean aesthetics |
Real-World Applications: Putting It All Together
To see how these fastening methods work in practice, let's walk through a hypothetical project: building a modular workbench using 4040C EU Standard Aluminum Profiles. A workbench needs to be sturdy (to hold tools and materials), functional (with shelves and maybe a vice), and easy to assemble. Here's how we might use bolts, rivets, and hidden connections:
Frame Construction: Bolts for Strength and Adjustability
The workbench frame—four vertical legs connected by horizontal rails—needs to be strong enough to support heavy tools and materials. For this, we'd use bolts. T-slot bolts and hex bolts, paired with angle brackets, would connect the rails to the legs. Bolts are ideal here because they're strong, easy to tighten, and if we ever need to adjust the height or width of the bench, we can simply loosen them and reposition the rails.
Shelf Installation: Rivets for Permanent, Lightweight Support
The lower shelf of the workbench will hold heavier items, but we don't need to adjust its height often. Blind rivets would work well here: they're quick to install, create a permanent joint, and don't add extra bulk. We'd drill holes through the shelf brackets and the frame rails, insert blind rivets, and pop them into place—secure and done.
Top Surface: Hidden Connections for a Clean Look
The workbench top is the most visible part, so we want it to look sleek. We'd use 90° aluminum profile connectors to attach the top panel to the frame. These connectors fit inside the T-slots of the frame rails, and we'd secure them with bolts that tighten against the slot walls. The result? A flush, seamless top with no visible hardware—perfect for a professional, clutter-free workspace.
This example shows how combining fastening methods can give you the best of all worlds: strength from bolts, permanence from rivets, and aesthetics from hidden connections. The key is to assess each part of your project and choose the method that aligns with its specific needs.
Choosing the Right Fastening Method: A Checklist
Still unsure which method to pick? Ask yourself these questions to narrow it down:
- Is the joint permanent? If yes, rivets or hidden connections (permanent types) are good. If no, bolts or reusable hidden connections are better.
- What's the load capacity? Heavy loads need bolts or solid rivets. Light to medium loads can use blind rivets or hidden connections.
- Will the project be visible? If appearance matters, hidden connections are the way to go. If not, bolts or rivets are more cost-effective.
- Do you need access to both sides? Blind rivets or hidden connections work if only one side is accessible. Bolts and solid rivets need both sides.
- What tools do you have? Bolts and blind rivets require minimal tools. Solid rivets and hidden connections may need specialized tools (e.g., rivet guns, precision drills).
- What's your budget? Bolts and rivets are cheaper upfront. Hidden connections cost more for accessories but add value in aesthetics.
Conclusion: Fastening for Success
At the end of the day, the 4040C EU Standard Aluminum Profile is a blank canvas—but it's the fastening methods that turn that canvas into something functional, durable, and beautiful. Bolts offer flexibility and strength, rivets provide permanence and simplicity, and hidden connections deliver sleek aesthetics and safety. By understanding how each method works and when to use it, you can build projects that not only meet your needs but exceed your expectations.
Whether you're constructing a workbench, a material rack, or a custom conveyor system, remember: the best fastening method is the one that balances your project's requirements for strength, cost, appearance, and ease of installation. And with the right aluminum profile accessories—like T-slot nuts, 90° connectors, or blind rivets—you'll have everything you need to bring your vision to life.
So, grab your tools, pick your method, and start building. The world of aluminum profiles is waiting—and with secure, smart fastening, the possibilities are endless.