- Company Articles
- Industry articles
- Industry standards
- 4040C EU Standard Aluminum Profile Joints: Types & Assembly Techniques

4040C EU Standard Aluminum Profile Joints: Types & Assembly Techniques
Related Product
4040C EU Standard Aluminum Profile
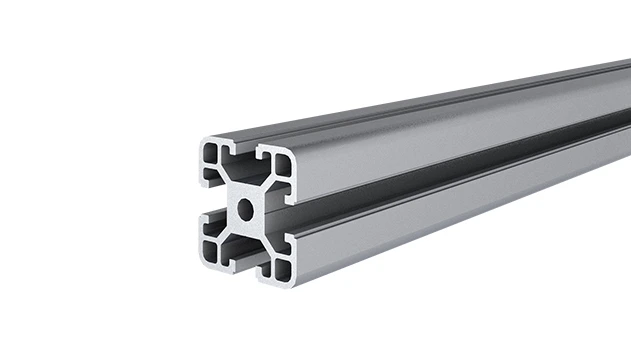
4040C is a 4.00x4.00 CM fractional 40 series square extrusion T-slot profile with four open T-slots, each side with 4.00cm face. The profile has align-a-grooves to assist in aligning connecting profiles.
Walk into any modern workshop, manufacturing plant, or even a DIY enthusiast's garage, and you'll likely spot structures built with aluminum profiles. There's a good reason for that—these sleek, modular frames have revolutionized how we build everything from workbenches and material racks to production lines and machine guards. Lightweight yet surprisingly strong, easy to assemble, and endlessly customizable, aluminum profiles have become the backbone of flexible, efficient workspaces. And at the heart of this versatility lies one critical component: the joints that hold everything together.
Today, we're diving deep into the world of 4040C EU Standard Aluminum Profile Joints—those unsung heroes that turn simple aluminum extrusions into sturdy, functional structures. Whether you're setting up a small workshop, scaling a production line, or just curious about how these systems work, understanding the types of joints available and how to assemble them properly can save you time, frustration, and even money down the line. Let's start by getting to know the star of the show: the 4040C aluminum profile itself.
Why 4040C? The Backbone of Modular Design
First off, what makes the 4040C profile so popular? For starters, it's part of the EU standard aluminum extrusion system, which means it's designed to be compatible with a wide range of accessories and components from different manufacturers. The "4040" refers to its dimensions: 40mm in width and 40mm in height—a sweet spot that balances strength and versatility. It's not too bulky for small projects, yet robust enough to handle heavy loads, making it a go-to choice for everything from workbenches to conveyor supports.
The "C" in 4040C typically denotes a specific groove design or profile shape, often with T-slots running along its length. These slots are where the magic happens—they let you slide in bolts, brackets, and (you guessed it) joints to connect profiles at any angle. Without reliable joints, though, even the sturdiest profile is just a piece of metal. Joints are the glue (metaphorically speaking) that turns individual profiles into stable, load-bearing structures. So, let's break down the most common types of joints you'll encounter when working with 4040C profiles.
Types of 4040C Aluminum Profile Joints: Finding the Right Fit
Not all joints are created equal. Depending on your project—whether you're building a right-angle frame, a T-shaped shelf, or a complex multi-angle structure—you'll need different joints to get the job done. Below, we'll explore the most widely used joint types, their unique purposes, and when to reach for each one.
1. 90° Aluminum Profile Connector: The Workhorse of Right Angles
If there's one joint you'll use more than any other, it's the 90° aluminum profile connector. As the name suggests, this joint is designed to connect two profiles at a perfect right angle—think the corners of a workbench or the vertical and horizontal beams of a rack. What makes it so versatile is its simplicity: most 90° connectors are compact, lightweight, and easy to install, making them ideal for both light and medium-duty applications.
These connectors typically slide into the T-slots of the 4040C profile and are secured with set screws or bolts. Some designs feature a "flanged" edge that sits flush against the profile, adding stability, while others are more streamlined for tight spaces. For heavier loads—like a material rack holding bulky components—look for reinforced 90° connectors made from thicker aluminum alloy or even steel. They might cost a bit more, but the extra durability is worth it when safety and stability are on the line.
2. Gusset Alp 4040: Adding Strength to Corners
Ever built a frame and noticed it wobbles a bit at the corners? That's where gussets come in. The Gusset Alp 4040 is a small, triangular (or sometimes square) bracket that reinforces 90° joints, distributing weight more evenly and preventing flexing. Think of it as a "corner brace" for your aluminum structure—simple, but incredibly effective.
Gussets are especially handy when your structure will bear heavy loads or experience frequent movement, like a workbench where you'll be hammering or assembling parts. They're usually installed alongside a 90° connector, screwing into both the vertical and horizontal profiles to create a rigid triangle (engineers love triangles for their stability!). The best part? They're low-profile, so they won't add bulk to your design, and they're affordable enough to use generously on critical joints.
3. 45° and 135° Connectors: Beyond Right Angles
Not every project is made of perfect squares and rectangles. Sometimes you need to build ramps, angled supports, or structures with sloped sides—and that's where 45° and 135° aluminum profile connectors shine. These specialized joints let you connect profiles at acute (45°) or obtuse (135°) angles, opening up a world of design possibilities.
For example, a 45° connector might be used to build a sloped material chute that guides parts from a higher shelf to a workstation below, while a 135° connector could help create a "notch" in a frame to avoid obstacles. Like their 90° counterparts, these connectors are often made from aluminum alloy and secure into T-slots with set screws. Just keep in mind: angled joints can put more stress on the profiles, so it's a good idea to pair them with gussets if you're dealing with heavy loads.
4. T-Joints and Cross Connectors: Building Branches and Intersections
What if you need to attach a profile perpendicular to the middle of another one—like adding a shelf to a vertical frame or a crossbeam to reinforce a long span? That's where T-joints and cross connectors come into play. T-joints (as the name suggests) form a "T" shape, connecting one profile to the side of another, while cross connectors (or "plus" connectors) let you connect four profiles at a single point, like the center of a grid.
These joints are a bit more complex than corner connectors, often featuring multiple attachment points to ensure stability. Some T-joints slide into the T-slot of the main profile and have a perpendicular socket for the secondary profile, while others use bolts to clamp around both profiles. If you're building a multi-tiered rack or a partition wall, you'll find yourself reaching for these connectors constantly.
5. End Caps and Edge Protectors: The Finishing Touches
Okay, technically, end caps aren't "joints," but no discussion of aluminum profile accessories would be complete without mentioning them. The 4040 aluminum profile end cap is a small, often rubber or plastic cap that snaps or screws onto the ends of aluminum profiles. Why bother? For starters, they cover the sharp, raw edges of the extrusion, preventing cuts and scrapes (trust us, those edges can be surprisingly sharp!). They also reduce noise—no more clanging when you move the structure—and keep dust, debris, and moisture out of the T-slots, which can corrode internal threads over time.
End caps come in a range of colors (often black, gray, or the same silver as the profile), so you can even use them to add a subtle pop of color to your design. They're cheap, easy to install, and make your finished structure look polished and professional—definitely worth the small investment.
| Joint Name | Primary Function | Ideal Application | Common Material |
|---|---|---|---|
| 90° Aluminum Profile Connector | Connects profiles at right angles | Workbench corners, vertical/horizontal frame joints | Aluminum alloy (light/medium duty); steel (heavy duty) |
| Gusset Alp 4040 | Reinforces 90° joints, reduces flexing | Heavy-load structures (material racks, workbenches) | Aluminum alloy or steel |
| 45°/135° Connector | Connects profiles at acute/obtuse angles | Sloped chutes, angled supports, notched frames | Aluminum alloy |
| T-Joint | Attaches a profile to the side of another (T-shape) | Shelves, crossbeams, mid-span attachments | Aluminum alloy |
| 4040 Aluminum Profile End Cap | Covers sharp edges, reduces noise, blocks debris | All exposed profile ends | Rubber, plastic, or aluminum |

Assembly Techniques: From Loose Parts to Sturdy Structure
Now that you know the types of joints available, let's talk about how to put them together. Assembling aluminum profiles with joints is generally straightforward, but there are a few tricks and best practices that can make the process smoother and ensure your structure is as stable as possible. Let's walk through the steps, from prep work to final tightening.
Pre-Assembly Prep: The Key to Success
Before you even pick up a hex key, take a few minutes to prep. First, lay out all your parts: profiles, joints, screws, end caps, and any accessories like gussets. Check that you have the right number of each component—there's nothing more frustrating than getting halfway through assembly only to realize you're missing a critical joint. Next, give the profiles a quick wipe-down with a clean cloth to remove any dust, oil, or debris from the T-slots. This ensures that screws and connectors seat properly and won't loosen over time.
If your project has specific dimensions (like a workbench that needs to be 120cm long), measure and mark the profiles where joints will go. A simple pencil mark or masking tape can help you align everything accurately. Finally, gather your tools: you'll need a set of hex keys (most joints use M5 or M6 screws, so have both metric sizes handy), a rubber mallet (for gently tapping joints into place without damaging the profile), and a level (to check for squareness once the structure is assembled).
Step-by-Step Assembly: Building Your First Frame
Let's use a simple example: building a small workbench frame with 4040C profiles. We'll need four vertical legs, four horizontal beams (two for the top, two for the bottom), 90° connectors, and gusset alp 4040 brackets for reinforcement. Here's how to do it:
- Start with the base: Take two bottom horizontal beams and two vertical legs. Attach a 90° connector to each end of the horizontal beams—slide the connector into the T-slot, then hand-tighten the set screw to hold it in place. Then, align the vertical leg with the connector and tighten the screw fully with a hex key. Repeat for the other end to form a rectangular "base frame."
- Add reinforcement: Attach gusset alp 4040 brackets to each corner of the base frame. Position the gusset so it sits flush against both the horizontal and vertical profiles, then secure it with screws through the pre-drilled holes. This adds rigidity and prevents the frame from wobbling.
- Build the top frame: Repeat step 1 with the two top horizontal beams and the remaining two vertical legs to create a second rectangular frame (the top of the workbench).
- Connect top and bottom: Stand the base frame upright, then carefully lower the top frame onto the vertical legs. Use 90° connectors to attach the top beams to the legs, making sure the structure is square (use a level to check both diagonally and horizontally).
- Final tightening: Go back through all the screws and connectors, giving each a final tighten with the hex key. Be careful not to overtighten—aluminum threads can strip if you apply too much force!
- Add end caps: Snap or screw 4040 aluminum profile end caps onto all exposed profile ends to protect edges and clean up the look.
Troubleshooting Common Issues
Even with careful prep, you might run into a few hiccups. Here are some common problems and how to fix them:
- Loose joints: If a joint feels wobbly after assembly, check that the set screw is fully tightened. If it still moves, try adding a drop of thread-locking fluid (like Loctite) to the screw before tightening—it prevents loosening from vibration.
- Misaligned profiles: If two profiles don't line up, double-check that the connectors are seated fully in the T-slots. Sometimes gently tapping the joint with a rubber mallet can help seat it properly.
- Stripped threads: Oops—overtightened a screw? If the threads in the T-slot are stripped, you can often drill a small pilot hole nearby and use a longer screw to secure the joint. For severe cases, replace the profile section (it's better than risking a weak joint).
Beyond Joints: Enhancing Your Structure with Accessories
Joints are the backbone of your aluminum structure, but the right accessories can take it from "functional" to "fantastic." We've already mentioned end caps, but there are a few other aluminum profile accessories worth considering:
Rubber strips: These slide into T-slots to create a non-slip surface on shelves or workbenches, preventing tools or parts from sliding around. They also help dampen noise when placing items on the profile.
Panel holders: These brackets let you attach plywood, acrylic, or metal panels to your frame, turning it into a cabinet, a machine guard, or a privacy screen. They're ideal for enclosing workspaces or creating storage.
Casters: Want your structure to be mobile? Add casters (wheels) to the bottom of vertical legs using special caster mounts. Look for locking casters to keep the structure stationary when needed.
Remember, the goal is to build a structure that works for your needs. Don't be afraid to mix and match joints and accessories to create something truly custom.
Wrapping Up: The Power of a Well-Built Joint
At the end of the day, aluminum profiles are only as good as the joints that hold them together. The 4040C EU Standard system's beauty lies in its flexibility—with the right joints and a little know-how, you can build almost anything. Whether you're a seasoned pro or a first-time builder, taking the time to understand your joint options and assembly techniques will pay off in a structure that's sturdy, reliable, and easy to modify down the line.
So, the next time you walk past that workbench or material rack, take a closer look at the corners and connections. Chances are, you'll see the 90° connectors, gussets, and end caps we've talked about—quietly doing their job to keep things running smoothly. And who knows? Maybe you'll be inspired to build something of your own. After all, with aluminum profiles and the right joints, the possibilities are endless.