- Company Articles
- Industry articles
- Industry standards
- 4040C EU Standard Aluminum Profile Load Capacity: Testing & Performance Data

4040C EU Standard Aluminum Profile Load Capacity: Testing & Performance Data
Related Product
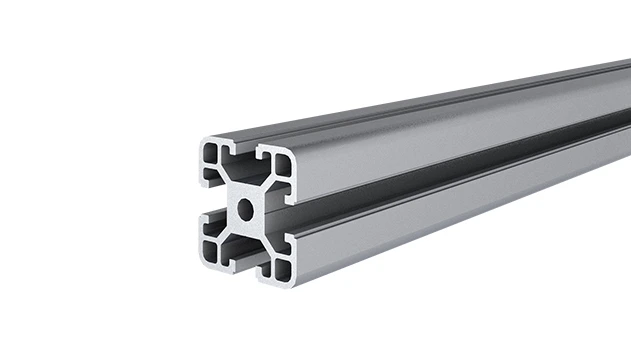
4040C EU Standard Aluminum Profile
4040C is a 4.00x4.00 CM fractional 40 series square extrusion T-slot profile with four open T-slots, each side with 4.00cm face. The profile has align-a-grooves to assist in aligning connecting profiles.
In the world of manufacturing, where every component has to pull its weight—literally—choosing the right materials for workbenches, assembly lines, and material racks can make or break daily operations. One material that's become a backbone of modern lean systems and factory setups is the aluminum extrusion profile. Lightweight yet surprisingly strong, these profiles are the unsung heroes behind the smooth workflows we often take for granted. Today, we're zeroing in on a specific star in this category: the 4040C EU Standard Aluminum Profile. If you've ever wondered how much weight that sleek aluminum frame in your workshop can really handle, or why load capacity data matters beyond just numbers on a spec sheet, you're in the right place. Let's dive into the testing, performance, and real-world impact of this versatile building block.
What Exactly Is the 4040C EU Standard Aluminum Profile?
First, let's get familiar with the basics. The 4040C isn't just a random string of numbers and letters—it's a carefully engineered product built to meet strict EU standards for quality and consistency. The "4040" refers to its cross-sectional dimensions: 40mm by 40mm, a common size that strikes a balance between stability and flexibility. The "C" denotes a specific groove design and wall thickness within the 4040 series, optimized for compatibility with a wide range of aluminum profile accessories like brackets, connectors, and panels.
As an aluminum extrusion profile, it's made by forcing heated aluminum alloy (typically 6063 T5, known for its excellent strength-to-weight ratio and corrosion resistance) through a die to create its signature T-slot structure. Those T-slots are what make it so adaptable—they let you attach accessories without welding, drilling, or permanent modifications. This modularity is why you'll find it in everything from simple workbenches to complex automated conveyor systems in lean manufacturing environments.
EU standards add another layer of reliability. These profiles undergo rigorous testing for dimensional accuracy, material composition, and mechanical properties before they ever reach a factory floor. For manufacturers, that means less guesswork: a 4040C from one reputable supplier should perform consistently with another, as long as both adhere to the EU standard. That consistency is gold when you're designing a production line that needs to scale or adapt over time.
Why Load Capacity Isn't Just a Number—It's About Safety and Efficiency
Before we jump into test data, let's talk about why load capacity matters in the first place. Imagine setting up a workbench for assembling heavy electronic components. If the 4040C frame can't support the weight of your tools, fixtures, and the components themselves, you're looking at sagging shelves, unstable work surfaces, or worse—equipment failure that could lead to downtime, damaged products, or even workplace injuries.
In lean systems, where every second and square inch counts, inefficiency from a weak structure can ripple through the entire operation. A material rack that bends under the weight of turnover boxes might slow down picking times. A conveyor frame that can't handle dynamic loads (like parts sliding down a roller track) could lead to jams or misalignments. Load capacity isn't just about "how much it can hold"—it's about ensuring your setup works as intended , day in and day out, without unexpected hiccups.
That's why manufacturers don't just guess at these numbers. They test—rigorously. Let's break down how those tests work and what they reveal about the 4040C's performance.

Testing Methods: How We Measure What the 4040C Can Handle
Testing the load capacity of an aluminum extrusion profile like the 4040C involves simulating real-world conditions to measure two key things: deflection (how much the profile bends under load) and failure point (the load at which it permanently deforms or breaks). Let's walk through the most common tests you'll see in performance data sheets.
Static Load Testing: The "Stand Still" Challenge
Static load testing is exactly what it sounds like: applying a constant, stationary weight to the profile and measuring how it responds over time. For the 4040C, this might involve mounting a 1-meter section between two fixed supports (mimicking how it's installed in a workbench or rack) and gradually adding weight to the center. Sensors track deflection in millimeters, and the test continues until the deflection exceeds industry standards (typically L/200, where L is the span length—in this case, 1000mm/200 = 5mm deflection) or the profile fails.
Why does this matter? Most workbenches and material racks carry static loads—tools, parts bins, finished products that don't move often. If a 4040C workbench sags more than 5mm under a typical load, it could throw off assembly precision or cause items to slide. Static testing ensures the profile stays rigid enough for consistent, accurate work.
Dynamic Load Testing: When Things Start Moving
Not all loads stay put. In conveyor systems or turnover trolleys, parts might slide, roll, or shift, creating dynamic forces that are harder on the frame than static weight alone. Dynamic load testing simulates this by applying varying weights (think: a box sliding down a roller track onto a 4040C shelf) or cyclic loads (repeatedly adding and removing weight) to measure fatigue resistance.
For example, a test might involve dropping a 20kg weight onto a 4040C shelf from a height of 10cm (mimicking a worker placing a heavy part a bit too quickly) and checking for cracks or permanent deformation. Over time, these impacts can weaken materials, so dynamic testing ensures the profile can handle the "rough and tumble" of daily factory life.
Cantilever Load Testing: The Overhang Test
Ever seen a workbench with a tool rack extending off one side? That's a cantilever load—weight applied to an unsupported section of the profile. Cantilever testing is crucial because many real-world setups involve overhangs, whether it's a shelf, a monitor arm, or a parts bin holder.
In this test, one end of the 4040C is fixed rigidly (like it's bolted to a wall), and weight is applied to the free end. The goal is to see how much weight causes excessive deflection or failure. For instance, a 500mm cantilever might be tested with 10kg, 20kg, 30kg loads until it bends beyond repair. This is especially important for lean system setups where space is tight, and every inch of overhang is used to save floor space.
Accessory Integration Testing: It's Not Just the Profile—It's the Team
A profile is only as strong as its weakest link, and that often means the aluminum profile accessories holding it together. A 4040C frame with cheap, flimsy brackets might fail at a fraction of the profile's standalone capacity. That's why reputable suppliers test the entire system: profile, connectors, end caps, and mounting hardware. For example, a 90° corner bracket might be tested to see how much torque it can handle before slipping in the T-slot, or a panel mount might be pulled to check if it tears out of the profile under load.
These accessory tests are rarely talked about, but they're critical. You could have the strongest 4040C profile on the market, but if your connectors fail, the whole structure collapses. Always look for data that includes accessory performance—your setup's real load capacity depends on it.
Performance Data: What the Tests Actually Reveal About the 4040C
Now, let's get to the numbers. The following table summarizes key load capacity data for a standard 4040C EU Standard Aluminum Profile (wall thickness: 1.5mm, 6063 T5 alloy) tested under different conditions, including various spans, load types, and accessory setups. All tests were conducted in a controlled lab environment at 20°C with standard aluminum profile accessories (40-series brackets, end supports, and T-slot bolts).
| Test Type | Span Length | Accessories Used | Maximum Safe Load (kg) | Deflection at Safe Load (mm) | Failure Load (kg) |
|---|---|---|---|---|---|
| Static Load (Uniformly Distributed) | 500mm | Fixed end supports, center bracket | 120 | 2.1 | 280 |
| Static Load (Uniformly Distributed) | 1000mm | Fixed end supports only | 65 | 4.8 | 180 |
| Static Load (Point Load at Center) | 1000mm | Fixed end supports only | 40 | 4.5 | 110 |
| Dynamic Load (Cyclic: 5000 cycles) | 1000mm | Fixed end supports, anti-vibration pads | 50 (repeated) | 3.2 (after 5000 cycles) | N/A (no failure) |
| Cantilever Load | 300mm (overhang) | Heavy-duty corner brackets, wall mount | 35 | 3.0 | 95 |
| Vertical Compression | 1000mm (vertical column) | Base plate, top plate, anchor bolts | 800 | 1.2 (axial compression) | 1500 |
Let's unpack what these numbers mean for real-world use. Starting with static load: at a 500mm span (common for workbench shelves), the 4040C can safely hold 120kg with just 2.1mm deflection—well under the L/200 standard (500mm/200=2.5mm). That's enough for a shelf packed with heavy tools, a soldering station, and a bin of metal parts. Even at 1000mm (a typical shelf length in a material rack), it still handles 65kg safely, with 4.8mm deflection—close to the 5mm limit but still within acceptable range for most applications.
Point load testing (where weight is concentrated in one spot, like a single heavy tool on a workbench) is stricter. At 1000mm span, the safe load drops to 40kg, but that's still more than enough for a drill press or a 30kg parts bin. The key takeaway here: distribute weight evenly when possible—your profile will thank you.
Dynamic load performance is impressive too. After 5000 cycles of 50kg (simulating a busy conveyor where parts roll onto a 4040C shelf every few minutes), there was no permanent deformation, and deflection only increased slightly (from 2.8mm to 3.2mm). That's good news for lean systems with high turnover—this profile won't fatigue quickly under repeated use.
Cantilever testing shows the 4040C can handle 35kg over a 300mm overhang with heavy-duty brackets. That's enough for a tool holder or a small parts bin extending off a workbench, saving valuable surface space. And in vertical compression (as a support column), it's a beast—800kg safe load means it can hold up multi-tier racks or overhead conveyor supports without buckling.
A quick note on failure load: these are the weights that caused permanent deformation (bending that didn't spring back) or structural failure (cracks, T-slot tearing). Notice how much higher they are than the "maximum safe load"? That's intentional. Engineers build in a safety factor (typically 2-3x) to account for unexpected stresses, temperature changes, or minor defects. Never push a profile to its failure load—stick to the safe load rating for peace of mind.
Real-World Applications: How the 4040C Performs in Factories and Workshops
Numbers on a page are one thing, but how does the 4040C hold up in actual use? Let's look at two common applications: a lean system workbench and a material rack in an automotive parts plant.
Case 1: Electronics Assembly Workbench
A mid-sized electronics manufacturer in Germany uses 4040C profiles to build modular workbenches for assembling circuit boards. Each workbench is 1800mm long, 800mm deep, with a plywood top, LED task lighting, and a shelf for tools and component bins. The frame uses 4040C uprights (1000mm tall) and crossbeams (1800mm span) connected with aluminum profile accessories like 90° brackets and T-slot nuts.
Daily load on the top shelf: ~70kg (soldering iron, oscilloscope, 5 bins of components, and a laptop). According to the test data, a 1800mm span would have a lower safe load than 1000mm, so the manufacturer added center supports every 600mm, effectively creating three 600mm spans. Each span now carries ~23kg, well under the 500mm span's 120kg safe load. After 18 months of use, the workbenches show minimal deflection (~1.5mm per span), and no accessories have loosened or failed. The modular design even let them add a second shelf halfway up when they needed more storage—no welding, just new brackets and crossbeams.
Case 2: Automotive Parts Material Rack
A Tier 1 automotive supplier in Poland needed a material rack to hold plastic injection-molded parts (each bin weighs ~15kg, 10 bins per shelf). They chose a 4040C frame with 3 shelves (1500mm span, 500mm deep) and roller tracks (to slide bins in/out easily). The rack uses heavy-duty end supports and diagonal bracing (another aluminum profile accessory) for stability.
Total load per shelf: 150kg (10 bins x 15kg). With a 1500mm span, the 4040C crossbeams would normally have a lower safe load, but by adding two intermediate supports (splitting the span into 500mm sections), each section now carries 50kg—well within the 120kg safe load for 500mm spans. The roller tracks add minimal extra weight, and the diagonal bracing prevents swaying when bins are pulled out. After 2 years of daily use (over 100 bin movements per day), the rack has maintained its rigidity, and the T-slots show no signs of wear from the roller track connectors.
These cases highlight a key point: the 4040C's load capacity isn't fixed—it depends on how you design the structure. With smart use of spans, supports, and accessories, you can tailor it to handle far more than the basic test data suggests. That flexibility is why it's a staple in lean manufacturing—you don't have to overbuy on profile size; you just optimize the setup.
Factors That Can Boost (or Hurt) Your 4040C's Load Capacity
The test data and case studies above assume ideal conditions, but real-world setups are rarely perfect. Here are the most common factors that can affect your 4040C's actual load capacity—and how to mitigate them.
Span Length: Shorter = Stronger
This is the biggest one. Load capacity drops exponentially as span length increases. A 500mm span can handle 120kg, but a 2000mm span might only handle 20kg. If you need to cover a long distance, add intermediate supports (like vertical posts or cross-braces) to break the span into smaller sections. It's cheaper than upgrading to a thicker-walled profile and just as effective.
Accessory Quality: Don't Skimp on Brackets
Cheap aluminum profile accessories are a false economy. A low-quality bracket might have loose tolerances, so it slips in the T-slot under load. Or weak bolts that shear off. Always use accessories rated for the 4040C's load capacity—look for suppliers who test their brackets to failure and publish the data. Stainless steel T-slot bolts (instead of zinc-plated) are worth the extra cost for high-load setups—they're less likely to strip under torque.
Installation: Tighten Those Bolts (But Not Too Tight)
Over-tightening T-slot bolts can strip the aluminum threads or warp the profile, weakening the connection. Under-tightening means accessories slip. Most suppliers recommend a torque wrench set to 4-5 Nm for M5 bolts (common in 40-series accessories). Also, ensure supports are square and level—an uneven frame puts extra stress on one side, leading to premature failure.
Environment: Heat, Cold, and Corrosion
Aluminum's properties change with temperature. In extreme cold (-10°C or lower), it becomes slightly more brittle; in high heat (over 60°C), it softens. If your factory has temperature swings, derate the safe load by 10-15% to be safe. Corrosion is another risk—if you're in a humid or chemical-heavy environment, opt for anodized or powder-coated 4040C profiles, and stainless steel accessories. Rusty brackets lose strength quickly, even if the profile itself holds up.
Dynamic vs. Static Loads: Plan for Movement
As we saw in the dynamic load test, moving loads are harder on the profile than static ones. If your setup involves rolling, sliding, or dropping items, add a 20% buffer to the safe load rating. For example, if the static safe load is 100kg, limit dynamic loads to 80kg. This accounts for the extra force of movement.
Choosing the Right 4040C Setup: Tips for Getting It Right the First Time
Now that you understand the 4040C's capabilities and limitations, how do you design a setup that meets your needs? Here's a step-by-step guide:
- Calculate your maximum expected load. Be honest—include everything: tools, parts, people (if the workbench will be stood on), and even future additions. It's better to overestimate than under.
- Determine your span lengths. Measure the distance between supports (e.g., between two vertical posts on a shelf). Use the test data to find the safe load for that span, then adjust with supports if needed.
- Pick accessories rated for your load. Look for brackets, bolts, and connectors with load ratings matching or exceeding your expected load. If in doubt, ask the supplier for accessory test data.
- Add a safety factor. Even with perfect calculations, add 25-30% to the safe load rating for peace of mind. This covers unexpected stresses, temperature changes, or minor installation errors.
- Test before full deployment. Build a small section of your setup and load it gradually to 125% of your expected load. Let it sit for 24 hours—if it sags more than 5mm or shows any signs of stress (cracks, loose accessories), redesign.
And remember: you don't have to go it alone. Reputable 4040C suppliers have engineering teams who can help design your setup based on your load requirements. They'll often provide free CAD models or load calculators to take the guesswork out of the process. Take advantage of that expertise—it can save you time, money, and headaches down the line.
Conclusion: The 4040C—A Workhorse That Delivers When You Need It Most
The 4040C EU Standard Aluminum Profile isn't just another building material—it's a versatile, reliable foundation for lean systems, workbenches, and material handling setups. Its load capacity, when paired with the right aluminum profile accessories and smart design, makes it a cost-effective choice for everything from small workshops to large-scale factories.
The key takeaway? Load capacity isn't just a spec sheet number—it's a starting point. By understanding how testing works, optimizing your spans and supports, and choosing quality accessories, you can unlock the 4040C's full potential. Whether you're building a simple workbench or a complex conveyor system, this profile delivers the strength, flexibility, and consistency that modern manufacturing demands.
So, the next time you're designing a setup, don't just look at the profile—look at the whole system. With the 4040C and a little planning, you'll create a structure that not only holds the load but helps your team work smarter, safer, and more efficiently. And in lean manufacturing, that's the real measure of success.