- Company Articles
- Industry articles
- Industry standards
- 4040C EU Standard Aluminum Profile vs. 4040B: Which Profile Suits High-Load Applications?

4040C EU Standard Aluminum Profile vs. 4040B: Which Profile Suits High-Load Applications?
Related Product
4040C EU Standard Aluminum Profile
4040C is a 4.00x4.00 CM fractional 40 series square extrusion T-slot profile with four open T-slots, each side with 4.00cm face. The profile has align-a-grooves to assist in aligning connecting profiles.
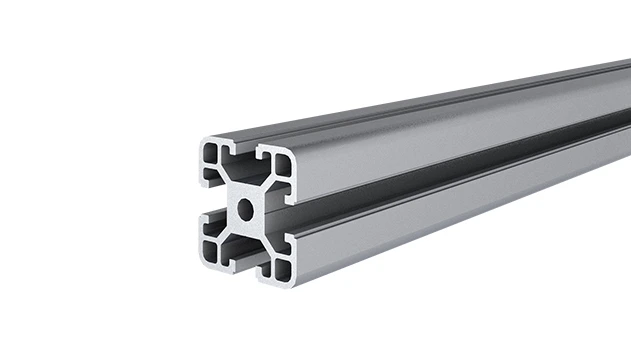
If you've ever walked through a manufacturing plant, warehouse, or even a modern workshop, you've probably seen them—sturdy, silver structures holding up workbenches, supporting material racks, or forming the backbone of conveyor systems. These unsung heroes are aluminum extrusion profiles, and when it comes to building heavy-duty setups that can handle serious weight, two names often rise to the top: the 4040C and 4040B EU Standard Aluminum Profiles. But here's the thing: while they might sound similar, choosing between them can make or break your project's success, especially if you're dealing with high-load applications like industrial workbenches or multi-tier material racks. Let's dive into what makes these profiles tick, how they stack up, and which one deserves a spot in your next big build.
The Backbone of Modern Lean Systems: Why 4040 Profiles Matter
Before we get into the nitty-gritty of 4040C vs. 4040B, let's take a step back. Aluminum extrusion profiles are the building blocks of lean systems, workbenches, material racks, and countless other industrial setups. Their popularity boils down to three big reasons: strength, versatility, and cost-effectiveness. Unlike rigid steel structures, aluminum profiles are lightweight yet durable, easy to assemble with aluminum profile accessories (think brackets, connectors, and end caps), and customizable to fit almost any need.
Now, the "4040" in their names isn't random—it refers to their cross-sectional dimensions: 40mm by 40mm. That square shape is intentional, providing balanced support from all sides, which is crucial for stability in high-load scenarios. Both 4040C and 4040B adhere to EU standards, meaning they're manufactured to strict quality and dimensional tolerances, ensuring consistency whether you buy one piece or a hundred. But here's where it gets interesting: even within the same 40mm x 40mm category, small differences in design can lead to big gaps in performance, especially when you're asking the profile to hold hundreds of kilograms day in and day out.
Imagine you're setting up a material rack B (3 row and 3 floor) to store heavy automotive components. If you skimp on the profile, you might end up with sagging shelves, wobbly structures, or worse—safety hazards. On the flip side, overspending on a profile that's stronger than you need can eat into your budget unnecessarily. That's why understanding the nuances between 4040C and 4040B is so important.
Meet the Contenders: What Makes 4040B Tick?
Let's start with the 4040B EU Standard Aluminum Profile. If profiles were cars, the 4040B would be the reliable sedan—versatile, efficient, and great for everyday use. It's a staple in many workshops and factories, often chosen for its balance of strength and affordability. But what exactly sets it apart?
First, the basics: the 4040B typically features a wall thickness ranging from 1.5mm to 2.0mm, depending on the manufacturer. Its cross-section is designed with standard T-slots—those groove-like channels running along the length—that allow for easy attachment of aluminum profile accessories. Most 4040B profiles have four T-slots (one on each side), making them compatible with a wide range of connectors, brackets, and even custom components.
Material-wise, 4040B is usually made from 6063-T5 aluminum alloy. This alloy is known for its excellent extrudability (meaning it can be shaped into complex profiles easily) and good corrosion resistance—key traits for industrial environments where moisture or chemicals might be present. The T5 tempering process (artificial aging) gives it a decent strength-to-weight ratio, making it suitable for loads that aren't overly heavy.
So, what kind of load can the 4040B handle? In static applications (where the weight isn't moving), a single 1-meter length of 4040B with a 2.0mm wall thickness can typically support around 150-200kg when properly mounted. For dynamic loads (like parts sliding on a material rack or tools being placed/removed from a workbench), that number drops to roughly 100-150kg, as movement adds stress to the profile. This makes it ideal for light to medium-duty tasks: think assembly workbenches for small parts, shelving for boxes of components, or even lightweight conveyor systems for products like electronics or cosmetics.
Another plus? The 4040B is widely available and often more budget-friendly than its heavier-duty counterparts. Since it uses less aluminum (thanks to thinner walls), it's cheaper to produce, which translates to lower costs for you. And because it's a common profile, finding aluminum profile accessories for it is a breeze—whether you need end caps to cover sharp edges, gusset plates to reinforce corners, or caster wheels to make a mobile workbench.
But here's the catch: the 4040B isn't built for extreme loads. If you try to use it for a material rack holding heavy cast iron parts or a workbench where operators regularly place 200kg+ machinery, you'll likely run into issues. Over time, the profile might bend, the T-slots could deform, or the whole structure might become unstable—all of which risk downtime, damaged products, or even workplace injuries.

The Heavyweight: Unpacking the 4040C EU Standard Aluminum Profile
Now, let's turn to the 4040C. If the 4040B is a sedan, the 4040C is the pickup truck—built tough, ready for heavy lifting, and designed to handle the rough stuff. It's the go-to choice for engineers and manufacturers who need a profile that can stand up to high loads without breaking a sweat.
At first glance, the 4040C might look similar to the 4040B—same 40mm x 40mm cross-section, same T-slot design. But look closer, and you'll notice the differences. The most obvious? Wall thickness. The 4040C typically has walls ranging from 2.5mm to 3.0mm—significantly thicker than the 4040B. That extra aluminum adds weight, but it also adds serious strength.
Material matters here too. While some 4040C profiles use 6063-T5, many step up to 6061-T6 aluminum alloy. 6061-T6 is known for its higher tensile strength and fatigue resistance compared to 6063-T5. The T6 tempering process (solution heat-treated and artificially aged) gives it a yield strength of around 240 MPa, versus 6063-T5's 110 MPa. In plain English: 6061-T6 can take more stress before bending or deforming.
So, how much weight can the 4040C handle? Strap in—this is where it shines. A 1-meter length of 4040C with a 3.0mm wall thickness and 6061-T6 alloy can support a static load of 300-400kg, and dynamic loads of 200-250kg. That's double what the 4040B can manage in some cases! This makes it perfect for high-load applications: heavy-duty workbenches in automotive repair shops, multi-tier material racks holding metal components, or even as the frame for industrial machinery that vibrates or moves under load.
But the 4040C's strength isn't just about thicker walls and better alloy. Many manufacturers also add internal ribs—extra pieces of aluminum running along the inside of the profile—to boost rigidity. These ribs act like the beams in a house, distributing weight more evenly and preventing twisting or warping under heavy loads. It's a small design tweak that makes a big difference in performance.
Of course, all that strength comes with trade-offs. The 4040C is heavier than the 4040B (a 1-meter length can weigh 2.5-3.0kg, versus 1.8-2.2kg for the 4040B), which can make handling and assembly more labor-intensive. It's also pricier—sometimes 30-50% more expensive than the 4040B—since it uses more aluminum and higher-grade alloys. And while it's compatible with most standard aluminum profile accessories, some components (like brackets or screws) might need to be heavier-duty to match the profile's strength. For example, a gusset plate that works for the 4040B might not be thick enough to reinforce a 4040C joint under extreme load.
Head-to-Head: 4040C vs. 4040B in Key Categories
To really see how these two profiles stack up, let's put them side by side. The table below breaks down their key features, so you can compare apples to apples:
| Feature | 4040B EU Standard Aluminum Profile | 4040C EU Standard Aluminum Profile |
|---|---|---|
| Cross-Section Dimensions | 40mm x 40mm | 40mm x 40mm |
| Wall Thickness | 1.5mm – 2.0mm | 2.5mm – 3.0mm |
| Material Alloy | 6063-T5 (common) | 6061-T6 (common) |
| Weight per Meter | 1.8kg – 2.2kg | 2.5kg – 3.0kg |
| Static Load Capacity (1m length, properly mounted) | 150kg – 200kg | 300kg – 400kg |
| Dynamic Load Capacity (1m length, properly mounted) | 100kg – 150kg | 200kg – 250kg |
| T-Slot Configuration | 4 T-slots (1 per side), standard size | 4 T-slots (1 per side), standard size (some with reinforced edges) |
| Internal Ribs | Rarely included | Often included for added rigidity |
| Cost (per meter) | Lower (e.g., $15 – $25 USD) | Higher (e.g., $25 – $40 USD) |
| Best For | Light to medium loads: small-part assembly workbenches, lightweight shelving, cosmetic/electronics conveyors | Heavy loads: industrial workbenches, material racks for heavy parts, machinery frames, vibrating equipment |
As you can see, the differences are clear. The 4040C is built for strength, while the 4040B is built for balance. But numbers only tell part of the story—let's look at real-world scenarios where these differences matter.
Real-World Applications: When to Choose Which Profile
To make this concrete, let's walk through two common high-load scenarios and see which profile comes out on top.
Scenario 1: A Heavy-Duty Material Rack for Automotive Parts
Imagine you run a warehouse that stores automotive engine blocks—each block weighs around 80kg, and you need a material rack with 3 rows and 3 floors (sound familiar? That's material rack B from your keyword list!). Each floor will hold 5 engine blocks, so per floor, that's 5 x 80kg = 400kg. Multiply by 3 floors, and the total load on the rack's frame is 1200kg—plus the weight of the shelves themselves.
Can the 4040B handle this? Let's do the math. Even if the rack is 2 meters tall, with 4 vertical supports (one at each corner), each support would need to carry roughly 300kg (1200kg / 4). But remember, the 4040B's static load capacity is only 150-200kg per meter. At 2 meters, that capacity drops further (longer spans mean more bending stress). The 4040B would likely bend or fail here, risking collapsed shelves and damaged engine blocks.
The 4040C, on the other hand, has a static load capacity of 300-400kg per meter. With 4 vertical supports, each would carry 300kg—well within the 4040C's limits. Add internal ribs for rigidity, and the rack would stand strong, even with the engine blocks being loaded and unloaded daily (dynamic load). In this case, the 4040C is the clear choice.
Scenario 2: An Assembly Workbench for Small Electronics
Now, let's flip the script. Suppose you're setting up a workbench for assembling smartphones. The workbench will hold tools (scales, screwdrivers, testers), a few boxes of components, and maybe a laptop—total load per workbench: around 50kg. The workbench is 1.5 meters long, with legs every 0.75 meters for support.
Here, the 4040B would be more than sufficient. Even with a 1.5-meter span, the 4040B can easily support 50kg (remember, its static capacity is 150-200kg per meter). Using the 4040C here would be overkill—you'd pay extra for strength you don't need, and the heavier profile would make the workbench harder to move (if you wanted to add casters later). The 4040B is cheaper, lighter, and still perfectly safe for this task.
Another scenario to consider: lean system setups. Lean manufacturing relies on efficient, flexible workspaces, and the right profile can make or break that flexibility. If your lean system involves frequent reconfigurations (moving workbenches, adjusting material racks), the lighter 4040B might be easier to handle. But if the system needs to support heavy machinery or large batches of products, the 4040C's strength will keep things running smoothly.
Accessories and Compatibility: Don't Overlook the Small Stuff
Choosing the right profile is only half the battle—you also need to make sure it works with the aluminum profile accessories you'll use to build your structure. Both 4040B and 4040C use standard T-slots, so most accessories (like brackets, connectors, and end caps) are compatible with both. But there are a few things to watch for.
First, screws and fasteners. The 4040C's thicker walls mean you'll need longer screws to secure accessories. A 16mm screw that works for the 4040B might not reach the T-slot nut in a 4040C—opt for 20mm or 25mm screws instead. You'll also want to use higher-strength screws (like stainless steel or zinc-plated) to match the profile's load capacity; a weak screw could be the weak link in an otherwise strong structure.
Second, brackets and gussets. For high-load applications with the 4040C, consider using reinforced accessories. For example, a standard L-bracket might bend under the stress of a heavy material rack, but a gusset alp 4040 (a triangular plate that reinforces corners) would add the extra support needed. Many manufacturers sell accessories specifically designed for heavy-duty profiles like the 4040C, so look for those if you're building something that will carry significant weight.
Third, caster wheels. If you're making a mobile workbench or trolley, the 4040C's extra weight means you'll need sturdier casters. A small 50mm caster that works for a lightweight 4040B bench might not handle the 4040C's heft—go for larger wheels (75mm or more) with higher load ratings (at least 100kg per caster) to ensure smooth movement and prevent wheel failure.
The good news? Since both profiles are EU standard, you won't have trouble finding accessories. Just remember: match the accessory's strength to the profile's strength. Using 4040C with flimsy accessories is like putting cheap tires on a sports car—you're not getting the performance you paid for.
Cost vs. Value: Is the 4040C Worth the Extra Money?
Let's talk about the elephant in the room: cost. The 4040C is more expensive than the 4040B—sometimes significantly so. Is it worth the extra investment?
It depends on your needs. If you're building something for light loads, the 4040B is the smarter choice. You'll save money without sacrificing safety or performance. But for high-load applications, the 4040C is often worth every penny. Think about it: a failed structure could cost you thousands in damaged products, downtime, or even legal fees if someone gets hurt. The 4040C's extra strength is insurance against those risks.
Another way to look at it: cost per kilogram of load capacity. The 4040B might cost $20 per meter and handle 200kg, so $0.10 per kg. The 4040C might cost $35 per meter and handle 400kg, so $0.0875 per kg. In high-load scenarios, the 4040C actually gives you better value per kg of load. It's a classic case of "pay more now to save later."
Of course, if you're on a tight budget and your loads are right at the 4040B's limit, you might be tempted to cut corners. Resist that urge! Instead, consider reinforcing the 4040B with extra supports (like adding a middle leg to a workbench) or using thicker wall 4040B (2.0mm instead of 1.5mm) to boost capacity without jumping to the 4040C. It's a compromise that can save money while keeping things safe.
Final Verdict: Which Profile Should You Choose?
At the end of the day, the choice between 4040C and 4040B comes down to one question: how much weight will your structure need to support? Here's a quick cheat sheet to help you decide:
- Choose 4040B if… Your loads are light to medium (under 150kg per meter in dynamic applications, under 200kg in static). Think small-part assembly, lightweight shelving, or non-industrial workbenches. You want to save money and prioritize ease of handling.
- Choose 4040C if… Your loads are heavy (over 150kg per meter dynamic, over 200kg static). Think industrial workbenches, material racks for heavy parts (like material rack B with 3 rows and 3 floors), or machinery frames. You're willing to pay more for strength and durability.
And remember: when in doubt, consult a supplier or engineer. Most aluminum profile suppliers have load capacity charts or can help you calculate the right profile for your specific application. They can also recommend the best aluminum profile accessories to pair with your chosen profile, ensuring your structure is safe, strong, and built to last.
Aluminum extrusion profiles like the 4040C and 4040B might not be the most glamorous part of your operation, but they're the foundation on which your productivity rests. Choose wisely, and you'll build a setup that's efficient, reliable, and ready to handle whatever your workflow throws at it.