- Company Articles
- Industry articles
- Industry standards
- Wall Thickness Variations in 2040 EU Standard Aluminum Profile: Impact on Strength

Wall Thickness Variations in 2040 EU Standard Aluminum Profile: Impact on Strength
Related Product
2040 EU Standard Aluminum Profile
2040 is a 2.00 x 4.00CM fractional 20 series square extrusion T-slot profile with four open T-slots, two side with 2.00cm face, the other side with 4.00cm face. The profile has align-a-grooves to assist in aligning connecting profiles.
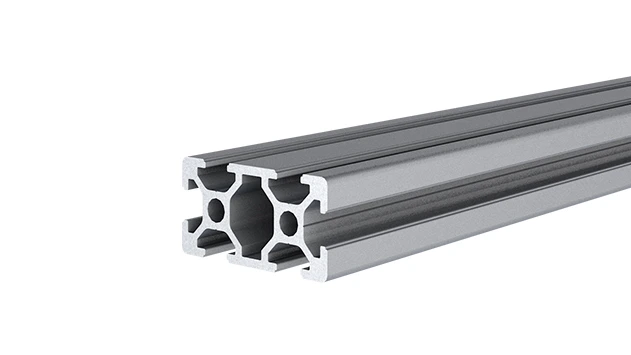
Walk into any modern manufacturing facility, warehouse, or even a tech startup's workshop, and you'll likely spot a common sight: sleek, modular structures built from aluminum profiles. These unassuming pieces of metal are the backbone of countless workspaces, from assembly lines to lab benches, and for good reason. Aluminum profiles are lightweight, corrosion-resistant, and infinitely customizable—thanks in large part to their modular design and the versatility of accessories that snap, bolt, or clamp onto them. Among the most widely used profiles in Europe and beyond is the 2040 EU standard aluminum profile. Its popularity stems from a sweet spot of size, strength, and adaptability, making it a go-to for everything from simple shelving to complex lean system setups. But here's a detail that often flies under the radar: wall thickness. That thin layer of aluminum that forms the "walls" of the profile's cross-section might seem trivial, but it's a make-or-break factor when it comes to strength, durability, and performance. In this article, we're diving deep into wall thickness variations in 2040 EU standard aluminum profiles, exploring why they matter, how they affect strength, and what it means for your next project—whether you're building a workbench, a material rack, or an entire lean manufacturing system.
Understanding the 2040 EU Standard Aluminum Profile: More Than Just a Shape
First, let's get familiar with the star of the show: the 2040 EU standard aluminum profile. If you're new to aluminum extrusion profiles, the "2040" label might sound like a random code, but it's actually quite straightforward. The numbers refer to the profile's cross-sectional dimensions: 20mm in width and 40mm in height. Picture a rectangle (though, in reality, most profiles have T-slots—those grooves running along the length—to attach accessories) that's 2cm wide and 4cm tall. Simple enough, right? But what makes it "EU standard"? That designation ensures consistency in dimensions, tolerances, and material quality across manufacturers, so you can mix and match profiles and accessories from different suppliers without worrying about compatibility issues. It's like the universal language of aluminum profiles, and it's why the 2040 is a staple in industries that value precision and interchangeability.
So, where do you find 2040 profiles in action? They're everywhere. Think of the workbench in your local repair shop, the shelving unit holding tools in a garage, or the flow racks zipping materials along an assembly line. They're also the building blocks of lean systems—those optimized workflows that minimize waste and maximize efficiency. Because 2040 profiles are neither too bulky nor too flimsy, they strike a balance that works for both light and moderate-duty tasks. But here's the catch: not all 2040 profiles are created equal. One of the key variables that sets them apart? Wall thickness.
Wall Thickness: The Unsung Hero of Profile Performance
Let's start with the basics: what exactly is wall thickness in an aluminum profile? Imagine slicing a 2040 profile crosswise (like cutting a carrot into rounds) and looking at the end. You'll see a frame-like structure: the outer edges (the "walls") and, often, internal ribs or webs that add rigidity. Wall thickness refers to the distance between the outer surface of the profile and the inner hollow space—or, in profiles with ribs, the thickness of those ribs themselves. It's measured in millimeters (mm), and common options for 2040 EU standard profiles range from 1.0mm on the thinner end to 3.0mm or more for heavy-duty applications.
At first glance, you might think, "Thicker is always better, right?" Not necessarily. Wall thickness isn't arbitrary; it's a design choice shaped by two main factors: the extrusion process and the profile's intended use. Aluminum profiles are made via extrusion, where heated aluminum billets are forced through a die (a metal mold) to create the desired cross-section. The die's design dictates the profile's shape, including wall thickness. Thinner walls require more precise dies and slower extrusion speeds to avoid warping, while thicker walls can handle faster production but use more material. On the flip side, end-users demand profiles tailored to their needs: a hobbyist building a small workbench might prioritize cost and weight over raw strength, while a manufacturer assembling a lean system for automotive parts needs something that can withstand constant heavy loads.
This balance—between manufacturing feasibility and real-world performance—is why wall thickness varies. A 1.2mm wall might be perfect for a lightweight turnover trolley, while a 2.5mm wall is non-negotiable for a material rack holding hundreds of pounds of inventory. The key is understanding how these variations impact the profile's strength—and, ultimately, whether it will hold up in your specific application.

The Science of Strength: How Wall Thickness Shapes Performance
Strength in materials science isn't a single metric; it's a combination of properties that determine how a material behaves under stress. For aluminum profiles, three key factors come into play: tensile strength, bending resistance, and load-bearing capacity. Let's break down how wall thickness influences each one.
Tensile Strength: Standing Up to Pulling Forces
Tensile strength is the maximum stress a material can withstand before breaking when pulled apart—think of a rope stretching until it snaps. In aluminum profiles, this matters for applications where the profile is under tension, like supporting a hanging load or being pulled by machinery. Thicker walls generally mean higher tensile strength because there's more material to resist the pulling force. For example, a 2040 profile with a 2.0mm wall might have a tensile strength of around 220-240 MPa (megapascals), while a 1.5mm wall could clock in at 200-220 MPa. That 20 MPa difference might not sound like much, but in high-stress environments—say, a lean system where parts are constantly being tugged along a conveyor—it can mean the difference between a profile that lasts years and one that warps or fails prematurely.
Bending Resistance: Stiffness When Pushed or Pulled Sideways
Bending resistance is what keeps a profile from flexing or bowing when force is applied perpendicular to its length. Imagine placing a heavy box on a shelf made from 2040 profiles: if the walls are too thin, the shelf might sag in the middle. Thicker walls increase a profile's moment of inertia—a physics term that describes its resistance to bending. The formula for moment of inertia (I) for a rectangular section is (width × thickness³)/12, which means thickness has a cubic impact. In plain English: doubling the wall thickness doesn't just double the bending resistance—it increases it by eight times. That's why a 3.0mm wall profile will feel drastically stiffer than a 1.5mm one, even if they're the same width and height.
Load-Bearing Capacity: How Much Weight Can It Hold?
Load-bearing capacity is the practical application of tensile strength and bending resistance: how much weight can the profile support without deforming or failing? This is critical for workbenches, material racks, and any structure where weight rests directly on the profile. Let's take a common example: Workbench E (single deck, without caster), a popular model often built with 2040 profiles. If the workbench uses 1.5mm wall profiles, it might safely support 150-200 kg of evenly distributed weight. Upgrade to 2.0mm walls, and that capacity jumps to 250-300 kg. Thicker walls distribute the load more evenly across the profile's cross-section, reducing stress on any single point.
2040 EU Standard Aluminum Profile: Wall Thickness vs. Strength Metrics
| Wall Thickness (mm) | Tensile Strength (MPa) | Max Bending Load (N)* | Recommended Load Capacity (kg)** | Typical Application |
|---|---|---|---|---|
| 1.0 | 180-200 | 800-1000 | 50-100 | Light-duty shelving, hobby workbenches |
| 1.5 | 200-220 | 1200-1500 | 100-200 | Small workbenches, turnover trolleys |
| 2.0 | 220-240 | 1800-2200 | 200-300 | Standard workbenches (Workbench E), material racks (3-row, 3-floor) |
| 2.5 | 230-250 | 2400-2800 | 300-400 | Heavy-duty workstations, lean system frames |
| 3.0 | 240-260 | 2800-3200 | 400+ | Industrial material handling, high-stress lean systems |
*Max bending load measured at mid-span of a 1m long profile, supported at both ends.
**Evenly distributed static load; dynamic loads (e.g., moving parts) may require higher thickness.
As the table shows, even small changes in wall thickness can lead to significant differences in performance. For instance, moving from 1.5mm to 2.0mm walls boosts the max bending load by 50%—a game-changer for applications where the profile is under constant stress.
Real-World Implications: When Wall Thickness Makes or Breaks Your Project
Numbers on a page are one thing, but how do these thickness variations play out in real life? Let's look at three common scenarios where wall thickness directly impacts performance: workbenches, lean systems, and material racks.
Workbench E: A Case Study in Everyday Use
Take Workbench E—a single-deck workbench without casters, a staple in workshops and labs. Imagine two versions of this workbench: one built with 1.5mm wall 2040 profiles, and another with 2.0mm walls. The 1.5mm version is lighter and cheaper, making it tempting for a small startup on a budget. But if the bench is used daily for assembling heavy equipment (say, 20kg toolboxes), over time, the thinner walls might start to flex. You might notice the tabletop sagging slightly in the middle, or the legs wobbling when you lean on it. On the flip side, the 2.0mm wall bench feels solid from day one. It handles the 20kg toolboxes without a hitch, and even a 50kg load (like a large printer) doesn't make it budge. The difference? That extra 0.5mm of aluminum adds the rigidity needed to turn a "good enough" bench into one that lasts for years.
Lean Systems: Keeping the Flow (Without Breaking Down)
Lean systems thrive on efficiency—materials moving smoothly from one workstation to the next, no bottlenecks, no wasted motion. Central to this are structures like conveyor tracks, flow racks, and pick stations, many of which rely on 2040 profiles. In a busy automotive parts plant, for example, a lean system might use 2040 profiles to support roller tracks carrying engine components. If those profiles have 1.2mm walls, the constant vibration and weight of the parts could cause the tracks to misalign over time, leading to jams and downtime. Upgrade to 2.5mm walls, and the structure stays rigid, keeping the workflow uninterrupted. It's not just about strength; it's about consistency. Thicker walls reduce the risk of deformation, ensuring the lean system operates as efficiently on day 1,000 as it did on day 1.
Material Rack B: Stacking Up the Weight
Material Rack B (3-row, 3-floor) is designed to hold boxes, bins, or parts in a compact footprint. Each floor might need to support 100kg of inventory—think 20 small boxes of electronic components per shelf. A rack built with 1.5mm walls might handle this initially, but over time, the cumulative weight (3 floors × 100kg = 300kg total) could stress the vertical supports. The result? Bowed uprights, sagging shelves, and a rack that feels unstable. Swap in 2.0mm walls, and the vertical profiles distribute the weight more effectively, keeping the rack square and secure. For warehouses storing heavy items like metal parts or machinery components, even 2.5mm walls might be necessary to ensure safety and longevity.
Aluminum Profile Accessories: Partners in Strength
Aluminum profiles don't work alone; they rely on a suite of aluminum profile accessories—connectors, brackets, end caps, and more—to form rigid structures. What many people overlook, though, is how wall thickness affects accessory compatibility and performance. A connector designed for a 1.5mm wall might not grip a 3.0mm wall properly, and vice versa. Let's break this down.
Take T-slot connectors, the most common accessories for joining profiles. These small, often L-shaped pieces slide into the profile's T-slots and are tightened with bolts to lock the profiles together. The connector's design includes a clamping mechanism that presses against the profile's inner wall. If the wall is too thin, over-tightening the bolt can crush or deform the wall, weakening the joint. If the wall is too thick, the connector might not reach far enough to clamp securely, leading to a loose joint. Reputable suppliers design accessories to match common wall thicknesses (1.5mm, 2.0mm, 3.0mm), so it's crucial to pair your profile's wall thickness with compatible accessories. For example, a "high-grip" connector for 2.0mm walls will have a deeper clamping tongue to ensure a tight fit, while a "light-duty" connector for 1.0mm walls will have a shallower tongue to avoid damaging the thinner aluminum.
Another example is end caps, which seal the ends of profiles to prevent dust buildup and add a finished look. Thicker walls require longer end caps to fit snugly inside the profile's hollow core. A 1.5mm wall profile has an inner dimension of 20mm (width) × 40mm (height) minus twice the wall thickness (so 20 - 2×1.5 = 17mm wide; 40 - 2×1.5 = 37mm tall). A 3.0mm wall profile, by contrast, has an inner dimension of 20 - 2×3.0 = 14mm wide × 40 - 2×3.0 = 34mm tall. Using an end cap designed for 1.5mm walls on a 3.0mm profile would result in a loose, rattling fit—hardly ideal for a clean, professional workspace.
The takeaway? Wall thickness isn't just about the profile itself; it's about the entire ecosystem of accessories that make your structure functional. Always check that your accessories are rated for your profile's wall thickness to avoid weak joints, damage, or safety hazards.
Choosing the Right Wall Thickness: A Practical Guide
With all this talk of tensile strength, bending loads, and accessories, you might be wondering: "How do I pick the right wall thickness for my project?" It boils down to three key questions:
1. What's the Maximum Load the Profile Will Bear?
Start by calculating the weight your structure will need to support—both static (stationary) and dynamic (moving). For a workbench, this includes the weight of tools, materials, and any equipment placed on it. For a material rack, it's the total weight of all items on all shelves. Be generous with your estimate; it's better to over-engineer than to risk failure. If you're unsure, refer back to the table earlier: a 2.0mm wall is a safe bet for most standard applications (200-300kg), while heavier loads call for 2.5mm or 3.0mm.
2. How Will the Profile Be Used? (Static vs. Dynamic Stress)
Profiles under constant motion (like those in conveyor systems or movable carts) face more stress than static structures (like a fixed workbench). Vibration, impacts, and repeated loading/unloading can fatigue even thick walls over time. If your project involves movement, opt for a wall thickness one step higher than you might for a static setup. For example, a static workbench might get by with 1.5mm walls, but a mobile workbench (with casters) would benefit from 2.0mm walls to handle the bumps and vibrations of being rolled around.
3. What's Your Budget? (Thicker = More Material = Higher Cost)
It's no secret: thicker walls mean more aluminum, which translates to higher material costs. A 3.0mm wall profile can cost 30-50% more than a 1.5mm wall profile of the same length. While it's tempting to cut costs with thinner walls, ask yourself: "What's the cost of failure?" A warped workbench or collapsed rack could lead to damaged equipment, injured workers, or downtime—expenses that far outweigh the savings from skimping on wall thickness. Balance is key: choose the thinnest wall that meets your load and stress requirements, but don't compromise on safety.
As a general rule of thumb, here are common wall thickness recommendations for popular applications:
- Light-duty (hobby, small workshops): 1.0mm-1.5mm
- Standard-duty (workbenches, small lean systems): 1.5mm-2.0mm
- Heavy-duty (industrial material handling, high-stress lean systems): 2.0mm-3.0mm
Conclusion: The Thickness That Fits Your Needs
Wall thickness might seem like a minor detail in the world of 2040 EU standard aluminum profiles, but it's a detail that ripples through every aspect of performance—from how much weight the profile can hold to how long it lasts in a busy workspace. Whether you're building a simple workbench, a complex lean system, or a material rack, taking the time to understand wall thickness variations and their impact on strength will save you headaches down the line. Remember: there's no "one-size-fits-all" thickness. A 1.5mm wall might be perfect for a hobbyist's bench but disastrous for an automotive assembly line. By matching wall thickness to your load requirements, stress factors, and budget, you'll create structures that are not just strong, but smart—built to work as hard as you do.
So the next time you're perusing aluminum extrusion profiles for your project, take a closer look at that wall thickness specification. It's more than just a number; it's the difference between a structure that falters and one that stands the test of time.