- Company Articles
- Products and Technology
- Installation And Maintenance
- Adjusting Aluminum Workbench B: Height, Shelving, and Accessory Customization Hacks

Adjusting Aluminum Workbench B: Height, Shelving, and Accessory Customization Hacks
Related Product
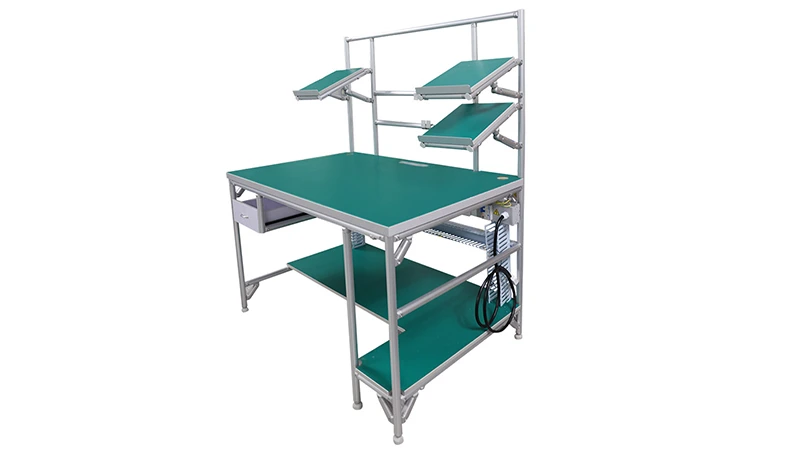
Aluminum Workbench B
Aluminum tube workbench is more flexible and durable, compared with traditional PE/ABS coated steel tube. It is easy to assemble, anti corrosion, rust protection, and recycle use after disassemble.
Why One-Size-Fits-All Workbenches Fall Short
Let's be real—how many times have you stood in front of a workbench and thought, "This just isn't right"? Maybe it's too low, forcing you to hunch over a project for hours. Or too high, making it impossible to steady your hands when assembling small parts. Perhaps the shelves are crammed with tools you rarely use, while the ones you need daily are out of reach. If you've ever felt this way, you're not alone. Traditional workbenches are like rigid puzzles—they force you to adapt to their design, instead of the other way around.
That's where the Aluminum Workbench B (single deck-without caster) comes in. Built with the flexibility of aluminum extrusion profile and a modular design, it's less of a "bench" and more of a blank canvas for your workflow. Whether you're running a small production line, setting up a garage workshop, or organizing a craft studio, this workbench doesn't just hold your tools—it adapts to how you work. Today, we're diving into three game-changing ways to customize it: dialing in the perfect height, building smart shelving, and adding accessories that turn chaos into efficiency. Let's get started.
Height Adjustment: Ergonomics That Grow With You
First things first: height. It's the most overlooked aspect of a workbench, but it's also the most critical. A bench that's too low leads to back strain; too high causes shoulder fatigue. The Aluminum Workbench B solves this with one simple but genius feature: adjustable leveling feet. These aren't just "levelers"—they're your ticket to a workspace that fits every task and every user.
How Adjustable Leveling Feet Work (And Why They're a Game Changer)
The Aluminum Workbench B sits on four adjustable leveling feet, each with a threaded stem and a rubber base. Here's the magic: twist the foot clockwise, and it extends, raising that corner of the bench. Twist counterclockwise, and it retracts, lowering it. No tools required—just a firm grip and a little elbow grease. This means if you're 5'2" and your coworker is 6'1", you can swap shifts without a single complaint about discomfort. Or, if you switch from sitting (assembling circuit boards) to standing (welding metal brackets), you can adjust on the fly.
Pro tip: Start by measuring your ideal height. For sitting tasks, the bench should hit just below your ribcage, letting your forearms rest flat. For standing tasks, aim for elbow height—this keeps your shoulders relaxed. Write these measurements down and tape them to the bench leg; it'll save you time when switching setups.
Stability Matters: Avoiding the "Wobbly Bench" Trap
You might be thinking, "If I adjust the feet, won't the bench wobble?" Not if you do it right. The key is to adjust all four feet evenly. Let's say you need to raise the bench by 2 inches. Twist each foot 10 full rotations (test how much one rotation lifts the foot first—mine lifts about 0.2 inches per twist). Then, place a level on the deck. If it tilts, tweak the lowest foot until the bubble centers. The rubber base on the leveling feet also helps—they grip concrete, wood, or tile floors, so even if you're leaning into a heavy project, the bench stays put.
Bonus hack: If you work in a space with uneven floors (looking at you, old garages!), the adjustable feet are a lifesaver. I once set up a workbench in a basement where the floor sloped ½ inch from one end to the other. Ten minutes with the leveling feet, and it was rock solid. No more spilled paint or rolling tools—total game changer.

Shelving Customization: Turn Vertical Space Into Productivity Gold
Once your workbench is at the perfect height, it's time to tackle the next challenge: storage. A cluttered bench top is a productivity killer—tools get lost, parts roll off, and suddenly you're spending 20 minutes hunting for a screwdriver instead of building. The solution? Stop treating your bench like a flat surface and start using the air above it. With aluminum profile accessories and modular shelving, you can turn empty vertical space into a organized storage system that puts everything you need within arm's reach.
Material Rack B: The "Set It and Forget It" Shelving Solution
If you're looking for a no-fuss way to add shelves, start with Material Rack B (3 row and 3 floor). Designed to bolt directly to the side or back of the Aluminum Workbench B, this rack is like a bookshelf for your tools and materials—but with way more flexibility. The "3 row and 3 floor" design means you get 9 separate compartments, each adjustable in height thanks to the aluminum guide rails that hold the shelves in place. Need to store tall boxes? Move a shelf up. Tiny components? drop a shelf down to create a shallow bin. It's like having a custom storage unit that grows with your inventory.
Installing it is surprisingly simple. The rack comes with brackets that slide into the T-slots of the workbench's aluminum extrusion profile—no drilling, no welding, just a hex key to tighten the bolts. I installed one in my own workshop last month, and now my drill bits, sandpaper, and spare parts are sorted by project. No more digging through a jumbled drawer—everything has a spot, and I can see it all at a glance.
Mix-and-Match Shelving: Beyond the Basics
Material Rack B is a great starting point, but why stop there? The beauty of aluminum profile is that it plays well with others. Here are a few combos I've seen work wonders:
- Aluminum Guide Rail A + Plastic Bins: Mount Aluminum Guide Rail A along the back of the bench, then clip on plastic bins. Perfect for small parts like screws, washers, or jewelry findings. The guide rail keeps bins from sliding, and you can rearrange them in seconds.
- Swivel Roller Balls 1 Inch + Shelf Surface: Add a layer of swivel roller balls to a shelf, and suddenly you've got a "lazy Susan" for tools. Spin it to grab a wrench, then spin it back—no more stretching across the bench.
- Aluminum Honeycomb Panel + Pegboard Hooks: replace a solid shelf with an aluminum honeycomb panel (lightweight but strong!) and hang pegboard hooks for hammers, tape measures, or scissors. It's like a hybrid of open and closed storage.
| Shelving Setup | Best For | Pro Tip |
|---|---|---|
| Material Rack B (3 row, 3 floor) | Heavy tools, large boxes, bulk materials | Label each compartment with a dry-erase marker on the aluminum profile—easy to update! |
| Aluminum Guide Rail A + Bins | Small parts, craft supplies, electronics components | Use color-coded bins (red for screws, blue for nails) to speed up sorting. |
| Honeycomb Panel + Pegboard Hooks | Frequently used hand tools, cords, or paintbrushes | Mount the panel at eye level so hooks are easy to reach without bending. |

Accessory Hacks: Turn Your Bench Into a Workflow Powerhouse
Height and shelving are the foundation, but accessories are where your Aluminum Workbench B truly becomes yours . These add-ons solve specific problems—like moving heavy materials, organizing cables, or keeping parts from rolling off the edge. Let's break down the most useful ones, and how to install them without breaking a sweat.
Roller Track: Let Gravity Do the Heavy Lifting
If you work with large parts, boxes, or assemblies, plastic roller track guide rail (yellow or grey) is about to become your new best friend. These rails mount to the edge of the workbench, creating a smooth, sloped surface that lets materials glide from one end to the other. No more straining to lift a 50-pound box—just give it a gentle push, and the rollers do the work.
Installing roller track is simple: the rails have pre-drilled holes that line up with the T-slots on the aluminum extrusion profile. Use roller track placon mount for aluminum profile flat brackets to secure them—they're designed to sit flush, so there's no gap between the bench and the rail. I use yellow roller track (it's bright, so I never miss it!) on the right side of my bench for incoming parts and grey on the left for finished assemblies. It's like having a mini conveyor belt built into the bench.
Pro hack: If you're working with delicate parts (like circuit boards or glass), swap the plastic rollers for stainless steel swivel roller balls 1 inch. They're smoother and gentler, so you won't scratch or damage materials.
Caster Wheels: Take Your Bench on the Go
Remember how we mentioned the Aluminum Workbench B comes "without caster"? That's not a limitation—it's an invitation to customize mobility. If you need to move the bench (say, to sweep underneath, or to reconfigure your workspace), adding caster wheel and accessories is a 10-minute upgrade.
Look for flat swivel castor wheel with brake—they lock in place when you need stability, and roll smoothly when you don't. To install, remove the adjustable leveling feet, bolt on the caster mounting plates (they fit the same threaded holes), and screw on the casters. Now your bench can glide across concrete, tile, or wood floors. I added casters to mine last winter, and now I can roll it outside to sand projects when the weather's nice—no more dragging sawdust indoors!
Word of caution: If you're using heavy tools or materials, go for heavy-duty casters (at least 150 lbs capacity each). You don't want the bench tipping when you're reaching for something on the top shelf.
Tool Organization: From Chaos to "Grab and Go"
Finally, let's talk about the little things—the tools, cords, and odds and ends that somehow multiply on your bench. Aluminum pipe clamp and aluminum profile accessories are perfect for taming this chaos. Here are a few of my favorite setups:
- Aluminum Pipe Clamp + Magnetic Strips: Mount aluminum pipe clamps horizontally under the bench top, then attach magnetic strips. Now your screwdrivers, pliers, and wrenches stick to the strips—no more digging through a toolbox.
- Aluminum Side Guard + Cable Management: The aluminum side guard (a thin, L-shaped profile) isn't just for safety—it's a great spot to run zip ties. Bundle cords together and secure them to the guard, so they don't dangle or get tangled.
- Plastic Roller Track Guide Rail + Tool Trays: Mount a short section of roller track on the bench edge, then set a tool tray on top. Slide the tray left or right as you work—your most-used tools are always within reach.
Troubleshooting: Fixing Common Customization Hiccups
Even the best-laid customization plans hit snags. Here are quick fixes for the issues I've seen pop up most often:
- Wobbly Shelves: If your Material Rack B sways, check the brackets—they might not be tight enough. Use a hex key to snug them into the T-slots. If it still wobbles, add a cross-brace between two shelves using aluminum profile—it'll stiffen the whole rack.
- Sticky Roller Track: Dust and debris love to gum up roller tracks. Wipe them down weekly with a dry cloth, and if they're really stuck, spray a tiny bit of silicone lubricant (avoid oil—it attracts more dust).
- Leveling Feet Slipping: If the feet start to twist on their own, wrap a thin layer of Teflon tape around the threaded stem before screwing them in. It adds friction, so they stay put.
Final Thoughts: Your Workbench, Your Way
At the end of the day, the Aluminum Workbench B isn't just a piece of equipment—it's a partner in your work. By adjusting the height to fit your body, building shelving that grows with your projects, and adding accessories that solve your unique pain points, you're not just organizing a workspace—you're creating a system that makes work feel easier, faster, and even enjoyable.
So grab your adjustable leveling feet, your Material Rack B, and a handful of aluminum profile accessories. Start small—adjust the height first, then add one shelf, then a roller track. Before you know it, you'll look at your workbench and think, "This is exactly right." And isn't that the point?
Now go make that bench work for you.