- Company Articles
- Products and Technology
- Installation And Maintenance
- Aluminum Guide Rail A in Flexible Conveyor Systems: Design & Installation Tips

Aluminum Guide Rail A in Flexible Conveyor Systems: Design & Installation Tips
Related Product
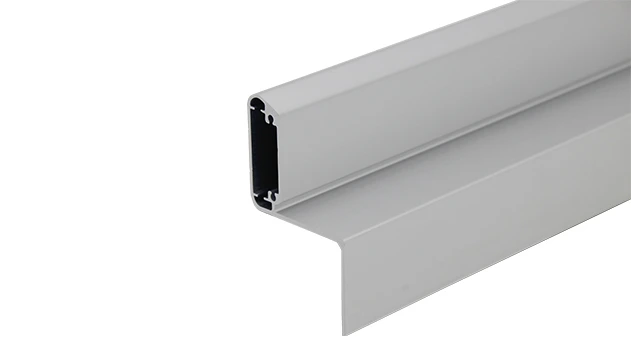
Aluminum Guide Rail A
The aluminum guide rails hold the transport goods securely on the roller track. For installation, the guide rails are simply pushed over the roller tracks.To protect sensitive products.
In today's fast-paced manufacturing world, where every second counts and adaptability is key, the backbone of efficient production often lies in the smallest components. Take conveyor systems, for example—they're the silent workhorses that keep materials moving, assembly lines flowing, and deadlines on track. But what makes a conveyor system truly "flexible"? More often than not, it's the unsung hero: guide rails. And when we talk about guide rails that balance durability, precision, and adaptability, Aluminum Guide Rail A stands out as a game-changer. Let's dive into how this unassuming component shapes the heart of modern flexible conveyor systems, with practical design insights and installation hacks that'll make your next project smoother than ever.
What Makes Aluminum Guide Rail A Special?
First things first: Why aluminum? If you've ever worked with heavy steel rails, you know the struggle—cumbersome installation, rust issues, and zero room for quick adjustments. Aluminum Guide Rail A flips that script. Made from high-grade aluminum extrusion profiles, it's lightweight enough for one person to handle during setup but tough enough to withstand the daily grind of manufacturing floors. Think of it as the "Swiss Army knife" of guide rails: corrosion-resistant for damp warehouse environments, sleek enough for cleanroom medical settings, and customizable to fit everything from small electronic parts to bulkier automotive components.
But what really sets Aluminum Guide Rail A apart is its design philosophy. Unlike rigid, one-size-fits-all rails, it's built with modularity in mind. Those T-slots running along its length? They're not just for show. They let you attach accessories—like roller track guides, stoppers, or even sensors—without drilling new holes. Need to reposition a guide rail to accommodate a new product size? No problem. Loosen a few bolts, slide it into place, and you're back in business. That's the "lean" promise in action: minimizing downtime, maximizing reuse, and growing with your needs.
Pro Insight: Keep an eye on the wall thickness of your Aluminum Guide Rail A. Most standard models come in 1.2mm to 2.0mm options. For light loads (like small 3C parts), 1.2mm works great. Heavy-duty applications (think automotive components) call for 2.0mm to prevent bending over time.
Designing with Aluminum Guide Rail A: 5 Key Considerations
1. Start with the End Goal: Understand Your Material Flow
Before you even pick up a rail, ask: What am I moving, and how fast? A guide rail for fragile medical devices will look very different from one handling metal parts in an automotive plant. For example, if you're designing a system for circuit boards (common in 3C assembly), you'll need smooth, burr-free edges to avoid scratching sensitive components. Aluminum Guide Rail A's anodized finish naturally resists nicks, but adding plastic roller track guide rails (yellow or grey, depending on your color-coding system) can add an extra layer of protection.
Speed matters too. High-speed conveyor lines (think 60+ meters per minute) need stiffer rails to prevent vibration. Pairing Aluminum Guide Rail A with 40 steel roller track (yellow wheel or black ESD wheel options) helps stabilize the flow, while slower lines might opt for lighter aluminum roller track to save on energy costs. It's all about matching the rail to the rhythm of your production.
2. Size It Right: Dimensions That Fit Your System
One of the biggest mistakes in guide rail design is mismatched sizes. Imagine this: You install a conveyor with Aluminum Guide Rail A that's 40mm wide, but your roller track is 38mm. The result? Materials get stuck, employees waste time unjamming the line, and frustration levels spike. Avoid this by mapping out your system's "critical dimensions" first:
| Component | Key Dimension | Why It Matters |
|---|---|---|
| Aluminum Guide Rail A | Width (30mm, 40mm, 45mm) | Must align with roller track or conveyor belt width to prevent side-to-side movement |
| Roller Track | Roller spacing (50mm, 75mm, 100mm) | Closer spacing = better support for small/irregular items |
| Conveyor Frame | Height from floor | Guide rail height should sit 1/3 the height of your tallest material to prevent tipping |
3. Think About the "Environment Factor"
Manufacturing environments are rarely one-size-fits-all, and your guide rail needs to keep up. If you're in the medical device industry, for instance, you'll need ESD (electrostatic discharge) protection to avoid frying sensitive equipment. Look for Aluminum Guide Rail A with a conductive anodized coating, paired with ESD workstation setups—this creates a grounded path that safely dissipates static charges. No more ruined pacemakers or circuit boards!
For food and beverage or pharmaceutical plants, hygiene is non-negotiable. Aluminum's natural resistance to bacteria growth is a plus, but opt for rails with rounded edges to eliminate hard-to-clean crevices. Pair them with plastic roller track guide rails in FDA-approved materials, and you'll pass those safety audits with flying colors.
4. Plan for Growth (Because Change Is Inevitable)
Here's a secret from lean manufacturing pros: The best systems are those that anticipate change. Today, you might be producing 100 units of Product X; six months from now, it could be Product Y, twice the size. Aluminum Guide Rail A's modular design shines here. When designing your layout, leave 10-15% extra space between rail supports—this gives you room to extend the conveyor later. Use adjustable aluminum pipe joint (internal rotary types work best) so you can angle rails without replacing the entire section. It's like building a house with walls—ready for expansion when you need it.
5. Don't Forget the "Human Factor"
At the end of the day, your conveyor system serves people—operators, technicians, and maintenance staff. A poorly designed guide rail can turn a smooth workflow into a daily headache. For example, if the rail sits too high, employees will strain their backs loading materials. Too low, and they'll hunch over, leading to fatigue. Aim for a height that lets operators work with their elbows at 90 degrees—usually around 800-900mm from the floor for most assembly lines. Also, consider visibility: matte finishes reduce glare under factory lights, so workers can spot jams or misaligned parts faster.

Installation Tips: From "Good" to "Great" Systems
You've designed the perfect layout—now it's time to install. Even the best rails will underperform if installed haphazardly. Follow these steps to ensure your Aluminum Guide Rail A delivers peak performance for years to come.
1. Prep Like a Pro (No Cutting Corners Here)
Start with a clean, level surface. Use a laser level to mark your guide rail path—even a 1mm slope over 3 meters can cause materials to drift or jam. Gather your tools: a torque wrench (to avoid over-tightening aluminum fasteners), a rubber mallet (for gentle adjustments), and a deburring tool (to smooth any cut edges—those sharp corners are a safety hazard!). Oh, and don't skip the PPE: gloves to protect against aluminum burrs and safety glasses when drilling.
Tool Hack: Invest in a magnetic level. It sticks to the conveyor frame, leaving both hands free to adjust the rail. Trust us, your wrists will thank you after a full day of installation.
2. Secure, but Don't Strangle: The Art of Fastening
Aluminum Guide Rail A attaches to frames using aluminum profile accessories—think brackets, T-nuts, and bolts. The key here is balance: too loose, and the rail shifts under load; too tight, and you risk warping the aluminum (yes, even strong aluminum bends if over-torqued). Most manufacturers recommend a torque setting of 4-6 Nm for M6 bolts. When in doubt, start low and test—if the rail doesn't budge during a gentle push test, you're good.
Spacing between fasteners matters too. For straight runs, aim for 500mm intervals. Around curves or where loads are heavier (like at the start of a conveyor), tighten that to 300mm. And always use lock washers or thread-locking fluid—vibration from constant material flow can loosen bolts over time, turning a minor issue into a major line stop.
3. Smooth Transitions: Rail-to-Roller Track Harmony
Your guide rail doesn't work alone—it's part of a team, and the most important teammate is the roller track. Ever seen a product get stuck where the rail meets the roller track? That's usually due to a height mismatch or a gap. Here's the fix: Use a straightedge to align the top of the guide rail with the roller tops. The difference should be no more than 0.5mm. If you're using plastic roller track guide rails (yellow or grey), glue them into place with industrial adhesive after alignment—this prevents shifting and ensures a seamless glide.
For conveyor systems that connect multiple workstations, pay extra attention to the "handover" points. If one conveyor ends and another begins, the gap between rails should be less than the smallest product you're moving. For tiny 3C parts (like smartphone screws), that means a gap of 2mm max. Larger items (like automotive door panels) can handle up to 5mm, but why risk it? Tighter is always better.
4. Test, Tweak, Repeat
Installation isn't done when the last bolt is tight—it's done when the system runs flawlessly. Start with an empty run: power up the conveyor and watch the rail. Are there any wobbles? Strange noises? Those are red flags. Next, add test loads—start light (50% of your target weight) and gradually increase. Watch how materials move: Do they stay centered? Speed up or slow down unexpectedly? Adjust the rail position or add side guides if needed. Finally, run it for an hour under full load—this reveals issues like overheating motors or loosening fasteners that short tests miss.
Real-World Win: How a 3C Factory Boosted Efficiency with Aluminum Guide Rail A
A mid-sized electronics manufacturer in Shenzhen was struggling with bottlenecks on their smartphone assembly line. Their old steel guide rails were rusting, and reconfiguring them for new phone models took 8 hours of downtime. They switched to Aluminum Guide Rail A with plastic roller track guide rails (grey, for ESD protection) and modular joints. The result? Installation time dropped to 2 hours, rust-related jams vanished, and they could now adjust rail positions in 15 minutes flat for new models. Their line efficiency jumped by 22%—all from upgrading a "small" component.

Aluminum Guide Rail A: More Than a Rail, It's a Lean Solution
At the end of the day, Aluminum Guide Rail A isn't just about moving materials—it's about building a smarter, more adaptable factory. Think about it: Every time you avoid replacing a rusted steel rail, you're cutting waste. Every minute saved on reconfiguration is time back for innovation. Every product that reaches the end of the line undamaged is a customer kept happy.
Whether you're setting up a new lean system from scratch or upgrading an old conveyor, remember: the best choices are the ones that grow with you. Aluminum Guide Rail A doesn't just fit your current needs—it anticipates your future ones. So next time you're planning a conveyor project, don't overlook the guide rail. It might be the smallest part of the system, but it's the one that keeps everything moving forward.
Ready to make your conveyor system work harder, smarter, and more flexibly? Start with the rail that's built for the way you manufacture today—and tomorrow. Your assembly line (and your bottom line) will thank you.