
Building with aluminum extrusion profiles is a favorite among DIY enthusiasts, small manufacturers, and workshop owners for good reason. These profiles are lightweight yet surprisingly strong, infinitely customizable, and compatible with a wide range of accessories—making them perfect for everything from workbenches and material racks to conveyor frames and equipment enclosures. But if you've ever spent hours wrestling with a wobbly frame or a connector that just won't stay tight, you know the difference between a successful build and a frustrating one often comes down to the tools in your hand. Today, we're zeroing in on the unsung heroes of aluminum profile assembly: the tools you need to install aluminum profile 3 way connectors properly. Whether you're a seasoned builder or just starting out, having the right tools will save you time, reduce frustration, and ensure your structures are sturdy, safe, and built to last.
Why Aluminum Profile 3 Way Connectors Deserve the Right Tools
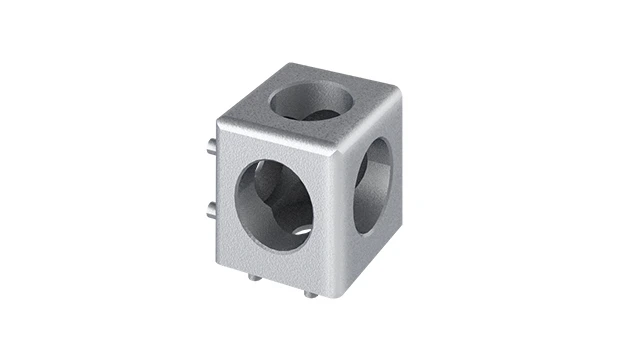
Before we dive into tools, let's talk about why 3 way connectors matter. These small but critical components are the "joints" of your aluminum profile structure, linking three profiles at once to form corners, T-junctions, or branching frames. Unlike fixed welds, they let you disassemble and reconfigure your project later—a huge plus for anyone who needs flexibility. But here's the catch: aluminum extrusion profiles have precise tolerances, and 3 way connectors rely on tight, secure fits to keep everything stable. A poorly installed connector can turn a solid frame into a (shaky) mess, risking damage to tools, materials, or even injury. The solution? Using tools designed to handle the unique properties of aluminum profiles—soft enough to avoid scratching, precise enough to ensure alignment, and durable enough to handle repeated use.
And let's not forget about aluminum profile accessories. Many builds require adding end caps, panels, or shelves to the frame, which often involve secondary fasteners or adjustments. The tools we'll cover here don't just install connectors—they'll help you tackle those finishing touches, too.
The Essential Toolkit: What You Need to Install 3 Way Connectors
You don't need a fully stocked industrial workshop, but skimping on tools will cost you in the long run. Below is a breakdown of the must-have tools, why they matter, and how to choose the best ones for your projects.
1. Hex Keys (Allen Wrenches): The Backbone of Connector Installation
If there's one tool you can't build with aluminum profiles without, it's a hex key. Also called Allen wrenches, these L-shaped tools are used to tighten the set screws that lock 3 way connectors onto the profile. Most aluminum profile 3 way connectors use metric set screws—common sizes include M3, M4, and M5—so a good metric hex key set is non-negotiable.
But not all hex keys are created equal. Here's what to look for:
- Material: Chrome vanadium steel (Cr-V) is your best bet. It's stronger than basic carbon steel, resists stripping, and stands up to repeated use. Avoid cheap, soft steel keys—they'll round off the screw heads after just a few turns.
- Design: L-shaped keys are compact and affordable, but for longer projects (like assembling a multi-shelf material rack), a T-handle hex key will save your hands. The T-shape gives you more leverage, reducing fatigue when tightening dozens of screws. Folding hex key sets are great for portability—perfect if you're building on-site or moving between workspaces.
- Sizing: Invest in a set with sizes from 1.5mm to 8mm. Even if your current project only uses M4 screws, you'll likely need smaller or larger sizes for aluminum profile accessories like end caps or panel mounts down the line.
Pro Tip: If a set screw is stuck or over-tightened, don't force it with a cheap hex key—you'll strip the screw. Instead, use a T-handle key for extra leverage, and apply a drop of penetrating oil (like WD-40) if it's rusted. Let it sit for 5 minutes, then try again gently.
2. Deburring Tool: Smooth Edges, Better Fits
Aluminum extrusion profiles are cut to length at the factory, but even the cleanest cut leaves tiny metal burrs—sharp, ragged edges along the cut end. These burrs might seem harmless, but they're a common culprit behind loose connectors and frustrating installations. A burr can scratch the inside of a 3 way connector, preventing it from sliding all the way onto the profile. Worse, it can catch on your gloves (or bare hands) while handling, leading to painful scrapes. That's where a deburring tool comes in.
Deburring tools are small, handheld devices with a sharp blade that shaves off burrs, leaving a smooth, clean edge. For aluminum profiles, look for a tool with a replaceable blade—you'll go through blades faster than you think, especially if you're cutting profiles yourself with a miter saw. There are two main types:
- Handheld deburring tools: These look like small pens with a retractable blade. They're great for quick touch-ups and work well on both the inside and outside edges of the profile.
- Countersink deburring tools: These have a conical head that deburrs and chamfers the edge at the same time, creating a slight bevel. This is especially useful if you're inserting the profile into a connector with a tight tolerance, as the chamfer helps guide the profile into place.
To use a deburring tool, simply run the blade along the cut edge of the profile, applying light pressure. You'll feel the burrs being scraped away. Do this for both the outer edges and the inner channel (if the profile has one) to ensure the 3 way connector slides on smoothly. It takes 10 seconds per profile, but it's one of the most overlooked steps that makes a huge difference in how tight and stable your connectors feel.
3. Carpenter's Square: No More Crooked Corners
Ever built a frame that looked straight until you stood back, only to realize one corner is slightly off? That's usually a problem with alignment, and it's easy to fix with a carpenter's square. Aluminum profile 3 way connectors are designed to create 90-degree angles (though some can be adjusted for other angles), but even a 1-degree misalignment can throw off the entire structure. Over time, that small lean can cause stress on the connectors, leading to loosening or even bending of the profiles.
A good carpenter's square should be made of aluminum or steel (to avoid warping) and at least 12 inches long—long enough to span the width of most standard profiles (like 2020 or 3030 aluminum extrusion profiles). Look for one with clear, etched markings and a "try square" design (one long arm and one short arm) for checking right angles. Here's how to use it during installation:
- Temporarily attach the 3 way connector to two profiles (don't fully tighten the set screws yet).
- Place the square's short arm against one profile and the long arm against the other, ensuring both arms lie flat against the profile surfaces.
- If the square rocks or there's a gap between the arms and the profiles, gently adjust the connector until the square sits flush.
- Once aligned, tighten the set screws halfway, recheck with the square, then fully tighten.
For larger projects (like a 4080 aluminum profile conveyor frame), consider a framing square (24 inches or longer) for even more accuracy. And if you're working alone, clamp the profiles to a workbench first—having a second set of hands to hold the square helps, but clamps work just as well.
4. Rubber Mallet: Gentle Taps for Perfect Seating
Sometimes, even with deburred edges and aligned profiles, a 3 way connector just won't slide all the way onto the profile. Maybe there's a tiny manufacturing variance, or the connector's inner diameter is slightly smaller than the profile's outer diameter (common with high-precision connectors). In these cases, brute force won't work—yanking or prying can scratch the aluminum or damage the connector. Instead, reach for a rubber mallet.
Rubber mallets are designed to deliver gentle, controlled force without marring surfaces. For aluminum profiles, a 16-ounce mallet (the most common size) is ideal—heavy enough to seat the connector, but light enough to avoid denting the profile. Here's how to use it:
- Position the connector: Slide it onto the profile as far as it will go by hand.
- Tap near the connector: Hold the mallet at a slight angle and tap the profile itself, about 1–2 inches from the connector. The vibrations will help the connector "settle" into place.
- Check alignment: After each tap, slide the connector again by hand. Repeat until it's fully seated.
Avoid tapping directly on the connector—this can crack the plastic or scratch the aluminum finish. And never use a metal hammer unless you wrap the head in a thick cloth first (even then, rubber is safer). For delicate projects, like installing aluminum profile end caps (which are often made of thin plastic), a smaller 8-ounce mallet works best—you don't want to crack the end cap while trying to seat it.
5. Level: Keep It Straight, Keep It Stable
You've aligned the corners with a square, seated the connectors with a mallet, and tightened the screws with a hex key. Now, step back and check: is the entire structure level? A frame that leans even slightly might seem stable at first, but add weight (like tools on a workbench or boxes on a material rack) and it will start to sag over time. This not only looks unprofessional but can strain the 3 way connectors, leading to loosening or failure.
A spirit level (the classic "bubble level") is all you need for most projects. Look for a 2-foot level with at least two vials (one for horizontal, one for vertical) and a magnetic edge—this lets you stick it to the aluminum profile without holding it, freeing up your hands to adjust the frame. For taller structures (like a 6-foot material rack), a 4-foot level is better, as it spans more of the profile and gives a more accurate reading.
Here's a pro trick: Check level before fully tightening all connectors. Tighten the bottom connectors first, then use the level to adjust the top ones. For example, if you're building a workbench with four legs, attach the top frame to two legs, level it, attach the other two legs, then check level again before tightening all screws. This prevents "chasing" level adjustments later—if one leg is too short, you can add shims under it before final assembly.

Bonus Tools: For Finishing and Customization
While the tools above are essential for installing 3 way connectors, a few extras will make your build go smoother and help with aluminum profile accessories. Here are our top picks:
| Tool | Why You Need It | Best For |
|---|---|---|
| Digital Calipers | Measures profile diameter, connector inner diameter, and accessory dimensions with 0.01mm precision. | Checking if a connector fits a non-standard profile (e.g., 2020 vs. 3030). |
| Magnetic Screwdrivers | Holds small screws (like those for aluminum profile end caps) in tight spaces. | Installing end caps, panel mounts, or label holders. |
| Drill & HSS Bits | For custom holes (e.g., adding a wooden top to a workbench frame). | Attaching non-aluminum accessories to profiles. |
| Clamps (Bar or C-Clamps) | Holds profiles in place during assembly, freeing up your hands. | Aligning long profiles (e.g., 8-foot conveyor rails). |

Final Thoughts: Invest in Quality Tools, Reap the Rewards
Building with aluminum extrusion profiles and 3 way connectors is supposed to be fun and rewarding—you're creating something functional, custom, and uniquely yours. But without the right tools, it can feel like fighting with the materials instead of working with them. The tools we've covered here aren't just "nice to have"—they're the difference between a wobbly frame that lasts a few months and a sturdy structure that serves you for years.
Start with the essentials: a good hex key set, deburring tool, carpenter's square, rubber mallet, and level. As you take on more projects, add the bonus tools to your collection. And remember: quality matters. A $10 hex key set might work for one project, but a $25 Cr-V set will last decades and save you from stripped screws and frustration. Your aluminum profile builds deserve the best—and with the right tools, you'll build them right the first time.
So grab your tools, pick out those aluminum extrusion profiles, and get building. The only limit is your imagination—and with properly installed 3 way connectors, there's no limit to what you can create.