- Company Articles
- Products and Technology
- Product knowledge
- Aluminum Profile 3 Way Connector Sizing: A Complete Measurement Guide

Aluminum Profile 3 Way Connector Sizing: A Complete Measurement Guide
Related Product
Aluminum Profile 3 Way Connector
The 3 way - squared corner connector is an external fastening method that is typically used to create a corner connection between three profiles. It is a heavy-duty connection that is simple to use and provides a polished look.
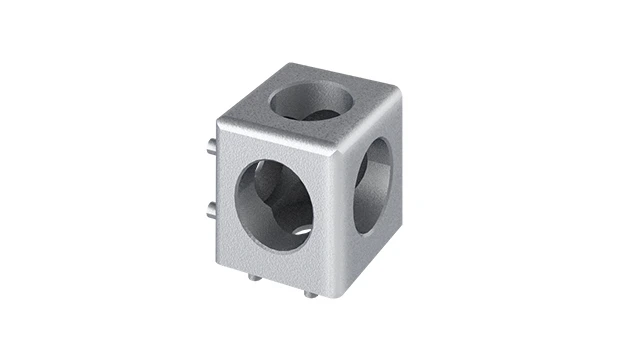
Ever spent hours building a frame for a workbench, only to have it wobble like a Jenga tower the second you put weight on it? Chances are, the culprit wasn't shoddy aluminum extrusion profiles or lazy assembly—it was probably a mis sized 3 way connector. These small but mighty pieces of aluminum profile accessories are the unsung heroes holding your projects together, and getting their size right isn't just about avoiding frustration. It's about safety, durability, and making sure your hard work doesn't end up in a pile of loose parts. In this guide, we'll walk through everything you need to know to measure aluminum profile 3 way connectors like a pro, so your next build stands strong—whether it's a workshop workbench, a storage rack, or a custom machine frame.
What Even Is an Aluminum Profile 3 Way Connector?
Let's start with the basics. If you've ever worked with aluminum extrusion profiles, you know they're the backbone of countless DIY and industrial projects. Lightweight, strong, and infinitely customizable, these profiles (think of them as industrial-grade building blocks with T-slots for attaching parts) can be linked into frames, shelves, and structures of all shapes. But to turn a pile of profiles into something useful, you need connectors—and the 3 way connector is one of the most versatile in the toolbox.
An aluminum profile 3 way connector does exactly what its name suggests: it joins three aluminum profiles at a single point. Picture a corner where two profiles meet horizontally, and a third runs vertically—like the corner of a workbench where the top, side, and leg come together. That's where a 3 way connector shines. Unlike straight connectors (which link two profiles in a line) or 90-degree L-connectors (which join two at a right angle), this little gadget handles three directions at once, making it essential for sturdy, multi-dimensional structures.
But not all 3 way connectors are created equal. They come in different materials (aluminum, plastic, even steel for heavy-duty jobs), designs (fixed angles, adjustable, with or without set screws), and—you guessed it—sizes. And since aluminum extrusion profiles themselves come in standard sizes (like 2020, 3030, or 4040, where the numbers represent width and height in millimeters), the connector's size has to match the profile's dimensions perfectly. A 3030 profile, for example, won't play nice with a connector made for a 4040 profile—kind of like trying to plug a USB-C cable into a USB-A port: it just won't fit, and forcing it will only cause damage.
Quick Tip:
Think of 3 way connectors as the "knees" of your aluminum frame. Just like your knee joint needs to fit your thigh and shin bones perfectly to move smoothly, a connector needs to snugly grip the profiles to keep the structure stable.
Why Sizing Accuracy Isn't Just "Nice"—It's Critical
Let's get real: measuring a connector might seem like a trivial step. "Eh, it's close enough," you think, grabbing the first 3 way connector that looks like it might fit. But in the world of aluminum profiles, "close enough" is a dangerous game. Here's why:
Structural Integrity = Safety
Imagine building a workbench for your garage. You've spent weeks picking the perfect aluminum extrusion profiles, sanding the edges, and even adding a fancy wooden top. But if the 3 way connectors holding the legs to the frame are too loose, that bench isn't just wobbly—it's a hazard. Set a power tool on it, and it could tip. Lean on it while reaching for a shelf, and you might end up on the floor. On the flip side, connectors that are too tight can warp the profiles, weakening them over time or even cracking the aluminum. Either way, a mis sized connector turns your project from a useful tool into a liability.
Wasted Time = Wasted Money
DIYers and small businesses know this pain all too well: ordering parts, waiting for them to arrive, spending hours assembling, and then realizing the connectors don't fit. Now you're stuck disassembling everything, shipping back the wrong parts (and paying return fees), and waiting again. For a hobby project, that's a weekend ruined. For a business building custom racks or workbenches for clients, it's missed deadlines and unhappy customers. One small measurement mistake can cost you days of work—and dollars—you can't get back.
Compatibility with Aluminum Extrusion Profiles
Aluminum extrusion profiles aren't one-size-fits-all. A 2020 profile (20mm x 20mm) is great for lightweight projects like small shelves, while a 4080 (40mm x 80mm) is better for heavy-duty workbenches or machine frames. Each size has a specific slot width, wall thickness, and outer dimensions—and the 3 way connector has to match all of these. A connector made for a 3030 profile, for example, has a bore (the hole where the profile fits) that's 30mm square. If you try to jam a 4040 profile into it, you'll either bend the connector or crack the profile's T-slot. And if you use a 2020 connector on a 3030 profile? It'll rattle around like a marble in a tin can.
Pro Story:
A friend of mine runs a small fabrication shop and once took on a job building 10 workbenches for a local brewery. He ordered a bulk pack of "universal" 3 way connectors online, assuming they'd fit his 4040 profiles. Spoiler: they didn't. The connectors were actually sized for 3030 profiles, and by the time he realized, the brewery's opening was a week away. He ended up paying rush shipping for new connectors and working 12-hour days to rebuild—all because he skipped measuring. Moral of the story? Measure twice, order once.

First, Know Your Aluminum Extrusion Profile
Before you even look at a 3 way connector, you need to get cozy with the aluminum extrusion profile you're using. The connector's size is 100% dependent on the profile's dimensions, so let's break down what you need to measure first:
Standard Profile Sizes (and What the Numbers Mean)
Most aluminum extrusion profiles are named with numbers like 2020, 3030, 4040, or 4080. These numbers aren't random—they're the profile's width and height in millimeters. A 2020 profile is 20mm wide and 20mm tall (square), while a 4080 is 40mm wide and 80mm tall (rectangular). There are also "R" variants (like 4040R) with rounded edges, but the dimensions still follow the same logic.
But here's the catch: even within the same size, profiles can vary slightly. Some have thicker walls (for extra strength), others have different T-slot widths (the grooves that run along the profile, where you insert bolts or accessories). For example, a 3030 profile from Brand A might have a T-slot width of 6mm, while Brand B's 3030 has a 8mm slot. This matters because some 3 way connectors use the T-slot to lock into place (via set screws or bolts), so a mismatch here can mean a loose fit.
Pro Move:
Always check the manufacturer's spec sheet for your aluminum extrusion profile. It should list outer dimensions (width/height), wall thickness, T-slot width, and slot depth. If you don't have the sheet, measure the outer width and height with a caliper—this is the most critical dimension for connector sizing.
Why Profile Material Matters (Spoiler: It's Mostly About Flexibility)
Most aluminum extrusion profiles are made from 6063 aluminum alloy, which is lightweight and easy to extrude. But some heavy-duty profiles use 6061, which is stronger but slightly stiffer. This can affect how tightly a connector grips the profile—stiffer profiles might need connectors with more precise tolerances to avoid cracking, while more flexible ones can handle a tiny bit of wiggle room. But for most DIY projects, focusing on the outer dimensions and T-slot width will cover your bases.

The Anatomy of a 3 Way Connector: What to Measure
Now that you know your profile's size, let's turn to the star of the show: the aluminum profile 3 way connector. These little devices might look simple, but they have several key dimensions that determine compatibility. Let's break them down one by one:
1. Bore Diameter (The "Hole" Where the Profile Fits)
The most important measurement is the bore diameter—or, more accurately, the inner dimensions of the connector's "arms." Since aluminum extrusion profiles are square or rectangular, the connector's arms should have a square or rectangular opening that matches the profile's outer dimensions. For example, a 3030 profile needs a 3 way connector with arms that are 30mm x 30mm on the inside.
To measure this, take a digital caliper and measure the inner width and height of one of the connector's arms. Make sure to measure at the opening (not the middle, as some connectors taper slightly) and check all three arms—yes, all three! Some 3 way connectors have two arms of one size and a third of a different size (though these are rare; most are symmetric, with all three arms matching). If even one arm is the wrong size, the connector is useless for your project.
Example: If your profile is 40mm x 40mm, your 3 way connector's arms should measure 40mm x 40mm (inner dimensions). A tolerance of ±0.1mm is acceptable—any more than that, and you'll have a loose or tight fit.
2. Arm Length (How Deep the Profile Inserts)
Next, measure the length of the connector's arms. This is how far the aluminum extrusion profile will insert into the connector. Most standard 3 way connectors have arm lengths between 25mm and 50mm. A longer arm means more contact between the connector and profile, which equals a stronger joint. For heavy-duty projects (like a workbench that will hold power tools), aim for arms that are at least 35mm long. For lightweight shelves, 25mm might be enough.
But be careful: if the arm is too long, it might stick out the end of your profile, leaving a messy overhang. If it's too short, the profile might not insert far enough to be secure. A good rule of thumb: the arm length should be 1.5–2 times the profile's width. For a 40mm profile, that's 60–80mm—but since most connectors top out at 50mm, just aim for the longest arm that fits your profile without overhang.
3. Set Screw Size (If Your Connector Uses Them)
Many 3 way connectors use set screws (small screws that tighten into the T-slot of the profile) to lock the connection in place. These screws are usually M5, M6, or M8 (metric sizes, where "M" stands for "meter" and the number is the diameter in millimeters). If your connector has set screws, check their size—they need to fit into your profile's T-slot. A M6 screw won't work in a 5mm T-slot, and an M8 will strip the slot entirely.
To measure a set screw, remove it from the connector (if possible) and use a thread gauge or caliper to measure the diameter across the threads. If you can't remove it, check the connector's spec sheet—most manufacturers list the set screw size.
4. Angle (Are We Talking 90 Degrees or Something Else?)
Most 3 way connectors are "fixed angle," meaning the three arms meet at 90 degrees (like the corner of a cube). But there are also adjustable 3 way connectors that let you set angles other than 90 degrees (useful for sloped roofs or angled frames). For fixed-angle connectors, double-check that the angle is indeed 90 degrees—some cheap knockoffs have arms that are slightly off (like 88 or 92 degrees), which can twist your frame and weaken joints.
To measure the angle, use a protractor (or a digital angle finder for precision). Place the connector on a flat surface, align one arm with the protractor's base, and check the angle between the arms. It should be exactly 90 degrees (±1 degree is acceptable for most projects).
Common 3 Way Connector Types (and How Their Sizing Differs)
Not all 3 way connectors are built the same, and their design affects how you measure them. Let's walk through the most common types you'll encounter, so you know what to look for:
Type 1: Standard Fixed 90-Degree 3 Way Connector
This is the "bread and butter" of aluminum profile accessories. It has three arms, all at 90 degrees, with square or rectangular bores that match the profile size. It usually has set screws in each arm (one or two per arm) that tighten into the profile's T-slot. These are the easiest to measure—just check the bore dimensions (30mm x 30mm for 3030 profiles, etc.) and arm length.
Example: A standard 4040 3 way connector will have three 40mm x 40mm arms, 35mm long, with M6 set screws. Perfect for building cube-shaped frames like workbench legs or storage cubes.
Type 2: Adjustable Angle 3 Way Connector
These are for when you need more flexibility (literally). Instead of fixed 90-degree arms, they have rotating joints that let you set angles between, say, 30 and 150 degrees. They're great for sloped roofs, angled machine guards, or custom-shaped frames. Sizing here is trickier because the rotating joint adds extra bulk—you'll need to measure not just the bore diameter but also the overall height/width of the connector to make sure it fits in your project's space.
Pro Tip: Adjustable connectors often have a "minimum profile size"—don't try to use a 2020 profile with an adjustable connector made for 3030 and up; the rotating parts will be too big and won't grip the smaller profile.
Type 3: Flanged 3 Way Connector (For Extra Strength)
Flanged connectors have a small "flange" (a flat, plate-like extension) at the joint where the three arms meet. This flange adds surface area, making the connector stronger and more stable for heavy loads. They're common in industrial workbenches or machine frames. When measuring flanged connectors, don't forget the flange thickness—if you're building a frame with tight clearances (like a shelf between two walls), the flange might stick out and cause a gap.
Type 4: T-Slotless Connectors (No Set Screws Needed)
Some connectors skip set screws entirely and instead use friction or compression to grip the profile. These are often called "push-fit" or "slip-fit" connectors. They rely entirely on the bore diameter matching the profile's outer dimensions—too loose, and they slip; too tight, and you'll bend the connector trying to insert the profile. These are great for quick builds but less reliable for heavy loads. For these, the bore diameter is everything —measure it three times, and make sure it's within ±0.05mm of your profile's outer dimensions.
The Ultimate Measurement Checklist (Tools You'll Need)
You don't need a lab full of equipment to measure 3 way connectors, but a few basic tools will make the job easier (and more accurate). Here's what to grab:
- Digital Caliper: The MVP of measurements. A good caliper (preferably one with a digital readout) can measure bore diameter, arm length, and profile dimensions down to 0.01mm. Avoid cheap plastic calipers—spring for a metal one ($20–$50 on Amazon) that won't flex or give false readings.
- Protractor or Digital Angle Finder: For checking that 90-degree angle on fixed connectors. A digital angle finder is more precise than a plastic protractor and worth the $15 investment if you're doing a lot of builds.
- Thread Gauge: If your connector has set screws, this tool (which looks like a flat metal ruler with different-sized notches) will tell you the screw's thread size (M5, M6, etc.).
- Straightedge: A metal ruler or straightedge helps check if the connector's arms are straight (no bends or warps, which can throw off measurements).
- Pencil and Paper: Write down measurements as you go! It's easy to forget if the bore was 30.1mm or 30.5mm an hour later.
Budget Hack:
If you don't have a digital caliper, a standard ruler with millimeter markings will work for rough measurements—but for critical projects (like a workbench that holds expensive tools), splurge on the caliper. The $20 will save you from a $200 mistake.
Step-by-Step Measurement Process (For Any Connector)
Now that you have your tools, let's walk through measuring a 3 way connector from start to finish. We'll use a standard fixed 90-degree connector for this example, but the process works for most types:
- Measure the Profile First: Use your caliper to measure the outer width and height of your aluminum extrusion profile (e.g., 40mm x 40mm). Write this down as "Profile Size: 40x40mm."
- Check the Connector's Bore Diameter: Open the caliper jaws and insert them into one of the connector's arms. Gently close the jaws until they touch the inner walls (don't squeeze too hard—you might bend the connector). Read the measurement on the caliper. Do this for all three arms, and write down each (e.g., "Arm 1: 40.2mm x 40.1mm; Arm 2: 40.0mm x 40.0mm; Arm 3: 40.1mm x 40.2mm").
- Compare Bore to Profile Size: Your profile is 40x40mm. The connector's arms should be 40mm x 40mm ±0.1mm. If the arms are 40.3mm or larger, the fit will be loose. If they're 39.8mm or smaller, the profile won't insert (or will bend the connector).
- Measure Arm Length: Use the caliper to measure from the end of the connector's arm to the base (where it meets the other arms). Write this down (e.g., "Arm Length: 35mm").
- Check Set Screw Size (If Applicable): Remove a set screw, measure its diameter with the thread gauge, and note the size (e.g., "Set Screw: M6").
- Verify the Angle: Place the connector on a flat surface, align one arm with the straightedge, and use the protractor to check the angle between arms (should be 90 degrees ±1 degree).
Pro Tip: If you're buying connectors online, ask the supplier for a spec sheet with all these measurements. Reputable aluminum profile accessories suppliers will have no problem sharing this—if they refuse, shop elsewhere.
Common Sizing Mistakes (and How to Avoid Them)
Even pros make mistakes—here are the ones to watch for:
Mistake #1: Assuming "3030 Connector" Fits All 3030 Profiles
Just because a connector is labeled "3030" doesn't mean it fits every 3030 aluminum extrusion profile. As we mentioned earlier, some profiles have thicker walls, which reduce the inner bore space. For example, a 3030 profile with 2mm walls has an inner dimension of 26mm x 26mm, but the outer dimension is still 30mm x 30mm. The connector's bore should match the outer dimension, not the inner. But some cheap connectors are labeled by inner bore, not outer—so a "3030" connector might actually have a 26mm bore, which won't fit a standard 30mm outer profile. Always, always measure the bore yourself.
Mistake #2: Ignoring Tolerances (The "Close Enough" Trap)
Manufacturing isn't perfect—connectors and profiles have tolerances (small allowable variations in size). For example, a 4040 profile might be 40.1mm x 39.9mm (within ±0.1mm of the standard 40mm). A connector with a 40.0mm bore should still fit, because 39.9mm (profile) is smaller than 40.0mm (connector). But if the profile is 40.2mm and the connector is 40.0mm, you're out of luck. Always check the tolerance range on both the profile and connector spec sheets—aim for a connector bore that's 0.05mm–0.1mm larger than the profile's outer dimension (this gives a snug but not tight fit).
Mistake #3: Forgetting About Coating Thickness
Some aluminum extrusion profiles have anodized coatings (a thin layer of oxide that protects against corrosion). Anodizing adds about 0.001–0.005mm to the profile's outer dimensions—usually not enough to affect connector fit, but if you're using a super-precise connector (like a slip-fit type), this tiny extra thickness can make a difference. If your profile is anodized, add 0.003mm to your outer dimension measurement when checking connector bores.
Mistake #4: Mixing Metric and Imperial Measurements
Aluminum extrusion profiles are almost always metric (millimeters), but some connectors (especially older or imported ones) might be labeled in inches. A "1.25 inch" connector sounds close to 30mm (since 1 inch = 25.4mm, 1.25 inches = 31.75mm), but 31.75mm is way bigger than a 30mm profile. Always convert inches to millimeters (or vice versa) using a calculator—don't guess.
Real-World Example: Building a Workbench with 3 Way Connectors
Let's put all this into practice with a common project: a garage workbench. Here's how proper connector sizing makes all the difference:
Step 1: Choose Your Profile
You want a sturdy workbench, so you pick 4040 aluminum extrusion profiles (40mm x 40mm, 2mm wall thickness). The spec sheet says outer dimensions are 40.0mm x 40.0mm, T-slot width is 8mm, and slot depth is 10mm.
Step 2: select the Right 3 Way Connector
You need connectors to join the legs (vertical profiles) to the front/back rails (horizontal profiles) and the crossbars (horizontal profiles between the front and back rails). You opt for standard fixed 90-degree 3 way connectors with M6 set screws (since the T-slot is 8mm, M6 fits perfectly).
Step 3: Measure the Connector Before Buying
You order a sample connector from an aluminum profile accessories supplier. Using your caliper, you measure the bore diameter: 40.1mm x 40.1mm (within the ±0.1mm tolerance of your 40.0mm profile). Arm length is 35mm (plenty long for stability). Set screws are M6, and the angle is 90 degrees exactly. Perfect—this connector will work.
Step 4: Assemble (and Enjoy a Wobble-Free Bench)
You assemble the frame: legs, rails, crossbars, all joined with the 3 way connectors. The set screws tighten into the T-slots, gripping the profiles securely. When you add the wooden top and set your drill press on it, the bench doesn't budge. No wobbles, no creaks—just a solid workspace that'll last for years.
What If You Got It Wrong?
Suppose you'd grabbed a "4040" connector without measuring, and its bore was 41mm x 41mm. The profiles would rattle inside, the set screws wouldn't reach the T-slot, and the bench would wobble so badly you couldn't use it. You'd have to take it apart, return the connectors, and wait for new ones—costing you time and frustration. Moral: measure first, build later.
Troubleshooting: When Your Connector Still Doesn't Fit
Even with careful measuring, sometimes things go wrong. Here's how to fix common issues:
Problem: Connector is Too Loose (Profile Wiggles Inside)
Causes: Bore diameter too large, set screws too small, or T-slot width mismatch.
Fixes: - If there are set screws, try using longer ones (that reach deeper into the T-slot) or add a washer under the screw head to increase grip. - For slip-fit connectors, wrap a thin layer of electrical tape around the profile's end (this adds just enough thickness to snug up the fit). - As a last resort, use a small amount of thread locker (like Loctite) on the set screws—this prevents them from backing out, but won't fix a fundamentally loose bore.
Problem: Connector is Too Tight (Can't insert the Profile)
Causes: Bore diameter too small, connector arms bent, or profile slightly warped.
Fixes: - Use a rubber mallet to gently tap the profile into the connector (don't use a metal hammer—you'll damage the profile). - If the bore is only slightly too small, carefully file the inner edges of the connector with a fine-grit file (go slow—you can't undo filed metal). - Check if the profile is warped by rolling it on a flat surface—if it rocks, it's bent, and you'll need a new profile.
Problem: Set Screws Strip the T-Slot
Causes: Screw size too big for the T-slot, over-tightening, or using a Phillips head (which slips) instead of hex head.
Fixes: - Switch to a smaller set screw (e.g., M5 instead of M6). - Use hex head screws and a hex key (not a Phillips driver) to avoid slipping. - Don't overtighten—snug is enough; the goal is to grip, not crush the T-slot.
Final Thoughts: Sizing = Success
Measuring aluminum profile 3 way connectors might seem like a small step in the grand scheme of your project, but it's the step that separates a rickety disaster from a rock-solid build. By taking the time to measure your aluminum extrusion profile's outer dimensions, check the connector's bore diameter and arm length, and verify set screw size, you're not just avoiding headaches—you're ensuring safety, durability, and pride in your work.
Whether you're building a workbench, a storage rack, or a custom machine, remember: the best projects start with the smallest details. And when it comes to 3 way connectors, that detail is size. So grab your caliper, check those measurements, and build something that stands the test of time.