- Company Articles
- Products and Technology
- Product knowledge
- Aluminum Profile 3 Way Connectors for Material Racks: A Practical Guide

Aluminum Profile 3 Way Connectors for Material Racks: A Practical Guide
Related Product
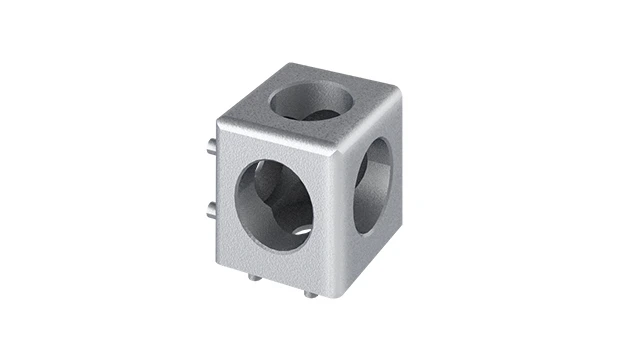
Aluminum Profile 3 Way Connector
The 3 way - squared corner connector is an external fastening method that is typically used to create a corner connection between three profiles. It is a heavy-duty connection that is simple to use and provides a polished look.
Walk into any well-organized workshop, manufacturing plant, or warehouse, and you'll likely spot a common hero: the material rack. These unsung workhorses keep tools, parts, and supplies off the floor, within arm's reach, and—most importantly—organized. But what makes a great material rack? It's not just the shelves or the frames; it's the hidden components that hold everything together. Among these, aluminum profile 3 way connectors stand out as quiet game-changers. They're the reason your rack stays sturdy when loaded with heavy boxes, the secret to adjusting shelf heights without rebuilding from scratch, and the key to turning a basic structure into a customized storage solution.
If you've ever struggled with wobbly racks that sag under weight, or wished you could rearrange your storage setup without buying new equipment, this guide is for you. We're diving deep into aluminum profile 3 way connectors: what they are, how they work, why they matter, and how to choose the right ones for your material rack. Whether you're a small business owner setting up a garage workshop or a production manager optimizing a factory floor, understanding these connectors will help you build a storage system that's durable, flexible, and tailored to your needs.
What Are Aluminum Profile 3 Way Connectors, Anyway?
Let's start with the basics. Aluminum profiles—those sleek, T-slot extruded bars you've seen in everything from workbenches to machine guards—are the backbone of modern modular systems. They're lightweight, strong, and designed to connect with accessories like brackets, panels, and yes, connectors. Aluminum profile 3 way connectors are exactly what they sound like: small, often metal or high-grade plastic components that join three aluminum profiles together at a single point. Think of them as the "joints" of your material rack, allowing you to create corners, branches, or multi-directional structures with ease.
Unlike traditional welding or bolting, which are permanent and require specialized skills, these connectors let you assemble and disassemble profiles in minutes. Most use a simple tightening mechanism—like a set screw or a cam lever—that grips the inside of the profile's T-slot, creating a secure hold without damaging the aluminum. This modularity is why aluminum profiles and their connectors are a favorite in lean system setups, where adaptability and waste reduction are top priorities.
But not all 3 way connectors are created equal. Some are designed for light-duty use, like holding up a shelf of small parts, while others are built to withstand hundreds of pounds of pressure, ideal for heavy material racks in industrial settings. They also come in different shapes and sizes to match common aluminum profile dimensions (think 2020, 3030, or 4040 profiles) and connection angles, ensuring a snug fit no matter your project.
Types of Aluminum Profile 3 Way Connectors: Which One Do You Need?
Choosing the right 3 way connector feels a bit like picking the right tool for a job: you need to match the connector to the task at hand. Let's break down the most common types you'll encounter, along with their best uses, materials, and load capacities. To make it easier, we've put together a quick reference table:
| Connector Type | Material | Typical Load Capacity | Best For | Key Feature |
|---|---|---|---|---|
| Standard 3 Way Connector | Aluminum Alloy | Up to 150 lbs per connection | General-purpose material racks, workbench frames | Simple design, easy to install with hex key |
| Reinforced 3 Way Connector | Steel or Heavy-Duty Aluminum | 200–300 lbs per connection | Industrial material racks, storage for heavy tools/parts | Thicker walls, extra set screws for added stability |
| Swivel 3 Way Connector | Aluminum with Nylon Bushings | Up to 100 lbs per connection | Adjustable racks, tilt-out shelves, mobile trolleys | Allows 360° rotation before locking in place |
| Right-Angle 3 Way Connector | Aluminum or Zinc-Plated Steel | 150–200 lbs per connection | Corner joints, L-shaped or U-shaped material racks | Pre-set 90° angles for precise, square structures |
| Lightweight Plastic 3 Way Connector | Glass-Filled Nylon | Up to 50 lbs per connection | Home workshops, hobby rooms, temporary storage | Budget-friendly, corrosion-resistant, easy to handle |
Let's dig into a few of these to understand their real-world applications. Take the reinforced 3 way connector , for example. If you're building a material rack to hold stacks of metal sheets or heavy machinery parts, a standard connector might flex over time. Reinforced versions, with their thicker steel bodies and extra set screws, distribute weight more evenly across the profiles, preventing sagging or bending. They're a must for any setup where safety and long-term durability are non-negotiable.
On the flip side, swivel 3 way connectors are a dream for anyone who needs flexibility. Imagine you run a small electronics assembly line, and your material rack needs to feed parts to workers on both sides. A swivel connector lets you pivot a shelf to face either direction, reducing the need for multiple racks. Or, if you're storing irregularly shaped items, you can adjust the angle of a crossbar to cradle the load securely.
Pro Tip:
Always check the connector's compatibility with your aluminum profile size. A 3030 profile (30mm x 30mm) needs a connector designed for 30mm slots, just as a 4040 profile requires a larger connector. Mismatched sizes will lead to loose connections and instability!

Why Aluminum Profile 3 Way Connectors Are a Game-Changer for Material Racks
You might be thinking, "Can't I just use bolts or welding to connect my aluminum profiles?" Technically, yes—but you'd be missing out on the unique benefits that make 3 way connectors worth every penny. Let's break down why these small components make a big difference:
1. No Special Skills or Tools Required
Welding aluminum takes practice, and drilling holes for bolts risks weakening the profile. With 3 way connectors, all you need is a hex key (Allen wrench) or a cam lever tool. Even if you're new to DIY projects, you can assemble a sturdy material rack in an afternoon. Tighten the set screw, and the connector's internal teeth bite into the profile's T-slot, creating a hold that's strong enough for most applications. Disassembly is just as easy—loosen the screw, pull the profiles apart, and reconfigure as needed.
2. Flexibility to Adapt as Your Needs Change
Your storage needs today won't be the same tomorrow. Maybe you're expanding your product line, so you need taller shelves. Or you're switching to larger bins, so you need wider spacing between crossbars. With traditional fixed racks, you'd have to buy a whole new system. With aluminum profile 3 way connectors, you simply loosen the connectors, adjust the profiles, and retighten. It's modularity at its finest—your rack grows and changes with your business.
3. Durability That Stands Up to Industrial Use
Aluminum alloy connectors are naturally resistant to rust and corrosion, making them ideal for humid warehouses or workshops with exposure to oils and chemicals. For even harsher environments, stainless steel connectors are available. Unlike plastic connectors (which can crack under stress), metal 3 way connectors maintain their strength over time, ensuring your material rack stays stable for years. We've seen racks in factories that have been disassembled, moved, and reassembled a dozen times—all with the same connectors still holding strong.
4. Cost-Effective in the Long Run
It's true: aluminum profile systems and their connectors can cost more upfront than basic wooden shelves or wire racks. But consider the lifespan. A cheap wire rack might last a year or two before bending; a wooden shelf could warp or rot. An aluminum profile rack with quality 3 way connectors? It'll outlive multiple product cycles. Plus, since you can reconfigure it instead of replacing it, you'll save money on new storage solutions down the line. It's an investment that pays off in reduced waste and long-term utility.

How to Choose the Perfect 3 Way Connector for Your Material Rack
Now that you know why aluminum profile 3 way connectors are useful, let's talk about how to pick the right one for your project. It's not just about grabbing the first connector you see online—you need to consider your load, your profile size, and your environment. Here's a step-by-step guide to making the best choice:
Step 1: Calculate Your Load Requirements
Start by asking: How much weight will this connector need to support? If you're building a material rack for lightweight items like small plastic bins or hand tools, a standard aluminum connector (150 lbs capacity) will work. But if you're storing heavy materials—think metal castings, automotive parts, or stacks of plywood—you'll need a reinforced connector with a higher load rating (200+ lbs). When in doubt, overestimate: it's better to have a connector that's stronger than needed than one that fails under stress.
Pro tip: Distribute weight evenly across multiple connectors. A shelf supported by four 3 way connectors (each rated for 150 lbs) can handle more total weight than one supported by two.
Step 2: Match the Connector to Your Aluminum Profile Size
Aluminum profiles come in standard sizes, usually named by their width and height in millimeters (e.g., 2020 = 20mm x 20mm, 3030 = 30mm x 30mm, 4040 = 40mm x 40mm). Your connector must fit the profile's slot width and depth. Most manufacturers list compatible profile sizes on their product pages (e.g., "For 3030 and 3060 profiles"), so double-check before buying. Using a 2020 connector on a 4040 profile will result in a loose, unstable connection—definitely not what you want for a material rack.
Step 3: Consider Your Environment
Where will your material rack live? If it's in a dry, indoor workshop, standard aluminum connectors are fine. If it's in a warehouse with high humidity, near water, or exposed to chemicals, opt for stainless steel or corrosion-resistant coated connectors. For cleanrooms or electronics manufacturing, look for ESD-safe connectors (electrostatic discharge) to prevent static damage to sensitive parts. Even outdoor use is possible with the right materials—just avoid plain steel, which will rust quickly.
Step 4: Think About Assembly and Adjustability
Do you need to adjust your rack frequently? If yes, choose connectors with quick-release levers instead of set screws—they let you reposition profiles in seconds. If your rack will stay in one place long-term, set-screw connectors are more secure (they're less likely to loosen over time). Also, consider the angle of connection: do you need a 90° corner, or a more flexible 180° straight line? Some connectors are fixed-angle, while others are multi-angle, letting you set any degree between 0° and 180°.
Step 5: Check for Quality and Brand Reputation
Not all connectors are made equal. A cheap, poorly machined connector might have misaligned threads or weak set screws that strip easily. Stick with reputable brands or suppliers who specialize in aluminum profile accessories—they'll have better quality control and often offer warranties. Read reviews from other buyers, too: if multiple people mention a connector loosening under load, steer clear. Remember, a few extra dollars for a quality connector is worth avoiding a collapsed rack (and damaged inventory) later.
Step-by-Step: Building a Material Rack with Aluminum Profile 3 Way Connectors
Ready to put your new knowledge into action? Let's walk through assembling a basic material rack using aluminum profiles and 3 way connectors. We'll keep it simple: a 4-tier rack, 4 feet tall, with adjustable shelves. You'll need:
- 4 aluminum profiles (4040, 4 feet long) for the vertical posts
- 8 aluminum profiles (4040, 3 feet long) for the horizontal shelves (2 per shelf, front and back)
- 12 aluminum profile 3 way connectors (standard, 4040 compatible, 150 lbs capacity)
- 1 hex key (size matches connector set screws)
- A level (to ensure the rack is straight)
- Optional: Casters (for mobility) and shelf panels (aluminum, plywood, or plastic)
Step 1: Lay Out Your Design
Start by sketching your rack or using a modular design tool (many aluminum profile suppliers offer free online planners). For our 4-tier rack, we'll have vertical posts at each corner, with horizontal shelves connecting them at 12-inch intervals. Mark where each connector will go on the vertical profiles—this ensures consistent shelf heights.
Step 2: Attach Connectors to Vertical Posts
Take one vertical post and slide a 3 way connector onto the T-slot at your first marked height. Make sure the connector's opening faces outward (where the horizontal shelf will go). Tighten the set screw with the hex key—snug, but not so tight you strip the thread. Repeat for all four vertical posts, adding connectors at each shelf level. You should end up with 3 connectors per vertical post (for 4 shelves, you need 3 sets of connectors per post).
Step 3: Connect Horizontal Shelf Profiles
Take a horizontal profile and slide one end into the open slot of a connector on the first vertical post. Hold it level, then attach the other end to the corresponding connector on the opposite vertical post. Tighten both set screws. Repeat for the front and back horizontal profiles of each shelf. Work your way up from the bottom shelf to the top—this keeps the rack stable as you build.
Step 4: Square Up the Rack and Tighten All Connections
Once all shelves are attached, stand the rack upright. Use a level to check that the vertical posts are straight (no leaning!) and the shelves are horizontal. If something's off, loosen the connectors, adjust the profiles, and retighten. Once level, go through every connector and give the set screws a final tighten—this ensures no connections loosen over time.
Step 5: Add Shelf Panels and Finishing Touches
Lay your shelf panels (aluminum, plywood, or plastic) across the horizontal profiles. If using aluminum panels, secure them with T-slot nuts and bolts through the panel into the profiles. For plywood, you can drill small holes and use zip ties or screws. If you added casters, lock them in place to prevent rolling. Finally, test the rack by placing some weight on each shelf—better to find a loose connector now than after loading it with inventory!
Common Mistake to Avoid:
Rushing the tightening process. A connector that's "almost" tight will loosen over time, especially with vibration (like in a busy factory). Take the extra 30 seconds to ensure each set screw is snug—your future self (and your stored items) will thank you.
Troubleshooting Common Issues with 3 Way Connectors
Even with careful planning, you might run into snags when using aluminum profile 3 way connectors. Here are the most common problems and how to fix them:
Problem: Connectors Keep Loosening
Cause: Set screws not tightened enough, or the profile's T-slot is dirty (dust or oil prevents a good grip). Solution: Clean the T-slot with a dry cloth or compressed air, then retighten the set screw. For extra security, apply a drop of thread-locking fluid (like Loctite) to the screw—just don't use too much, or you'll never get it loose again!
Problem: Connectors Won't Fit the Profile
Cause: Mismatched profile size (e.g., using a 2020 connector on a 3030 profile) or a defective connector with burrs. Solution: Double-check the connector's listed compatible profiles. If the fit is tight but the size is correct, gently file down any burrs on the connector with fine sandpaper. Never force a connector—it could damage the profile's T-slot.
Problem: Shelves Sagging in the Middle
Cause: Not enough connectors supporting the shelf, or using lightweight profiles for heavy loads. Solution: Add a middle vertical post (and more 3 way connectors) to support the center of long shelves. For example, a 6-foot shelf needs at least three vertical posts (one at each end, one in the middle) instead of two. You can also upgrade to thicker profiles (e.g., 4040 instead of 3030) for added rigidity.
Problem: Connector Threads Stripped
Cause: Over-tightening with the wrong size hex key, or using a low-quality connector with soft metal threads. Solution: replace the stripped connector—there's no fixing damaged threads. To prevent this, always use the correct size hex key and stop tightening when you feel resistance (don't crank it until the key bends!). Invest in high-quality connectors with hardened steel threads—they're less likely to strip.
Final Thoughts: Building a Material Rack That Grows With You
Aluminum profile 3 way connectors might seem like small, parts, but they're the foundation of a storage system that works for you—not against you. By choosing the right connectors, you're not just building a material rack; you're creating a flexible, durable solution that adapts to your changing needs. Whether you're storing tiny electronic components or heavy machinery parts, these connectors ensure your rack stays sturdy, organized, and ready for whatever comes next.
Remember: the best material rack is one that's built with intention. Take the time to calculate your load, match your connectors to your profiles, and prioritize quality over cost. With the right setup, you'll spend less time fixing wobbly shelves and more time focusing on what matters—growing your business, creating great products, or simply enjoying a clutter-free workspace.
So go ahead: grab your aluminum profiles, your 3 way connectors, and a hex key. Your perfect material rack is just a few tightenings away.