- Company Articles
- Products and Technology
- Product knowledge
- Aluminum Profile 3 Way Connectors vs. 2-Way: When to Use Each Type

Aluminum Profile 3 Way Connectors vs. 2-Way: When to Use Each Type
Related Product
Aluminum Profile 3 Way Connector
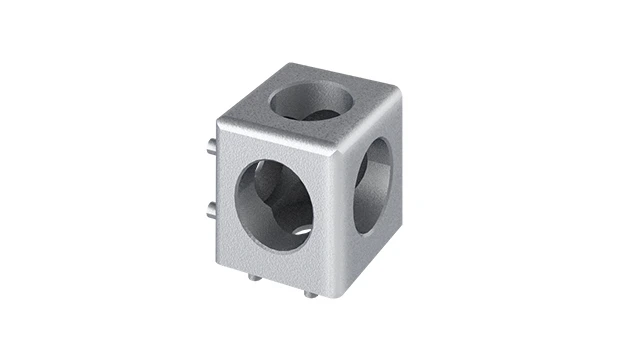
The 3 way - squared corner connector is an external fastening method that is typically used to create a corner connection between three profiles. It is a heavy-duty connection that is simple to use and provides a polished look.
Walk into any modern workshop, manufacturing floor, or even a well-organized garage, and you'll likely spot the sleek, modular structures that make these spaces tick: workbenches that adjust to any task, material racks that keep supplies within arm's reach, conveyors that glide components from station to station. What holds all these together? More often than not, it's aluminum profiles—and the unsung heroes that make their flexibility possible: aluminum profile accessories , especially connectors. Today, we're zeroing in on two of the most essential types: 3-way and 2-way aluminum profile connectors. Let's break down how they work, when to choose one over the other, and why getting this decision right can mean the difference between a wobbly mess and a setup that stands the test of time.
Why Aluminum Profiles (and Their Connectors) Matter
Before we dive into connectors, let's take a quick step back. Aluminum profiles—those lightweight, grooved beams you see in everything from assembly lines to DIY projects—are beloved for a reason. They're strong yet easy to handle, corrosion-resistant, and infinitely customizable. But here's the thing: even the sturdiest aluminum profile is only as good as the pieces that hold it together. Connectors are the glue (literally, in some cases) that turn individual profiles into functional structures. They determine how your setup can bend, branch, and bear weight. Choose the wrong one, and you might end up with a shelf that sags under toolboxes, a workbench that shakes during precision tasks, or a conveyor frame that creaks with every load. Not exactly ideal for productivity—or safety.
That's where 2-way and 3-way connectors come in. They're two of the most common types, but they serve very different purposes. Think of them as the "Lego bricks" of the industrial world: some let you build straight lines, others let you build corners, and still others let you branch off in new directions. Let's start with the simpler of the two: 2-way connectors.
2-Way Aluminum Profile Connectors: The Reliable Workhorses
What Are They, Exactly?
As the name suggests, 2-way aluminum profile connectors are designed to join two profiles together. They're the most basic (but by no means basic!) type of connector, and you'll find them in almost every aluminum profile setup. Picture a simple "L" shape for connecting two profiles at a 90° angle, or a straight sleeve for joining two profiles end-to-end. Some are fixed, meaning they lock the profiles into a specific angle, while others are adjustable, letting you tweak the angle slightly before tightening. But at their core, they're all about linking two pieces—no more, no less.
Design and Materials
Most 2-way connectors are made from the same aluminum alloy as the profiles themselves (think 6063-T5, a common choice for its strength and machinability). Some lower-cost options might use plastic, but those are better suited for lightweight, temporary setups (like a quick DIY shelf in your garage). Metal connectors often have a sleek anodized finish, which not only looks professional but also adds an extra layer of corrosion resistance—handy if your workspace is humid or exposed to oils and coolants.
Design-wise, they're pretty straightforward. The most common styles include:
- L-shaped brackets: For 90° corners (think the corner of a workbench or the legs of a shelf).
- Straight couplers: For extending a profile (like making a longer beam by joining two shorter ones).
- T-joints: Okay, technically a T-joint connects three profiles, but wait—no, actually, some "T" shapes are 2-way if they're designed to attach a perpendicular profile to a main one. Confusing? Don't worry—we'll clarify later. For now, focus on the "two connection points" rule.)
What They're Good For (and When to Use Them)
2-way connectors shine in simple, linear, or corner-based structures. If your project doesn't require branching off in multiple directions, these are your best bet. Let's break down their sweet spots:
Pro Tip: 2-way connectors are often sold in bulk, which makes them budget-friendly for large setups. If you're building something with lots of straight lines or right angles (like a basic shelving unit), stock up—you'll save money and reduce setup time.
Simple Structures with Low to Medium Loads
If you're building a single-level shelf for storing lightweight tools, a small workbench with no side extensions, or a hand trolley (like the hand trolley a from our keyword list), 2-way connectors are more than enough. They're lightweight, easy to install, and won't add unnecessary bulk. For example, a basic hand trolley frame might use 90° 2-way connectors at the corners to join the vertical and horizontal profiles. Since the trolley only needs to support the weight of a few boxes or parts, the 2-way connectors can handle the load without breaking a sweat.
Quick Assembly and Disassembly
Need to set up a temporary workspace for a weekend project? 2-way connectors are your friend. Many are designed to be installed with just a hex key or a screwdriver—no fancy tools required. And since they only connect two profiles, there's less alignment work involved. You can have a basic shelf up in 20 minutes, then take it apart just as quickly when you're done. This makes them perfect for rental spaces, pop-up workshops, or anyone who likes to rearrange their setup frequently.
Budget-Conscious Builds
Let's talk money: 2-way connectors are almost always cheaper than their 3-way counterparts. If you're working with a tight budget, using 2-way connectors where possible can save you a significant amount. For example, building a 4-foot workbench with 2-way corner brackets might cost half as much as using 3-way connectors (even if you don't need the extra support). Just remember: don't skimp on quality here. A cheap plastic 2-way connector might save you $5 now, but it could cost you far more when it cracks under a heavy load.
Potential Drawbacks to Keep in Mind
2-way connectors are versatile, but they're not. Their biggest limitation is obvious: they only connect two profiles. That means if you need to branch off in a third direction—say, adding a side shelf to your workbench or a crossbar to a rack—you'll need to get creative. You could stack 2-way connectors, but that's a recipe for instability. Imagine trying to attach a third profile to a corner made of two 2-way L-brackets: the joint would be weak, and the extra weight could pull the brackets apart over time. For those cases, you need something with more "arms": 3-way connectors.

3-Way Aluminum Profile Connectors: The Branching Innovators
What Makes Them Different?
If 2-way connectors are the "straight line" builders, 3-way aluminum profile connectors are the "branching" ones. They're designed to join three profiles together, opening up a world of possibilities for more complex structures. Think of a Y-shape, a T-shape, or even a cross shape—all designed to split a main profile into two or more directions. The 3 way aluminum profile connector is like adding a "junction" to your setup, letting you build up, out, and around with confidence.
For example, a T-shaped 3-way connector can attach a perpendicular profile to the middle of a main beam—perfect for adding a shelf halfway up a rack or a support bar across a conveyor frame. A Y-shaped connector might split a vertical profile into two angled ones, like the legs of a sturdy A-frame. And some 3-way connectors are even adjustable, letting you rotate the branches to different angles before locking them in place. This flexibility is what makes them indispensable for anything beyond the most basic builds.
Design and Materials: Built for Complexity
3-way connectors are a bit more engineered than their 2-way cousins. Since they have to support three profiles instead of two, they're often bulkier and made from thicker aluminum alloy. Some have internal ribs or reinforced corners to distribute weight evenly across all three connections. You'll also find more variation in their designs: fixed-angle 3-way connectors (like a 90° T-joint) for precise setups, and swivel 3-way connectors for when you need to adjust the angle of the branches. They might use bolts, set screws, or even spring-loaded pins to lock the profiles in place—all designed to ensure that each of the three connections is just as strong as the others.
When to Reach for a 3-Way Connector
3-way connectors are all about solving the "third direction" problem. But they're not just for branching—they also add stability to complex structures. Here are the scenarios where they're non-negotiable:
Multi-Level or Multi-Directional Structures
If you're building something with more than two "arms"—like a material rack b (3 row and 3 floor) from our keyword list, which has multiple shelves branching off vertical posts—3-way connectors are a must. Each shelf needs to attach to the vertical post and the adjacent shelf supports, and a 3-way T-joint is the perfect way to do that. Without it, you'd have to use 2-way connectors on both sides of the vertical post, leaving a gap in the middle and weakening the entire rack. A 3-way connector bridges that gap, locking all three profiles together in a single, solid joint.
High Load or Heavy-Duty Applications
3-way connectors aren't just for show—they're built to handle more weight. Because they distribute the load across three profiles instead of two, they're inherently more stable. For example, a conveyor system that carries heavy parts all day long needs a frame that won't flex or twist. Using 3-way connectors at the support junctions ensures that the weight of the conveyor belt and the parts is spread evenly through the frame, reducing stress on any single profile. The same goes for workbenches used for heavy machining: a 3-way connector under the tabletop can support the weight of a drill press or grinder without sagging.
Permanent or Semi-Permanent Setups
While 2-way connectors are great for quick builds, 3-way connectors shine in setups that are meant to last. Since they create stronger, more integrated joints, they're ideal for structures you don't plan on taking apart often—like a factory's main assembly line racks or a workshop's permanent tool wall. Yes, they take a bit longer to install (you have to align three profiles instead of two), but that extra time pays off in durability. Once locked in place, a well-installed 3-way connector will keep your structure solid for years, even with daily use.
The Tradeoffs: Cost and Complexity
All that flexibility and strength comes with a catch: 3-way connectors are more expensive than 2-way ones. Depending on the design and material, a single 3-way connector can cost two to three times as much as a 2-way. They're also bulkier, which can make them harder to fit into tight spaces. And installation? It's a bit trickier. Aligning three profiles at once requires patience and maybe an extra pair of hands—especially if you're working alone. One misaligned profile can throw off the entire joint, leading to a wobbly connection that defeats the purpose of using a 3-way in the first place.
Real-World Example: The Material Rack That Needed 3-Way Connectors
Let's say you're tasked with building a material rack b (3 row and 3 floor) for a warehouse. This rack needs to hold heavy boxes of parts, with three shelves per section and three vertical posts per side. If you tried to build this with 2-way connectors, here's what would happen: each shelf would attach to the vertical posts using L-brackets (2-way), but there'd be no horizontal support between the shelves. Over time, the weight of the boxes would pull the vertical posts outward, bowing the shelves and eventually causing the whole rack to collapse. Not good.
Now, swap in 3-way T-connectors: each shelf attaches to the vertical post via a 3-way connector, which also connects to a horizontal crossbar running between the vertical posts. Now the weight is distributed across the vertical posts and the crossbars, keeping the rack square and stable. The 3-way connectors act as anchors, ensuring that every part of the rack works together to bear the load. That's the difference between a rack that lasts a month and one that lasts a decade.

2-Way vs. 3-Way: A Side-by-Side Comparison
Still trying to decide which one is right for your project? Let's put them head-to-head in a comparison table. This will help you see at a glance how they stack up on key factors like design, load capacity, and cost.
| Feature | 2-Way Aluminum Profile Connector | 3-Way Aluminum Profile Connector |
|---|---|---|
| Number of Profiles Connected | 2 profiles | 3 profiles |
| Common Designs | L-shape (90°), straight (180°), adjustable angle | T-shape, Y-shape, cross-shape, fixed or adjustable angles |
| Load Capacity | Medium (best for light to moderate loads) | High (handles heavy loads and complex weight distribution) |
| Installation Complexity | Simple: align two profiles, tighten screws | Moderate: align three profiles, ensure even tightening |
| Cost | Lower (budget-friendly for bulk purchases) | Higher (more materials and engineering) |
| Best For | Straight lines, corners, simple structures (shelves, hand trolleys, small workbenches) | Branching structures, multi-level racks, heavy-duty setups (material racks, conveyor frames, complex workbenches) |
| Limitations | Cannot branch into third directions without extra hardware | Bulkier, more expensive, requires precise alignment |
Choosing the Right Connector: A Step-by-Step Guide
Now that you know the differences, how do you decide which connector to use for your project? Here's a simple step-by-step process to help you choose:
Step 1: Map Out Your Structure
Start by sketching your project. How many profiles do you need? Where do they connect? Are there any branches or junctions where three profiles meet? If your sketch only has straight lines and 90° corners, 2-way connectors are probably enough. If there are T-junctions, Y-junctions, or crossbars, you'll need 3-way connectors for those spots.
Step 2: Estimate the Load
How much weight will each joint need to support? A small shelf for lightweight tools might be fine with 2-way connectors, but a rack holding 50-pound boxes will need the extra strength of 3-way connectors. Check the manufacturer's specs for load capacity—most reputable suppliers list the maximum weight each connector can handle.
Step 3: Consider Future Modifications
Are you building something permanent, or might you want to add on later? If you think you might need to branch off in a new direction down the line, it's smarter to install a 3-way connector now, even if you don't use the third branch yet. It's easier to leave a "blank" branch than to try to retrofit a 3-way connector later.
Step 4: Balance Budget and Needs
3-way connectors are more expensive, so only use them where you truly need the extra support. For example, use 2-way connectors for the straight sections of a rack and 3-way connectors for the T-junctions where shelves attach. This way, you save money without sacrificing stability.
Final Thoughts: It's All About the Right Tool for the Job
At the end of the day, there's no "better" connector—only the right one for your project. 2-way aluminum profile connectors are the reliable, budget-friendly choice for simple, linear, or corner-based builds. They're quick to install and perfect for lightweight to medium loads. 3-way connectors, on the other hand, are the versatile powerhouses that let you build complex, multi-directional structures that can handle heavy loads and stand the test of time. The 3 way aluminum profile connector is a game-changer when you need to branch off, add levels, or create sturdy junctions.
Remember: the best setups often use a mix of both. A workbench might use 2-way L-brackets for the corners and 3-way T-junctions for the side shelves. A rack might use 2-way straight connectors for the vertical posts and 3-way Y-junctions for the crossbars. By understanding how each type works, you can mix and match to create a setup that's strong, flexible, and tailored to your needs.
So the next time you're staring at a pile of aluminum profiles and accessories, take a moment to plan your joints. Ask yourself: Do I need to connect two profiles, or three? What's the load? How complex is my design? The answers will lead you to the right connector—and a setup that works as hard as you do.