- Company Articles
- Products and Technology
- Installation And Maintenance
- Aluminum Profile Rubber Strip Installation Guide for Material Rack B

Aluminum Profile Rubber Strip Installation Guide for Material Rack B
Related Product
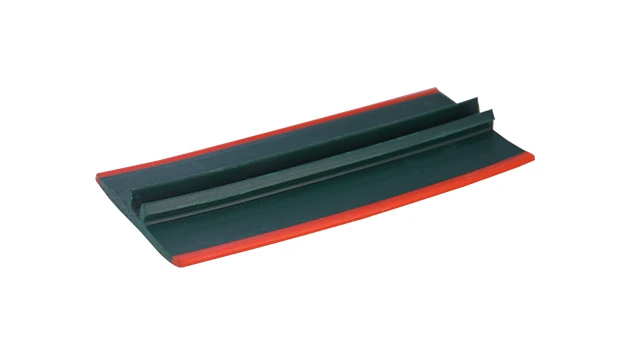
Aluminum Profile Rubber Strip
The tread strip fits into a T-slot channel and provides an anti-slip ribbed surface. It has a key pad that presses into a T-slot and is commonly used for adding traction on steps or as padding for doors. Tread strip can be ordered by rolls. The high quali
Walk into any well-run manufacturing facility, and you'll notice something right away: every tool, every shelf, every piece of equipment has a purpose. That's the heartbeat of a lean system—efficiency, order, and a relentless focus on reducing waste. And when it comes to keeping materials organized, accessible, and damage-free, few pieces of equipment work harder than the Material Rack B (3 row and 3 floor). But even the sturdiest rack needs a finishing touch to truly shine: aluminum profile rubber strips. These small but mighty accessories are the unsung heroes of material handling, cushioning delicate parts, sealing gaps, and ensuring smooth, scratch-free movement of goods. In this guide, we'll walk you through everything you need to know to install aluminum profile rubber strips on your Material Rack B, from gathering tools to troubleshooting common hiccups. Let's dive in.
Why Aluminum Profile Rubber Strips Matter for Your Material Rack B
Before we get our hands dirty, let's talk about why these rubber strips are worth your time. Material Rack B (3 row and 3 floor) is designed to hold multiple layers of materials, from small components to larger parts. Without proper protection, the edges of the aluminum profiles that make up the rack can scratch, dent, or even chip delicate items—think circuit boards, painted parts, or polished metal components. Over time, those small scratches add up: damaged materials mean rework, wasted time, and increased costs, all of which run counter to the lean system principles that keep your operation running smoothly.
Aluminum profile rubber strips solve this problem by acting as a buffer between the rack and your materials. Made from durable, flexible rubber, they line the T-slots of the aluminum profiles (a key feature of Material Rack B's design), creating a soft, non-abrasive surface. But their job doesn't stop there: they also seal gaps in the T-slots, preventing dust, debris, and small particles from building up. A clean rack is an efficient rack—debris-free slots mean easier adjustments (if you ever need to reconfigure the rack) and less time spent cleaning. Plus, the rubber's grip helps keep materials from sliding around during transport, reducing the risk of spills or misalignment. In short, these strips turn a good rack into a great one—protecting your materials, streamlining your workflow, and keeping your lean system on track.
Pro Tip: Not all rubber strips are created equal! For Material Rack B, look for strips specifically labeled as "aluminum profile rubber strip" or "T-slot rubber seal cover." These are designed to fit snugly into the T-slots of aluminum extrusion profiles, ensuring a secure, long-lasting fit.
Tools You'll Need: Gearing Up for Installation
Installing aluminum profile rubber strips is a straightforward job, but having the right tools on hand will make the process faster and frustration-free. Here's what you'll need to gather before you start:
| Tool/Item | Purpose | Notes |
|---|---|---|
| Aluminum Profile Rubber Strip | The main component—lines the T-slots of Material Rack B | Measure the length of your rack's T-slots first to avoid buying too little (or too much!) |
| T-slot Rubber Seal Cover (optional) | For extra sealing in high-debris areas | Similar to rubber strips but often thicker; use if your rack is in a dusty environment |
| Measuring Tape | To measure the length of T-slots on Material Rack B | A retractable tape with clear markings (in inches or centimeters) works best |
| Utility Knife or Scissors | To cut rubber strips to the correct length | Use a sharp blade to avoid jagged edges; a straight-edge ruler can help with clean cuts |
| Cleaning Cloth | To wipe down T-slots before installation | Microfiber cloths work well—they trap dust and debris without leaving lint |
| Rubber Mallet (optional) | To gently tap strips into tight T-slots | Use a soft rubber head to avoid damaging the aluminum profile or the rubber strip |
| Straight-Edge Ruler | To guide cutting and ensure straight edges | A metal ruler is sturdier than plastic and less likely to bend during cutting |

Step-by-Step Installation: How to Fit Rubber Strips on Material Rack B
Now that you've got your tools ready, let's walk through the installation process step by step. We'll break it down into simple, actionable steps—no prior experience required!
Step 1: Prep the T-Slots—Cleanliness is Key
First things first: your Material Rack B's T-slots need to be clean. Over time, dust, grease, and small bits of debris can build up in the slots, and if you install the rubber strip over that gunk, it won't stick properly. Grab your cleaning cloth and wipe down each T-slot thoroughly. Pay extra attention to the corners and crevices—use a dry cloth first to brush away loose dirt, then dampen the cloth (with water only!) to wipe away any sticky residue. Let the slots air dry completely before moving on—moisture can prevent the rubber strip from adhering tightly.
Quick Check: Run your finger along the inside of a T-slot. If it comes away dusty or greasy, give it another wipe. A clean slot = a secure fit!
Step 2: Measure Twice, Cut Once—Getting the Right Length
Next, you'll need to measure the length of the T-slots on your Material Rack B (3 row and 3 floor). Most racks of this type have uniform slot lengths across rows and floors, but it's always a good idea to measure each slot individually—manufacturing tolerances or minor bends can lead to slight variations. Use your measuring tape to measure from one end of a T-slot to the other, keeping the tape straight and taut. Jot down the measurement (rounding up to the nearest 1/4 inch to be safe) and repeat for all slots you plan to cover.
Once you have your measurements, unroll the aluminum profile rubber strip on a flat, clean surface. Lay your straight-edge ruler along the strip, aligning it with the length you need, and use the utility knife to cut. Apply firm, even pressure—let the blade do the work, and avoid sawing back and forth, which can create uneven edges. If the strip is thick, you may need to make a few passes with the knife to get through cleanly.
Step 3: Align the Rubber Strip with the T-Slot
With your cut rubber strip in hand, head back to Material Rack B. Take a moment to align the strip with the T-slot—this is where patience pays off. The rubber strip should have a lip or ridge that fits into the opening of the T-slot; make sure this lip is facing downward (toward the inside of the slot) as you position it. Start at one end of the slot, pressing the strip gently into place to hold it steady. You'll feel a slight "click" as the lip catches the edge of the slot—this is your signal that it's aligned correctly.
Step 4: Press and Secure the Strip into Place
Now comes the fun part: pressing the rubber strip into the T-slot. Start at the end where you aligned the strip, and use your thumb to press firmly along the length of the strip. Move slowly, applying even pressure—you want the strip to seat fully into the slot, with no gaps or bubbles. If you hit a tough spot (some T-slots are tighter than others), grab your rubber mallet. Wrap a cloth around the mallet head to avoid damaging the rubber, then tap gently along the strip to encourage it into place. The goal is to make sure the entire strip is flush with the surface of the aluminum profile—no part should stick up or bulge.
Work your way from one end of the slot to the other, pausing occasionally to check for alignment. If the strip starts to veer off-center, gently peel it back a few inches and realign before pressing forward again. It's better to take an extra minute to get it right than to end up with a crooked strip that doesn't protect the rack properly.
Step 5: Trim Excess and Check for Gaps
Once the strip is fully pressed into the T-slot, take a step back and inspect your work. Are there any gaps between the strip and the slot? Is the strip longer than the slot at either end? If there's excess strip hanging over, use your utility knife to trim it flush with the edge of the aluminum profile—just be careful not to scratch the rack itself. For gaps, try pressing the strip again with your thumb or mallet; if the gap persists, it may mean the strip was cut too short, and you'll need to trim a new piece to the correct length.
- Pro Alignment Trick: If you're installing strips on multiple T-slots (like all three rows of Material Rack B), do one slot at a time. This keeps you from getting overwhelmed and ensures each strip gets the attention it needs.
- Don't Rush the Pressing: Take 30-60 seconds to press each strip into place. Rushing can lead to bubbles or uneven seating, which will weaken the strip's grip over time.

Troubleshooting Common Installation Issues
Even with careful prep, things can go wrong. Here are a few common problems you might run into and how to fix them:
Problem 1: The Rubber Strip Won't Stay in the T-Slot
If the strip pops out or slides around after installation, the first thing to check is the T-slot itself. Was it clean? Grease or dust can act as a barrier, preventing the rubber from gripping. If the slot is clean, the issue may be with the strip's size—some generic rubber strips are too thin for the T-slots on Material Rack B. In that case, swap them out for a thicker strip or a T-slot rubber seal cover, which is designed for a tighter fit.
Problem 2: The Strip is Too Short (or Too Long)
Measuring mistakes happen! If the strip is too short, you'll need to cut a new piece—this time, add 1/2 inch to your measurement to account for any errors. If it's too long, trim the excess with your utility knife. When trimming, angle the blade slightly toward the strip (not the rack) to avoid scratching the aluminum profile.
Problem 3: The Strip is Misaligned and Wrinkled
Wrinkles or twists in the strip usually mean it wasn't aligned properly before pressing. Gently peel the strip back to the point where the wrinkle starts, realign it with the T-slot, and press forward again. If the wrinkle is severe, it's better to start over with a new strip—wrinkles create weak spots that can tear over time.
Maintaining Your Rubber Strips: Keeping Material Rack B in Top Shape
Installing aluminum profile rubber strips is just the first step—like any part of your lean system, they need regular care to keep working well. Here's how to maintain them:
- Monthly Cleaning: Wipe down the rubber strips with a damp cloth to remove dust and debris. Avoid harsh chemicals (like bleach or solvents), which can dry out the rubber and cause it to crack.
- Quarterly Inspections: Check for signs of wear—cracks, tears, or sections that have pulled away from the T-slot. replace any damaged strips right away; a small tear can quickly turn into a big problem if left unaddressed.
- After Heavy Use: If you've been loading/unloading heavy materials on Material Rack B, take a minute to check the strips. Heavy items can shift the strips over time, so press them back into place if needed.
Wrapping Up: Rubber Strips, Lean Systems, and the Big Picture
At first glance, aluminum profile rubber strips might seem like a small detail—but in the world of lean manufacturing, details matter. By taking the time to install and maintain these strips on your Material Rack B (3 row and 3 floor), you're not just protecting materials—you're protecting your team's hard work, your bottom line, and the efficiency that makes your lean system thrive. A scratch-free part means no rework. A clean T-slot means faster adjustments. A secure strip means fewer spills and less waste. It all adds up to a smoother, more productive workflow.
So grab your tools, measure carefully, and take pride in the process. Your Material Rack B (and your lean system) will thank you.