- Company Articles
- Products and Technology
- Installation And Maintenance
- Aluminum Profile Rubber Strip Installation Tools: What You Need to Get Started

Aluminum Profile Rubber Strip Installation Tools: What You Need to Get Started
Related Product
Aluminum Profile Rubber Strip
The tread strip fits into a T-slot channel and provides an anti-slip ribbed surface. It has a key pad that presses into a T-slot and is commonly used for adding traction on steps or as padding for doors. Tread strip can be ordered by rolls. The high quali
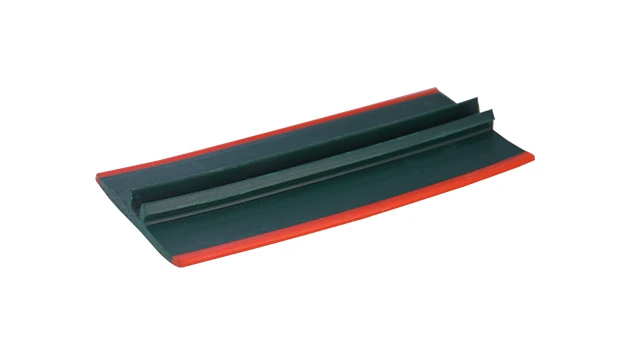
If you've ever worked with aluminum profiles—whether building a workbench, assembling a machine guard, or installing a modular shelving unit—you know that the little details make all the difference. One of those critical details? The rubber strips that line the T-slots, edges, and seams of aluminum profiles. These unassuming strips do more than just fill space: they seal out dust, dampen noise, cushion impacts, and protect both the profile and whatever it's holding. But installing them properly? That takes the right tools. In this guide, we'll walk you through everything you need to know about choosing and using the essential tools for aluminum profile rubber strip installation, so you can achieve a clean, durable finish every time.
Understanding Aluminum Profile Rubber Strips: More Than Just a "Filler"
Before diving into tools, let's take a moment to appreciate what we're working with. Aluminum profiles, with their T-slots and modular design, are the backbone of countless industrial, commercial, and even DIY projects. But without rubber strips, those T-slots and sharp edges can become liabilities: they might catch on wires, collect debris, or even scratch hands during assembly. That's where rubber strips come in, and not all are created equal.
The most common type you'll encounter is the T-slot rubber seal cover —a flexible strip designed to snap into the T-slots of aluminum profiles. Made from materials like EPDM, silicone, or PVC, these strips are engineered to withstand temperature fluctuations, UV exposure, and daily wear. They come in various sizes and shapes: some are hollow for extra cushioning, others have a lip to lock into the slot, and many are colored (black, gray, or even custom hues) to blend with the profile. Beyond T-slots, there are edge-trim rubber strips for softening sharp profile edges, foam-backed strips for enhanced sealing, and specialized versions for waterproofing or electrical insulation. No matter the type, their job is simple: make the profile safer, cleaner, and more functional.
But here's the catch: even the best rubber strip will fail if installed poorly. A misaligned strip might pop out under pressure; a cut that's too short leaves gaps; a rough edge on the profile could tear the strip over time. That's why having the right tools isn't just a convenience—it's the key to a professional result.
Essential Tools for the Job: Your Installation Toolkit
Installing rubber strips might seem straightforward, but anyone who's wrestled with a stiff T-slot cover on a cold morning knows better. The right tools turn a frustrating chore into a quick, precise task. Below, we've broken down the must-have tools, why they matter, and how to use them effectively.
1. Utility Knife: The Precision Cutter
At the top of every installer's list is a sharp utility knife. Rubber strips rarely come pre-cut to your exact profile length, so you'll need to trim them to size. A utility knife with a retractable blade gives you control—no jagged edges, no uneven cuts. Look for one with a comfortable grip (you'll be making multiple cuts) and replaceable blades (dull blades tear rubber instead of slicing it cleanly). Pro tip: Score the rubber strip first with light pressure, then make a second pass to cut through fully. This prevents stretching or deforming the material.
2. Tape Measure and Pencil: Measure Twice, Cut Once
You've heard the saying, and it applies here more than ever. A retractable tape measure (10–25 feet works for most projects) ensures your rubber strip matches the length of your aluminum profile exactly. Pair it with a fine-tipped pencil or a washable marker to mark cut lines—avoid permanent markers, as they can bleed into the rubber over time. For T-slots that curve or have angles, a flexible measuring tape (like a sewing tape) helps conform to the profile's shape, ensuring your strip fits snugly around bends.
3. Rubber Mallet: Gentle Persuasion
When a rubber strip is tight—especially in cold weather, when rubber stiffens—a rubber mallet becomes your best friend. Unlike a metal hammer, which can crack the rubber or dent the aluminum profile, a rubber mallet delivers soft, even force to seat the strip into place. Opt for a mallet with a comfortable handle and a head made of non-marring rubber (look for durometer ratings around 60–70 Shore A for flexibility without being too soft). Use short, light taps along the length of the strip to avoid localized damage.
4. T-Slot Installation Tool: The Specialist
For T-slot rubber seal covers (the most common type), a dedicated T-slot installation tool is a game-changer. These tools have a curved or angled tip that slides under the edge of the rubber strip, guiding it into the T-slot without pinching or tearing. They come in plastic or metal—plastic is gentler on soft rubber, while metal offers more durability for rigid strips. Some even have ergonomic handles to reduce hand fatigue during long installations. If you're working with aluminum profiles regularly, investing in one of these tools will save you time and frustration.
5. Deburring Tool: Smooth Edges = Happy Strips
Aluminum profiles, especially newly cut ones, often have sharp burrs or rough edges along the T-slots. These can snag and damage rubber strips during installation, leading to premature wear. A deburring tool (either manual or battery-powered) smooths these edges, creating a clean surface for the strip to sit against. Look for a tool with interchangeable blades for different profile sizes, and always deburr before cleaning the profile—you don't want metal shavings getting trapped under the rubber strip.
6. Cleaning Supplies: A Clean Slate
Dust, oil, or fingerprints on the aluminum profile's T-slot can prevent the rubber strip from adhering properly (especially if the strip uses adhesive backing). Keep alcohol wipes or a lint-free cloth and isopropyl alcohol handy to clean the slot before installation. Wipe in one direction (not back-and-forth) to avoid spreading debris, and let the surface dry completely—even a small amount of moisture can weaken the bond.
7. Heat Gun: For Cold Weather Installs
Rubber becomes stiff and less flexible in cold temperatures, making it hard to stretch or insert into T-slots. A heat gun (on the lowest setting) gently warms the rubber strip, making it more pliable. Hold the gun 6–8 inches away from the strip, moving it constantly to avoid overheating (which can melt or degrade the rubber). Test a small section first to find the right temperature—you want the strip to bend easily, not feel hot to the touch.

Tool Comparison: Choosing the Right Tool for the Task
| Tool Name | Primary Use | Key Features | Best For |
|---|---|---|---|
| Utility Knife | Cutting rubber strips to length | Retractable blade, ergonomic grip, replaceable blades | Straight cuts on all rubber strip types |
| T-Slot Installation Tool | Guiding strips into T-slots | Curved tip, plastic/metal construction, ergonomic handle | T-slot rubber seal covers and rigid strips |
| Rubber Mallet | Seating tight-fitting strips | Non-marring rubber head, balanced weight (8–16 oz) | Stiff rubber strips or cold-weather installs |
| Deburring Tool | Smoothing profile edges | Interchangeable blades, compact design | Newly cut aluminum profiles with sharp burrs |
| Heat Gun | Softening rubber in cold weather | Adjustable temperature, low-heat setting | Winter installations or rigid silicone strips |

Step-by-Step Installation: Putting Your Tools to Work
Now that you have your toolkit ready, let's walk through the installation process. We'll focus on T-slot rubber seal covers (the most common type), but the steps can be adapted for edge-trim or adhesive-backed strips.
Step 1: Pre-Installation Prep
Start by gathering your materials: aluminum profile, rubber strip (measure and cut to length with your utility knife), and tools. Lay the profile on a flat, stable surface—clamp it down if it's prone to moving. Use the deburring tool to smooth any rough edges, then clean the T-slot with alcohol wipes. Let it dry for 2–3 minutes. If the rubber strip has adhesive backing, peel off a 2-inch section of the backing to expose the adhesive—leave the rest attached for now to avoid accidental sticking.
Step 2: Dry Fit the Strip
Before committing, do a dry fit: lay the rubber strip along the T-slot to check length and alignment. If it's too long, trim with the utility knife; if too short, cut a new strip (never stretch a short strip to fit—it will loosen over time). For profiles with corners or bends, make small relief cuts (1/4 inch deep) in the strip at the bend points to help it conform without wrinkling.
Step 3: insert the Strip (With Tools!)
Starting at one end of the profile, position the rubber strip at the opening of the T-slot. If using a T-slot installation tool, place the tool's curved tip under the strip's edge and gently push downward, guiding the strip into the slot. For stiff strips, tap the tool lightly with the rubber mallet to help the strip seat. If you don't have an installation tool, use your thumb (wearing a glove to avoid blisters) to press the strip into place, working from one end to the other. For adhesive-backed strips, peel off the remaining backing as you go, pressing firmly to ensure the adhesive bonds to the slot.
Step 4: Secure and Trim
Once the strip is fully inserted, go over it with the rubber mallet (on low force) to ensure it's seated evenly—pay extra attention to corners and bends. If there's excess strip at the ends, trim it with the utility knife, holding the blade at a 45-degree angle for a clean edge. For T-slot covers with a lip, make sure the lip is flush with the profile's surface—this prevents it from catching on tools or materials later.
Step 5: Post-Installation Check
Give the strip a gentle tug at a few points to ensure it's secure. Run your hand along the length—there should be no gaps, bumps, or loose sections. If the strip pops out, check for debris in the slot (clean again) or burrs (deburr) and try reinserting with more pressure. For adhesive strips, let the adhesive cure for 24 hours before subjecting the profile to heavy use.
Troubleshooting Common Issues (And How Tools Fix Them)
Even with the right tools, you might run into hiccups. Here's how to solve the most common problems:
Issue: Rubber Strip Won't Stay in the T-Slot
Cause: Debris in the slot, dull installation tool, or strip is too small. Solution: Clean the slot with alcohol wipes, sharpen your utility knife (or replace the blade) to ensure clean cuts, and use the T-slot tool to press the strip deeper into the slot. If the strip is too small, measure the T-slot width and get a larger size—aluminum profiles come in standard sizes (2020, 3030, 4040), so match the strip to your profile's T-slot dimensions.
Issue: Strip Tears During Installation
Cause: Sharp burrs on the profile, using a dull knife, or pulling the strip too hard. Solution: Deburr the profile thoroughly, replace the utility knife blade, and warm the strip with a heat gun (if cold) to make it more flexible. Avoid pulling—press gently instead.
Issue: Uneven or Wrinkled Strip
Cause: Stretching the strip during installation, or not aligning it properly. Solution: Remove the strip, cut a new one (don't reuse a stretched strip), and install it without pulling. Use a pencil line on the profile as a guide to keep the strip straight.
Maintaining Your Tools: Keep Them Ready for the Next Project
Your installation tools are only as good as their condition. With proper care, they'll last for years:
- Utility Knife: Retract the blade when not in use, and replace blades at the first sign of dullness (a dull blade is more dangerous than a sharp one). Store in a dry place to prevent rust.
- Rubber Mallet: Wipe the head clean after use to remove rubber residue. Avoid hitting metal surfaces (it can damage the mallet head).
- T-Slot Installation Tool: Clean the tip with alcohol to remove rubber or adhesive buildup. If it's plastic, avoid exposing it to high heat (like a heat gun).
- Deburring Tool: Remove metal shavings from the blade after use, and oil the pivot point occasionally to keep it moving smoothly.
Final Thoughts: Tools That Make the Difference
Installing aluminum profile rubber strips might seem like a small part of a larger project, but it's a detail that impacts durability, safety, and functionality. With the right tools—utility knife, T-slot installation tool, rubber mallet, and the rest—you'll turn a tedious task into a quick, satisfying one. And remember, aluminum profile accessories like these tools are investments: they not only make your current project easier but ensure every future installation goes smoothly too. So grab your toolkit, prep your profile, and get ready to seal, protect, and perfect your aluminum creations—one rubber strip at a time.