- Company Articles
- Products and Technology
- Installation And Maintenance
- Aluminum Profile Rubber Strip Troubleshooting: Bubbling, Peeling, and Hardening Issues Solved

Aluminum Profile Rubber Strip Troubleshooting: Bubbling, Peeling, and Hardening Issues Solved
Related Product
Aluminum Profile Rubber Strip
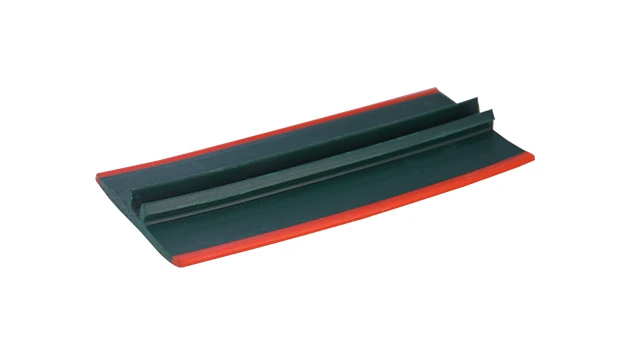
The tread strip fits into a T-slot channel and provides an anti-slip ribbed surface. It has a key pad that presses into a T-slot and is commonly used for adding traction on steps or as padding for doors. Tread strip can be ordered by rolls. The high quali
If you've ever walked through a manufacturing plant, warehouse, or even a workshop, you've probably seen them: sleek aluminum extrusion profiles holding together workbenches, material racks, or conveyor systems. These profiles are the backbone of modern lean systems, but there's a small yet critical component that often goes unnoticed—until it fails: the aluminum profile rubber strip. Tucked into the T-slots of aluminum profiles, these strips seal gaps, reduce noise, protect materials from scratches, and even dampen vibrations. But when they bubble, peel, or harden, they don't just look unprofessional—they can slow down production, damage products, and create safety hazards.
Let's face it: dealing with faulty rubber strips isn't anyone's idea of a good day. You might have stood in front of a workbench, staring at a bubbled strip, wondering, "Why is this happening? And how do I fix it without halting the line?" Or maybe you've noticed peeling strips on a material rack B, watching as they catch on boxes and slow down inventory movement. Hardened strips are even trickier—they lose their flexibility, crack easily, and stop absorbing impact, turning a smooth workflow into a clunky, frustrating process.
In this guide, we're diving deep into the three most common issues with aluminum profile rubber strips: bubbling, peeling, and hardening. We'll break down why they happen, how to troubleshoot them step-by-step, and—most importantly—how to prevent them from recurring. Whether you're a production manager, a maintenance technician, or a small business owner relying on aluminum profile accessories to keep operations running, this article will turn those head-scratching problems into easy fixes. Let's roll up our sleeves and get these strips back in shape.
Understanding Aluminum Profile Rubber Strips: More Than Just a "Strip"
Before we jump into troubleshooting, let's get clear on what these rubber strips are and why they matter. Most aluminum extrusion profiles—like the 2020, 3030, or 4040 series you'll find in workbenches or material racks—come with T-slots: long, narrow grooves designed to hold accessories like brackets, handles, or our star here: rubber strips. These strips are usually made of EPDM, silicone, or PVC, chosen for their flexibility, weather resistance, and durability. They're often paired with T-slot rubber seal covers, which snap into place to keep dust and debris out of the slots.
Think about a typical scenario: a workbench E (single deck, without casters) in an electronics assembly line. The aluminum profile edges are lined with rubber strips to prevent sensitive circuit boards from getting scratched when slid across the surface. If those strips bubble, the boards might catch on the raised edges, causing delays or even product damage. Or consider a roller track on a material rack B (3 row and 3 floor)—if the rubber strips along the track harden, they lose their grip, making it harder to slide boxes smoothly. Suddenly, what was a seamless workflow becomes a daily battle with stuck materials.
The bottom line? These "small" strips play a big role in keeping lean systems efficient. Now, let's tackle each problem one by one.
Problem #1: Bubbling Rubber Strips—What's Trapping Air (or Worse)?
Picture this: you're inspecting a newly assembled aluminum profile workstation, and instead of a smooth, flat rubber strip running along the T-slot, there are unsightly bubbles—some small and pin-sized, others large enough to press down like a blister. What causes this, and how do you fix it?
Common Causes of Bubbling
1. Poor Adhesion During Installation – Most rubber strips are designed to press-fit into T-slots, but some require adhesive to stay in place, especially in high-vibration areas (like near conveyor motors). If the T-slot wasn't cleaned properly before installation—think oil, dust, or leftover aluminum shavings from cutting the profile—the adhesive can't bond. Air gets trapped between the strip and the slot, forming bubbles over time.
2. Trapped Air During Press-Fitting – Even adhesive-free strips can bubble if they're installed too quickly or at the wrong angle. If you push the strip into the slot in one go instead of working from one end to the other, air gets caught underneath. Temperature can worsen this: installing strips on a hot day makes the rubber softer and more likely to trap air, while cold weather makes it stiff and harder to seat properly.
3. Low-Quality Rubber or Manufacturing Defects – Not all rubber strips are created equal. Cheap strips might have inconsistent thickness or weak spots in the material. Over time, these weak spots can expand, creating bubbles as the strip deforms under pressure (like when heavy tools are placed on a workbench).
Troubleshooting Bubbling Strips
Step 1: Identify the Bubble Type – Pin-sized bubbles are often from trapped air; large, irregular bubbles might mean poor adhesion or a defect. Gently press the bubble: if it pops and deflates, it's air. If it feels firm and doesn't move, it could be a manufacturing flaw.
Step 2: For Small Air Bubbles – Use a sharp, clean utility knife to make a tiny slit in the bubble (be careful not to cut the aluminum profile!). Press the strip to release the air, then smooth it down. If the strip has adhesive, apply a small drop of rubber-compatible glue into the slit and press firmly for 30 seconds. Wipe away excess glue with a cloth dampened with isopropyl alcohol.
Step 3: For Large or Defective Bubbles – Unfortunately, if the bubble is caused by a defect or widespread poor adhesion, you'll need to replace the strip. Start by removing the old strip: use a flathead screwdriver to gently pry it out, taking care not to scratch the T-slot. Clean the slot thoroughly with a cloth and isopropyl alcohol, then let it dry completely.
Step 4: Reinstall Correctly – When installing the new strip, work from one end to the other, pressing firmly with your thumb or a rubber mallet (for stiffer strips). If the strip has adhesive, peel the backing off 1-2 inches at a time as you go, avoiding stretching the rubber. For extra security, especially in high-vibration areas, add a thin line of rubber adhesive along the T-slot before pressing the strip in.
Pro Tip: If you're installing strips in bulk (like for a row of workbenches), keep the rubber strips at room temperature for 24 hours before installation. This ensures they're pliable and less likely to trap air.

Problem #2: Peeling Strips—When the Strip Just Won't "Stick Around"
Peeling is another common headache. You'll notice the rubber strip starting to lift at the edges, or in severe cases, peeling away entirely from the T-slot. This isn't just unsightly—peeling strips can catch on gloves, tools, or materials, creating a safety risk. Let's get to the root of why this happens.
Common Causes of Peeling
1. Surface Contamination – Even if you cleaned the T-slot during installation, oils from hands (if you touched the strip without gloves) or residue from cleaning products (like harsh solvents) can break down the adhesive over time. In food processing or chemical plants, spills or fumes can also degrade the rubber, causing it to peel.
2. Mechanical Stress – Rubber strips along high-traffic areas (like the edges of a workbench where tools are constantly slid on and off) endure a lot of friction. Over time, this stress weakens the bond between the strip and the T-slot. The same goes for strips near moving parts, like the sides of a roller track—if boxes or pallets rub against the strip repeatedly, it will start to lift.
3. Incompatible Adhesive or Strip Type – Using a general-purpose adhesive on a high-temperature rubber strip (like silicone) is a recipe for peeling. Similarly, using a soft, flexible strip in an area that needs rigidity (like a heavy-duty material rack) will cause it to stretch and peel under weight.
Troubleshooting Peeling Strips
Step 1: Assess the Damage – If only the edges are peeling (less than 1 inch), you might be able to save the strip. For larger areas (or if the strip is peeling in multiple spots), replacement is better than patching.
Step 2: Fix Minor Peeling – Clean the peeled area with isopropyl alcohol, then apply a small amount of rubber contact adhesive (make sure it's compatible with your strip material—check the manufacturer's specs!). Press the strip down firmly and hold it in place with masking tape for 24 hours to let the adhesive cure. Avoid using super glue—it's too rigid and will crack when the rubber flexes.
Step 3: replace Severely Peeling Strips – Remove the old strip and clean the T-slot as described earlier. This time, take extra care to choose the right strip: for high-friction areas, opt for a thicker, more durable EPDM rubber. For chemical exposure, silicone strips are better. If adhesion is still a concern, use aluminum profile accessories like T-slot rubber seal covers—these snap over the strip, holding it in place while adding an extra layer of protection.
Step 4: Prevent Future Peeling – After reinstallation, avoid touching the strip with bare hands (wear gloves) and clean the area with mild soap and water instead of harsh chemicals. For workbenches or material racks, add edge guards over the rubber strips to reduce direct friction.

Problem #3: Hardening Strips—When Flexibility Turns to Brittle Rigidity
Hardening is the silent killer of rubber strips. At first, you might not notice—until you try to bend the strip and it cracks, or it feels more like plastic than rubber. Hardened strips lose their ability to absorb shock, seal gaps, or grip materials, making them practically useless. What causes rubber to harden, and can you reverse it?
Common Causes of Hardening
1. UV Exposure – Rubber strips near windows, skylights, or outdoor work areas (like loading docks) are bombarded by UV rays. Over time, UV radiation breaks down the rubber's molecular structure, causing it to dry out and harden. This is especially common with cheaper PVC strips, which are less UV-resistant than EPDM or silicone.
2. Extreme Temperature Fluctuations – Freezing cold followed by sweltering heat (think unheated warehouses in winter or direct sunlight on a metal roof in summer) causes rubber to expand and contract repeatedly. This "thermal cycling" weakens the material, leading to brittleness.
3. Chemical Exposure – Oils, solvents, or even certain cleaning products can leach plasticizers from rubber strips. Plasticizers are what keep rubber flexible; without them, the strip becomes hard and rigid. For example, using a degreaser with strong solvents near a workbench's rubber strip might seem harmless, but over time, it will take a toll.
Troubleshooting Hardened Strips
Step 1: Test Flexibility – Gently bend a small section of the strip. If it cracks or doesn't return to its original shape, it's too far gone—replacement is the only option. If it's slightly stiff but still bends, you might be able to soften it temporarily, but this is a band-aid, not a fix.
Step 2: Temporary Softening (For Mild Cases) – Apply a small amount of rubber conditioner (available at hardware stores) to the strip and let it sit for 24 hours. This can restore some flexibility, but it won't reverse UV or chemical damage. Use this only as a stopgap while waiting for replacement strips.
Step 3: replace Hardened Strips – Remove the old strip and clean the T-slot. When choosing a new strip, prioritize UV-resistant options (look for "UV-stabilized" on the label) if it will be exposed to sunlight. For extreme temperatures, silicone or EPDM strips are better than PVC. If the area is prone to chemical spills, ask your aluminum profile supplier about chemical-resistant formulations—they might have specialty strips designed for your industry.
Step 4: Prevent Hardening – For outdoor or window-exposed areas, install shade covers or use aluminum profile end caps to block direct sunlight. In temperature-fluctuating environments, insulate the aluminum profiles (or the area around them) to stabilize temperatures. And always use mild cleaners—soap and water is usually enough.
Troubleshooting Summary: Bubbling, Peeling, Hardening—At a Glance
| Issue | Common Causes | Quick Fix | Prevention Tips |
|---|---|---|---|
| Bubbling | Trapped air, poor adhesion, low-quality rubber | Slit small bubbles to release air; replace large/defective bubbles | Clean T-slots thoroughly; install strips from end to end; use room-temperature strips |
| Peeling | Surface contamination, mechanical stress, incompatible adhesive | Glue minor edge peeling; replace severely damaged strips | Use gloves during installation; choose durable strip materials; add edge guards |
| Hardening | UV exposure, temperature fluctuations, chemical damage | replace hardened strips (temporary softening with conditioner for mild cases) | Use UV-stabilized/silicone strips; insulate profiles; avoid harsh chemicals |
Maintenance Tips to Keep Rubber Strips in Top Shape
Now that you know how to fix these issues, let's talk about prevention—because keeping strips in good condition is easier than repairing them. Here's a simple maintenance routine to follow:
- Weekly Inspections – Walk through your facility and check rubber strips on high-use equipment (workbenches, material racks, conveyor tracks). Look for early signs of bubbling, peeling, or hardening.
- Monthly Cleaning – Wipe down strips with a damp cloth and mild soap to remove dust and oils. Avoid pressure washers—they can force water under the strips, causing bubbling.
- Quarterly Lubrication (For Moving Parts) – If strips are near roller tracks or casters, apply a small amount of silicone spray to keep them flexible (check compatibility first!)
- Annual Replacement Plan – Even well-maintained strips wear out. Keep a stock of replacement strips and plan to swap them out every 1-2 years, depending on usage. Your aluminum profile supplier can help you estimate lifespan based on your environment.
Final Thoughts: Small Strips, Big Impact
Aluminum profile rubber strips might not be the most glamorous part of your lean system, but they're a perfect example of how the smallest components can make the biggest difference. By understanding what causes bubbling, peeling, and hardening—and how to fix and prevent these issues—you can keep your workbenches, material racks, and conveyors running smoothly, reduce downtime, and extend the life of your aluminum extrusion profiles.
Remember: when in doubt, consult your aluminum profile supplier. They can help you choose the right strip material, recommend compatible adhesives, and even provide samples to test in your specific environment. And don't overlook aluminum profile accessories like T-slot rubber seal covers or edge guards—these little extras can save you big headaches down the line.
So the next time you walk past that workbench or material rack, take a second to check the rubber strips. A quick inspection today could prevent a major disruption tomorrow. After all, in lean manufacturing, efficiency starts with the details—and that includes the rubber strip in the T-slot.