- Company Articles
- Products and Technology
- Installation And Maintenance
- Aluminum Workbench A Assembly Guide: Quick Setup for Immediate Productivity

Aluminum Workbench A Assembly Guide: Quick Setup for Immediate Productivity
Related Product
Aluminum Workbench A
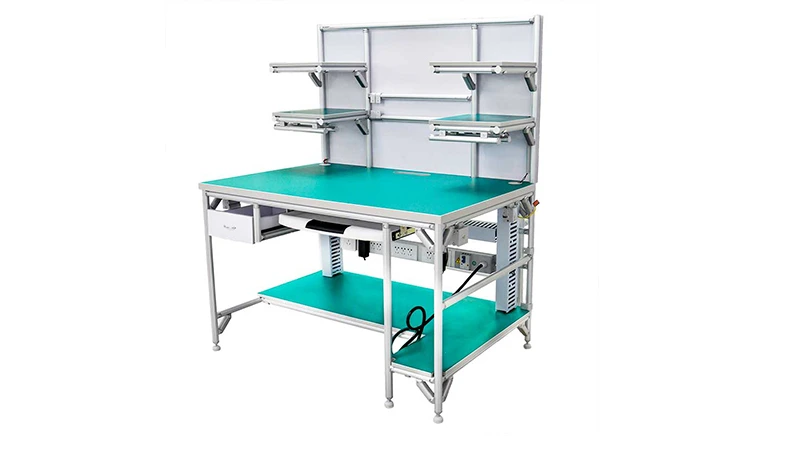
Aluminum tube workbench is more flexible and durable, compared with traditional PE/ABS coated steel tube. It is easy to assemble, anti corrosion, rust protection, and recycle use after disassemble.
Introduction: The Heartbeat of Your Workspace
Walk into any efficient workshop, manufacturing floor, or garage, and you'll notice one common element that ties everything together: a reliable workbench. It's where ideas transition to action, where parts become products, and where daily tasks transform into finished projects. The Aluminum Workbench A isn't just another piece of equipment—it's the foundation of a productive workspace. Crafted from lightweight yet robust aluminum profiles, designed for stability with adjustable features, and built to adapt to your unique needs, this workbench is engineered to make your workflow smoother from day one.
Maybe you've stared at a pile of unassembled parts before, feeling overwhelmed by the thought of putting them together. I get it—those aluminum profiles, joints, and screws can look like a puzzle with no clear picture. But here's the truth: assembling the Aluminum Workbench A is simpler than you think. With this guide, we'll break down the process into easy, manageable steps, so you can spend less time figuring out instructions and more time using your new workbench. Let's get started.
Unboxing: What's Inside and What to Check First
Before diving into assembly, let's start with the basics: unboxing. Your Aluminum Workbench A will arrive in a sturdy cardboard box, packed to protect every component during shipping. Find a clear, flat area to unpack—preferably near where you plan to set up the workbench to avoid moving heavy parts later. Lay out a blanket or old sheet on the floor to prevent scratches on the aluminum profiles or tabletop.
Inside the box, you'll find a curated set of parts tailored to build your workbench. Here's what to expect (contents may vary slightly by supplier, but this is the standard kit):
- Aluminum profiles : These are the "bones" of your workbench—pre-cut tubes that form the legs, side rails, and support braces. They're lightweight, corrosion-resistant, and labeled for easy identification (look for stickers like "Rear Leg" or "Cross Brace").
- Tabletop : A durable, flat surface (often made of plywood, MDF, or aluminum composite) sized to fit the frame. Some models come pre-drilled for easy mounting; others include a template for drilling.
- Adjustable leveling feet : Small but critical components that screw into the bottom of the legs, ensuring your workbench stays stable even on uneven floors.
- Hardware kit : Hex screws, washers, and aluminum profile joints (the connectors that link the profiles together). Most kits also include a hex key set for tightening screws.
- Optional extras : Depending on your order, you might find caster accessories (for mobility), roller track (to slide materials smoothly), or additional aluminum profile accessories like tool hooks.
Pro Tip: Grab the instruction manual (included in the box or downloadable from your supplier) and do a quick inventory. Check each part against the manual's checklist to ensure nothing is missing. Found a broken joint or a missing screw? Contact your aluminum workbench supplier immediately—most keep spare parts in stock and can ship replacements quickly.

Tools You'll Need (Spoiler: You Probably Already Have Them)
You don't need a professional toolbox to assemble the Aluminum Workbench A. In fact, you likely have most of these tools at home. Gather them before starting to avoid mid-assembly trips to the garage or hardware store:
| Tool | Why It's Essential | Quick Tip |
|---|---|---|
| Hex Key Set (Included) | Most aluminum profile joints and hardware use hex screws—this is your primary tool. | Keep keys organized by size; the kit usually includes a small holder with labeled slots. |
| Rubber Mallet | Gently taps profiles into alignment without damaging the aluminum finish. | Avoid metal hammers—they can scratch or dent the profiles. |
| Phillips Screwdriver | For securing the tabletop or any cross-head screws in accessories. | A magnetic-tip screwdriver holds screws in place, saving time and frustration. |
| 4-foot Level | Ensures the workbench is flat and stable after assembly. | Check both side-to-side and front-to-back for perfect leveling. |

Step-by-Step Assembly: Building Your Workbench in 6 Simple Steps
Assembly is all about taking it one step at a time. Rushing leads to mistakes, so grab a drink, clear your schedule for an hour or two, and let's build something solid.
1 Prep Your Space: Flat, Clean, and Ready
Start by setting up your workspace. You'll need an area at least 3 feet larger than the workbench on all sides—this gives you room to lay out parts and move around. Sweep the floor to remove debris, and if the ground is uneven (like a garage with a slight slope), place a thin piece of plywood under the assembly area to create a flat surface. Lay down a blanket or cardboard to protect the aluminum profiles and tabletop from scratches.
2 Build the Frame: Connecting the Aluminum Profiles
The frame is the skeleton of your workbench, and it starts with connecting the aluminum profiles. Refer to the manual to identify which profiles are for the legs, side rails, and cross-braces (they're often marked with labels). Lay the side rails and cross-braces on the floor to form a rectangle—this will be the base frame that the legs attach to.
Take the aluminum profile joints (small, angular connectors) and insert them into the ends of the profiles. Align the holes in the joints with the holes in the profiles—this might take a little wiggling, but don't force it. If they're misaligned, gently twist the profile until the holes line up. Once aligned, thread the hex screws into the joints and tighten them by hand first (to avoid stripping), then use the hex key to snug them up. Repeat until all four corners of the frame are connected.
3 Attach the Legs: Adding Height and Stability
With the frame assembled, it's time to add the legs. Flip the frame upside down so the "bottom" faces up—this makes attaching the legs easier. Take the leg profiles and insert aluminum profile joints into their top ends. Align each leg with a corner of the frame, ensuring the joint holes match up with the frame's holes. Thread the screws through the joints and into the frame, tightening them until the legs feel secure (no wobbling when you gently shake the frame).
Once all four legs are attached, carefully flip the frame upright. At this point, you'll have a wobbly "table frame" with legs—don't worry, we'll stabilize it next with the adjustable leveling feet.
4 Install Adjustable Leveling Feet: No More Wobbles
Adjustable leveling feet are the secret to a stable workbench, even on uneven floors. Screw one leveling foot into the bottom of each leg by hand—they should twist easily. Once all four are in place, place your level on top of the frame (along one of the cross-braces). Check the bubble: if it's off-center, twist the leveling foot on the low side clockwise to raise that corner, or counterclockwise to lower it. Repeat until the bubble is centered both side-to-side and front-to-back.
Pro Tip: If your floor has a noticeable slope, adjust the feet until the frame is level, even if one foot is higher than the others. A level workbench prevents tools from rolling off and ensures accurate measurements.
5 Mount the Tabletop: Securing the Work Surface
Now it's time to add the tabletop—the surface where you'll actually work. Lift the tabletop onto the frame, centering it so there's equal overhang on all sides (or align it flush, depending on your preference). If the tabletop is pre-drilled, align the holes with the mounting brackets on the frame. If not, use the manual's template to mark where to drill (use a drill bit slightly smaller than the screws to prevent splitting).
Have a helper hold the tabletop steady while you crawl underneath to attach the mounting brackets. These small metal plates connect the tabletop to the frame. Thread the screws through the brackets and into the tabletop, tightening them until the tabletop doesn't move when you push or pull it. If the tabletop is heavy, ask a friend to help lift it—no need to strain your back!
6 Add Extras: Roller Track, Casters, and Custom Touches
Now that the basic workbench is assembled, it's time to add accessories that make it work for you. One popular upgrade is roller track—a rail with small wheels that lets materials slide across the workbench effortlessly. To install it: measure where you want the track (usually along the back edge or a side), mark the holes, and screw it into the tabletop using the included hardware. Make sure it's level so items roll smoothly.
If you ordered caster accessories for mobility, swap out the adjustable leveling feet for casters. Unscrew the feet, attach the caster mounting plates to the legs, then screw the casters into the plates. Lock the brakes when the workbench is in use to keep it stationary.
Troubleshooting: Fixing Common Issues
Even with careful assembly, small hiccups can happen. Here's how to solve the most common problems:
- Wobbly Workbench : Check the adjustable leveling feet first—twist them to rebalance the frame. If the frame itself wobbles, tighten the screws on the aluminum profile joints (they can loosen during assembly).
- Profiles Won't Connect : If joints and profiles don't align, gently twist the profile until the holes match. Avoid forcing—if the profile is bent (rare, but possible), use a rubber mallet to straighten it slightly.
- Tabletop Squeaks : This usually means the mounting bracket screws are loose. Crawl underneath and tighten them—be careful not to over-tighten, which can damage the tabletop material.
- Missing Parts : Contact your aluminum workbench supplier. Most keep spare screws, joints, and feet in stock and can ship them quickly—no need to delay your project.
Maximizing Productivity: Tips for Your New Workbench
Your Aluminum Workbench A is assembled—now let's make it work as hard as you do. Here are a few ways to boost productivity:
Go Vertical with Aluminum Profile Accessories : Use the space above and around the workbench with shelves, pegboards, or tool hooks made from extra aluminum profiles. This keeps tools within reach and clears the tabletop for projects.
Use Roller Track for Material Flow : If you installed roller track, organize parts by frequency of use. Place commonly needed items on the track so they slide to you, reducing time spent reaching or bending. For assembly tasks, set up the track to feed parts from one end to the other, creating a mini production line.
Keep It Clean : A cluttered workbench slows you down. At the end of each day, wipe the tabletop, return tools to their spots, and clear scraps. Start each morning with a fresh workspace—no time wasted tidying up.
Adapt and Evolve : Your needs will change, and your workbench should too. Add extensions with extra aluminum profiles, swap legs for taller ones, or install new accessories. The flexibility of aluminum means your workbench can grow with you.
Conclusion: Ready to Work Smarter
You did it—you've assembled your Aluminum Workbench A, and it's ready to transform your workspace. From the sturdy aluminum profiles to the adjustable leveling feet, every part is designed to make your work easier, more efficient, and more enjoyable. Remember, this workbench isn't just a piece of furniture—it's an investment in your productivity.
As you use it, don't be afraid to customize it. Add shelves, swap accessories, or adjust the setup to fit new projects. And if you ever need help—whether with assembly questions or replacement parts—your aluminum workbench supplier is there to assist.
Now, step back, admire your handiwork, and get to work. Your new workbench is ready—and so are you.