- Company Articles
- Products and Technology
- Installation And Maintenance
- Aluminum Workbench A Maintenance Guide: Keeping Your Workbench in Prime Condition

Aluminum Workbench A Maintenance Guide: Keeping Your Workbench in Prime Condition
Related Product
Aluminum Workbench A
Aluminum tube workbench is more flexible and durable, compared with traditional PE/ABS coated steel tube. It is easy to assemble, anti corrosion, rust protection, and recycle use after disassemble.
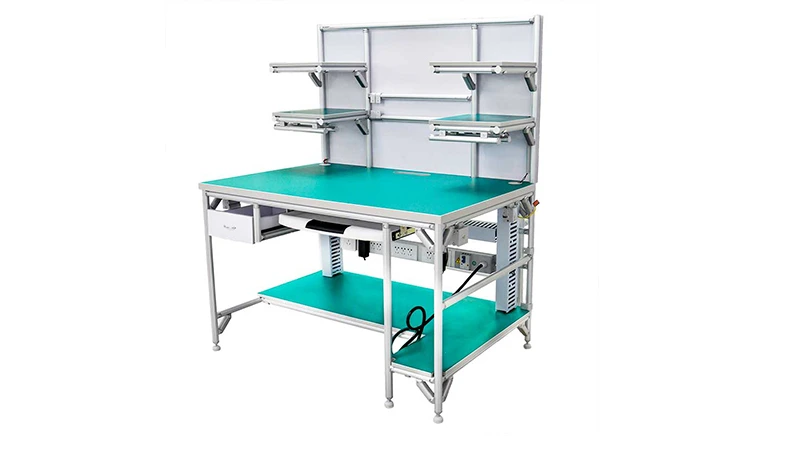
Whether you're running a busy factory floor, a bustling workshop, or a compact home garage, your Aluminum Workbench A is more than just a piece of equipment—it's a silent partner in your daily operations. This sturdy, versatile workbench, built with durable aluminum profile and designed to withstand the rigors of production assemble, relies on regular care to keep up with your demands. Neglecting maintenance might seem harmless at first, but over time, loose joints, sticky surfaces, or wobbly legs can slow down workflows, compromise safety, and even shorten the workbench's lifespan. The good news? With a little effort and the right routine, you can keep your Aluminum Workbench A in top shape for years to come. Let's dive into how to give it the care it deserves.
Understanding Your Aluminum Workbench A
Before we jump into maintenance steps, let's take a quick look at what makes your Aluminum Workbench A tick. This model, often referred to as "Workbench E (single deck-without caster)" in supplier catalogs, is crafted from high-grade aluminum profile, known for its lightweight strength and resistance to corrosion. Its single-deck top—sometimes featuring an aluminum honeycomb panel for added durability—provides a smooth, stable surface for everything from intricate assembly work to heavy tool storage. Underneath, the frame is held together by aluminum profile accessories like internal rotary aluminum joints and 90° aluminum profile connectors, which keep the structure rigid without adding unnecessary weight.
Unlike heavier steel workbenches, Aluminum Workbench A's design prioritizes flexibility. Its components, from the aluminum guide rail along the edges to the adjustable leveling feet at the base, are meant to be both sturdy and adaptable. But this adaptability means each part relies on proper upkeep to function as intended. A loose joint here or a dirty rail there might not seem like much, but together, they can turn a reliable workbench into a frustrating hassle.
Daily Cleaning: The Foundation of Longevity
Think of daily cleaning as brushing your teeth—simple, quick, and essential for preventing bigger problems down the line. Even if your workbench looks "clean enough," tiny debris, oil smudges, or metal shavings can cause scratches, corrode the aluminum surface, or gunk up moving parts over time. Here's how to do it right:
Start with a Dry Wipe
Begin each day (or end each shift) by wiping down the workbench top with a clean, dry microfiber cloth. This removes loose dust, wood chips, or metal filings that might have accumulated. Pay extra attention to the edges and corners, where debris loves to hide. If you work with materials like glass or plastic, check for small shards that could scratch the surface when wiped. For stubborn bits, gently sweep them into a dustpan with a soft-bristled brush—avoid using metal scrapers, which can leave marks on the aluminum.
Tackle Spills Immediately
Oil, grease, or chemical spills are inevitable in any workshop. The key is to address them before they have time to set. For oil or grease, blot the spill with a paper towel first to absorb as much as possible, then wipe the area with a cloth dampened in warm, soapy water (mild dish soap works best). Avoid harsh chemicals like bleach or ammonia, which can discolor or corrode the aluminum. For water-based spills, a quick wipe with a dry cloth is usually enough—aluminum resists rust, but standing water can leave water spots if left unattended.
Don't Forget the Edges and Rails
The aluminum guide rail A or B along the front edge of your workbench (depending on your model) is designed to keep tools or materials from sliding off. But it's also a magnet for grime. Use a cotton swab or a small brush to clean out the crevices of the rail, where dust and oil can build up. If your workbench has a roller track (common in production settings for moving parts along the surface), wipe the rollers with a dry cloth to ensure they spin freely. A quick spin test—give each roller a gentle push to make sure it rotates smoothly—can save you from jams later.
Pro Tip:
Keep a dedicated microfiber cloth and a small bottle of mild soap near your workbench. Having supplies handy makes daily cleaning feel less like a chore and more like a quick habit.

Weekly Inspections: Catching Problems Early
Daily cleaning keeps the surface fresh, but weekly inspections help you spot issues before they escalate. Set aside 10–15 minutes each week to give your workbench a thorough once-over. This isn't just about looking—it's about touching, testing, and tightening. Here's what to check:
Check for Loose Joints and Connectors
Aluminum profile accessories like 90° aluminum profile connectors and internal rotary aluminum joints are the backbone of your workbench's stability. Over time, vibrations from heavy use can loosen these connections. Grab a hex key (most aluminum profile joints use standard hex bolts) and gently test each joint. If a bolt turns easily, tighten it until it's snug—but don't over-tighten, as this can strip the threads or warp the aluminum. Pay special attention to the corners of the frame and the connections where the top deck meets the legs—these are high-stress areas that tend to loosen first.
Test the Adjustable Leveling Feet
Even if your workshop floor seems flat, slight unevenness can cause your workbench to wobble. That's where the adjustable leveling feet at the base come in. To check if they're doing their job, place a bubble level on the workbench top. If the bubble isn't centered, adjust the feet by turning them clockwise (to raise) or counterclockwise (to lower) until the surface is level. While you're at it, inspect the feet themselves for cracks or wear—if the rubber pads are worn down, replace them to prevent slipping and protect your floor.
Inspect the Workbench Top
Run your hand across the aluminum honeycomb panel top to feel for scratches, dents, or rough spots. Small scratches can be buffed out with a fine-grit sandpaper (2000 grit or higher) followed by a polish, but deeper dents might need professional attention. If you use the workbench for tasks involving chemicals, check for discoloration—this could be a sign that the protective coating is wearing thin. In that case, applying a thin layer of aluminum-safe wax can help restore the finish and add a barrier against future damage.

Monthly Deep Maintenance: Going the Extra Mile
Once a month, set aside 30–45 minutes for a deeper clean and inspection. This is when you'll tackle tasks that don't need daily or weekly attention but are crucial for long-term health. Think of it as a "tune-up" for your workbench.
Lubricate Moving Parts
If your Aluminum Workbench A has any moving components—like the internal rotary aluminum joints that allow for height adjustments or the roller track along the edges—they need lubrication to stay smooth. Use a silicone-based lubricant (avoid oil-based products, which attract dust) and apply a small amount to the joints or roller axles. Wipe away excess lubricant with a cloth to prevent it from gumming up with debris. For roller tracks, a quick spray of dry silicone spray on the plastic roller track guide rail (whether yellow or grey) can keep materials sliding effortlessly.
Clean Under and Around the Workbench
It's easy to ignore the space under the workbench, but dust bunnies, spilled liquids, or even small tools can accumulate there, leading to pests or corrosion. Slide the workbench away from the wall (if possible) and vacuum or sweep the area underneath. Check the legs and frame for signs of rust (unlikely with aluminum, but possible if steel accessories are present) or mold (common in humid environments). If you spot mold, wipe it away with a mixture of water and vinegar, then dry thoroughly.
Tighten and replace Aluminum Profile Accessories
Over time, even well-maintained joints can wear out. During your monthly check, take a close look at the aluminum profile accessories like corner codes, gussets, or brackets. If a joint is bent, cracked, or stripped, replace it immediately—using damaged parts puts the entire structure at risk. Most suppliers (like your go-to aluminum profile supplier) stock replacement parts, so keep a few spares on hand for quick fixes. For example, if a 45° aluminum profile connector is loose and won't tighten, swapping it out for a new one takes minutes and ensures your workbench stays stable.
Pro Tip:
Create a "maintenance kit" with essentials: hex keys, silicone lubricant, microfiber cloths, mild soap, sandpaper, and replacement aluminum profile accessories (like extra joints or leveling feet). Storing it near the workbench makes monthly tasks a breeze.
Seasonal Considerations: Adapting to the Elements
Your workbench doesn't exist in a bubble—temperature and humidity changes throughout the year can affect its performance. Adjust your maintenance routine to keep up with the seasons:
Humid Summers
High humidity can cause condensation on metal surfaces, which, while aluminum resists rust, can still lead to mold or mildew on wooden or fabric items stored on the workbench. Wipe down the top and frame more frequently during humid months, and consider placing a dehumidifier nearby if your workshop is prone to moisture. Also, check the adjustable leveling feet—wooden floors might swell in humidity, throwing off the workbench's level, so you may need to readjust them.
Dry Winters
Low humidity can cause wood (if you have wooden accessories) to shrink, but for aluminum workbenches, the main risk is static electricity, especially if you work with sensitive electronics. If static becomes an issue, wipe the workbench top with a slightly damp cloth (not wet!) to reduce static buildup. You can also use an anti-static spray designed for metal surfaces—just test it on a small, hidden area first to ensure it doesn't discolor the aluminum.
Troubleshooting Common Issues
Even with regular maintenance, problems can pop up. Here's how to diagnose and fix some of the most common issues with Aluminum Workbench A:
| Issue | Possible Cause | Solution |
|---|---|---|
| Workbench wobbles | Loose joints or unlevel adjustable leveling feet | Tighten all aluminum profile connectors; adjust leveling feet with a bubble level |
| Sticky roller track | Dust or debris in the plastic roller track guide rail | Clean the rail with a dry brush, then apply silicone lubricant to rollers |
| Scratched workbench top | Heavy tools or abrasive materials | Buff with 2000-grit sandpaper, then polish with aluminum wax |
| Joints won't tighten | Stripped threads or worn aluminum profile accessories | replace the joint with a new one from your aluminum profile supplier |
| Leveling feet sink into the floor | Soft floor (e.g., concrete with cracks) or worn rubber pads | Add metal or rubber floor protectors under the feet; replace worn pads |
Long-Term Care: Investing in the Future
Beyond regular maintenance, a few extra steps can extend your workbench's life even further. For example, avoid overloading the top—check the manufacturer's weight limit (usually listed in the product manual) and stick to it. If you need to store heavy tools, distribute the weight evenly to prevent warping. When not in use for long periods (like during a workshop shutdown), cover the workbench with a breathable cloth to protect it from dust and debris.
Also, stay in touch with your aluminum profile supplier. They can provide replacement parts, offer advice on upgrades (like adding casters for mobility), or let you know about new aluminum profile accessories that can enhance your workbench's functionality. After all, your Aluminum Workbench A is an investment—treating it like one ensures it keeps supporting your work for years to come.
Conclusion: A Little Care Goes a Long Way
Your Aluminum Workbench A is more than just a piece of equipment—it's a tool that helps you get the job done, day in and day out. By incorporating daily cleaning, weekly inspections, and monthly deep maintenance into your routine, you're not just keeping it clean—you're ensuring it stays reliable, safe, and ready to tackle whatever you throw at it. Remember, every wipe, every tightened joint, and every adjustment is an investment in the workbench's future and your own productivity. So grab that cloth, pick up that hex key, and give your workbench the care it deserves. It will thank you with years of smooth, steady service.