- Company Articles
- Products and Technology
- Installation And Maintenance
- Aluminum Workbench A Troubleshooting: Common Issues and Solutions

Aluminum Workbench A Troubleshooting: Common Issues and Solutions
Related Product
Aluminum Workbench A
Aluminum tube workbench is more flexible and durable, compared with traditional PE/ABS coated steel tube. It is easy to assemble, anti corrosion, rust protection, and recycle use after disassemble.
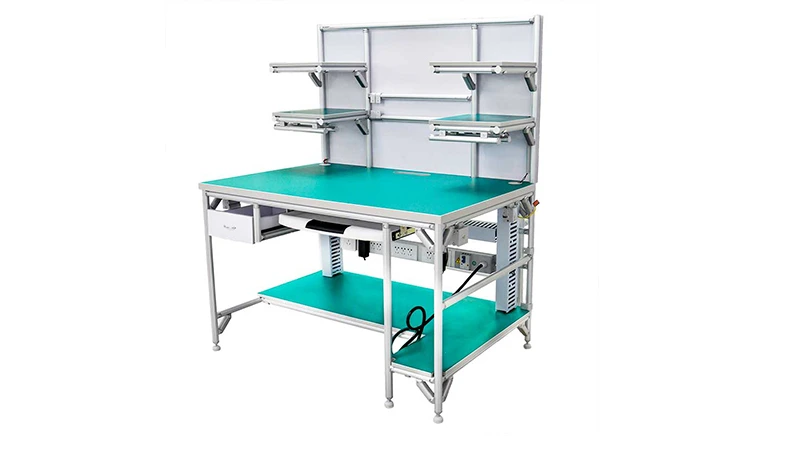
If you've spent any time in a busy workshop or production line, you know the unsung hero that keeps things moving: the workbench. And when it comes to durability, flexibility, and sheer reliability, Aluminum Workbench A stands out. Whether you're assembling electronics, packing orders, or fine-tuning components, this workbench is the steady partner you rely on to keep your workflow smooth. But what happens when that partner starts acting up? A wobbly surface, a stuck roller track, or a loose joint can turn a productive day into a frustrating one—slowing down tasks, increasing errors, and even testing the patience of your team.
The good news? Most issues with Aluminum Workbench A are fixable with a little know-how and some basic tools. In this guide, we're diving into the most common problems workers face, why they happen, and step-by-step solutions to get your workbench back in top shape. Think of it as a friendly troubleshooter's manual—written not by engineers in a lab, but by someone who's been there: someone who's cursed a wobbly table mid-assembly, or wasted 10 minutes trying to unjam a roller track. Let's get your workbench (and your workflow) back on track.
The good news? Most issues with Aluminum Workbench A are fixable with a little know-how and some basic tools. In this guide, we're diving into the most common problems workers face, why they happen, and step-by-step solutions to get your workbench back in top shape. Think of it as a friendly troubleshooter's manual—written not by engineers in a lab, but by someone who's been there: someone who's cursed a wobbly table mid-assembly, or wasted 10 minutes trying to unjam a roller track. Let's get your workbench (and your workflow) back on track.
Quick Reference: Common Issues & Fixes
| Issue | Key Symptoms | Quick Fix |
|---|---|---|
| Workbench Instability (Wobbling) | Shakes during use; tools/parts slide | Tighten adjustable leveling feet; check floor unevenness |
| Uneven Work Surface | Items tilt; difficulty aligning components | Inspect aluminum profile for bends; adjust deck installation |
| Roller Track Jamming | Materials get stuck; slow/choppy movement | Clean track debris; realign plastic roller track guide rail |
| Caster Wheel Malfunctions | Hard to move; wheel locks or drags | Clean caster wheels; replace worn bearings or caster accessories |
| Loose Lean Pipe Joints | Creaking sounds; shifting frame parts | Tighten joints with hex key; use thread locker on loose connections |
1. Workbench Instability (Rocking or Wobbling)
Symptoms:
You're in the zone, assembling a small component, when suddenly the workbench starts to shake. Your hand slips, and you have to restart. Or maybe you notice tools sliding toward the edge when you lean on the table. Worse, when multiple people work on the bench at once, it feels like it might tip over. Annoying? Absolutely. Dangerous? Potentially, if heavy parts slide off.
Why It Happens:
More often than not, instability boils down to three culprits:
- Loose adjustable leveling feet: These small, threaded feet under the workbench are designed to stabilize it on uneven floors. Over time, vibrations from daily use can loosen them, making the bench rock.
- Uneven floor surface: Even if the feet are tight, a floor with dips or bumps (common in older workshops) can throw the bench off balance.
- Worn or damaged caster wheels: If your Aluminum Workbench A has optional casters (for mobility), wheels with flat spots or stuck bearings can cause uneven rolling and wobbling when stationary.
How to Fix It:
Let's start with the easiest fix: checking the adjustable leveling feet. Here's what to do:
- Give the feet a twist: Get down on the floor and inspect each leveling foot (there are usually 4, one at each corner). Use a wrench or your hand (if they're not too tight) to turn them clockwise to tighten. If they spin freely, they were definitely loose.
- Use a level tool: Place a spirit level on the workbench surface—both lengthwise and widthwise. If the bubble is off-center, adjust the feet until the bubble is centered. Pro tip: Mark the feet with a marker once they're set, so you can quickly spot if they loosen later.
- Check for floor issues: If the level still shows unevenness after adjusting the feet, place a thin shim (like a metal washer or piece of plywood) under the foot that's sitting lower. Just make sure the shim is sturdy and won't slip.
- Inspect caster wheels: If your bench has casters, lift the bench slightly and spin each wheel. If a wheel doesn't spin smoothly or has a flat spot, replace it with a new caster wheel from your lean pipe supplier. Also, check caster accessories like brackets—tighten any loose screws here.
Keep It Stable Long-Term:
Spend 2 minutes once a week to check the leveling feet—tighten them if they're loose. Wipe off any dirt or debris from the feet (sawdust or metal shavings can make them slip). If you move the bench often, lock the casters when it's in use to prevent unnecessary movement.
2. Uneven Work Surface
Symptoms:
You place a ruler on the workbench, and it rocks back and forth. Or when you lay a flat component down, one corner lifts off the surface. This isn't just annoying—it can ruin precision work. Imagine trying to solder a circuit board on an uneven surface, or aligning parts that won't sit flat. Frustrating, right?
Why It Happens:
Aluminum Workbench A is built with sturdy aluminum profile, but even the best materials can have issues:
- Bent aluminum profile: If the bench was overloaded (e.g., someone stood on it) or dropped during installation, the main aluminum extrusion profile (the frame) might have a slight bend.
- Uneven deck installation: The workbench top (single deck, in the case of Workbench A) is attached to the frame with screws or brackets. If these are loose or installed at an angle, the deck can sit unevenly.
- Loose aluminum profile accessories: Corner codes, brackets, or joints connecting the frame pieces can loosen over time, causing the frame to shift and warp the surface.
How to Fix It:
First, rule out a bent frame. Here's how:
- Check the frame straightness: Remove the deck (if possible) by unscrewing the brackets holding it to the aluminum profile. Lay a long, straight piece of wood or metal (like a level) along the frame rails. If there's a gap between the straight edge and the frame, the profile is bent. For minor bends, gently tap the frame back into shape with a rubber mallet (never a steel hammer—you'll dent the aluminum). For major bends, you may need to replace the profile (contact your aluminum profile supplier for a replacement part).
- Realign the deck: If the frame is straight, the deck is likely the culprit. Loosen the screws holding the deck to the frame, then place the level on the deck. Adjust the deck until it's level, then retighten the screws. Make sure the screws are snug but not over-tightened—stripping the threads in the aluminum profile is a common mistake.
- Tighten accessories: Inspect all aluminum profile accessories, like 2020 switch to aluminum corner codes or 3060 aluminum angle yards (depending on your bench model). Use a hex key to tighten any loose screws. Pay extra attention to the corners—these take the most stress.
Keep the Surface Flat:
Avoid overloading the workbench beyond its weight limit (check the manual—most Aluminum Workbench A models handle 200-300kg). When moving heavy items, lift them instead of sliding them across the deck (sliding can scratch the surface and loosen brackets). Every month, check the deck screws and frame accessories to keep everything tight.

3. Roller Track Jamming (Material Flow Issues)
Symptoms:
You're sliding a bin of parts down the roller track (a common add-on for Aluminum Workbench A), and suddenly it stops—halfway, of course. You give it a push, and it jerks forward, spilling a few parts. Or worse, the rollers themselves won't spin, making you drag materials instead of sliding them. This isn't just a time-waster; it can damage delicate parts or strain your back from pushing.
Why It Happens:
Roller tracks rely on smooth, free-spinning rollers and aligned guide rails. When they jam, it's usually due to:
- Debris in the track: Sawdust, metal shavings, or even small parts (like screws) can get stuck between the rollers, gumming up the works.
- Misaligned plastic roller track guide rail: The yellow or grey plastic guides that keep rollers in place can shift over time, causing rollers to bind.
- Worn swivel roller balls: If your track uses swivel roller balls (1 inch or 0.5 inch), these small, spherical rollers can wear out or get dented, making them stick.
- Loose roller track placon mounts: These brackets attach the track to the workbench frame. If they're loose, the track can sag or twist, causing jams.
How to Fix It:
Let's start with the simplest solution: cleaning the track. Grab a brush, rag, and some compressed air (if you have it):
- Clear the debris: First, remove any materials from the track. Use a small brush (a toothbrush works for tight spots) to sweep out sawdust or shavings. For stubborn debris, blast it with compressed air. If something is stuck between rollers, gently pry it out with a flathead screwdriver (be careful not to bend the rollers).
- Check the guide rails: Look at the plastic roller track guide rail (yellow or grey) along the edges of the track. If they're bent or misaligned, loosen the screws holding them to the track, realign them so they're straight and parallel, then retighten. Pro tip: Use a ruler to measure the distance between the rails at both ends—they should be equal.
- Test the swivel roller balls: Spin each roller ball with your finger. If any don't spin freely, they need to be replaced. For 1 inch or 0.5 inch swivel roller balls, simply pop out the old ones (they're usually press-fit) and push in new ones. If you don't have spares, contact your roller track supplier—they're cheap and easy to stock.
- Tighten placon mounts: Inspect the roller track placon mount for aluminum profile (flat or high) that attach the track to the workbench. Use a hex key to tighten any loose screws. If a mount is cracked, replace it—don't risk a sagging track.
Keep Rollers Rolling Smoothly:
Make it a daily habit to sweep the roller track at the end of your shift—even a quick brush can prevent buildup. Every month, apply a drop of light machine oil to the swivel roller balls (avoid heavy oil, which attracts dust). And if you're using the track for heavy bins, check the placon mounts quarterly—they take a lot of stress.

4. Caster Wheel Problems (Stiff Movement or Locking)
Symptoms:
You need to move the workbench to clean behind it, but it feels like dragging a boulder. Or one caster wheel locks up, making the bench veer to the side. If the wheels won't roll smoothly, even a small move becomes a workout. And if a wheel locks while you're moving it, you could strain your back or damage the floor.
Why It Happens:
Caster wheels are tough, but they're not invincible. Common issues include:
- Debris in the wheels: Hair, string, or small metal shavings can wrap around the axle, jamming the wheel.
- Worn bearings: The bearings inside the wheel allow it to spin. Over time, they can wear out or rust (if the workshop is humid), causing the wheel to stiffen.
- Loose caster accessories: The brackets, pins, or locks that hold the caster to the bench can loosen, making the wheel wobble or lock.
- Flat spots on the wheel: If the bench is left in one spot for months, the caster wheel (especially rubber ones) can develop flat spots, causing bumpy rolling.
How to Fix It:
Let's tackle debris first—it's the easiest fix:
- Clean the wheels: Flip the workbench onto its side (get help if it's heavy!) to access the casters. Use a pair of tweezers or a small knife to pick out hair or string wrapped around the axle. For metal shavings, wipe the wheel and axle with a rag dipped in rubbing alcohol (this also removes grease and grime).
- Lubricate the bearings: If the wheel still feels stiff after cleaning, apply a few drops of bearing oil (or WD-40, if that's all you have) to the axle where the wheel meets the bracket. Spin the wheel by hand to work the oil in. Avoid over-lubricating—excess oil attracts dirt.
- replace worn wheels: If the wheel has flat spots or the bearings are completely seized, it's time for a new caster wheel. Most casters are held on with a bolt or pin—remove it, take the old wheel to your caster supplier to match the size, and bolt on the new one. Pro tip: Buy a few spares and keep them in your toolbox—you'll thank yourself later.
- Tighten caster accessories: Check the caster installation base and any brackets holding the caster to the bench. Tighten loose screws with a wrench. If a bracket is bent, replace it—bent brackets put uneven pressure on the wheel, causing premature wear.
Keep Casters Rolling Freely:
Every week, give the caster wheels a quick spin and wipe. If the bench stays in one spot for long periods, move it slightly every few days to prevent flat spots. And if you work in a humid environment, apply a thin coat of oil to the bearings monthly to prevent rust.
5. Loose Lean Pipe Joints (Creaking or Shifting Frames)
Symptoms:
You hear a creaking sound every time you lean on the workbench. Or the frame shifts slightly when you push a heavy bin onto the roller track. Loose joints might not seem urgent, but over time, they can weaken the entire structure—leading to bigger problems like a warped surface or even a collapsed shelf.
Why It Happens:
Aluminum Workbench A uses lean pipe joints (or aluminum pipe joints) to connect the frame pieces. These joints are strong, but:
- Vibration from daily use: Every time you hammer, drill, or drop a tool, vibrations loosen the joints a tiny bit. Over weeks or months, those tiny loosens add up.
- Improper initial tightening: If the workbench was assembled in a hurry, joints might not have been tightened fully in the first place.
- Low-quality joints: If the bench uses generic or cheap lean pipe joints (instead of high-quality ones from a reputable lean pipe supplier), the threads can wear out quickly, making them impossible to tighten.
How to Fix It:
Fixing loose joints is straightforward—you just need the right tool (usually a hex key or wrench) and a little patience:
- Identify loose joints: Walk around the workbench and gently shake each part of the frame. Listen for creaks or feel for movement. Pay extra attention to corners and where horizontal and vertical pipes meet—these are the most common spots for loose joints.
- Tighten with the right tool: Most lean pipe joints use hex screws (Allen keys). insert the correct size hex key into the joint and turn clockwise until snug. Don't over-tighten—you could strip the threads or crack the joint (especially if it's plastic-coated).
- Use thread locker for stubborn joints: If a joint keeps loosening, apply a small drop of thread locker (like Loctite) to the threads before tightening. This helps keep the screw in place without damaging the joint.
- replace damaged joints: If a joint is cracked, stripped, or won't tighten, replace it. Remove the old joint by loosening the adjacent pipes, slide on the new joint (from your lean pipe and accessories stock), and tighten. It's quick and cheap insurance against bigger frame issues.
Keep Joints Tight for the Long Haul:
Add a "joint check" to your weekly maintenance routine. Spend 5 minutes walking around the bench, tightening any loose joints. If your workshop uses power tools regularly (which create more vibration), check joints twice a week. And when assembling new workbenches, take the time to tighten joints properly—rushing here leads to headaches later.
Final Thoughts: Your Workbench, Your Workflow
Aluminum Workbench A is more than just a table—it's the backbone of your daily work. When it's working well, you barely notice it. But when it's not, it's impossible to ignore. The good news is that most issues are small, fixable, and preventable with basic maintenance. By taking a few minutes each week to check the leveling feet, clean the roller track, or tighten a joint, you'll keep your workbench (and your workflow) running smoothly for years.
Remember: A little care goes a long way. And if you ever run into a problem you can't fix, don't hesitate to reach out to your aluminum profile supplier or lean pipe supplier—they're there to help. Now go give your workbench a quick once-over, and get back to what you do best: creating, building, and keeping things moving.