- Company Articles
- Products and Technology
- Product knowledge
- Aluminum Workbench B Customization Guide: From Dimensions to Specialized Fixtures

Aluminum Workbench B Customization Guide: From Dimensions to Specialized Fixtures
Related Product
Aluminum Workbench B
Aluminum tube workbench is more flexible and durable, compared with traditional PE/ABS coated steel tube. It is easy to assemble, anti corrosion, rust protection, and recycle use after disassemble.
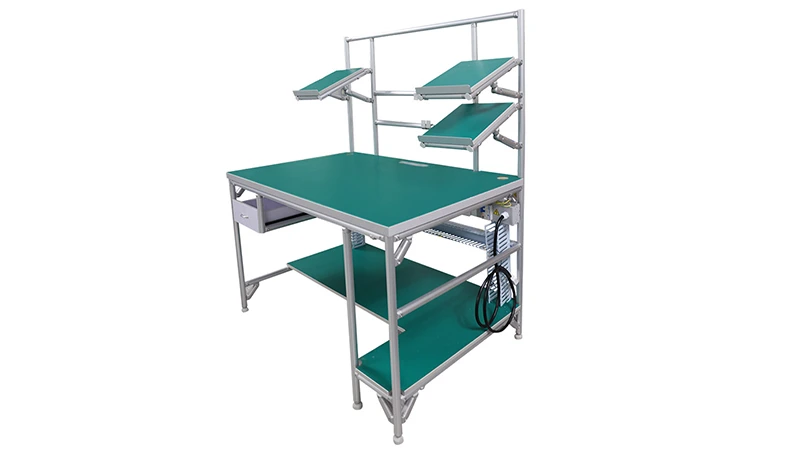
Imagine walking into a busy manufacturing floor—tools clatter, conveyor belts hum, and every workstation seems to have its own rhythm. Now, picture one workbench that stands out: it's exactly the right height for the operator, has shelves perfectly spaced for their tools, and a surface that resists scratches from heavy parts. That's the power of a customized aluminum workbench B. Unlike generic workbenches that force you to adapt, a tailored one adapts to you —making workflows smoother, reducing fatigue, and even boosting productivity. But where do you start when customizing? Let's break it down, step by step, from choosing the right dimensions to adding those finishing touches that make all the difference.
Understanding Aluminum Workbench B: The Basics
First, let's get clear on what an aluminum workbench B actually is. At its core, it's a modular workstation built using aluminum extrusion profiles—those sleek, T-slot rails you've probably seen in workshops and factories. What makes it "B" in particular? Typically, it refers to a single-deck design without casters (though we'll talk about adding mobility later if you need it), making it a stable, fixed solution for tasks that demand precision, like assembly or quality inspection. But here's the beauty: that "single-deck" base is just a starting point. With the right aluminum profile and accessories, you can transform it into a multi-functional hub that grows with your needs.
Why aluminum, though? Steel is strong, wood is cheap, but aluminum hits that sweet spot of durability, lightweight design, and flexibility. Aluminum extrusion profiles are made by pushing molten aluminum through a die, creating consistent, strong shapes with built-in T-slots. Those slots are game-changers—they let you attach accessories (shelves, tool hooks, lights) anywhere along the profile, no drilling or welding required. And since aluminum resists rust and corrosion, your workbench will stay looking sharp even in messy environments, like automotive shops or labs where spills happen.
Step 1: Defining Your Dimensions—It's All About the Fit
The first rule of customization? Measure twice, customize once. Getting the dimensions right is critical because a workbench that's too tall will strain shoulders, too short will hurt your back, and too narrow will leave you juggling tools. Let's break down the key measurements:
Height: Comfort Starts Here
Standard workbench height is around 36 inches, but that's a one-size-fits-all number. If your operators are taller or shorter, adjust accordingly. A good rule: when standing with arms relaxed at your sides, your elbows should bend at a 90-degree angle when resting on the workbench surface. For seated work (like electronics assembly), aim for 29–30 inches to keep knees comfortable under the bench. Pro tip: If multiple people will use the same bench, consider adjustable height legs—though that adds complexity. For fixed-height setups, survey your team's average height and round up to the nearest inch.
Width and Depth: Space to Work (Without Wasting Space)
Width is how long the bench is (left to right), depth is how far it extends from front to back. Start by mapping out your workflow: Do you need space for a laptop and tools? Will you be laying out large parts, like circuit boards or engine components? A typical width ranges from 48–72 inches, but if you're tight on floor space, 36 inches might suffice. Depth is trickier—too deep, and you'll strain to reach items at the back; too shallow, and you'll constantly clear clutter. Aim for 24–30 inches deep for most tasks. If you're using the bench for assembly lines, align the width with your conveyor system to ensure parts flow smoothly from one station to the next.
Load Capacity: Don't Skimp on Strength
This is non-negotiable. If you're placing heavy equipment (like a 50-pound testing machine) or stacks of materials on the bench, you need to know it can handle the weight. Aluminum profiles come in different thicknesses and sizes, and their load capacity varies. For example, a 2020 profile (20mm x 20mm) is great for light tasks, but for heavy-duty use, a 4040 profile (40mm x 40mm) with thicker walls will be more reliable. Check the manufacturer's specs—most reputable suppliers list the maximum static load (weight when stationary) and dynamic load (weight when moving, though workbench B is fixed, so static is key).

Step 2: Choosing the Right Aluminum Profile—The Backbone of Your Bench
Now that you have your dimensions, it's time to pick the aluminum extrusion profile that will form the frame of your workbench B. Think of this as choosing the bones of your project—they need to be strong, but also compatible with the accessories you'll add later. Let's compare the most common profiles used for workbenches:
| Profile Type | Dimensions (W x H) | Typical Wall Thickness | Max Static Load (Per Linear Foot) | Best For |
|---|---|---|---|---|
| 2020 Aluminum Profile | 20mm x 20mm | 1.2mm | 150–200 lbs | Light tasks: small parts assembly, electronics work |
| 3030 Aluminum Profile | 30mm x 30mm | 1.5mm | 300–400 lbs | Medium tasks: tool storage, light machinery |
| 4040 Aluminum Profile | 40mm x 40mm | 2.0mm | 500–700 lbs | Heavy-duty tasks: industrial assembly, material handling |
| 4080 Aluminum Profile | 40mm x 80mm | 2.0mm | 800–1000 lbs | Extra-heavy loads: large equipment, multi-person workstations |
For most aluminum workbench B setups, 3030 or 4040 profiles are the sweet spot. 3030 is lightweight enough for easy assembly but strong enough for tools and parts, while 4040 is better if you anticipate heavy loads. Remember, the profile's T-slot size also matters—most use M5 or M6 bolts, so make sure your accessories (like brackets and shelves) are compatible with that slot size.
Surface Options: More Than Just a Top
The workbench surface is where the magic happens, so don't overlook it. Aluminum honeycomb panels are a popular choice—they're lightweight, rigid, and have a smooth surface that's easy to clean. For ESD (electrostatic discharge) environments (like electronics manufacturing), go for an ESD-safe top with a conductive layer to protect sensitive components from static shocks. If you need something more durable, phenolic resin tops resist chemicals and scratches, while plywood with a laminate finish is budget-friendly for lighter use. Attach the surface to the aluminum frame using T-slot nuts and bolts—no glue needed, so you can replace it later if it wears out.

Step 3: Aluminum Profile Accessories—The Details That Make It Yours
Now comes the fun part: accessorizing. Aluminum profile accessories turn a basic frame into a customized workstation. Let's walk through the essentials and some "nice-to-haves":
Joints and Connectors: Holding It All Together
You can't build a frame without connecting the profiles, and here's where aluminum profile accessories shine. The most common is the 90-degree aluminum profile connector—perfect for joining vertical legs to horizontal rails. For corners that need extra strength, use gusset plates (small triangular brackets) to reinforce the joint. If you want to add a shelf halfway up the bench, internal straight aluminum joints let you connect two profiles end-to-end inside the T-slot, keeping the exterior sleek. Pro tip: Choose heavy-duty connectors (made from die-cast aluminum, not plastic) for load-bearing parts like the legs—they'll prevent wobbling over time.
Shelves and Drawers: Organize Without Clutter
A workbench with a cluttered surface is a productivity killer. Add shelves using aluminum profile brackets—adjustable, of course, so you can move them up or down as your needs change. For small tools (screwdrivers, pliers), drawer units that mount to the T-slots are a game-changer. Look for drawers with soft-close mechanisms to prevent slamming, and label them to keep things organized. If you need to store larger items (like bins of parts), side-mount racks attach to the bench legs, keeping floor space clear.
Lighting and Power: Work Smarter, Not Harder
Poor lighting leads to mistakes, so add a LED light bar above the work surface. Mount it using T-slot brackets, and run the cord through cable management channels (another handy accessory) to keep wires from dangling. For power tools, install a power strip under the shelf using a bracket—again, adjustable, so you can position it where it's easiest to reach. Some strips even have USB ports for charging phones or tablets, which is a nice touch for operators who use digital work instructions.
Casters: Adding Mobility (If You Change Your Mind)
Remember earlier when we said workbench B typically doesn't have casters? Well, rules are made to be bent. If you think you might need to move the bench later (for deep cleaning or rearranging the floor plan), add caster installation bases to the legs. Choose swivel casters with brakes—lock them in place when you're working, unlock to roll, and they won't mark up your floors if you go with rubber wheels.
Step 4: Specialized Fixtures—Tailoring to Your Industry
Depending on your work, you might need fixtures that go beyond the basics. Here are some examples for common industries:
Manufacturing: Tool Racks and Part Holders
If you're assembling parts, tool hooks mounted to the side of the bench keep wrenches and screwdrivers within arm's reach. For small parts like nuts and bolts, add a material rack B (3 row and 3 floor) above the bench—each bin can hold a different component, so you don't waste time searching. Roller track guide rails (plastic or aluminum) along the back of the bench let parts slide smoothly from storage to the work surface.
Laboratories: Chemical-Resistant Additions
In lab settings, spills are inevitable. Add a lip around the workbench surface to contain liquids, and use corrosion-resistant aluminum profile rubber strips to seal the edges. For holding test tubes or beakers, custom pegboards with T-slot mounts let you rearrange holders as experiments change. And don't forget adjustable leveling feet—they keep the bench stable even if the floor isn't perfectly flat, crucial for precise measurements.
Electronics: ESD Protection Everywhere
Static electricity can fry circuit boards, so ESD workbench accessories are a must. An ESD-safe mat on the surface, grounded via a cord to the bench frame, dissipates static charges. ESD wrist straps connect to the mat, and ESD-safe bins (mounted under the bench) store sensitive components. Even the casters (if you added them) should be ESD-rated to prevent static buildup from rolling.
Step 5: Assembly Tips—Avoiding Common Mistakes
You've got your dimensions, profile, accessories, and fixtures—now it's time to build. Here's how to avoid headaches during assembly:
- Pre-drill (if needed): Most T-slot connections don't require drilling, but if you're attaching a heavy surface, pre-drill pilot holes in the aluminum to prevent cracking.
- Torque the bolts: Over-tightening can strip the T-slot nuts; under-tightening leads to wobbling. Use a torque wrench set to the manufacturer's recommended setting (usually 4–6 Nm for M5 bolts).
- Check for square: Before tightening all joints, measure the diagonals of the frame—they should be equal if the bench is square. If not, adjust the joints until they match.
- Test the load: Once assembled, place a weight (like sandbags) equal to your maximum expected load on the surface and let it sit for 24 hours. If the bench sags or joints loosen, reinforce with extra brackets.
Real-World Example: A Custom Workbench B in Action
Let's put this all together with a case study. A small automotive parts manufacturer needed a workbench for assembling brake calipers. Their requirements: 60 inches wide, 30 inches deep, 38 inches tall (to accommodate tall operators), ESD-safe surface, and shelves for tools and parts bins. Here's how they customized:
They chose 4040 aluminum extrusion profiles for the frame (to handle the weight of calipers and tools), an ESD honeycomb top, and 90-degree aluminum connectors with gussets for stability. They added two adjustable shelves (one at 18 inches, one at 30 inches) using internal straight joints, and mounted a power strip under the top shelf. For parts, they attached a material rack B (3 rows, 3 floors) to the side of the bench, using parallel aluminum joint A to connect it securely. Finally, they added leveling feet to account for their uneven factory floor. The result? Operators reported 20% faster assembly times, and the ESD top eliminated costly static damage to sensitive components.
Troubleshooting: When Things Don't Go as Planned
Even with careful planning, issues can pop up. Here's how to fix common problems:
Wobbly Legs
This is usually due to loose connectors or uneven floors. Tighten all bolts first—if that doesn't work, add gusset plates to the leg joints. For uneven floors, replace fixed feet with adjustable leveling feet (aluminum pipe adjustable leveling feet are perfect here) and tweak each until the bench is stable.
Surface Sagging
If the top bends under load, add a center support bracket (like a roller track placon mount center support bracket) along the middle of the bench. For extra strength, use a thicker surface panel or add a cross-brace between the legs under the surface.
Accessories Sliding in the T-Slot
This happens when T-slot nuts aren't tight enough. Use flange nuts (which have a wider base) to grip the slot better, or add thread-locking adhesive to the bolt threads to prevent loosening over time.
Conclusion: Your Workbench, Your Way
Customizing an aluminum workbench B isn't just about building furniture—it's about building a workspace that works for you. By starting with the right dimensions, choosing the perfect aluminum extrusion profile, and adding accessories that fit your workflow, you'll create a bench that's not just functional, but a reflection of how you work. And since aluminum is modular, you can always add, remove, or rearrange parts later as your needs change. So go ahead—measure, choose your profile, accessorize, and build something that makes every day on the job a little easier. After all, the best workbenches aren't just tools—they're partners in productivity.