- Company Articles
- Products and Technology
- Installation And Maintenance
- Aluminum Workbench B Maintenance Checklist: Keeping Your Workstation in Top Shape

Aluminum Workbench B Maintenance Checklist: Keeping Your Workstation in Top Shape
Related Product
Aluminum Workbench B
Aluminum tube workbench is more flexible and durable, compared with traditional PE/ABS coated steel tube. It is easy to assemble, anti corrosion, rust protection, and recycle use after disassemble.
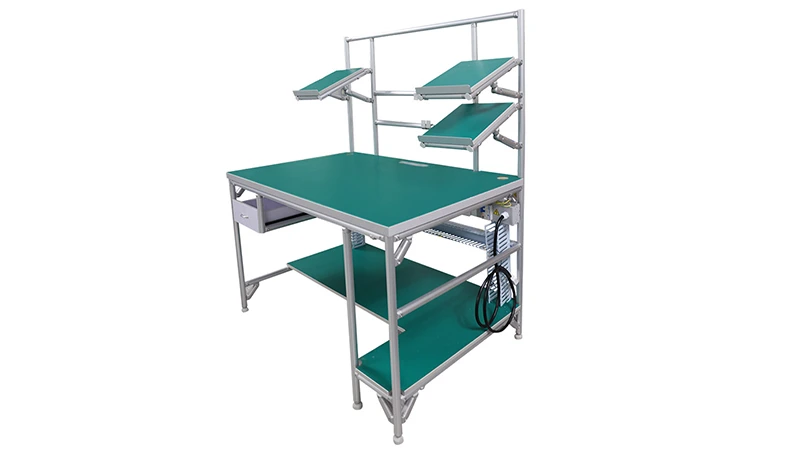
Walk into any busy workshop, factory floor, or production line, and you'll likely spot the unsung hero of the space: the workbench. It's where ideas take shape, parts get assembled, tools find their home, and teams collaborate to keep operations running smoothly. Among these workhorses, the Aluminum Workbench B stands out for its durability, flexibility, and sleek design—thanks in no small part to its high-quality aluminum profile and thoughtful engineering. But like any hardworking tool, it needs a little TLC to stay in peak condition. Neglecting maintenance might lead to wobbly surfaces, stuck components, or even safety hazards down the line. That's why we've put together this comprehensive guide to help you keep your Aluminum Workbench B (and its trusty companions like caster accessories and adjustable leveling feet) in top shape, day in and day out.
Why Maintenance Matters: More Than Just a Clean Surface
Let's start with the obvious: a well-maintained workbench looks better. But the benefits go far beyond aesthetics. Think about it—your Aluminum Workbench B is probably handling everything from heavy tool storage to delicate assembly tasks. If its joints loosen, its surface gets scratched, or its casters (if equipped) start to drag, suddenly that reliable workstation becomes a bottleneck. Loose aluminum profile accessories could lead to unstable shelving, putting materials at risk of falling. A sticky roller track might slow down material flow, making your team's workflow feel like wading through molasses. And let's not forget safety: a wobbly workbench isn't just annoying—it's a trip hazard waiting to happen.
Regular maintenance isn't just about fixing problems; it's about preventing them. By taking 10-15 minutes each day to check for wear, tighten a loose bolt, or wipe down the surface, you'll extend the life of your workbench, reduce costly repairs, and keep your team working efficiently. Plus, there's something satisfying about knowing your workspace is in control—no unexpected jams, no last-minute scrambling to fix a broken part. Let's dive into how to make that happen.
Daily Maintenance: Quick Checks to Start (and End) Your Day Right
Your daily routine sets the tone for the workbench's health. These quick checks take almost no time but can save you from bigger headaches later. Think of them as a morning "hello" and evening "goodbye" to your workstation.
Pro Tip: Keep a small toolkit near the workbench—just a screwdriver, a soft brush, and a microfiber cloth. Having supplies handy makes it easier to tackle small issues before they grow.
Morning Check: Start with a Fresh Slate
| Task | How to Do It | Why It Matters |
|---|---|---|
| Inspect the surface | Wipe down the workbench top with a damp microfiber cloth to remove dust, debris, or leftover residue from the previous day. Check for scratches, dents, or sticky spots (like dried glue or tape). | A clean surface prevents debris from scratching materials or jamming tools. Sticky spots can transfer to parts, ruining finishes or causing assembly errors. |
| Check for loose aluminum profile accessories | Gently wiggle the side rails, shelves, and any attached components (like tool holders or bins). If something moves more than it should, tighten the screws or bolts with a screwdriver (most Aluminum Workbench B models use standard Phillips or hex screws). | Loose accessories can make the workbench unstable. Over time, vibration from daily use can loosen fasteners, so a quick check keeps everything secure. |
| Test adjustable leveling feet | Stand at each corner of the workbench and gently push down. If it rocks, adjust the leveling feet by turning the knobs clockwise to lower or counterclockwise to raise until the bench feels steady. | Leveling feet keep the workbench stable on uneven floors. A wobbly bench can cause tools to slide, parts to tip, or even lead to back strain if you're constantly compensating for the tilt. |
| Inspect caster accessories (if applicable) | If your workbench has casters, spin each wheel by hand. They should roll smoothly without grinding or sticking. Check for debris (like threads, small screws, or dust bunnies) caught in the wheels or axles. Test the brakes (if equipped) by pressing them down—they should lock firmly and release easily. | Casters make it easy to move the workbench, but stuck wheels or faulty brakes can lead to accidents (like the bench rolling unexpectedly) or make repositioning a struggle. |
| Check for debris in roller track (if integrated) | If your workbench has a roller track (for sliding materials or bins), run your hand along the track to feel for obstructions. Use a soft brush to sweep away dust, small parts, or lint that might block the rollers. | A clear roller track ensures materials glide smoothly, reducing the effort needed to move items and preventing jams that slow down workflow. |
End-of-Day Check: Wrap Up with Care
After a long day, it's tempting to rush out the door—but a 5-minute end-of-day routine ensures your workbench is ready for tomorrow. Here's what to do:
- Clear the surface: Remove all tools, parts, and materials. Return them to their designated spots (toolboxes, bins, shelves). A cluttered surface invites damage and makes morning setup harder.
- Deep wipe: Use a mild detergent (like dish soap mixed with water) on a damp cloth to tackle any stubborn stains (oil, grease, ink). Avoid abrasive cleaners—they can scratch the aluminum finish.
- Do a final "wiggle test": Give the shelves and rails one last check for looseness. Tighten any bolts you missed in the morning—better safe than sorry!
- Lock casters (if applicable): If you moved the workbench during the day, lock the casters to prevent it from shifting overnight (especially in busy areas where people might bump into it).

Weekly Maintenance: Digging Deeper to Prevent Wear
Daily checks handle the basics, but weekly maintenance is where you'll catch issues that take time to develop—like worn caster wheels, stiff joints, or buildup in hard-to-reach places. Set aside 20-30 minutes once a week (maybe Friday afternoons, when things slow down) to give your Aluminum Workbench B a little extra love.
Tighten, Lubricate, and Protect
Tighten all fasteners: Grab your screwdriver and go through every visible bolt, screw, and clamp on the workbench. Pay special attention to areas that get the most use—like the corners of the tabletop, the connections between the frame and shelves, and any moving parts (hinges, drawer slides, or roller track brackets). Over time, vibration from tools or material movement can loosen these, so a quick tighten keeps everything secure. For aluminum profile accessories, use a torque screwdriver if you have one—over-tightening can strip the threads, so aim for "firm but not forceful."
Lubricate moving parts: If your workbench has a roller track, hinges, or casters, a little lubrication goes a long way. For roller track, apply a drop of silicone lubricant (avoid oil-based lubes, which attract dust) to each roller axle. Spin the rollers to spread the lube evenly. For casters, put a small amount of lubricant on the wheel bearings (you can usually find a small gap between the wheel and the frame). Wipe away excess lube with a cloth—you don't want it dripping onto the workbench surface.
Inspect caster accessories for wear: Flip the workbench onto its side (ask a colleague for help if it's heavy!) to check the caster wheels and brakes. Look for cracks in the wheel tread, flat spots, or embedded debris (like gravel or metal shavings). If the wheels are worn, replace them with new caster accessories—worn wheels roll unevenly, putting stress on the caster frame and making the workbench harder to move. Test the brakes again: they should engage smoothly and hold the bench in place without slipping.
Clean the "Hidden" Spots
Dust and debris love to hide in nooks and crannies—like under the workbench, between the frame and the floor, or in the grooves of the aluminum profile. Use a soft-bristled brush (an old toothbrush works great for tight spaces) to sweep these areas, then vacuum up the debris. Pay attention to the adjustable leveling feet: dust or dirt can get trapped under the pads, making them less effective at gripping the floor. Wipe the feet with a damp cloth and check the rubber pads—if they're cracked or worn, replace them to keep the bench stable.
If your workbench has drawers or bins, remove them and clean the tracks or shelves underneath. Crumbs, small screws, or bits of material can fall here and attract pests or cause drawers to jam. Wipe the drawer slides with a dry cloth and apply a light coat of lubricant if they're sticking.

Monthly Deep Dive: Keep It Looking (and Working) Like New
Once a month, it's time to go all in. This is when you'll tackle tasks that require a bit more effort—like removing shelves for cleaning, inspecting the frame for corrosion, or refinishing small scratches. Think of it as a "spa day" for your workbench.
Inspect for Corrosion and Damage
Aluminum is naturally resistant to rust, but it can still corrode if exposed to harsh chemicals, salt, or constant moisture. Check the entire frame, including the undersides and joints, for white, powdery spots (a sign of corrosion) or discoloration. If you spot any, mix a solution of equal parts water and white vinegar, dip a soft cloth in it, and gently rub the area. Wipe clean with water and dry thoroughly. For stubborn spots, use a non-abrasive aluminum cleaner (test it on a hidden area first to avoid discoloration).
Check the workbench top for deep scratches or dents. For minor scratches, you can buff them out with a metal polish (apply a small amount to a cloth and rub in circular motions). For deeper dents, if they're in a non-critical area (not supporting weight), you can leave them—but if they weaken the structure (like a dent in a load-bearing beam), contact the manufacturer about replacement parts.
Reinforce and replace Worn Parts
Take a close look at all aluminum profile accessories, caster accessories, and adjustable leveling feet. Are any brackets bent? Are the leveling foot pads cracked? Is the roller track starting to warp? Now's the time to replace these. Ordering new parts early beats waiting until they fail—imagine a caster breaking mid-shift, leaving you with a stuck workbench and a backed-up production line.
If you're not sure where to get replacement parts, check with your original supplier—they'll have the exact caster accessories, leveling feet, or aluminum profile pieces that fit your Aluminum Workbench B. Avoid generic parts, which might not align properly or be as durable as the original equipment.
Troubleshooting Common Issues: Fix It Before It Breaks
Even with regular maintenance, things can go wrong. Here's how to spot and fix the most common problems with your Aluminum Workbench B:
Problem: The Workbench Rocks or Wobbles
Cause: Most likely, the adjustable leveling feet are out of alignment, or one of the feet has a worn or missing pad. Uneven floors can also be to blame.
Solution: Use a level tool on the workbench surface to see which corner is high or low. Adjust the leveling feet by turning the knobs—clockwise to lower, counterclockwise to raise—until the bubble in the level is centered. If a foot pad is missing or cracked, replace it with a new one (most hardware stores carry generic pads, but for the best fit, use the manufacturer's part).
Problem: Roller Track Is Sticky or Jams
Cause: Debris (dust, small parts, or hair) is trapped in the roller axles, or the rollers are dry and need lubrication.
Solution: Remove the roller track from the workbench (if possible) and use a soft brush to clean out the axles. For stubborn debris, use a toothpick or compressed air. Apply a drop of silicone lubricant to each axle, then spin the rollers to distribute the lube. Reattach the track and test with a small box—materials should glide smoothly without stopping.
Problem: Caster Wheels Won't Roll Straight
Cause: The caster swivel mechanism is dirty or worn, or the wheels are misaligned.
Solution: Clean the swivel mechanism with a cloth and compressed air to remove dust and debris. Apply a small amount of lubricant to the swivel joint. If the wheels still don't roll straight, check for bent caster frames—if the frame is bent, replace the entire caster unit with new caster accessories.
Long-Term Care: Invest in the Future
Your Aluminum Workbench B is built to last, but with a few extra steps, you can extend its lifespan even further—maybe decades! Here's how to make sure it stays a reliable part of your workspace for years to come.
Avoid Overloading
Every workbench has a weight limit—check the manufacturer's specs (usually printed on a label under the tabletop or in the user manual). Avoid stacking heavy tools or materials beyond this limit, especially on shelves or cantilevered parts. Overloading can bend the aluminum profile, warp the tabletop, or damage the frame over time. If you need to store heavy items, distribute the weight evenly across the surface (don't pile everything on one corner) and use lower shelves, which are better supported.
Protect Against the Elements
Aluminum resists rust, but it's not immune to damage from extreme temperatures or chemicals. If your workbench is in a garage or workshop with high humidity, wipe down the frame monthly to prevent moisture buildup. Avoid placing it near heaters or air conditioners—rapid temperature changes can cause the aluminum to expand and contract, loosening joints. If you work with chemicals (like solvents or acids), use a protective mat on the workbench surface to prevent spills from eating into the aluminum finish.
Upgrade When Needed
As your needs change, your workbench can change with you—thanks to its modular design and compatible aluminum profile accessories. Need more storage? Add a shelf. Want to move it more easily? Upgrade to heavy-duty casters. Just make sure any new accessories are designed for your specific model of Aluminum Workbench B—mixing and matching parts from different brands can lead to instability or poor fit.
Final Thoughts: Your Workbench Deserves the Best
At the end of the day, your Aluminum Workbench B is more than just a piece of equipment—it's a partner in your daily work. It holds your tools, supports your projects, and keeps your team moving forward. By following this maintenance checklist, you're not just keeping a table in good shape—you're investing in efficiency, safety, and peace of mind. Whether it's a quick morning wipe-down, a weekly tightening session, or a monthly deep clean, every small step adds up to a workbench that serves you well for years to come.
So grab your cloth, your screwdriver, and a little patience—and give your Aluminum Workbench B the care it deserves. Your future self (and your team) will thank you.