- Company Articles
- Products and Technology
- Product knowledge
- Aluminum Workbench B Sizing Guide: Selecting the Right Dimensions for Your Space

Aluminum Workbench B Sizing Guide: Selecting the Right Dimensions for Your Space
Related Product
Aluminum Workbench B
Aluminum tube workbench is more flexible and durable, compared with traditional PE/ABS coated steel tube. It is easy to assemble, anti corrosion, rust protection, and recycle use after disassemble.
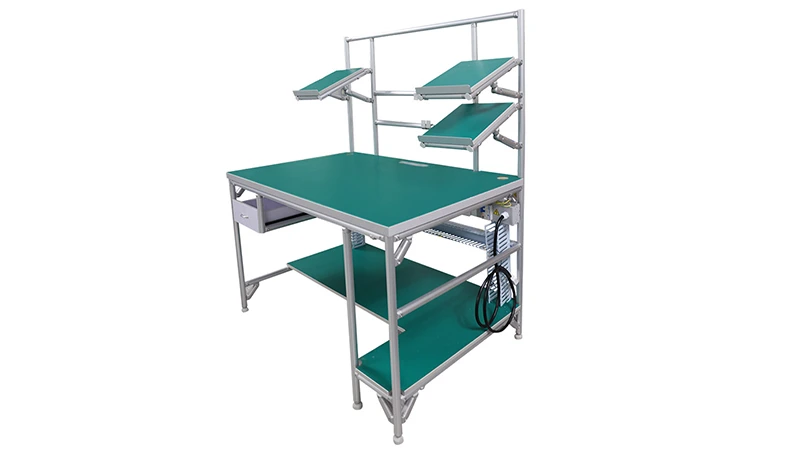
A workbench isn't just a piece of equipment—it's the heartbeat of your workspace. It's where parts come together, where problems get solved, and where your team spends hours turning ideas into reality. But here's the hard truth: even the sturdiest, most well-designed workbench can become a liability if it's the wrong size. Too small, and you're constantly shuffling tools, materials, and projects, watching efficiency slip through your fingers. Too large, and it dominates the room, cramping movement and turning simple tasks into obstacle courses. That's why getting the size right for your Aluminum Workbench B is so critical. This guide will walk you through every step of sizing your bench, from measuring your space to matching dimensions to your daily tasks, so you can create a workspace that works with you, not against you.
Why Size Matters: More Than Just a Numbers Game
Let's start with the basics: why does size matter so much? Think about the last time you worked at a poorly sized table. Maybe it was a kitchen counter that was too low, leaving you hunched over chopping vegetables. Or a desk that was too narrow, forcing your laptop and notes to overlap. Frustrating, right? Now multiply that by eight hours a day, five days a week, in a high-pressure environment like a production floor or workshop. A mis sized workbench doesn't just annoy—it slows you down, increases the risk of mistakes, and even leads to aches and pains from poor posture. On the flip side, a well-sized Aluminum Workbench B becomes an extension of your workflow. It gives you room to spread out materials, keeps tools within arm's reach, and lets you move freely around it. It's not just about comfort; it's about creating a space where productivity thrives.
Meet the Aluminum Workbench B: Built for Flexibility
Before we dive into dimensions, let's talk about why the Aluminum Workbench B is worth your attention. Unlike heavy steel benches that are tough to reposition or flimsy wooden ones that warp over time, this bench is built with aluminum extrusion profile —a material that strikes the perfect balance between strength and versatility. The aluminum profile is lightweight enough to move (with help, of course) but sturdy enough to handle heavy tools, parts, and daily wear and tear. Plus, its modular design, with T-slots running along the edges, means you can customize it with aluminum pipe accessories like tool racks, shelves, or monitor mounts, all without drilling holes or permanently altering the bench. It's a workbench that grows with your needs—but first, you need to get the foundation right: its size.

Step 1: Assessing Your Space—Measure Twice, Buy Once
Mapping Your Work Area
The first rule of sizing any workbench is simple: measure your space before you start shopping. Grab a tape measure, a pencil, and a piece of paper (or use a digital app like Floorplanner) and sketch out your workspace. Note the total length and width of the area where the bench will go, then mark fixed obstacles: walls, doors, windows, electrical outlets, existing machinery, or storage units. These are non-negotiable—your bench has to fit around them. For example, if there's a 60cm deep shelf unit along one wall, you'll need to subtract that from your available width. Similarly, a door that swings open 90 degrees will eat into your usable space, so make sure to account for its arc.
Leaving Room to Move
Here's a common mistake: people measure the empty floor and think, "I can fit a 200cm bench here!" But they forget to leave space to actually use it. You need room to walk around the bench, grab materials from nearby shelves, and avoid bumping into co-workers. A good rule of thumb: leave at least 90cm of clearance on all sides of the bench. That might sound like a lot, but imagine trying to carry a heavy box of parts past someone working at the bench—90cm gives you both enough space to move without squeezing. If your area is tight, you can get away with 75cm on one side (say, against a wall), but never less than that. Cramped spaces don't just slow you down; they're a safety hazard.
Thinking Vertically, Too
Size isn't just about width and depth—height matters, too, but so does vertical space above the bench. If you plan to mount shelves, overhead lights, or a monitor arm above your Aluminum Workbench B, measure the ceiling height and subtract the bench's height to ensure there's enough clearance. For example, if your ceiling is 240cm high and your bench is 85cm tall, you have 155cm of vertical space above—plenty for a shelf or two. But if you're in a basement or low-ceilinged room, you might need to skip overhead storage and focus on under-bench cabinets instead. The key is to plan for the whole picture, not just the floor.

Step 2: Key Dimensions Explained—Width, Depth, and Height
Now that you've mapped your space, let's break down the three core dimensions of the Aluminum Workbench B: width, depth, and height. Each plays a unique role in how the bench functions, so let's tackle them one by one.
Width: How Much Horizontal Space Do You Need?
Width is the most visible dimension—it's how long the bench is from left to right. To figure out how wide your Aluminum Workbench B should be, ask yourself: How many people will use it at once? and What's the largest item I'll regularly place on it?
If you're working alone, a width of 120–150cm is usually enough. It gives you room to lay out materials, set down tools, and even have a small area for finished parts. But if two people will work side by side—say, assembling products on an assembly line—you'll need 180cm or more. For example, two assemblers might each need 90cm of space to avoid overlapping arms and materials. And if you're working with large items—like sheet metal, engine parts, or bulky equipment—add 30cm to the width of the largest item to account for maneuvering. A 100cm wide component, for instance, would need a bench at least 130cm wide to leave space on either side.
Depth: Balancing Reach and Surface Area
Depth (front to back) is trickier than width because it's about more than just space—it's about reach . A bench that's too deep means you'll have to stretch to grab tools or materials from the back, leading to strained shoulders and wasted time. Too shallow, and you'll constantly be moving items to make room.
The sweet spot for depth depends on how you'll use the bench. If it's against a wall (a "single-sided" bench), aim for 60–80cm. That way, you can reach the back comfortably from the front without leaning over. If it's in the middle of the room (a "double-sided" bench), where people work on both sides, go for 120–150cm—60–75cm per side, so neither person has to stretch. For example, a 120cm deep double-sided bench lets two people work opposite each other, each with 60cm of reachable space. Avoid going deeper than 150cm unless you have a specific reason—anything more and you'll end up with a "dead zone" in the middle where items get forgotten.
Height: Ergonomics First
Height is all about ergonomics. A bench that's too low forces you to hunch over, leading to back pain; too high, and your arms tire quickly from holding tools at shoulder level. The standard height for a workbench is 80–90cm, but this can vary based on who's using it. A good test: stand with your arms at your sides, then bend your elbows to 90 degrees. The distance from the floor to your palms is your ideal bench height. For most adults, this falls between 85–90cm, which is why the Aluminum Workbench B is often designed in this range. If multiple people will use the bench, stick to the lower end (85cm) to accommodate shorter users, or look into adjustable-height models (though the standard Aluminum Workbench B has a fixed height, so plan accordingly).
Step 3: Matching Size to Tasks—What Will You Actually Do on It?
Your workbench's size should reflect your daily tasks. A bench for electronics assembly will look very different from one used for heavy machinery repairs. Let's break down common use cases and how they influence sizing.
Assembly and Light Manufacturing
If you're assembling small to medium-sized products—think smartphones, power tools, or medical devices—you'll need a balance of width and depth. Aim for a width of 150–180cm (enough for two people or a spread of components) and a depth of 60–70cm (shallow enough to keep tools and parts within reach). For example, an electronics assembler might need space for a circuit board, a soldering iron, a bin of screws, and a magnifying lamp—all without overlapping. A 150cm width and 60cm depth gives them room to organize these items logically, reducing the time spent searching for tools.
Testing and Inspection
Testing or inspecting products often requires focused, detailed work—think checking for defects, running quality control checks, or troubleshooting. Here, depth is more important than width. A depth of 70–80cm gives you space to lay out the product, testing equipment (like multimeters or gauges), and paperwork, all without crowding. Width can be smaller, around 120–150cm, since you're likely working alone and don't need extra space for others. For example, a quality inspector testing small parts might need a 120cm width (to hold a light box and inspection tools) and 75cm depth (to spread out parts and checklists).
Heavy-Duty Work
If you're working with heavy tools, machinery, or large components—like welding, woodworking, or engine repair—size up. A width of 180–240cm gives you room to maneuver heavy items, while a depth of 80–100cm provides stability for clamping or securing parts. For example, a mechanic working on a car engine might need a 200cm width to place the engine block, tools, and a parts cleaner, plus an 80cm depth to clamp the block securely. The aluminum profile of the Aluminum Workbench B is strong enough to handle this weight, but the size ensures you can work safely without overcrowding.
Sizing Guide Table: Find Your Perfect Dimensions
| Task Type | Recommended Width (cm) | Recommended Depth (cm) | Recommended Height (cm) | Ideal Aluminum Profile Thickness |
|---|---|---|---|---|
| Single-User Assembly (Small Parts) | 120–150 | 60–70 | 85–90 | 1.5–2.0mm |
| Dual-User Assembly Line | 180–220 | 60–80 | 85 | 2.0mm |
| Testing/Inspection | 120–150 | 70–80 | 85–90 | 1.5mm |
| Heavy-Duty Work (Welding, Mechanics) | 180–240 | 80–100 | 85–90 | 2.0–3.0mm |
| Storage-Focused Bench | 150–180 | 60–80 | 85 | 2.0mm |
Note: These are general guidelines. Adjust based on your specific space, team size, and materials. Thicker aluminum profile (2.0–3.0mm) is recommended for heavy-duty tasks to ensure stability.
Common Sizing Mistakes to Avoid
Mistake 1: Overestimating Available Space
It's easy to look at an empty room and think, "I can fit a 200cm bench here!" But then you forget about the 50cm deep tool cabinet next to it, or the door that swings into the space, leaving only 150cm of usable width. Always measure twice and subtract 90cm from your total available space for walkways. If your room is 300cm wide, for example, you only have 210cm max for the bench (300cm – 90cm for walking space). Ignoring this leads to a bench that fits on paper but makes the room feel cramped.
Mistake 2: Prioritizing Surface Area Over Ergonomics
Some people think, "Bigger is better!" and opt for the widest, deepest bench possible. But a 200cm deep bench might sound great for storage, but in reality, you'll never use the back half—you'll just stretch and strain to reach it. Focus on ergonomics first: can you reach all areas comfortably? Is the height right for your team? A slightly smaller bench that's easy to use is better than a giant one that causes frustration.
Mistake 3: Forgetting About Accessories
The Aluminum Workbench B is modular, which means you can add aluminum pipe accessories like shelves, tool hooks, or monitor arms. But these take up space. A 120cm wide bench might seem roomy—until you add a 30cm deep shelf above it, which hangs over the front and reduces usable depth. Plan for accessories when sizing: if you want a side shelf, for example, add 15–20cm to the bench's depth to account for it.
Mistake 4: Not Planning for Growth
Your business or projects might grow, and your workbench should keep up. If you're currently a team of one but plan to hire more people in the next year, size up now. A 150cm bench that works for one person will feel tiny with two. Similarly, if you're working with small parts now but expect larger orders, go for a wider bench to avoid replacing it later. The Aluminum Workbench B's modular design helps with growth, but starting with the right base size saves time and money.
Customizing Your Aluminum Workbench B with Accessories
Once you've nailed the size, it's time to make the most of it with accessories. The T-slots in the aluminum profile let you add tools, storage, and extras without expanding the bench's footprint. Here are a few ways to customize:
- Tool Racks: Attach hanging tool racks to the sides or back of the bench using aluminum pipe clamps. This keeps tools off the surface but within arm's reach, freeing up width and depth for work.
- Shelves: Add overhead or under-bench shelves for storage. A 30cm deep overhead shelf, for example, can hold boxes of parts without taking up surface space.
- Monitor Mounts: If you use digital instructions or checklists, a monitor mount frees up desk space and keeps screens at eye level, reducing neck strain.
- Casters (Optional): Some Aluminum Workbench B models (like the "Workbench E" variant) come with casters, but if yours doesn't, you can add them later. Just ensure the bench is sized to move through doorways and around obstacles when on wheels.
Final Thoughts: Your Workbench, Your Space, Your Success
Sizing your Aluminum Workbench B isn't just about numbers on a tape measure—it's about creating a space that fits your workflow, your team, and your goals. By measuring carefully, matching dimensions to your tasks, and avoiding common mistakes, you'll end up with a bench that feels like it was custom-built for you. Remember, the Aluminum Workbench B's aluminum extrusion profile and modular design mean it can grow with you—add accessories, reposition it, or even expand it later if needed. But getting the base size right from the start sets the foundation for a workspace that's efficient, comfortable, and ready to tackle whatever you throw at it.
So grab your tape measure, refer back to the guide, and start planning. Your future self—sitting comfortably at a perfectly sized workbench, tools within reach, projects moving smoothly—will thank you.