- Company Articles
- Products and Technology
- Installation And Maintenance
- Aluminum Workbench D Installation Guide: Tips for Quick and Efficient Setup

Aluminum Workbench D Installation Guide: Tips for Quick and Efficient Setup
Related Product
Aluminum Workbench D
Aluminum tube workbench is more flexible and durable, compared with traditional PE/ABS coated steel tube. It is easy to assemble, anti corrosion, rust protection, and recycle use after disassemble.
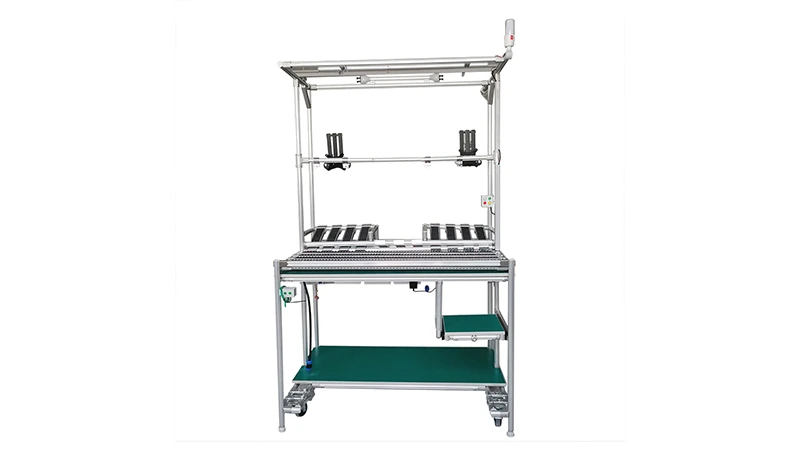
If you've recently ordered an Aluminum Workbench D, you're probably eager to get it up and running—whether it's for your production assemble line, a busy workshop, or a home garage. These workbenches are beloved for their sturdiness, flexibility, and sleek aluminum profile design, but let's be honest: unboxing a pile of aluminum pipes, joints, and panels can feel a bit overwhelming at first. I've helped set up dozens of these workbenches over the years, and I'm here to walk you through the process step by step. No fancy tools, no confusing jargon—just clear, friendly advice to get your workbench ready in under an hour. By the end, you'll have a stable, functional workspace that's built to last. Let's dive in!
1. Pre-Installation Prep: Safety, Space, and Parts Check
Before you start screwing anything together, let's lay the groundwork. Rushing into assembly without prep is like baking a cake without preheating the oven—you might get there, but it won't turn out as well. Here's what you need to do first:
Safety First: Protect Yourself and Your Workspace
Aluminum is lightweight, but the edges of the profiles and panels can be sharp—especially if they're fresh out of the box. Grab a pair of work gloves to avoid nicks, and clear a flat, spacious area to work. A garage floor, workshop table, or even a clean driveway works—just make sure the surface is level (we'll check that later, but starting on a wonky floor makes alignment harder). If you're assembling indoors, lay down a drop cloth or old blanket to protect your floors from scratches.
Unboxing and Organizing: Don't Lose the Small Stuff
Open the boxes carefully—those aluminum pipe accessories (like joints and screws) have a knack for rolling into corners. Empty everything onto your workspace and group similar parts together: aluminum profiles in one pile, joints in another, caster wheels (if included) off to the side, and the workbench top set aside to avoid scratches. Trust me, spending 5 minutes organizing now saves you 20 minutes of hunting for a missing bolt later.
Parts Checklist: Make Sure You Have Everything
Manufacturers usually include a parts list in the manual, but it never hurts to double-check. Below is a typical checklist for Aluminum Workbench D—your exact parts may vary slightly, but this covers the basics. If something's missing, contact your supplier right away (don't try to "make do" with a substitute; aluminum profiles and joints are precision-made, and mismatched parts will weaken the structure).
Pro Tip:
Take a photo of the parts layout before you start assembling. If you need to pause mid-project, the photo will help you remember where everything goes!
| Part Name | Quantity | Description |
|---|---|---|
| Aluminum Profile (Main Frame) | 4 | Long, rectangular tubes (typically 120cm–180cm) for the workbench legs and side rails |
| Internal Rotary Aluminum Joints | 8 | Silver, L-shaped joints that connect the aluminum profiles at 90° angles |
| Workbench Top (Aluminum Honeycomb Panel) | 1 | Flat, lightweight panel with a honeycomb core for strength (usually 120cm x 60cm) |
| Caster Wheels (Locking) | 4 | Wheels with brake levers to attach to the bottom of the legs (for mobility) |
| Hex Bolts (M8 x 20mm) | 16–20 | Silver bolts to secure joints to profiles (check the length—too short won't hold!) |
| Hex Keys (2.5mm and 4mm) | 2 | Usually included; these are critical for tightening the bolts into the aluminum profiles |
| Rubber Grommets (Optional) | 4 | Small, soft rings to place under caster wheels if you're using the workbench on hardwood floors |
2. Tools You'll Need (Spoiler: Probably Already in Your Garage)
You don't need a workshop full of power tools for this. In fact, most people have everything they need at home. Here's the short list:
- Hex Keys: The ones included with the workbench should work, but if they're flimsy, grab a set of high-quality metric hex keys (2.5mm and 4mm are standard for Aluminum Workbench D).
- Rubber Mallet: Handy for gently tapping profiles into alignment if holes don't line up perfectly (no sledgehammers—aluminum dents easily!)
- Level: A 2-foot or 4-foot spirit level to check if the workbench is flat (critical for stability).
- Tape Measure: To double-check distances between legs (optional, but helpful for precision).
- Thread Locker (Optional): A small bottle of blue thread locker (like Loctite) to keep bolts from loosening over time—great if the workbench will see heavy use.
Heads Up:
Avoid using power tools like drills or impact drivers! The bolts for aluminum profiles are designed to be hand-tightened. Over-tightening with power tools can strip the threads or warp the aluminum. Save the drills for wood—this is a hand-tool job.

3. Step-by-Step Assembly: Building the Frame
Now for the fun part! We'll start with the frame, which is the "skeleton" of your workbench. Follow these steps, and you'll have a stable base in no time.
Step 1: Build the Two Side Frames
The Aluminum Workbench D frame is made of two identical side "rectangles" connected by cross rails. Let's build one side first, then replicate it for the other.
Take two vertical aluminum profiles (these will be the legs) and two shorter horizontal profiles (the top and bottom rails). Lay them on your workspace to form a rectangle: vertical profiles on the left and right, horizontal on top and bottom. Now, grab four internal rotary aluminum joints—these are the corner connectors. Slide one joint onto the end of each horizontal profile, then align the vertical profiles with the joint openings.
Here's a trick I learned early on: the joints have small set screws that lock onto the profiles. Loosen these screws slightly with your hex key before sliding the profiles in—this makes alignment easier. Once the profiles are seated in the joints (you'll feel a "click" when they're all the way in), tighten the set screws just enough to hold everything in place—we'll fully tighten later.
Repeat this to build the second side frame. Now you have two identical rectangles—these are the left and right sides of your workbench.
Step 2: Connect the Side Frames with Cross Rails
Now we'll connect the two side frames to form the full frame. Take four more horizontal aluminum profiles—these are the cross rails that run front to back. Stand the two side frames upright (you might need a helper to hold them steady, or prop them against a wall). Place a cross rail across the top of the frames, sliding the ends into the open joints on the top horizontal rails of each side frame.
Again, loosen the joint set screws first, slide the cross rail in, then tighten gently. Do the same for the bottom cross rails—these go across the bottom of the side frames, near the floor. For extra stability, most Aluminum Workbench D models include middle cross rails (halfway up the legs). Attach those too, if included—they prevent the frame from wobbling side to side.
Once all cross rails are in place, give the frame a gentle shake. It should feel sturdy—no loose joints or wobbly profiles. If something moves, check that the profiles are fully seated in the joints and the set screws are snug (but not over-tightened).
Step 3: Attach the Caster Wheels (If Included)
Many Aluminum Workbench D models come with caster wheels for mobility—perfect if you need to roll the workbench around your production assemble line or garage. Here's how to attach them:
Flip the frame upside down so the bottom cross rails are facing up. Each caster wheel has a mounting plate with holes that align with pre-drilled holes in the bottom of the legs. Place a caster wheel on the end of a leg, line up the holes, and insert the bolts (usually included with the casters). Use your hex key to tighten the bolts—snug, but not so tight that you warp the mounting plate. Repeat for all four legs.
If your caster wheels have brakes, test them now: flip the brake lever down, and try to roll the frame. It should stay put. If not, check that the brake pad is making contact with the wheel.
Pro tip: If you don't need mobility, or if you'll use the workbench on uneven ground, you can swap the caster wheels for leveling feet (some models include these as an option). Just screw them into the leg ends instead—they're great for fine-tuning height and stability.

4. Adding the Workbench Top: The Final Touch
With the frame built and casters attached, it's time to add the star of the show: the workbench top. This is usually an aluminum honeycomb panel or a solid aluminum sheet, and it's designed to sit securely on top of the frame.
Aligning the Top with the Frame
Flip the frame right side up (carefully—get help if it's heavy!) and roll it to your desired location. Now, place the workbench top on the frame. Most tops have pre-drilled holes that align with the top cross rails. If not, center the top on the frame so there's equal overhang on all sides (usually 2–3 inches—this prevents items from falling off the edges too easily).
Once aligned, secure the top to the frame using the screws provided. These are usually short, self-tapping screws that go through the top and into the aluminum profile cross rails. Tighten them evenly—start with a screw in each corner, then add screws along the sides (every 12–18 inches) to prevent the top from bowing in the middle.
Checking for Level: The Most Important Step
Even if your frame felt stable earlier, the workbench top might be uneven once it's all assembled. Grab your level and place it on the top, front to back and side to side. If the bubble is off-center, adjust the caster wheels (or leveling feet) until it's perfectly level.
Here's a quick test: place a marble or small ball on the top. If it rolls, the bench is still uneven. Keep adjusting until the marble stays put. A level workbench isn't just about aesthetics—it prevents tools and parts from sliding off during production assemble, and it ensures your projects (like woodworking or electronics) are accurate.
5. Troubleshooting: Fixing Common Hiccups
Even with careful assembly, you might run into a few issues. Don't panic—these are easy fixes!
Issue: Profiles Won't Slide into Joints
This is usually because the joint set screws are too tight. Loosen them a full turn, then gently tap the profile into the joint with your rubber mallet. Once it's seated, retighten the screws.
Issue: Wobbly Frame
Check that all cross rails are attached—missing middle rails are a common culprit. If the rails are in place, tighten the joint set screws (but don't overdo it!). If the wobble is side to side, add diagonal braces (some workbenches include these as optional aluminum pipe accessories).
Issue: Workbench Top is Uneven
First, check if the frame itself is level (use your level on the cross rails). If the frame is level but the top isn't, the top panel might be warped (rare, but possible). Contact your supplier for a replacement, or shim the low spots with thin aluminum washers under the top.
6. Maintenance: Keep Your Workbench Looking and Working Like New
Aluminum is durable, but a little care goes a long way. Here's how to keep your workbench in top shape:
Cleaning the Aluminum Profile
Wipe down the frame and top with a damp cloth to remove dust and grease. For stubborn stains (like oil from production assemble), use a mild soap and water—avoid harsh chemicals, which can damage the aluminum's finish.
Tightening Joints and Bolts
Every few months, give the joint set screws and top bolts a quick tighten with your hex key. Aluminum expands and contracts slightly with temperature changes, so joints can loosen over time.
Replacing Worn Parts
Caster wheels take a lot of abuse—if they start squeaking or rolling unevenly, replace them (most suppliers sell replacement caster wheels). The same goes for aluminum pipe accessories like joints or brackets—keep a few spares on hand for quick swaps.
Protecting the Workbench Top
Use a cutting mat or rubber pad if you're doing heavy work (like metalworking) to prevent scratches. For woodworking, a bench vise can be mounted to the top (just make sure to bolt it into the cross rails for stability).
7. Final Thoughts: Enjoy Your New Workspace!
You did it! Your Aluminum Workbench D is now assembled, level, and ready to tackle whatever you throw at it—from production assemble tasks to DIY projects. Take a step back and admire your handiwork: that sleek aluminum profile, the sturdy frame, the smooth-rolling caster wheels (if you added them). This workbench isn't just a piece of furniture—it's a tool that will make your daily tasks easier, safer, and more efficient.
Remember, if you ever need to reconfigure the workbench (maybe you want to add a shelf or extend the top), the beauty of aluminum pipe accessories is that they're modular. Just loosen the joints, rearrange the profiles, and tighten—no need to buy a whole new workbench.
Thanks for following along, and happy building! If you have questions or want to share how your workbench turned out, feel free to reach out—I'd love to hear from you.