- Company Articles
- Products and Technology
- Installation And Maintenance
- Aluminum Workbench D Maintenance: Simple Steps to Extend Its Lifespan

Aluminum Workbench D Maintenance: Simple Steps to Extend Its Lifespan
Related Product
Aluminum Workbench D
Aluminum tube workbench is more flexible and durable, compared with traditional PE/ABS coated steel tube. It is easy to assemble, anti corrosion, rust protection, and recycle use after disassemble.
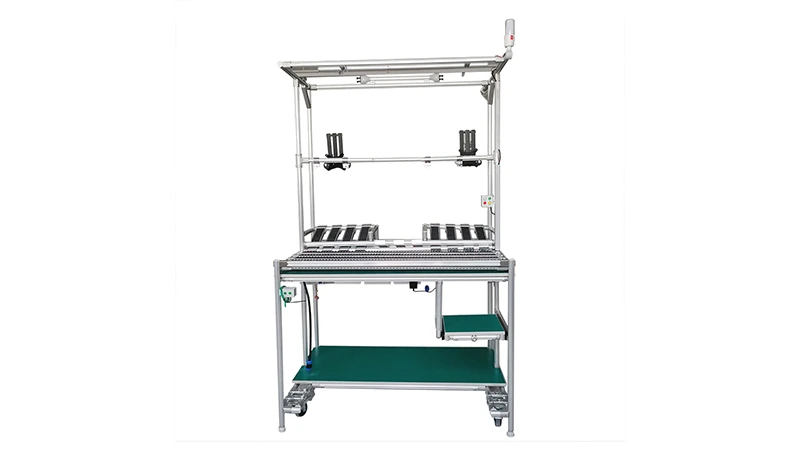
If you've invested in an Aluminum Workbench D, you already know it's more than just a piece of equipment—it's the backbone of your workspace. Whether you use it for production assemble, material staging, or daily tasks, this workbench is designed to be sturdy, flexible, and long-lasting. But like any hardworking tool, it needs a little care to keep performing at its best. Neglecting maintenance can lead to wobbly frames, stuck components, or even safety hazards over time. The good news? With a few simple, consistent steps, you can extend its lifespan by years, ensuring it stays as reliable as the day you first set it up. Let's dive into the essential maintenance tips that will keep your Aluminum Workbench D in top shape.
Understanding Your Aluminum Workbench D: Key Components to Care For
Before we jump into maintenance, let's take a quick look at what makes up your Aluminum Workbench D. Knowing its parts will help you target your care efforts where they matter most. At its core, the workbench features a lightweight but durable aluminum frame, typically built from aluminum profile—strong, corrosion-resistant, and easy to adjust. The worktop itself is often a smooth, flat surface (some models, like the "Workbench E (single deck-without caster)" variant, focus on stability over mobility, but Aluminum Workbench D often includes caster wheels for flexibility). You'll also find aluminum profile accessories like joints, clamps, and brackets holding everything together. If your setup includes material flow features, there might even be roller track components to help move parts or tools across the surface.
Other key parts include the caster wheels (if equipped), which let you move the workbench smoothly; aluminum pipe clamps that secure accessories or additional shelves; and sometimes integrated storage like small racks or holders. Each of these components plays a role in the workbench's functionality, and each needs specific attention to avoid wear and tear. Now, let's break down how to care for each one, step by step.
Daily Maintenance: Quick Habits to Prevent Build-Up and Wear
Daily maintenance is all about preventing small problems from turning into big ones. These tasks take just a few minutes but make a huge difference in keeping your workbench clean, safe, and efficient.
1. Wipe Down the Worktop and Frame
Start each day (or end it, depending on your workflow) by wiping down the worktop and frame with a soft, damp cloth. Even if the surface looks clean, dust, oil, or small debris can accumulate, especially in corners or around joints. For most messes, plain water or a mild soap solution (a drop of dish soap in a bucket of warm water) works best. Avoid harsh chemicals or abrasive sponges—they can scratch the aluminum finish or damage any protective coatings. If you work with oils, greases, or adhesives, a gentle degreaser (test it on a small, hidden area first!) can help lift stubborn residues without harming the metal.
Pay extra attention to the edges of the worktop and the areas around aluminum pipe clamps or brackets. These spots are magnets for crumbs, metal shavings, or dirt, which can eat away at the finish over time. A soft-bristled brush (like an old toothbrush) can help dislodge debris from tight gaps.
2. Clear Debris from Roller Track (If Equipped)
If your Aluminum Workbench D has roller track—those smooth, wheeled rails that help slide materials across the surface—don't overlook them during daily cleaning. Even tiny bits of grit or metal shavings can get caught in the rollers, causing them to jam or scratch the track. Use a dry cloth or compressed air to blow out debris from between the rollers. For sticky spots, a quick wipe with a cloth dampened in soapy water will do the trick. Avoid using oil here—oil can attract more dirt, turning a small problem into a bigger one.
3. Check Caster Wheels for Obstructions
If your workbench has caster wheels (and many models do, for easy mobility), give them a quick once-over each day. Debris like threads, small screws, or even carpet fibers can wrap around the wheels, making them hard to roll or causing uneven movement. Spin each wheel by hand to check for resistance—if it feels stuck, flip the workbench onto its side (carefully!) and use a pair of tweezers or a small brush to remove the obstruction. Also, check the wheel locks: if they're sticky, a quick wipe with a dry cloth usually frees them up. Caster wheels are small, but they take a lot of abuse—keeping them clean ensures you can move the workbench safely and smoothly whenever you need to.

Weekly Inspections: Catching Issues Before They Escalate
Daily care keeps things clean, but weekly inspections help you spot early signs of wear or damage. Set aside 10–15 minutes each week to go through these checks—they'll save you time and money in the long run.
1. Tighten Loose Fasteners and Joints
Aluminum Workbench D frames are held together by a combination of bolts, screws, and aluminum profile accessories like joints and brackets. With regular use, vibration from tasks or movement can loosen these fasteners over time. Grab a basic tool kit (a hex key set and a screwdriver should cover most needs) and gently check each joint and connection. Focus on areas that bear the most weight: the legs, the worktop supports, and any shelves or racks attached to the frame. If you find a loose bolt, tighten it just until it's snug—over-tightening can strip the threads or warp the aluminum profile, so avoid cranking it with all your strength.
Pay special attention to aluminum pipe clamps if you use them to hold tools or accessories. These clamps can loosen when items are attached or removed repeatedly, so a quick twist with a wrench will keep them secure.
2. Inspect the Worktop for Damage
The worktop takes the brunt of daily use—scratches, dents, or stains are inevitable, but catching them early can prevent further damage. Run your hand over the surface to feel for rough spots or deep scratches. Small scratches can be buffed out with a mild aluminum polish (test it on a hidden corner first!), while deeper dents might need a gentle tap with a rubber mallet from underneath (if the worktop is removable) to pop them back into shape. For stains, especially from chemicals or oils, a paste of baking soda and water can help lift discoloration—let it sit for 10 minutes, then wipe clean with a damp cloth.
3. Test Mobility and Stability
Give the workbench a gentle shake from different angles to check for wobbling. A stable workbench shouldn't move side-to-side or front-to-back. If it does, the issue is likely loose legs or uneven caster wheels. Adjust the leveling feet (if your model has them) to balance the workbench on uneven floors—most feet screw in or out to raise or lower the height. For caster wheels, check if any are bent or worn; a wobbly wheel can throw off the entire balance. If a wheel is damaged, don't wait to replace it—most caster wheels are standard sizes, so you can find replacements from your lean pipe supplier or hardware store.

Monthly Deep Maintenance: Keeping Components Moving and Strong
Once a month, set aside a bit more time for deeper care. These tasks go beyond cleaning and tightening to ensure moving parts stay lubricated, metal stays protected, and hidden areas stay debris-free.
1. Lubricate Moving Parts
Moving components like caster wheel bearings, roller track wheels, and adjustable joints need lubrication to stay smooth. For aluminum parts, avoid heavy oils—they can attract dirt and corrode the metal over time. Instead, use a silicone-based spray lubricant (like WD-40 Specialist Silicone Spray) or dry graphite lubricant. Here's how to apply it:
- Caster Wheels: Spray a small amount into the bearing area (where the wheel meets the axle). Spin the wheel a few times to distribute the lubricant evenly.
- Roller Track: Apply a thin line of lubricant along the track rails, then roll a clean cloth over the rollers to spread it—this prevents buildup and keeps materials sliding smoothly.
- Joints and Hinges: For adjustable joints (like those used to fold down shelves), spray a tiny amount into the pivot points and move the joint back and forth to work the lubricant in.
Remember: Less is more with lubricant. Too much can drip onto the worktop or attract dust, so a light coating is all you need.
2. Clean Hidden Areas and Accessories
Over time, dust and debris can accumulate in hidden spots: under the worktop, inside hollow aluminum profile rails, or around attached accessories like tool holders. Use a vacuum with a crevice tool to suck out dirt from these areas. For aluminum profile rails with T-slots (common in adjustable frames), a pipe cleaner or small brush can reach into the slots to dislodge debris that might block future adjustments. If you have aluminum profile accessories like brackets or clamps that aren't frequently moved, remove them, clean both the accessory and the mounting area, then reattach them—this prevents corrosion from trapped moisture.
3. Inspect for Corrosion and Rust
Aluminum is naturally resistant to rust, but it can still corrode if exposed to salt, chemicals, or constant moisture. Check for white, powdery spots (aluminum oxide) or pitting on the frame or worktop. If you spot corrosion, gently scrub the area with a nylon brush and a solution of vinegar and water (1:1 ratio). Rinse with clean water and dry thoroughly. To prevent future corrosion, apply a thin coat of car wax to the aluminum surfaces—this creates a protective barrier against moisture and chemicals. Avoid using steel wool or wire brushes, as they can scratch the aluminum and make it more prone to corrosion.
Seasonal Maintenance: Adapting to Weather and Workload Changes
Depending on your environment, seasonal changes can affect your workbench. Humidity, temperature swings, or even increased workload during busy seasons can impact its condition. Here's how to adjust your maintenance routine:
1. Humid or Rainy Seasons: Fight Moisture
In humid climates or during rainy months, moisture is the biggest threat. Check for condensation on the worktop or frame—wipe it dry immediately to prevent water spots or corrosion. If your workspace isn't climate-controlled, consider placing a dehumidifier nearby to reduce air moisture. For caster wheels, remove them temporarily and dry the axles thoroughly if they get wet—trapped moisture here can lead to rusted bearings. You can also apply a thin layer of car wax to the aluminum frame to repel water.
2. Dry or Dusty Seasons: Combat Debris
Dry, dusty environments mean more particles getting into joints, roller track, and caster wheels. Increase your daily cleaning frequency—wipe down the worktop twice a day instead of once, and use compressed air on roller track every other day to blow out dust. For the frame, a quick wipe with a microfiber cloth (which traps dust better than regular cloths) will keep aluminum surfaces from looking dull or gritty.
3. High-Workload Seasons: Check for Wear
If you have busy periods with heavier use (like peak production times), parts like roller track and caster wheels will wear faster. Inspect these components weekly instead of monthly, and tighten joints more often—vibration from constant use can loosen fasteners quickly. Consider having spare parts on hand (like extra roller track wheels or caster accessories) so you can replace worn items immediately without disrupting workflow.
Troubleshooting Common Issues: Quick Fixes for Annoying Problems
Even with regular maintenance, you might run into occasional issues. Here's how to troubleshoot and fix the most common problems with your Aluminum Workbench D:
Problem: Roller Track is Sticking or Jamming
Chances are, debris is trapped in the wheels or the track is misaligned. First, clean the track thoroughly with compressed air. If that doesn't work, check if any wheels are bent or broken—replace them with new ones (you can order from your roller track supplier). For misalignment, loosen the brackets holding the track, adjust it until it's straight, then retighten the brackets.
Problem: Workbench Won't Stay Level
Uneven floors or worn leveling feet are usually the culprit. Use a bubble level to check which leg is too short or long. Adjust the leveling feet by screwing them in or out—turn clockwise to lower, counterclockwise to raise. If the feet are stripped or damaged, replace them with new ones (most are standard M10 or M12 sizes).
Problem: Aluminum Profile is Scratched or Dented
Small scratches can be buffed with aluminum polish and a microfiber cloth. For deeper dents, if the profile is part of the frame, you may need to replace the section—aluminum profile is modular, so you can order a new piece from your aluminum profile supplier and swap it out with basic tools. To prevent future scratches, consider adding edge guards or corner protectors to high-traffic areas.
Long-Term Preservation: When to Repair vs. replace
With proper care, your Aluminum Workbench D should last 10 years or more. But even the best-maintained equipment will need parts replaced eventually. Knowing when to repair or replace can save you money and keep your workspace safe.
Repair When: Parts are loose, scratched, or slightly worn but still functional (e.g., tightenable bolts, buffable scratches, lubricatable joints). Most repairs are simple and cost-effective—replacing a caster wheel, tightening a bracket, or polishing the worktop.
replace When: Parts are bent, cracked, or corroded beyond repair (e.g., a bent aluminum profile, a cracked worktop, or seized caster bearings that won't lubricate). If the frame itself is warped, it's safer to replace the entire workbench—structural damage can lead to collapse under weight.
Pro tip: Keep a log of maintenance tasks and repairs. Note when you tightened bolts, replaced a wheel, or lubricated parts. This log will help you spot patterns (e.g., a certain joint always loosens) and plan for future replacements before a part fails unexpectedly.
Maintenance Task Schedule: At a Glance
To make it easy to stay on track, here's a quick reference table of maintenance tasks and how often to perform them:
| Task | Frequency | Tools Needed | Key Notes |
|---|---|---|---|
| Wipe down worktop and frame | Daily | Soft cloth, mild soap (if needed) | Avoid abrasive cleaners; focus on corners and joints. |
| Clear debris from roller track | Daily (if used) | Compressed air, dry cloth | Check for stuck rollers or grit between wheels. |
| Inspect caster wheels for obstructions | Daily (if mobile) | Tweezers, small brush | Remove threads, screws, or fibers wrapped around axles. |
| Tighten loose bolts and joints | Weekly | Hex keys, screwdriver | Focus on legs, worktop supports, and shelves. |
| Test stability and mobility | Weekly | Bubble level (optional) | Shake gently; adjust leveling feet if wobbling. |
| Lubricate moving parts | Monthly | Silicone spray, dry graphite | Avoid oil-based lubricants on aluminum. |
| Deep clean hidden areas | Monthly | Vacuum with crevice tool, pipe cleaner | Focus on T-slots, under worktop, and joint gaps. |
| Check for corrosion | Seasonally | Vinegar solution, nylon brush | Address white spots immediately to prevent spread. |
Final Thoughts: Your Workbench Deserves the Same Care You Put Into Your Work
Your Aluminum Workbench D works hard for you—isn't it worth spending a few minutes each day, week, and month to return the favor? By following these maintenance steps, you're not just extending its lifespan; you're ensuring a safer, more efficient workspace. A well-cared-for workbench reduces downtime, prevents accidents, and even boosts morale—there's something satisfying about working at a tool that feels as good as new, year after year. And when it comes time to upgrade or expand, a maintained workbench will hold its value, making it easier to sell or repurpose. So grab your cloth, your tool kit, and make maintenance a habit—your future self (and your workbench) will thank you.