- Company Articles
- Products and Technology
- Installation And Maintenance
- Assembly Guide for Aluminum Workbench B: Step-by-Step Installation Process

Assembly Guide for Aluminum Workbench B: Step-by-Step Installation Process
Related Product
Aluminum Workbench B
Aluminum tube workbench is more flexible and durable, compared with traditional PE/ABS coated steel tube. It is easy to assemble, anti corrosion, rust protection, and recycle use after disassemble.
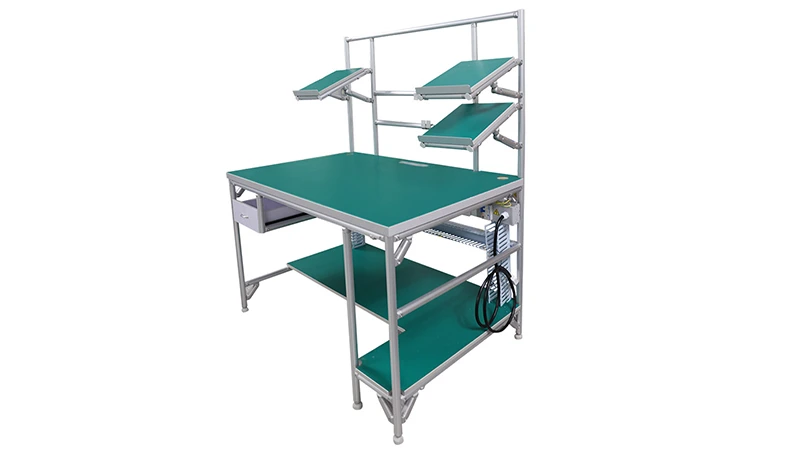
Whether you're setting up a new workshop, upgrading your production line, or just need a reliable surface for daily tasks, a well-built workbench is the backbone of efficiency. Enter Aluminum Workbench B —a versatile, durable solution designed to adapt to your needs, thanks to its modular aluminum profile construction and compatibility with a wide range of aluminum profile accessories. Unlike heavy wooden workbenches that warp over time or flimsy plastic ones that can't handle weight, this aluminum workbench strikes the perfect balance: lightweight enough to move (with the right caster wheels, of course) yet sturdy enough to support tools, materials, and even heavy machinery.
In this guide, we'll walk you through assembling Aluminum Workbench B from start to finish. We'll cover everything from unpacking the parts to testing the final setup, with plenty of tips to ensure your workbench is level, stable, and ready to tackle whatever you throw at it. Even if you're new to DIY assembly, don't worry—this process is designed to be straightforward, and with a little patience, you'll have a professional-grade workbench in no time. Let's dive in!
Tools, Materials, and Safety First
Before you start tightening bolts or connecting aluminum profiles, let's make sure you have everything you need. Skipping this step can lead to frustrating delays (like realizing you're missing a key tool halfway through) or even mistakes that affect the workbench's stability. Here's what you'll need:
Tools You'll Need
- Hex key set (most aluminum profile accessories use metric sizes, so check the package for the right one—usually 4mm or 5mm)
- Rubber mallet (for gently tapping profiles into place without damaging them)
- Measuring tape (to ensure your frame is square and parts are aligned)
- Level (a 2-foot or 4-foot spirit level works best to check for flatness)
- Work gloves (to protect your hands from sharp edges on aluminum profiles)
- Phillips-head screwdriver (for any additional screws, like those securing the workbench top)
Parts Checklist: What's in the Box?
Aluminum Workbench B comes with all the core components you need, but it's smart to double-check everything before starting. Below is a typical parts list—yours might vary slightly based on customizations, but the basics will be similar:
| Part Name | Quantity | Description |
|---|---|---|
| Aluminum profile (main frame) | 4–6 pieces | Extruded aluminum rails (often 40x40mm or 30x30mm) for the frame's front, back, and sides |
| Aluminum profile accessories | Varies | Including 90° aluminum profile connectors, end caps, and brackets to join profiles |
| Workbench top | 1 piece | Typically an aluminum honeycomb panel (lightweight but strong) or plywood with an aluminum overlay |
| Caster wheel set | 4 (optional) | Lockable caster wheels for mobility (look for ones rated for at least 50kg each) |
| Roller track (optional) | 1–2 pieces | For material flow (e.g., sliding parts from one end to the other) |
| Hardware pack | 1 set | Screws, washers, and hex bolts for securing the top and accessories |
Pro Tip:
Lay out all parts on a clean, flat surface (like a garage floor or large table) and group similar items together. This makes it easier to grab what you need during assembly. If something is missing, contact your supplier right away—don't try to substitute parts, as this can weaken the structure.
Safety Reminders
Assembly is straightforward, but a few precautions will keep you safe and the workbench intact:
- Wear gloves: Aluminum profiles can have sharp edges, especially if they're new. Gloves also give you a better grip when tightening connectors.
- Work on a flat surface: A sloped floor or uneven table will make it hard to build a square frame. If your floor isn't level, use shims under the workbench during assembly (you can adjust later with leveling feet).
- Don't overtighten: Aluminum profile accessories (like connectors) can strip if you crank the hex key too hard. Tighten until snug, then give a quarter-turn more—no need to gorilla-grip it.
- Check for damage: If a profile is bent or a connector is cracked, don't use it. Damaged parts compromise stability.
Step 1: Unpack and Inspect All Parts
Let's start with the basics: unpacking. Most workbenches come in a cardboard box with parts wrapped in bubble wrap or foam. Carefully cut the tape (don't use a box cutter near the parts!) and remove everything. Lay the parts out in sections: frame profiles, aluminum profile accessories, workbench top, caster wheels (if included), and hardware.
Now, compare your parts to the checklist above (or the manual that came with your workbench). Pay special attention to the aluminum profiles—they should be straight, with no dents or bends. Run your hand along the length to check for rough spots (these can be sanded down gently with fine-grit sandpaper if needed). For aluminum profile accessories like connectors, make sure the threads aren't stripped and the levers (if any) move smoothly.
If you ordered optional extras like roller track, set those aside for later—we'll focus on the core frame first. The workbench top is usually the heaviest part, so place it near the assembly area but out of the way until you're ready for it.
Pro Tip:
Take photos of the parts layout before you start. If you get stuck later, you can refer back to see how everything was organized!

Step 2: Build the Frame Base
The frame is the skeleton of your workbench, and it all starts with the base. Aluminum Workbench B's frame uses aluminum profiles connected by aluminum profile accessories—think of it like building with adult Legos, but sturdier. Here's how to do it:
Substep 2.1: Connect the Front and Back Rails
Start with the two longest aluminum profiles—these will be your front and back rails. Lay them parallel on the floor, with the ends aligned. The distance between them should match the length of your side rails (check the manual for exact measurements—common sizes are 1200mm or 1500mm long).
Next, take four shorter profiles (the side rails) and connect them to the front/back rails using 90° aluminum profile connectors. Here's how: slide a connector into the end of a side rail, then align it with the end of the front rail. insert the hex bolt through the hole in the connector and tighten it with the hex key. Do this for all four corners—front-left, front-right, back-left, back-right.
At this point, you should have a rectangular frame lying flat on the floor. Grab your measuring tape and check the diagonals—if the frame is square, both diagonals will be equal. For example, if your frame is 1200mm long and 600mm wide, the diagonal should be √(1200² + 600²) ≈ 1341mm. If one diagonal is longer than the other, gently push the longer corner until both measurements match. This ensures your frame won't wobble later.
Substep 2.2: Add Vertical Supports (Legs)
Now, we'll add the legs to lift the frame off the ground. Take four vertical aluminum profiles (these are shorter than the side rails—standard height is 800mm, but yours might vary). Place one at each corner of the base frame, aligning the holes with the connectors on the frame.
Use 90° aluminum profile connectors again to attach the legs to the base. This time, the connectors will join the vertical leg to the horizontal base rail. Tighten the bolts just enough to hold the leg in place—we'll fully tighten everything later once the frame is upright.
Once all four legs are attached, carefully flip the frame upright (you might need a helper for this—aluminum is light, but the frame can be awkward). Stand back and check if the legs are plumb (vertical). If one leg is leaning, loosen the connector, adjust, and retighten. A level can help here—place it along the side of a leg to confirm it's straight.
Substep 2.3: Reinforce the Frame (Optional but Recommended)
For extra stability—especially if you plan to load the workbench with heavy tools—add cross-braces between the legs. Cut two more aluminum profiles to the length of your side rails (or use pre-cut ones from the supplier) and attach them halfway up the legs using 45° aluminum profile connectors. This "X" or "ladder" bracing prevents the legs from splaying outward under weight.
Pro Tip:
If you're not sure where to place cross-braces, look for pre-drilled holes in the legs—these are usually spaced to make bracing easy.

Step 3: Attach the Workbench Top
With the frame built, it's time to add the top—the surface you'll actually work on. Aluminum Workbench B typically uses an aluminum honeycomb panel for the top, which is lightweight but surprisingly strong (it's designed to resist dents and scratches). If your top is a different material, the process will be similar—just follow the manufacturer's instructions for securing it.
Substep 3.1: Prepare the Top
Place the workbench top upside down on a clean, soft surface (like a blanket or cardboard) to avoid scratching it. If your top has pre-drilled holes for mounting, align them with the holes in the frame's top rails. If not, you'll need to mark where to drill—measure twice, drill once!
To mark holes: Place the top on the frame (right-side up) and center it so there's equal overhang on all sides (usually 25–50mm). Use a pencil to mark through the frame's rail holes onto the bottom of the top. Remove the top, flip it over, and drill pilot holes (smaller than the screws) at your marks. This prevents the top from splitting when you drive in the screws.
Substep 3.2: Secure the Top to the Frame
Carefully lift the top (again, get help if it's large) and place it back on the frame, aligning the pilot holes with the frame's rail holes. insert the screws from the hardware pack through the top and into the frame rails. Tighten them with a screwdriver or hex key—snug but not so tight that you warp the top.
For extra security, use washers under the screw heads—these distribute pressure and prevent the screws from pulling through the top. If your workbench has a lip or edge, make sure it's facing the front (where you'll stand) for comfort.
Once the top is secured, give it a gentle shake. It should feel solid—no creaking or movement. If it wobbles, check that all screws are tight and the frame is level (we'll adjust leveling feet next if needed).
Step 4: Add Leveling Feet or Caster Wheels
Now, let's make sure your workbench sits flat on the floor. Most Aluminum Workbench B models come with either adjustable leveling feet or the option to add caster wheels. Here's how to install both:
Option A: Installing Leveling Feet
Leveling feet are great if the workbench will stay in one place. They thread into the bottom of each leg, allowing you to tweak the height to compensate for uneven floors. Simply screw a leveling foot into each leg until the base is flush with the leg end. Then, place the level on the workbench top and adjust the feet up or down until the bubble is centered. Tighten the lock nut on each foot to keep it from unscrewing over time.
Option B: Installing Caster Wheels
If you need to move the workbench (e.g., to sweep underneath or reconfigure your workspace), caster wheels are a must. Start by removing the leveling feet (if pre-installed) and threading the caster stems into the leg bottoms. Most caster wheels for aluminum workbenches have a threaded stem that screws directly into the leg—no extra tools needed beyond your hands (though a wrench can help if it's tight).
Choose a caster wheel with a brake for safety—this locks the wheel in place when you're using the workbench. To test, push the workbench gently—if it rolls smoothly, you're good. Press the brake lever on one wheel; it should resist movement. Repeat for all four wheels.
Pro Tip:
For heavy workbenches, opt for caster wheels with ball bearings—they roll more smoothly and last longer than plain bearings.
Step 5: Install Optional Extras (Roller Track, Shelves, etc.)
Now that the core workbench is done, it's time to customize! If you ordered roller track for material flow (e.g., sliding parts from one end to the other during assembly), here's how to install it:
Installing Roller Track
Roller track is a series of small wheels mounted on a rail, designed to let materials glide easily. Measure where you want the track to go—most people mount it along the back edge of the workbench top, or as a shelf below the top for storing bins.
Use aluminum profile accessories like brackets to attach the roller track to the workbench frame. Drill pilot holes into the track (if needed) and secure it with screws. Test it by placing a small box on the track and pushing—it should roll smoothly without sticking. If a wheel is jammed, check for debris or tighten the axle screw gently.
Adding Shelves or Drawers
Aluminum profile accessories also include shelf brackets, which let you add lower shelves for storage. Measure the distance between the legs, cut an aluminum profile to size, and attach brackets to the legs. Place a shelf board (plywood or aluminum) on top and secure with screws. For drawers, look for modular drawer units that mount to the frame using the same connectors—no need for custom drilling!
Step 6: Final Checks and Adjustments
You're almost done! Let's do a final walkthrough to ensure everything is safe and sturdy:
- Tighten all bolts: Go back through every aluminum profile connector and bolt, giving each a gentle tighten with the hex key. Don't overtighten—just snug them up.
- Check level again: Place the level on the workbench top in both directions (front-to-back and side-to-side). If it's off, adjust the leveling feet or caster wheels.
- Test weight capacity: Place a heavy object (like a toolbox) on the top and leave it for an hour. Check for sagging or creaking—if the top dips, you may need to add center supports (using aluminum profile accessories like brackets).
- Clean up: Wipe down the aluminum profiles with a damp cloth to remove fingerprints or dust. For stubborn marks, use a mild soap (avoid abrasive cleaners, which can scratch the finish).
Maintenance Tips to Keep Your Workbench Like New
Aluminum Workbench B is built to last, but a little care goes a long way:
- Clean regularly: Wipe spills immediately to prevent staining. For oil or grease, use a degreaser and a soft brush.
- Lubricate moving parts: If you have caster wheels or roller track, apply a drop of machine oil to the axles every few months to keep them rolling smoothly.
- Check connections: Every 6 months, tighten any loose aluminum profile accessories—vibration from daily use can loosen bolts over time.
- Protect the top: Use a rubber mat or tool tray to prevent scratches from heavy tools. For chemical resistance, consider a silicone worktop protector.
Final Thoughts: Enjoy Your Custom Workbench!
Congratulations—you've just built your Aluminum Workbench B! Take a step back and admire your handiwork. What started as a pile of aluminum profiles and accessories is now a functional, sturdy workspace that will serve you for years. Whether you're using it for woodworking, electronics assembly, or as a packing station, the beauty of this workbench is its flexibility—add more shelves, swap out the caster wheels for leveling feet, or even expand the top with additional aluminum profiles as your needs grow.
Remember, if you ever need to reconfigure or repair your workbench, the modular design makes it easy. Aluminum profile accessories are widely available, so replacing a connector or adding a new part is as simple as ordering online and tightening a few bolts. Here's to many productive hours at your new workbench!