- Company Articles
- Products and Technology
- Installation And Maintenance
- Castor Install Base Installation Time: DIY vs. Professional Services

Castor Install Base Installation Time: DIY vs. Professional Services
Related Product
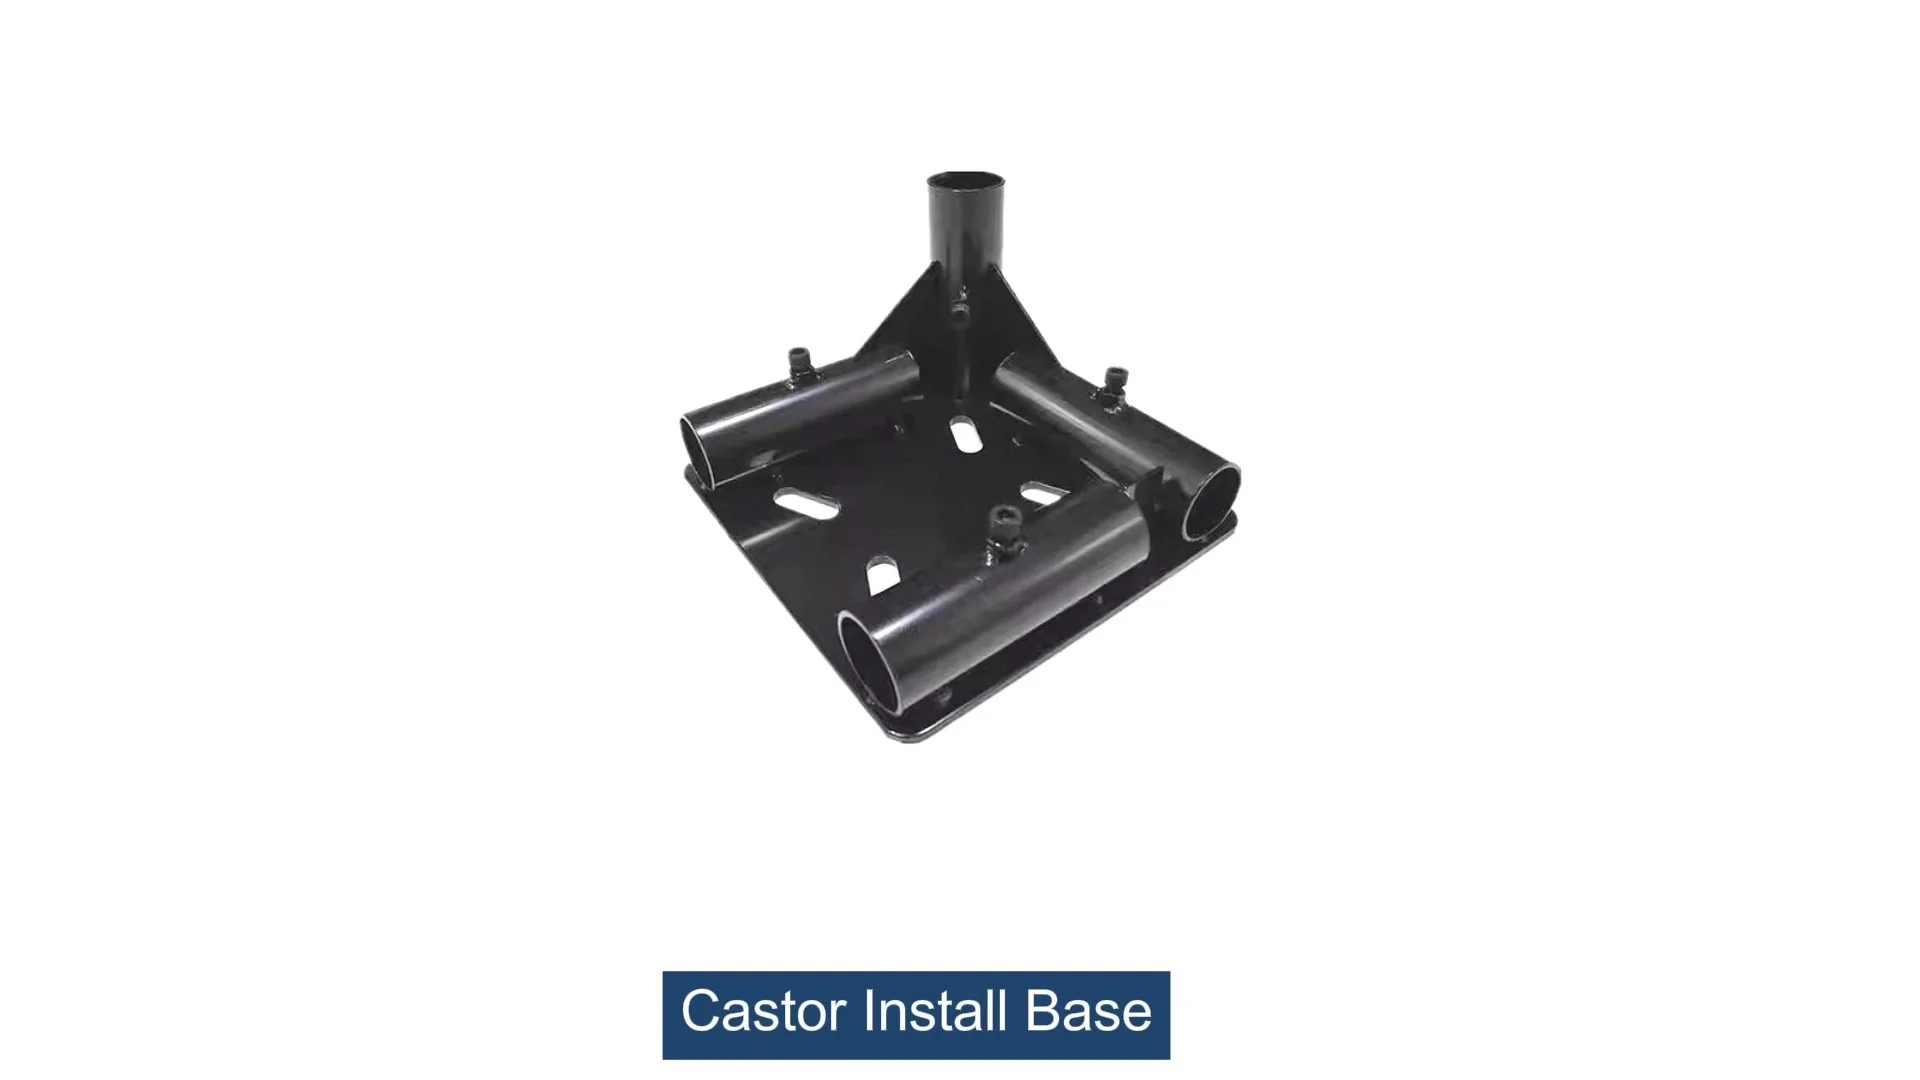
Castor Install Base
Castor install base, used for connection between pipe and castor, it can connect 4 pcs pipe by 1 pcs castor base, to make the structure strong and stable.
The Unsung Hero of Workplace Mobility: Why Castor Install Bases Matter
In the fast-paced world of manufacturing, warehousing, and workshop operations, mobility isn't just a convenience—it's a cornerstone of efficiency. Think about the workbenches where assemblers piece together components, the material racks that hold inventory, or the turnover trolleys that ferry parts across the floor. What makes these tools truly adaptable? Often, it's the humble castor install base. These unassuming components connect casters to frames, turning stationary structures into movable assets that can be repositioned in seconds to adapt to shifting workflows.
But here's the thing: installing a castor install base isn't as simple as screwing a wheel onto a leg. The time it takes to get the job done right—whether you're a hands-on DIY enthusiast or you're hiring a professional—can impact everything from project timelines to long-term safety. A poorly installed base might lead to wobbly workbenches, stuck casters, or even accidents down the line. On the flip side, a smooth, efficient installation ensures your equipment is up and running quickly, minimizing downtime and keeping productivity high.
In this article, we'll dive deep into the world of castor install base installation, comparing the time, effort, and outcomes of DIY projects versus professional services. We'll explore the factors that influence installation speed, the pros and cons of each approach, and help you decide which path makes sense for your specific needs—whether you're outfitting a small garage workshop or scaling up a large manufacturing facility.
First Things First: What Exactly Is a Castor Install Base?
Before we jump into installation times, let's make sure we're all on the same page about what a castor install base is. At its core, this component is a mounting plate or bracket designed to securely attach casters (those swiveling wheels with brakes) to the bottom of structures like workbenches, aluminum profile frames, or lean pipe systems. It acts as the bridge between the caster and the equipment, distributing weight evenly and ensuring the caster can rotate and roll smoothly without damaging the frame.
Castor install bases come in various designs, from simple flat plates for lightweight workbenches to heavy-duty split foot seats for industrial-grade material racks. They're often made from steel or aluminum—durable materials that can handle the stress of daily use. And while they might seem like a small part of the bigger picture, their quality and installation directly impact how well your equipment performs. A misaligned base, for example, could cause a caster to drag, increasing wear and tear and slowing down operations.

Why Installation Time Isn't Just About "Getting It Done Fast"
When you're staring at a pile of unassembled workbenches or a fleet of new material racks, it's tempting to rush the installation process. After all, the faster you get those casters on, the faster you can start using the equipment, right? But installation time is about more than speed. It's about balancing efficiency with precision. A quick but shoddy job might save you an hour today, but it could cost you days of downtime later when a caster fails or a workbench becomes unstable.
Consider safety, too. In environments where employees are moving heavy loads or working around mobile equipment, a loose castor install base isn't just a nuisance—it's a hazard. A wobbly trolley could tip over, or a stuck caster might cause a worker to strain their back while pushing. Taking the time to install the base correctly isn't just about productivity; it's about protecting your team.
So, whether you're tackling the project yourself or hiring a pro, the question isn't just "How long will it take?" but "How long will it take to do it right?" Let's break down both approaches.

DIY Installation: Rolling Up Your Sleeves and Taking Control
For many small businesses, hobbyists, or teams with a "can-do" attitude, DIY installation is the default choice. It feels empowering, saves on labor costs, and lets you work on your own schedule. But how much time does it really take, and what factors can throw a wrench into your timeline?
The DIY Process: Step-by-Step (and Where Time Slips Away)
Let's walk through a typical DIY installation for a castor install base on a standard aluminum profile workbench. Here's what you'll need to do:
1. Gather Your Tools and Parts : First, you'll need the castor install bases themselves, matching casters (don't forget caster accessories like washers or lock nuts), a drill, screws or bolts, a level, a measuring tape, and maybe a wrench for tightening. If you're working with aluminum profiles, you might also need T-slot bolts or brackets to attach the base to the frame. Skipping this prep step? You'll end up making multiple trips to the hardware store, eating into your time.
2. Prep the Workbench Frame : If the workbench is already assembled, you'll need to flip it upside down to access the legs or bottom rails. For unassembled frames (like those made from lean pipe or aluminum extrusion profiles), you'll need to ensure the structure is square and stable before adding casters. This step alone can take 10–15 minutes per workbench, especially if you're working alone.
3. Measure and Mark : Precision is key here. You'll need to mark where the castor install base will attach to the frame, ensuring all four bases are aligned evenly. A misaligned base can cause the workbench to wobble or roll unevenly. Using a level and measuring tape, this might take 5–10 minutes per base—more if you're double-checking (which you should).
4. Drill Pilot Holes (If Needed) : Depending on the frame material (steel, aluminum, or wood), you might need to drill pilot holes to avoid splitting or damaging the material. For aluminum profiles, this is crucial—drilling too fast or using the wrong bit can strip the T-slot or crack the profile. This step adds another 5–10 minutes per base, plus time to clean up metal shavings.
5. Attach the Base and Caster : Finally, you'll secure the castor install base to the frame with screws or bolts, then attach the caster to the base. Tightening the hardware requires care—over-tightening can strip threads, while under-tightening leaves the base loose. Using a torque wrench (if you have one) adds precision but also time. Expect 10–15 minutes per base here.
Factors That Slow Down DIY Installations
So, how long does all this take for a single workbench? Let's crunch the numbers. For someone with moderate DIY experience, installing four castor install bases (one per leg) might take 1.5–2.5 hours. But that's under ideal conditions. Real-world factors can stretch that timeline:
- Skill Level : If you're new to using power tools or working with aluminum profiles, expect to take longer. Fumbling with a drill or struggling to align a level can add 30 minutes or more.
- Tool Quality : A cheap drill might bog down when drilling into steel, or a flimsy level could give inaccurate readings. Investing in good tools saves time, but not everyone has that luxury.
- Part Quality : Not all castor install bases are created equal. If the holes in the base don't line up with your frame, or the screws are too short, you'll spend extra time improvising solutions.
- Distractions : Let's be real—most DIY projects happen in busy environments. Phone calls, interruptions from coworkers, or unexpected tasks can break your focus and extend the process.
The Pros and Cons of DIY
Pros :
- Cost Savings : No labor fees—you're only paying for parts.
- Flexibility : Work on your own schedule, no need to coordinate with a contractor.
- Learning Opportunity : Gain hands-on knowledge about your equipment, which can help with future repairs.
Cons :
- Time Investment : For beginners, a 2-hour job can easily turn into a half-day project.
- Risk of Errors : Misalignment, stripped bolts, or loose bases can lead to rework or safety issues.
- Tool Limitations : Without professional-grade tools (like precision levels or torque wrenches), achieving perfect alignment is harder.

Professional Installation: Bringing in the Experts
For larger operations, time-sensitive projects, or teams that prioritize speed and precision, professional installation is often worth the investment. Professional installers bring experience, specialized tools, and a systematic approach that can cut installation time significantly. But how does their process differ, and what does it cost in terms of time?
The Professional Process: Efficiency Through Expertise
Professional installers don't just show up with a drill and a level—they come prepared. Here's a typical workflow:
1. Pre-Installation Assessment : Before starting, a pro will evaluate the equipment (workbenches, racks, etc.), the floor conditions (is it level? Are there obstacles?), and the type of casters and bases being used. This step ensures they bring the right tools and materials, avoiding delays later. For a small project, this might take 15–30 minutes; for larger setups, up to an hour.
2. Team Coordination : Unlike DIYers, professionals often work in teams. One person might prep the frames, another drill holes, and a third attach the bases and casters. This division of labor speeds things up dramatically. For example, a two-person team can install four bases on a workbench in under an hour.
3. Specialized Tools : Pros use commercial-grade equipment that makes the job faster and more precise. Magnetic drills for steel frames, cordless impact drivers for quick tightening, and laser levels for alignment—these tools cut down on time without sacrificing quality. A laser level, for instance, can align all four bases in minutes, whereas a manual level might take 15–20 minutes.
4. Quality Control Checks : After installation, professionals test each caster for smooth rotation, check the stability of the equipment, and torque all hardware to manufacturer specifications. This step ensures the job is done right the first time, reducing the need for callbacks.
How Fast Can Pros Really Work?
For a single workbench with four castor install bases, a professional team might finish the job in 30–60 minutes—less than half the time of a DIYer. For larger projects, the efficiency gap grows. Installing bases on 10 workbenches? A DIYer might take 15–25 hours over a weekend, while a pro team could knock it out in a single day (8–10 hours).
But speed isn't the only advantage. Professionals also account for variables that DIYers might miss, like floor unevenness (which requires adjustable casters or shims) or compatibility issues between bases and aluminum profile accessories. By addressing these upfront, they avoid costly delays.
The Pros and Cons of Professional Installation
Pros :
- Speed : Professionals work faster, minimizing downtime for your operation.
- Precision : Expertise and tools ensure bases are aligned, torqued, and tested correctly.
- Safety Compliance : Pros are familiar with industry safety standards, reducing the risk of accidents.
- Warranty Coverage : Many installers offer warranties on their work, giving you peace of mind.
Cons :
- Cost : Professional labor isn't cheap. Hourly rates can range from $75–$150, adding up for large projects.
- Scheduling : You'll need to coordinate with the installer's availability, which might not align with your timeline.
- Less Control : You're trusting someone else with the job, which can be stressful if you're particular about details.
DIY vs. Professional: A Side-by-Side Comparison
| Factor | DIY Installation | Professional Installation |
|---|---|---|
| Time per Workbench (4 bases) | 1.5–2.5 hours (beginner to experienced DIYer) | 0.5–1 hour (team of 2 professionals) |
| Total Cost | Low (parts only: $20–$50 per base) | High (parts + labor: $100–$200 per base) |
| Skill Required | Moderate (basic tool use, measuring, alignment) | High (specialized knowledge of materials and safety standards) |
| Risk of Errors | Higher (misalignment, loose hardware, tool mishaps) | Lower (experience, quality control checks) |
| Flexibility | High (work on your own schedule) | Lower (dependent on installer availability) |
| Safety Assurance | Depends on DIYer's attention to detail | High (adherence to safety standards, tested installations) |
Choosing the Right Path: When to DIY and When to Call in the Pros
There's no one-size-fits-all answer to whether DIY or professional installation is better. It depends on your unique situation. Here are some scenarios where each approach shines:
Scenario 1: Small-Scale Project, Tight Budget
You're a startup with a single workbench in your garage and a limited budget. You have basic tools and some DIY experience. DIY is likely the way to go. The project is small enough that even if it takes 2–3 hours, the cost savings ($100–$200 in labor) are worth the time investment. Just be sure to double-check your alignment and torque the hardware properly!
Scenario 2: Large Manufacturing Facility, Urgent Timeline
You're opening a new production line with 50 workbenches and need them operational by next week. DIY would take weeks (50 workbenches × 2 hours = 100 hours), and mistakes could delay your launch. Hiring a professional team makes sense here. They can install all 50 workbenches in 2–3 days, ensuring they're safe, aligned, and ready to use on time.
Scenario 3: High-Safety Environment (e.g., Medical Device Assembly)
In environments where precision and safety are non-negotiable (like labs or medical device workshops), professional installation is a must. A wobbly workbench could compromise delicate assemblies, or a loose caster could create a contamination risk. Professionals understand these standards and have the expertise to ensure installations meet strict safety guidelines.
Other factors to consider: Do you have the tools? If you need to buy a drill, level, and torque wrench for a single project, the cost savings of DIY shrink. What's your team's time worth? If your employees are better suited to assembling products than installing casters, pulling them off production to do DIY work might cost more in lost productivity than hiring a pro.
Common Mistakes to Avoid, No Matter Which Path You Choose
Whether you're DIYing or hiring a pro, some pitfalls can derail your installation timeline or compromise quality. Here are a few to watch out for:
- Ignoring the Manufacturer's Instructions : Castor install bases and aluminum profile accessories often come with specific torque specs or alignment guidelines. Skipping these can lead to failures. Always read the manual!
- Using the Wrong Hardware : A screw that's too short won't hold the base securely; one that's too long might puncture the frame. Match the hardware to the base and frame material (steel vs. aluminum).
- Forgetting About Floor Conditions : Uneven floors can make even a perfectly installed caster base wobble. Use adjustable casters or shims if needed.
- Rushing the Alignment : It's tempting to eyeball the bases, but a few millimeters off can lead to uneven weight distribution. Take the time to measure and level.
Final Thoughts: Time Well Spent Equals Long-Term Success
At the end of the day, installing a castor install base is about more than attaching a wheel to a frame—it's about building a foundation for efficiency, safety, and adaptability in your workspace. Whether you choose to DIY or hire a professional, the key is to prioritize quality over speed. A few extra minutes spent aligning a base or torquing a bolt can save you hours of frustration and risk down the line.
For small projects with tight budgets and skilled hands, DIY is a solid choice. For large-scale operations, urgent timelines, or high-safety environments, professionals bring the speed, expertise, and peace of mind that make the investment worthwhile. Whichever path you take, remember: the time you put into installation today will pay off every day your mobile workbenches, racks, and trolleys roll smoothly and safely across your floor.
So, grab your tools (or your phone to call a pro), and get ready to transform your workspace—one castor install base at a time.