- Company Articles
- Products and Technology
- Installation And Maintenance
- Common Installation Mistakes with Four Way Straight Lean Pipe Joint (and How to Avoid Them)

Common Installation Mistakes with Four Way Straight Lean Pipe Joint (and How to Avoid Them)
Related Product
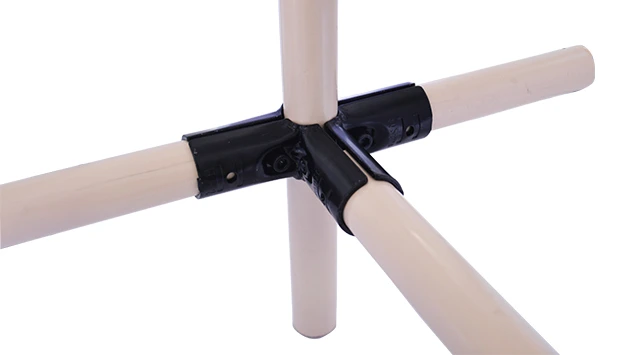
Four Way Straight Lean Pipe Joint
Four way lean pipe joint for 4 pcs 28MM lean pipe connection in straight angle, which used widely in workbench, flow rack, hand trolley frame connection.
In the world of lean manufacturing, where efficiency and adaptability are king, the humble lean pipe system stands as a backbone of (workshop) organization. From assembly lines to material handling, these systems rely on precision—especially when it comes to the joints that hold everything together. Among the most critical components is the four way straight lean pipe joint, a workhorse that connects multiple pipes at once, enabling the creation of complex structures like workbenches, flow racks, and turnover trolleys. But even the sturdiest joints can fail if installed incorrectly. Let's dive into the most common mistakes teams make when installing four way straight lean pipe joints, why they happen, and how to steer clear of them to keep your lean system running smoothly.
Why the Four Way Straight Lean Pipe Joint Matters
Before we jump into mistakes, let's take a moment to appreciate why this joint is so crucial. Unlike simpler two-way or three-way joints, the four way straight lean pipe joint is designed to connect four pipes in a linear or perpendicular arrangement—think of it as the intersection point where horizontal and vertical pipes meet to form the frame of a workbench or the shelves of a flow rack. Its versatility makes it a favorite for building custom, modular systems that can adapt to changing production needs. But with great versatility comes great responsibility: a single misstep during installation can throw off the entire structure's stability, leading to wobbly work surfaces, inefficient material flow, or even safety hazards.
Whether you're a seasoned plant manager or a new technician setting up your first lean system, understanding these mistakes will save you time, money, and headaches down the line. Let's start with the most frequent offender.
Mistake #1: Over-Tightening the Joints—"Tighter = Better" Is a Myth
The Temptation to Crank It Down
Walk into any workshop, and you'll likely hear the sound of a wrench being tightened with all the strength someone can muster. It's a common instinct: if a little tightness is good, surely maximum tightness is better, right? When it comes to four way straight lean pipe joints, this couldn't be further from the truth.
Most four way joints—whether made of metal, plastic, or aluminum—rely on threaded connections or compression fittings to secure pipes. Over-tightening these connections can warp the joint's internal components, strip the threads, or even crack the joint itself. For example, if you're using a chrome-plated steel four way joint with 2.0mm pe coated lean pipe, cranking the wrench beyond the recommended torque can compress the pipe's PE coating unevenly, creating weak points that fail under stress. Similarly, aluminum joints, which are lighter but more prone to deformation, can bend if over-tightened, leaving gaps between the pipe and joint that compromise stability.
Consequences of Over-Tightening
- Stripped Threads: Once the threads inside the joint are stripped, the joint becomes useless—you won't be able to tighten or loosen it without replacing the entire component.
- Deformed Joints: Bent or cracked joints can't hold pipes securely, leading to wobbly structures that shake during use. This is especially dangerous for workbenches or material racks holding heavy items.
- Difficulty in Disassembly: When it's time to reconfigure your lean system (a key benefit of lean manufacturing!), over-tightened joints can seize up, requiring excessive force to take apart—often resulting in broken tools or damaged pipes.
How to Avoid It
The solution is simple: use a torque wrench and follow the manufacturer's recommended torque settings. Most lean pipe suppliers provide this information in their product manuals—for example, a typical steel four way joint might require 15-20 Nm of torque, while an aluminum joint could need as little as 10-12 Nm. If you don't have a torque wrench, get to know the "feel" of proper tightness: snug the joint until you feel resistance, then give it a quarter-turn more—no more. You can also mark the joint and pipe with a pencil before tightening; if the marks shift more than 1/8 of an inch, you've gone too far.
Pro tip: For joints that need occasional reconfiguration, apply a small amount of anti-seize lubricant to the threads during installation. This prevents seizing without compromising hold strength.

Mistake #2: Ignoring Pipe and Joint Compatibility—Size Does Matter
When "One Size Fits All" Fails
Lean pipe systems come in a variety of pipe diameters and materials: 1.2mm, 1.5mm, and 2.0mm pe coated lean pipe, stainless steel pipe series, aluminum lean pipe—the list goes on. The four way straight lean pipe joint you choose must match the pipe's outer diameter (OD) and material to create a secure fit. Yet, it's (surprising) how often teams mix and match joints and pipes without checking compatibility.
For instance, imagine using a joint designed for 28mm OD aluminum lean pipe with a 30mm OD stainless steel pipe. The stainless pipe will be too large, forcing you to hammer it into the joint—a sure way to crack the joint or deform the pipe. Conversely, a 25mm OD pipe in a 28mm joint will rattle loosely, even when tightened, leading to instability. Material matters too: plastic joints, which are lightweight and corrosion-resistant, can't handle the weight of steel pipes, while steel joints may scratch or damage the coating on pe coated lean pipe if the fit is too tight.
| Pipe Type | Typical OD (mm) | Compatible Joint Material | Common Mistake |
|---|---|---|---|
| 1.5mm PE Coated Lean Pipe | 28 | Steel, Aluminum | Using 25mm joint (too loose) |
| Stainless Steel Pipe (2.0mm) | 30 | Steel, Stainless Steel | Using plastic joint (insufficient strength) |
| Aluminum Lean Pipe | 28 | Aluminum, Anodized Steel | Using steel joint with sharp threads (scratches aluminum) |
Consequences of Incompatibility
At best, incompatible joints and pipes lead to a system that never feels "solid"—workbenches wobble, flow racks shift, and turnover trolleys rattle. At worst, the mismatch can cause pipes to slip out of joints entirely, leading to collapsed structures and damaged materials. For example, a flow rack built with mismatched joints might dump a load of circuit boards onto the floor when a worker pulls a bin, costing time and money to replace damaged parts.
How to Avoid It
Start by checking the product specifications from your lean pipe supplier. Reputable suppliers will clearly list the compatible pipe sizes for each joint. If you're unsure, measure the pipe's OD with a caliper—don't guess! When mixing materials, opt for joints designed for versatility: aluminum joints, for example, work well with both aluminum and pe coated lean pipe without scratching. And if you're reusing old pipes or joints, inspect them for wear: a pipe that's been bent or dented may have an uneven OD, making it incompatible with even the "right" joint.

Mistake #3: Rushing Alignment—"Close Enough" Isn't Good Enough
The Hidden Cost of Crooked Joints
When you're on a tight deadline to set up a new assembly line, it's tempting to skip the "fussy" steps like double-checking alignment. You pop the four way joint onto the pipes, give it a quick glance to make sure it's "sort of straight," and tighten it down. But here's the problem: even a tiny misalignment in a four way joint can create uneven weight distribution across the entire lean system.
Let's say you're building a workbench using a four way joint to connect the front, back, and side rails. If the joint is tilted even 5 degrees off vertical, the workbench top will slope, causing tools and parts to slide off. Over time, the uneven weight stresses the joint's connection points, leading to premature wear. For flow racks with roller track, misaligned joints can cause rollers to bind, slowing down material flow and increasing friction—exactly what lean systems are designed to eliminate.
Alignment issues are especially tricky with four way joints because they connect multiple pipes at once. A single pipe that's off-kilter can pull the entire joint out of square. For example, if the vertical pipe connected to the joint is leaning to the left, the horizontal pipes will tilt right to compensate, creating a "twist" in the structure. This twist puts extra pressure on the joint's internal bearings (if it's a rotating joint) or threads (if fixed), leading to cracks or slippage.
How to Ensure Proper Alignment
The key is to take it slow and use the right tools. Here's a step-by-step approach:
- Mark Your Pipes: Before assembling, use a pencil to mark where each pipe will enter the joint. This gives you a reference point to check alignment.
- Use a Spirit Level: For vertical pipes, hold a spirit level against the pipe to ensure it's plumb (perfectly vertical). For horizontal pipes, check that they're level (no slope).
- Tighten in Stages: Don't fully tighten one pipe before the others. Snug each pipe into the joint loosely, adjust alignment, then tighten them incrementally—alternating between pipes to keep the joint centered.
- Check Diagonally: For rectangular structures (like a workbench frame), measure the diagonals. If they're equal, the frame is square; if not, adjust the joints until they match.
It might take an extra 10 minutes per joint, but the payoff is a system that's stable, efficient, and built to last.
Mistake #4: Using Damaged or Low-Quality Joints—You Get What You Pay For
The Risks of Cutting Corners on Joint Quality
In lean manufacturing, cost control is important—but skimping on four way straight lean pipe joints is a false economy. Low-quality joints, whether sourced from uncertified suppliers or reused beyond their lifespan, are ticking time bombs. These joints often have hidden flaws: cracks in the casting, uneven threading, or weak welds that fail under stress. Even a small defect, like a hairline crack in the joint's body, can spread when the joint is loaded, leading to sudden collapse.
How can you spot a bad joint? Start with visual inspection: look for cracks, rust, or pitting on metal joints. For plastic joints, check for warping or discoloration, which indicate poor material quality. Threaded joints should have clean, even threads without burrs or chips. If the joint feels "flimsy" when you wiggle it (even when not installed), it's probably low-quality. Reused joints are another risk: a joint that's been tightened and loosened multiple times may have worn threads or weakened connections, even if it looks intact.
Choosing a reputable lean pipe supplier is half the battle. Reliable suppliers test their joints for load capacity, corrosion resistance, and durability, and they'll provide certificates or test reports upon request. For example, a high-quality steel four way joint should withstand a static load of at least 500kg per connection point—far more than the typical weight of parts on a workbench or flow rack. Cheap knockoffs, by contrast, may fail at half that load.
When to replace a Joint
Even the best joints don't last forever. replace a four way joint if you notice:
- Visible cracks or deformation
- Threads that slip or won't hold tension
- Looseness that can't be fixed by tightening
- Rust or corrosion that weakens the material
Investing in quality joints upfront saves you from costly repairs, downtime, and safety incidents later. Remember: a joint that costs $5 more today could prevent a $500 repair (or worse, an injury) tomorrow.
Mistake #5: Forgetting Post-Installation Inspection—"Set It and Forget It" Doesn't Work
The Importance of Checking Back
You've tightened the joints to the right torque, aligned everything perfectly, and used compatible, high-quality parts. Done, right? Not quite. Even the most carefully installed four way straight lean pipe joint can loosen over time, especially in high-traffic areas like production floors where vibrations are constant. Ignoring post-installation inspections is like buying a car and never checking the oil—eventually, something will break.
Vibrations from machinery, repeated loading and unloading of materials, and even temperature changes can cause joints to creep loose. For example, a flow rack near a stamping machine will vibrate every time the machine cycles, gradually loosening the four way joints that hold the roller track in place. If left unchecked, the track could shift, jamming the rollers and halting production. Similarly, a workbench used for heavy assembly will experience constant downward pressure, which can compress the joint's threads over time, leading to slack.
How to Build a Maintenance Routine
Preventing this is simple: schedule regular inspections. Here's a quick checklist to follow:
- Weekly Checks: Walk around the lean system and visually inspect all four way joints. Look for gaps between the pipe and joint, or pipes that wobble when gently pushed.
- Monthly Tightening: Use a torque wrench to retighten joints to the manufacturer's specs. Focus on high-stress areas like workbench corners or flow rack supports.
- Quarterly Deep Dive: Disassemble and inspect critical joints for wear. Clean out debris (like dust or oil) that can prevent proper seating, and replace any joints showing signs of damage.
Make inspections part of your team's daily routine. Assign operators to check the joints nearest their workstations at the start of each shift—they're the first to notice if something feels "off." And don't forget to document inspections: a simple log noting which joints were tightened or replaced can help you spot patterns (e.g., joints near a particular machine loosen faster) and address root causes.
Conclusion: Install with Care, Reap the Rewards
The four way straight lean pipe joint may seem like a small component, but its role in your lean system is huge. By avoiding these common mistakes—over-tightening, ignoring compatibility, rushing alignment, using low-quality parts, and skipping inspections—you'll build a system that's stable, efficient, and adaptable. Remember, lean manufacturing is about eliminating waste, and nothing wastes time or money like a collapsed workbench, a jammed flow rack, or a safety incident caused by a faulty joint.
Whether you're a lean pipe supplier working with clients to design custom systems or a production team setting up your first workbench, take the time to do it right. Measure twice, tighten to spec, align carefully, and check back often. Your lean system (and your bottom line) will thank you.