- Company Articles
- Products and Technology
- Installation And Maintenance
- Common Mistakes to Avoid When Installing 2020 Aluminum Profile End Caps

Common Mistakes to Avoid When Installing 2020 Aluminum Profile End Caps
Related Product
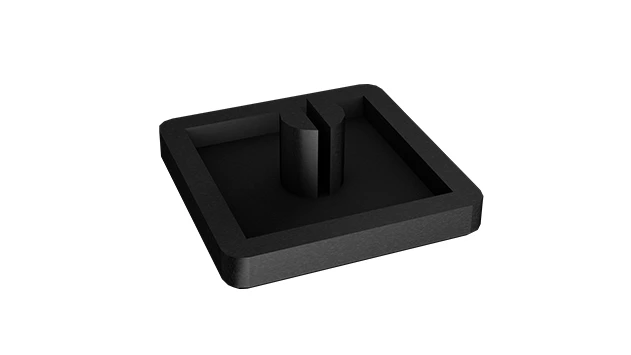
2020 Aluminum Profile End Cap
The aluminum profile end cap adds a finishing touch to your project and closes off profile ends to limit dust and debris buildup, also it can avaid some scratch for material and labor during the assemble work.
Aluminum extrusion profiles have quietly become the backbone of countless projects—from workshop workbenches and lab equipment frames to DIY 3D printer enclosures and even custom storage solutions at home. Among the most popular sizes is the 2020 aluminum profile, loved for its versatility, strength-to-weight ratio, and compatibility with a wide range of aluminum profile accessories. Yet, for all its utility, even the sturdiest 2020 frame can be let down by a tiny, often overlooked component: the end cap.
At first glance, 2020 aluminum profile end caps seem almost trivial. They're small, plastic or rubber pieces designed to snap or press into the open ends of the profile. But their role is far from insignificant: they smooth sharp edges to prevent cuts, seal out dust and debris that can jam T-slots, and give projects a clean, professional finish. Unfortunately, installing them correctly is trickier than it looks. Whether you're a seasoned maker or a weekend DIYer, skipping a step or misjudging a detail can turn these simple caps into a source of frustration—loose fits, cracked edges, or even caps that fall off entirely.
In this guide, we'll walk through the most common mistakes people make when installing 2020 aluminum profile end caps, why they matter, and how to avoid them. By the end, you'll know how to ensure your end caps fit snugly, last longer, and keep your 2020 profiles looking and performing their best.
Mistake #1: Ignoring Profile Compatibility—"One Size Fits All" Doesn't Apply Here
Walk into any hardware store or browse an aluminum profile accessories supplier's website, and you'll see end caps labeled for different profile sizes: 2020, 3030, 4040, and so on. It's tempting to assume they're interchangeable, especially if they look "sort of the same." But here's the truth: a 3030 end cap won't fit a 2020 profile, and vice versa. 2020 aluminum profiles measure exactly 20mm by 20mm on the outside, with internal dimensions that vary slightly by manufacturer but are designed to pair with end caps engineered for that specific size.
**Why this happens:** Many people grab the first end caps they see, assuming "small" equals "2020," or they reuse end caps from old projects without checking. For example, if you previously worked with 2040 profiles (20mm by 40mm), their end caps might *look* like they could stretch to fit 2020, but they'll be too loose. Others might order generic "plastic end caps" online without verifying the size in the product specs.
**The consequences:** A misfit end cap is worse than no end cap at all. If it's too large, it'll bulge awkwardly, ruining the profile's clean lines and potentially catching on tools or clothing. If it's too small, it'll slide out with minimal vibration, leaving the profile's raw edges exposed—risking cuts and letting dust, metal shavings, or moisture into the T-slots. Over time, that debris can corrode the interior or make it harder to insert bolts, nuts, or other aluminum profile accessories later.
**How to avoid it:** Always double-check the product description before buying. Look for end caps explicitly labeled "2020 aluminum profile end cap" or "for 20x20mm extrusion." If you're unsure, measure your profile's outer width and height with a caliper—20mm x 20mm is non-negotiable. Reputable aluminum profile suppliers will list compatibility clearly, so stick to trusted brands or suppliers who specialize in aluminum extrusion profile parts. When in doubt, order a small sample pack first to test the fit before buying in bulk.
Mistake #2: Skipping Surface Preparation—Dirt and Burrs Ruin the Seal
You've got the right 2020 end caps, and you're eager to finish your project. So you grab a cap, line it up with the profile end, and press. It fits… sort of. But a day later, it's loose. What went wrong? Chances are, you skipped surface preparation. Even brand-new aluminum profiles can have hidden obstacles: tiny metal burrs from cutting, dust or oil from manufacturing, or even fingerprints that leave behind oils.
**Why this happens:** Surface prep feels like a "nice-to-have" step, especially when you're in a hurry. After all, the end cap just needs to "snap on," right? But aluminum extrusion profiles are often cut to length with saws, which can leave sharp burrs along the cut edge. These burrs act like little speed bumps, preventing the end cap from seating flush. Similarly, dust or grease on the profile's inner walls creates a barrier, so the cap can't grip tightly.
**The consequences:** A cap installed over burrs will sit unevenly, with gaps that let in debris. Over time, vibration from tools or movement can jostle it loose. Oil or grease residue makes the fit even more precarious—imagine trying to stick a suction cup to a greasy window. Worst of all, if a burr is sharp enough, it can tear the end cap's plastic or rubber as you press it on, weakening it and making it prone to cracking later.
**How to avoid it:** Spend 30 seconds prepping each profile end before installing the cap. Start by inspecting the cut edge for burrs—run your finger gently along the inside and outside (wear gloves if you're unsure!). If you feel rough spots, use a deburring tool, fine-grit sandpaper (220-grit or higher), or even a metal file to smooth them down. Next, wipe the inside of the profile and the end edge with a clean, lint-free cloth dampened with isopropyl alcohol. This removes dust, oil, and fingerprints, ensuring the end cap's material can grip the aluminum properly. Let the alcohol dry completely (it takes just a few seconds) before pressing on the cap—you'll notice it seats much more firmly.

Mistake #3: Forgetting the Aluminum Profile Rubber Strip—A Small Accessory with Big Impact
Many 2020 aluminum profile end caps come with a thin, flexible aluminum profile rubber strip along their inner edge. It's easy to mistake this strip for packaging or a "bonus" part and either discard it or ignore it during installation. But that rubber strip is actually a critical component, designed to create a tight, vibration-resistant seal between the end cap and the profile.
**Why this happens:** The rubber strip is often subtle—thin, black, and sometimes pre-attached to the end cap in a way that makes it look like part of the cap itself. DIYers new to aluminum extrusion profiles might not realize it's a functional feature, assuming it's just for cushioning. Others might remove it intentionally, thinking it "bulks up" the cap and makes installation harder. In reality, the strip is engineered to compress slightly when the cap is installed, filling tiny gaps between the cap and the profile's inner walls.
**The consequences:** Without the rubber strip, even a well-fitted end cap will lack friction. It might stay in place initially, but over time, temperature changes, vibrations, or accidental bumps will cause it to loosen. The rubber also acts as a barrier against moisture—without it, condensation from a workshop's humidity or a spilled drink could seep into the profile, leading to oxidation. For profiles used outdoors or in damp environments, this is a disaster waiting to happen.
**How to avoid it:** Always check if your end cap includes a rubber strip—most quality 2020 aluminum profile end caps do. If it's pre-attached, leave it alone! If it's separate (some suppliers package it as a loose accessory), apply it to the cap's inner groove before installation. Make sure the strip is centered and free of twists—if it's misaligned, it won't seal properly. When pressing the cap on, you'll feel slight resistance from the rubber compressing—that's a good sign! If your end cap didn't come with a strip, you can buy adhesive-backed rubber strips (1-2mm thick) from hardware stores and cut them to fit, but it's better to source end caps that include them pre-installed for a perfect fit.

Mistake #4: Applying Too Much (or Too Little) Force—The "Snap" Test Matters
Installing an end cap feels intuitive: line it up, push until it "clicks," and you're done. But the amount of force you use can make or break the installation. Some people press so gently that the cap barely catches, while others hammer it on like they're driving a nail—both approaches lead to problems.
**Why this happens:** The "gentle pressers" are often worried about breaking the end cap, especially if it's made of rigid plastic. They tap it lightly, then assume it's seated because it doesn't fall off immediately. The "hammerers," on the other hand, figure "tighter is better" and use brute force—maybe even a rubber mallet—to drive the cap in, not realizing that plastic and rubber end caps can crack under excessive pressure.
**The consequences:** Too little force means the cap isn't fully seated. It might sit flush at first, but the first time you move the profile or bump it against a wall, it'll pop out. Too much force is worse: rigid plastic end caps can crack along the edges or split down the middle, while rubber ones might tear or deform. Even if they don't break immediately, over-pressing can stretch the cap's material, weakening its grip over time. For end caps with built-in tabs (to lock into T-slots), excessive force can bend or snap those tabs, rendering the cap useless.
**How to avoid it:** Aim for a firm, even press. Start by aligning the end cap with the profile's end, making sure it's centered (no lopsided edges). Then, using the palms of your hands, press straight in with steady pressure. You should feel a slight "give" as the cap seats—for plastic caps, there might even be a soft "snap" when the tabs (if present) lock into the T-slots. If it feels like it's resisting too much, stop! Check for burrs or debris you might have missed (see Mistake #2). If it's still tight, warm the cap slightly in your hands—plastic becomes more flexible when warm, making installation easier. Never use a metal hammer; if you need extra force, wrap the cap in a cloth and tap gently with a rubber mallet, focusing on the center to avoid cracking the edges.
Mistake #5: Disregarding T-Slot Alignment—Tabs Need a Home Too
Many modern 2020 aluminum profile end caps come with small plastic tabs or prongs designed to fit into the profile's T-slots. These tabs add extra security, preventing the cap from rotating or sliding out. But they only work if they're aligned with the T-slots during installation—and far too many people skip this step, jamming the cap on without checking.
**Why this happens:** T-slots are the long, narrow grooves running along the profile's length, used for attaching brackets, panels, or other aluminum profile accessories. On a 2020 profile, there are typically four T-slots (one on each side). End caps with tabs are molded to match the T-slot spacing, but if you rotate the cap 90 degrees during installation, the tabs will hit the solid aluminum between slots instead of sliding into them. DIYers in a rush might not notice the tabs at all, assuming the cap is "just a flat plug."
**The consequences:** Tabs that miss the T-slots serve no purpose. The cap will rely solely on friction to stay in place, which is never enough for high-vibration environments (like near a drill press or CNC machine). Even minor bumps can twist the cap, leaving gaps on one side. Over time, the misaligned tabs might wear down the profile's inner walls, creating grooves that make future installations even harder.
**How to avoid it:** Before installing, inspect the end cap for tabs—they're usually small, rectangular projections on the inner surface. Then, look at your 2020 profile's end and note the position of the T-slots (they'll be recessed grooves, often 4-5mm wide). Rotate the cap until the tabs line up with these slots—you should be able to see the tabs "aiming" into the grooves. Once aligned, press the cap on as usual; the tabs will slide into the T-slots and lock into place, adding a second layer of security. If your cap has multiple tabs (some have two or four), make sure all of them align—even one misaligned tab can throw off the fit.
Summary of Common Mistakes and Solutions
| Mistake | Common Cause | Consequences | Best Solution |
|---|---|---|---|
| Ignoring profile compatibility | Using end caps for other sizes (e.g., 3030) or generic caps | Loose fit, exposed edges, debris in T-slots | Buy end caps labeled "2020 aluminum profile end cap"; verify size with calipers |
| Skipping surface preparation | Rushing past burr removal or cleaning | Uneven seating, loose caps, debris buildup | Deburr edges with sandpaper/file; clean with isopropyl alcohol |
| Forgetting the rubber strip | Mistaking it for packaging or removing it intentionally | Reduced friction, moisture ingress, loose caps | Keep pre-attached strips; align and press firmly during installation |
| Applying wrong force | Pressing too gently or hammering excessively | Cracked caps, incomplete seating, deformed edges | Use steady, even pressure; warm plastic caps if tight; avoid metal hammers |
| Disregarding T-slot alignment | Not aligning end cap tabs with profile T-slots | Cap rotation, reduced security, wall wear | Match tabs to T-slots before pressing; ensure all tabs lock into place |
Final Thoughts: The Little Cap That Protects the Big Project
Installing 2020 aluminum profile end caps might seem like a minor step in a larger project, but as we've seen, it's one that deserves attention. These small accessories are the first line of defense for your aluminum extrusion profile—protecting its edges, sealing its T-slots, and keeping your workspace safe and clean. By avoiding these common mistakes—checking compatibility, prepping the surface, using the rubber strip, applying the right force, and aligning T-slot tabs—you'll ensure your end caps fit snugly, last longer, and let your 2020 frame shine.
Remember, the best aluminum profile projects are built on details. A frame with properly installed end caps doesn't just look more professional—it functions better, too. So the next time you reach for that 2020 aluminum profile end cap, take an extra minute to do it right. Your hands (and your project) will thank you.