- Company Articles
- Products and Technology
- Installation And Maintenance
- Common Mistakes to Avoid When Installing a Castor Install Base on Lean Tubes

Common Mistakes to Avoid When Installing a Castor Install Base on Lean Tubes
Related Product
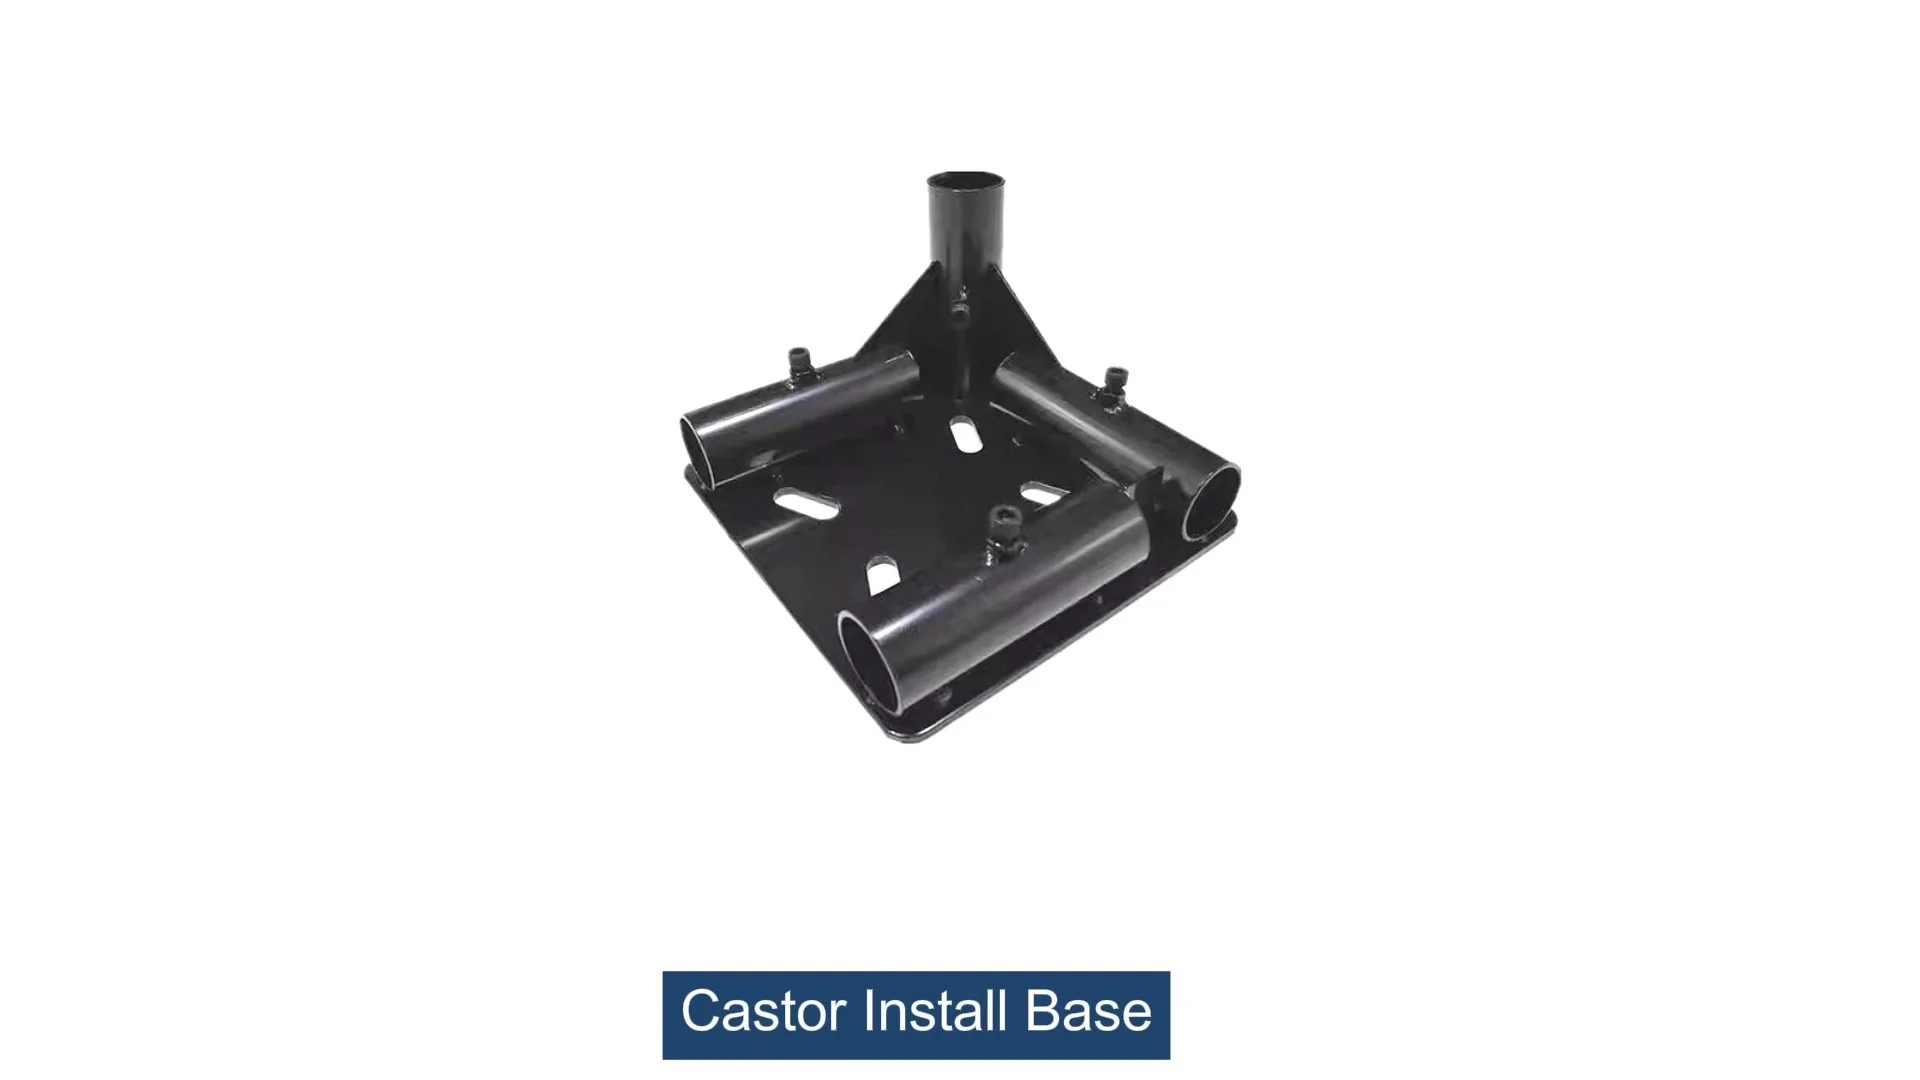
Castor Install Base
Castor install base, used for connection between pipe and castor, it can connect 4 pcs pipe by 1 pcs castor base, to make the structure strong and stable.
Let's start with a familiar scene: It's Monday morning on the factory floor, and your team is gearing up to assemble a new batch of products. The workbench, freshly built with lean tubes and a castor install base, is supposed to glide smoothly across the floor, making it easy to move materials from station to station. But instead, every time someone pushes it, the whole structure wobbles. A caster wheel locks up, and the tools on the bench rattle—one even slides off, clattering to the ground. Frustration builds, deadlines loom, and you can't help but wonder:
Why is this happening?
More often than not, the culprit isn't the quality of the lean tube or the caster itself—it's how the castor install base was attached to the lean tube structure. Installing a castor install base might seem like a simple "bolt-and-go" task, but overlooking small details can lead to big headaches: instability, premature wear, safety hazards, and yes, even that Monday morning chaos.
In this article, we'll walk through the most common mistakes teams make when installing castor install bases on lean tubes, why they happen, and how to avoid them. Whether you're a seasoned production manager or a new technician setting up your first workbench, these insights will save you time, money, and plenty of frustration.
Mistake #1: Over-Tightening or Under-Tightening the Lean Pipe Joints
Let's kick things off with a mistake that's as easy to make as it is to overlook: getting the tension wrong on the lean pipe joints when attaching the castor install base. Lean tubes rely on modular joints to connect components, and the castor install base is no exception—it's typically secured to the lean tube frame using these joints. But here's the catch: lean pipe joints aren't meant to be cranked down with all your might, nor should they be left loose enough to wiggle.
Over-tightening is a common reflex. You want the base to be "rock solid," so you grab a wrench and tighten the joint until your knuckles turn white. Sounds good, right? Wrong. Lean pipe joints (especially plastic or aluminum ones) are designed to flex slightly under load. Cranking them too tight can crack the joint's threads, warp the lean tube, or even strip the bolts. Over time, this leads to a "false sense of security"—the joint feels tight initially, but as the material weakens, it loosens, and the whole structure becomes wobbly.
Under-tightening is just as bad. Maybe you're in a hurry, or you assume "hand-tight" is enough. But even a small gap between the joint and the lean tube creates play in the structure. Every time the workbench moves, the base shifts, putting extra stress on the caster wheel and the lean tube. Over weeks of use, this movement wears down the joint's grip, leading to squeaky wheels, uneven weight distribution, and eventually, a base that detaches entirely.
Real-World Example: The "Weekend Warrior" Disaster
A manufacturing team in Ohio once set up a new assembly line over the weekend to meet a tight deadline. Eager to finish quickly, they hand-tightened the lean pipe joints attaching the castor install bases, figuring "they'll hold." By Tuesday, the workbenches were wobbling so badly that operators had to them to keep tools from falling off. When the maintenance team inspected the joints, they found they could twist most of them by hand—no wrench needed. The fix? Re-tightening each joint to the manufacturer's specs, but not before losing two days of productivity.
How to Avoid It:
Invest in a torque wrench and check the manufacturer's guidelines for your specific lean pipe joint. Most plastic lean pipe joints require 25–30 Nm of torque, while aluminum joints might need slightly more (30–35 Nm). If you don't have a torque wrench, use the "two-finger rule": tighten the joint until it's snug, then give it a quarter-turn with a wrench using only two fingers. This prevents over-tightening while ensuring a secure fit.
Pro tip: Mark the joint with a permanent marker after tightening. If the mark shifts later, you'll know the joint has loosened and needs re-tightening.
Mistake #2: Using Mismatched Caster Accessories for the Lean Tube Size
Imagine this: You order a castor install base online, unbox it, andly try to attach it to your lean tube—only to find the base's clamp is too small for the tube. Or maybe the holes in the base don't line up with the lean pipe joint's bolt pattern. Cue the frustration: "Why didn't this fit?!"
Mismatched caster accessories are a silent productivity killer. Lean tubes come in standard sizes (1.5-inch, 2.0-inch, etc.), and castor install bases are designed to match these sizes. But if you grab a base meant for a 1.2mm pe coated lean pipe and try to attach it to a 2.0mm stainless steel pipe, you're asking for trouble. The base won't clamp properly, leading to slippage, instability, and even damage to the lean tube's coating.
It's not just the tube diameter, either. Caster accessories like bolts, washers, and mounting plates need to match the base and the lean tube material. For example, using a steel bolt with an aluminum lean tube can cause galvanic corrosion (a chemical reaction between metals) that eats away at the joint over time. Similarly, plastic washers might crack under heavy loads if paired with a steel caster base.
Real-World Example: The Corrosion Surprise
A electronics plant in Texas switched to aluminum lean tubes to reduce weight on their assembly line workbenches. They reused castor install bases from their old steel lean tube setup, assuming "a bolt is a bolt." Six months later, maintenance noticed the bases were sticking to the aluminum tubes—when they pried them off, they found rust-like corrosion where the steel bolts had touched the aluminum. The corrosion had weakened the joint, making the workbenches unsafe to move. They had to replace all the bases and tubes, costing thousands in downtime.
How to Avoid It:
Before ordering, double-check the lean tube's specifications: diameter, material (steel, aluminum, pe coated), and wall thickness. Then, match these to the castor install base's requirements. Most suppliers list compatible tube sizes on their product pages (e.g., "Fits 1.5-inch aluminum lean tubes"). When in doubt, ask the supplier—reputable lean pipe suppliers will happily confirm compatibility.
Also, pay attention to the accessories: Use stainless steel or aluminum bolts with aluminum lean tubes to prevent corrosion, and opt for reinforced plastic or metal washers rated for your workbench's weight capacity.

Mistake #3: Ignoring Weight Distribution When Placing the Castor Install Base
Let's say you've tightened the joints correctly and used the right accessories—great! But now you attach the castor install base to the "most convenient" part of the lean tube frame, rather than where the weight will actually sit. Big mistake. Weight distribution is critical for castor install base stability, and ignoring it is like building a table with legs only on one side—it's going to tip.
Workbenches, turnover trolleys, and material racks (like the "material rack b (3 row and 3 floor)" you might use for parts storage) have specific load zones. The castor install base needs to be placed directly under these zones to evenly distribute weight across all casters. If the base is too far forward, backward, or off-center, the load shifts to one or two casters, causing them to wear out faster, lock up, or even collapse under stress.
This is especially true for "top-heavy" setups, like workbenches with tools or equipment stacked on shelves. A common error is attaching the castor install base to the bottom of the lean tube frame without considering how high the load sits. The higher the load, the more unstable the structure becomes—even with perfectly tightened joints.
Real-World Example: The Tipping Trolley
A warehouse team in California built a turnover trolley to move heavy boxes using a lean tube frame and castor install bases. They attached the bases near the front and back of the trolley, assuming that would "balance it out." But when they loaded the trolley with 50-pound boxes stacked three high, the weight shifted to the rear casters. One day, an operator pushed the trolley around a corner, and the whole thing tipped—spilling boxes and injuring the operator's ankle. An inspection showed the bases should have been placed 6 inches closer to the center to balance the top-heavy load.
How to Avoid It:
Start by calculating your workbench or trolley's "center of gravity." This is the point where the weight is most concentrated. For a standard workbench with a single deck (like "workbench e (single deck-without caster)"), the center of gravity is usually halfway between the front and back of the deck. Place the castor install bases symmetrically around this point—two in front, two in back, spaced evenly.
For taller structures (like material racks), err on the side of wider spacing between casters to increase stability. If you're unsure, use a mockup: place the empty frame on a level surface, add weights to simulate the load, and see if it tilts. Adjust the base positions until the frame stays balanced.

Mistake #4: Skipping Pre-Installation Checks on the Lean Tube and Base
You've got your lean tube, your castor install base, and your tools—time to start building, right? Hold on. Before you even pick up a wrench, there's a step many teams skip: inspecting the components for damage or defects. A bent lean tube, a cracked castor install base, or a warped joint might seem minor, but they'll sabotage your installation from the start.
Lean tubes can get dented during shipping, especially if they're not properly packaged. A dent might not look like much, but when you attach the castor install base, it creates an uneven surface—so the base sits at a slight angle. Over time, this angle puts extra stress on the caster wheel and the joint, leading to premature wear.
Castor install bases aren't immune to damage either. A cracked mounting plate, stripped bolt hole, or bent clamp can make it impossible to secure the base tightly. Even small defects, like a burr on the base's clamp, can scratch the lean tube's coating, exposing it to rust or corrosion.
And let's not forget the lean pipe joint itself. A joint with a stripped thread or a broken locking mechanism won't hold the base securely, no matter how carefully you tighten it. Skipping this check is like building a house on a cracked foundation—eventually, it will fail.
Real-World Example: The "Invisible" Dent
A automotive parts manufacturer received a shipment of lean tubes for new workbenches. The tubes looked fine at first glance, so the team started installing castor install bases right away. A month later, operators complained that the workbenches "pulled to the left" when rolled. The maintenance team checked the casters, tightened the joints, and even replaced the wheels—nothing worked. Finally, they removed a base and noticed a small dent in the lean tube where the base was attached. The dent had angled the base slightly, causing the caster to drag. They had to replace the dented tubes and re-install all the bases, costing 12 hours of downtime.
How to Avoid It:
Make pre-installation checks a non-negotiable step. For lean tubes: Roll them on a flat surface to check for bends, and inspect for dents, scratches, or rust (especially on stainless steel or pe coated tubes). For castor install bases: Check for cracks, stripped holes, or bent clamps. For lean pipe joints: Test the threads by hand-screwing a bolt into them—if it spins freely without resistance, the threads are stripped.
If you find a defective component, don't "make it work" with tape, washers, or extra bolts. Contact your lean pipe supplier for a replacement. It might take an extra day, but it's better than rebuilding the entire structure later.

Mistake #5: Poor Alignment Between the Castor Install Base and the Lean Tube Frame
Let's wrap up with a mistake that's easy to spot once you know what to look for: misalignment between the castor install base and the lean tube frame. Even if the joints are tight, the accessories match, and the weight is balanced, a base that's "off-kilter" with the frame will cause problems.
Alignment issues usually happen when the castor install base is attached at an angle, rather than square to the lean tube frame. Maybe the lean tube itself is slightly bent (hello, pre-installation check!), or the joint was attached crookedly. Either way, the result is the same: when you roll the workbench, the casters fight against each other. Some wheels spin forward, others drag sideways, leading to uneven wear, squeaking, and a structure that's hard to maneuver.
This is especially noticeable with swivel casters. A misaligned base can cause the swivel mechanism to bind, making it difficult to turn the workbench. Over time, the constant stress can break the caster's bearings or the lean pipe joint, turning a minor annoyance into a major repair.
Real-World Example: The Stuck Swivel
A small electronics workshop built a custom workbench with swivel casters for easy mobility. But from day one, the swivel casters stuck—operators had to yank the workbench to turn it, and sometimes the casters would "lock" mid-roll. The team assumed the casters were defective and replaced them—twice. Finally, a supplier rep visited and noticed the castor install bases were attached at a 5-degree angle to the lean tube frame. The misalignment was forcing the swivel bearings to twist, causing them to jam. Re-aligning the bases solved the problem instantly.
How to Avoid It:
Use a level and a square to ensure the castor install base is aligned with the lean tube frame. Place the square against the lean tube and the base—if there's a gap between the square and the base, adjust the joint until they're flush. For swivel casters, test the movement before fully tightening the joint: the caster should spin freely without resistance.
If you're attaching multiple bases (like four for a workbench), check that all bases are aligned with each other. Use a string line or a straightedge to ensure the bases are parallel—this prevents the workbench from "crabbing" (moving sideways) when rolled.
| Mistake | Common Cause | Consequence | Prevention Tip |
|---|---|---|---|
| Over/Under-Tightening Joints | Using too much force or assuming "hand-tight" is enough | Stripped threads, warped tubes, wobbly structure | Use a torque wrench (25–30 Nm for plastic joints); follow "two-finger rule" |
| Mismatched Accessories | Ignoring tube size/material or using old accessories | Slippage, corrosion, damage to tube coating | Check tube specs (diameter, material) and match to base; use compatible bolts/washers |
| Poor Weight Distribution | Attaching base without calculating center of gravity | Uneven wear, tipping, caster failure | Place bases symmetrically around load's center; test balance with mock loads |
| Skipping Pre-Install Checks | Rushing to install without inspecting components | Dents, stripped threads, corrosion, misalignment | Inspect tubes, bases, and joints for damage; replace defective parts |
| Misalignment | Attaching base at an angle or using bent tubes | Stuck casters, uneven wear, "crabbing" movement | Use a level/square to align bases; test swivel movement before tightening |
Final Thoughts: Small Details, Big Results
Installing a castor install base on a lean tube might not be the most glamorous task in your production process, but it's one of the most critical. A wobbly workbench, a stuck caster, or a corroded joint might seem like minor nuisances, but they add up: lost productivity, increased maintenance costs, and even safety risks for your team.
The good news? These mistakes are entirely avoidable. By taking the time to tighten joints correctly, use matched accessories, distribute weight evenly, inspect components, and align bases properly, you'll create a lean tube structure that's stable, durable, and a joy to use.
So the next time you're setting up a workbench or turnover trolley, remember: the difference between a smooth, efficient workflow and a Monday morning headache often comes down to the little things. Take it slow, check your work, and your lean tube structure will reward you with years of reliable service.
After all, in lean manufacturing, every detail matters—and that includes how you attach a castor install base.