- Company Articles
- Products and Technology
- Product knowledge
- Connection Methods: Joining 3060 National Standard Profile A with Other Aluminum Extrusions

Connection Methods: Joining 3060 National Standard Profile A with Other Aluminum Extrusions
Related Product
3060 National Standard Profile A
Workbench, production line, logistic rack, warehouse rack Industry: Manufacturer workshop, Automobile, Electronic, Assembling, logistic
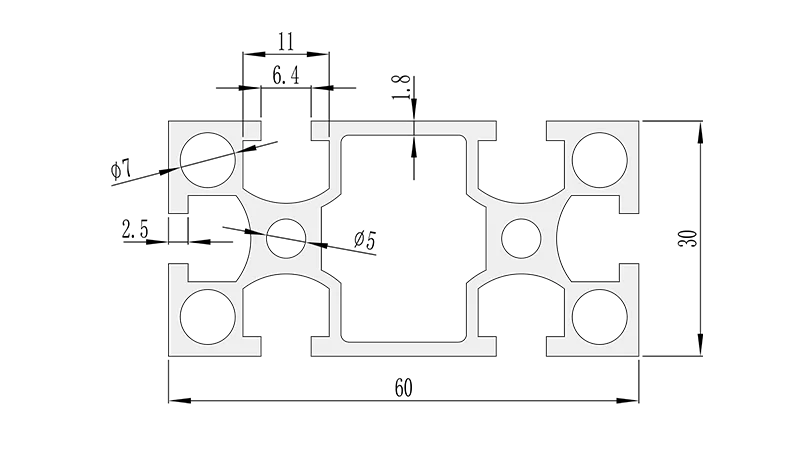
Walk into any modern manufacturing facility, warehouse, or workshop, and you'll notice a silent hero holding everything together: aluminum extrusions. These versatile, lightweight structures form the backbone of workbenches, material racks, conveyor systems, and even custom machine frames. But here's the thing—none of these setups work unless the extrusions are connected properly. That's where the rubber meets the road, especially when dealing with a workhorse like the 3060 National Standard Profile A. Whether you're building a lean system for a bustling assembly line or a custom workbench for a small workshop, knowing how to join 3060 Profile A with other aluminum extrusions can make or break your project's efficiency, durability, and adaptability.
In this guide, we're diving deep into the art and science of connecting 3060 National Standard Profile A to other aluminum extrusion profiles. We'll break down the tools, aluminum profile accessories, and techniques that turn disjointed pieces into cohesive, functional structures. Along the way, we'll keep an eye on what matters most in today's fast-paced environments: lean principles that prioritize flexibility, waste reduction, and seamless workflow. So, whether you're a seasoned facility manager or a hobbyist building your first aluminum frame, let's roll up our sleeves and get into the details.
What is 3060 National Standard Profile A, Anyway?
Before we talk connections, let's get familiar with the star of the show: 3060 National Standard Profile A. If aluminum extrusions were a toolbox, this profile would be the reliable wrench you reach for daily. Its name gives away the basics: "3060" refers to its cross-sectional dimensions—30mm in width and 60mm in height—while "National Standard" means it adheres to uniform manufacturing specs, ensuring compatibility across brands. "Profile A" typically denotes a specific slot design (usually T-slots) and wall thickness, making it a go-to for medium-load applications.
Why is it so popular? For starters, it strikes a sweet spot between strength and weight. Made from 6063-T5 aluminum alloy (a common choice for extrusions), it's rigid enough to support workbenches, shelving, and light machinery, yet lightweight enough to reconfigure without heavy lifting. Its T-slots—those long, narrow grooves running along its length—are the real secret. These slots let you slide in fasteners, brackets, and accessories, turning a simple beam into a modular building block. Whether you're mounting a tool holder, adding a shelf, or connecting to another extrusion, those T-slots make customization a breeze.
You'll find 3060 Profile A everywhere: in factory workbenches where technicians assemble electronics, in material racks holding components, even in retail displays and office partitions. Its versatility means it often needs to play well with others—think smaller profiles like 2020 or 3030 for crossbeams, or larger ones like 4080 for heavier frames. That's why mastering its connection methods is key to building systems that are not just sturdy, but also adaptable—exactly what lean manufacturing demands.
The Golden Rules of Connecting Aluminum Extrusions
Connecting 3060 Profile A to other extrusions isn't just about slapping on a bracket and tightening a bolt. To build systems that last—and adapt—you need to follow a few core principles. Let's break them down:
1. Prioritize Load-Bearing Needs
First, ask: What's this connection holding? A light shelf with small parts? A workbench top where someone might stand? The answer dictates your method. For example, a 3060 upright supporting a heavy material rack will need beefier connectors than one holding a lightweight tool hook. Underestimating load can lead to sagging, loose joints, or even failure—something no lean system can afford, as downtime from repairs eats into productivity.
2. Aim for Alignment (But Be Forgiving)
Aluminum extrusions are straight, but real-world assembly isn't always perfect. A slight misalignment can throw off an entire structure, leading to wobbly shelves or binding moving parts (like conveyor rollers). Good connection methods allow for minor adjustments—think slotted holes in brackets or swivel connectors that let you tweak angles. That said, start with precise measurements: a quick check with a level or square before tightening can save hours of frustration later.
3. Build for Reconfiguration (Lean's Best Friend)
Lean systems thrive on change. A production line that assembles smartphones today might switch to tablets next month, requiring new workbenches or material flows. That means your connections shouldn't be permanent. Welding, for example, is strong but rigid—great for fixed structures, terrible for lean. Instead, opt for mechanical fasteners (bolts, nuts) or friction-fit connectors that can be loosened, adjusted, and reused. This way, you're not tearing down and rebuilding from scratch every time needs shift.
4. Don't Overlook Vibration
Factories are noisy, busy places—and all that activity creates vibration. Over time, even tight bolts can loosen, turning a solid joint into a rattle hazard. To combat this, use lock washers, thread-locking fluid (like Loctite), or nylock nuts (nuts with a nylon insert that grips the bolt). For critical joints (like those on conveyor frames), periodic checks with a torque wrench ensure connections stay tight, preventing costly breakdowns.
Meet the MVPs: Aluminum Profile Accessories That Make Connections Work
You can't talk about connecting extrusions without talking about accessories. These small, often overlooked parts are what turn 3060 Profile A into a team player. Let's walk through the essentials you'll reach for again and again:
T-Slot Nuts and Bolts: The Foundation
These are the bread and butter of extrusion connections. T-slot nuts are shaped like a "T"—the wide part slides into the extrusion's T-slot, while the narrow part sticks up through the slot. You then thread a bolt through your bracket or second extrusion and into the nut, tightening to secure the joint. They come in different sizes (match the slot width of your profile) and materials (nylon for light loads, steel for heavy ones). Pro tip: Nylon T-slot nuts are great for temporary setups—they grip well but won't scratch the extrusion's finish.
Angle Connectors: For 90s, 45s, and Beyond
When you need to join two extrusions at an angle, angle connectors are your best bet. The most common is the 90° aluminum profile connector—a small, L-shaped bracket with holes for bolts. It fits into the T-slots of two perpendicular extrusions (say, a 3060 upright and a 3030 crossbeam) and tightens down, creating a rigid right angle. For slopes or diagonal braces, there's the 45° aluminum profile connector, shaped like a triangle with 45° edges. These are perfect for reinforcing frames or building inclined surfaces, like chutes for parts to slide down.
Some connectors are "internal," meaning they fit inside the extrusion's slot, keeping the joint flush and neat (great for visible structures like retail displays). Others are "external," clamping around the outside for extra strength (ideal for heavy loads). Either way, they take the guesswork out of aligning angles—no more measuring and marking every joint.
Three-Way Connectors: Branching Out
Need to split a single extrusion into two directions? Enter three-way connectors. Shaped like a "T" or a "Y," these let you connect one main extrusion (like a 3060 vertical beam) to two crossbeams (maybe 2020 or 3030 profiles). They're indispensable for building shelving units, where you might have a central upright with shelves on both sides, or workbenches with overhead racks. Most three-way connectors have T-slot compatible holes, so you can secure them with the same nuts and bolts you're already using.
Turning Angle Codes: For Tight Spaces
Sometimes, you need a low-profile connection—like when two extrusions meet at a corner but space is limited (think the edge of a workbench). That's where turning angle codes come in. These are small, flat brackets (often L-shaped) with pre-drilled holes. They sit flush against the extrusion's surface, using T-slot nuts to bolt into place. Turning angle code 3030, for example, is designed to connect 3030 profiles, but with the right bolts, it can also link 3030 to 3060. They're not as strong as bulky external connectors, but they're sleek and great for light to medium loads.
End Caps and Covers: The Finishing Touches
Okay, they don't "connect" extrusions, but end caps are worth mentioning. These plastic or aluminum caps snap or bolt onto the ends of extrusions, covering sharp edges (safety first!) and keeping out dust and debris. For 3060 Profile A, you'll want 3060 aluminum profile end caps—they're cheap, easy to install, and make your project look polished. Plus, they prevent small parts from falling into the extrusion's hollow center (a common workshop annoyance).
Step-by-Step: How to Connect 3060 Profile A to Other Extrusions
Now that we've covered the "what" (accessories) and "why" (principles), let's get to the "how." Below are the most common methods for joining 3060 National Standard Profile A with other aluminum extrusions, along with step-by-step breakdowns and when to use each.
Method 1: T-Slot Fastening (For Straight or Parallel Joints)
Best for: Connecting two extrusions end-to-end (in a straight line) or side-by-side (parallel). Think extending a 3060 beam or adding a 2020 rail along a 3060 workbench edge.
Tools needed: T-slot nuts (matching 3060's slot size), bolts (M5 or M6 are common), hex key, marker, measuring tape.
Steps:
- Measure and mark where you want the joint. If aligning end-to-end, use a straightedge to ensure the extrusions are flush.
- Slide T-slot nuts into the T-slots of both extrusions, positioning them where the bolts will go (usually 2-3 nuts per joint for stability).
- Hold the extrusions together, lining up their slots. If parallel, clamp them gently to keep them from shifting.
- Thread bolts through the overlapping area (or through a connecting plate, if the extrusions don't touch directly) and into the T-slot nuts.
- Tighten the bolts with a hex key—snug but not over-tight (you'll strip the nut or warp the extrusion if you crank too hard).
Pro tip: For extra strength, use a backer plate (a flat piece of aluminum or steel) behind the joint. Drill holes in the plate to match the bolt positions, then sandwich it between the extrusions. The plate distributes weight, preventing the T-slots from bending under load.
Method 2: 90° Angle Connection with External Connectors
Best for: Right-angle joints, like attaching a horizontal 3060 shelf to a vertical 3060 upright, or a 3030 crossbeam to a 3060 frame.
Tools needed: 90° aluminum profile connectors, T-slot nuts, bolts, hex key, level, pencil.
Steps:
- Decide where the horizontal extrusion will meet the vertical one (e.g., 12 inches from the top of the upright for a shelf).
- Mark the position on the vertical 3060 extrusion. Place the 90° connector against the vertical extrusion, aligning its holes with the T-slots. Slide T-slot nuts into the vertical extrusion's slots under the connector's holes.
- Bolt the connector to the vertical extrusion, leaving the bolts slightly loose (you'll adjust later).
- Place the horizontal extrusion (e.g., another 3060 or a 3030) into the connector's other arm. Slide T-slot nuts into the horizontal extrusion's slots, aligning with the connector's remaining holes.
- Bolt the horizontal extrusion to the connector. Use a level to ensure the horizontal piece is straight, then tighten all bolts fully.
When to use internal connectors: If you want a cleaner look, use internal 90° connectors. These fit inside the T-slots of both extrusions, so only the bolt heads are visible. They're not as strong as external ones, so stick to light to medium loads (like a tool shelf, not a heavy machinery mount).
Method 3: Reinforced Joints with Angle Brackets and Turning Angle Codes
Best for: Joints that need extra stability, like the corners of a workbench or the base of a material rack. Combining angle brackets and turning angle codes adds redundancy—great for high-vibration areas.
Tools needed: Turning angle code 3030 (or compatible size), L-shaped angle brackets, T-slot nuts, bolts, hex key, wrench.
Steps:
- Attach the 90° aluminum profile connector as in Method 2—this will be your primary joint.
- On the opposite side of the joint (or adjacent to it), install turning angle codes. For example, if you're connecting a 3060 upright to a 3030 crossbeam, bolt a turning angle code 3030 to the 3030 and a matching code to the 3060, then link them with a short bracket.
- Add an L-shaped angle bracket across the joint, bolting it to both extrusions. This "triangulates" the connection, preventing twisting.
- Tighten all bolts evenly—start with the main connector, then the angle code, then the bracket. Uneven tightening can pull the joint out of alignment.
This method is overkill for light loads, but for something like a workbench where someone might lean or stand, it's worth the extra time. The result is a joint that feels rock-solid, even under stress.
| Connection Method | Best For | Tools Needed | Pros | Cons |
|---|---|---|---|---|
| T-Slot Fastening | Straight/parallel joints | T-slot nuts, bolts, hex key | Simple, versatile, low profile | Not ideal for angles; weak under shear force |
| 90° External Connectors | Right-angle joints, heavy loads | 90° connectors, T-slot nuts, bolts | Strong, easy alignment, reusable | Bulky; adds width to the joint |
| Reinforced Angle Joints | High-stress areas (workbenches, racks) | Connectors, angle codes, brackets, bolts | Extremely stable, resists twisting | Time-consuming; uses more accessories |
Bringing It All Together: Building Lean Systems with 3060 Profile A
At this point, you might be thinking, "Okay, I can connect extrusions—but how does this fit into a lean system?" Great question. Lean manufacturing is all about eliminating waste: wasted time, wasted space, wasted effort. By using 3060 Profile A and the connection methods above, you build systems that adapt to change, reduce downtime, and keep workflows smooth. Let's look at two real-world examples:
Example 1: A Modular Workbench for Electronics Assembly
Imagine a small electronics shop that builds custom circuit boards. Their assembly line needs workbenches that can adjust as orders change—sometimes they're assembling 10 small boards, other times 2 large ones. Using 3060 Profile A for the bench frames, they can build a base that's sturdy but flexible.
The frame uses 3060 uprights connected to 3060 side rails with 90° external connectors (Method 2). For the top, they use a 3060 crossbeam with T-slot fastened plywood (Method 1). Here's where lean comes in: along the back rail, they add 2020 aluminum extrusion profile (connected via three-way connectors) to mount tool holders, ESD mats, and small parts bins. When a new board design requires different tools, they simply slide the holders along the 2020 rail or swap out accessories—no need to rebuild the entire bench.
Even better, if they need a longer bench, they can connect two 3060 frames end-to-end using T-slot fasteners (Method 1), adding a center support leg (another 3060 upright with a reinforced angle joint) for stability. When the project ends, they disassemble the extra length and reuse the parts elsewhere. That's lean: no wasted materials, no downtime waiting for new furniture.
Example 2: Material Rack B (3 Row and 3 Floor) for Parts Storage
Material rack B (3 row and 3 floor) is a common setup in warehouses—three vertical columns with three horizontal shelves, perfect for organizing small to medium parts. Building it with 3060 Profile A ensures it can hold heavy bins without sagging, while aluminum profile accessories make it easy to adjust shelf heights.
The vertical columns are 3060 Profile A, spaced 4 feet apart. Horizontal shelves use 3060 rails connected to the columns with reinforced angle joints (Method 3)—critical, since each shelf might hold 50+ pounds of parts. To adjust shelf heights, they use T-slot nuts and bolts (Method 1) instead of fixed holes. When a new shipment comes in with taller bins, they loosen the bolts, slide the shelves up, and retighten—done in 10 minutes, not hours.
At the bottom, they add casters (connected via castor installation base, another aluminum profile accessory) so the rack can roll to the assembly line when parts are needed, cutting down on walking time (a classic lean waste). When not in use, it tucks neatly against the wall, saving floor space. That's the power of aluminum extrusions: strength where you need it, flexibility where you want it.
Tools and Tricks for Stress-Free Connections
Even the best methods fail with the wrong tools. Here's what you'll need in your toolkit, plus some pro tips to make connections go smoothly:
Essential Tools
- Hex key set: Metric sizes (M5, M6, M8) are standard for aluminum extrusions. Get a set with ball-end keys—they let you reach bolts at angles, handy in tight spaces.
- Torque wrench: For critical joints, a torque wrench ensures you tighten bolts to the right tension (usually 4-6 Nm for M5 bolts in aluminum). Too loose, and the joint wobbles; too tight, and you risk cracking the extrusion.
- Deburring tool: Extrusion ends are often sharp or have burrs from cutting. A deburring tool smooths these edges, preventing cuts and ensuring T-slot nuts slide in easily.
- Rubber mallet: Sometimes extrusions need a gentle tap to align—don't use a steel hammer; it'll dent the aluminum. A rubber mallet delivers soft, even force.
- Level and square: A 2-foot level checks for vertical/horizontal alignment, while a speed square ensures 90° angles. Skip these, and your rack might lean or your shelves might slope.
- Clamps: Bar clamps or C-clamps hold extrusions together while you insert bolts—no more fumbling with one hand and tightening with the other.
Pro Tips for Perfect Joints
- Pre-load T-slot nuts: Before assembling, slide T-slot nuts into the extrusions and tighten a bolt slightly—this "locks" them in place so they don't spin when you're trying to attach brackets.
- Use thread locker sparingly: For joints that vibrate (like near a conveyor), a drop of medium-strength thread locker (blue Loctite) keeps bolts from loosening. Avoid red (permanent) locker unless you never plan to disassemble the joint.
- Test load before finalizing: Once a joint is connected, give it a gentle shake or apply light pressure. If it moves, check for loose bolts or misaligned connectors before adding heavy loads.
- Label parts for reconfiguration: If you build something temporary, label extrusions and connectors with tape (e.g., "Bench A – Left Upright")—it saves time when you reassemble later.
Troubleshooting: When Connections Go Wrong (and How to Fix Them)
Even with the best prep, things can go sideways. Here are common issues and quick fixes:
Loose Joints
Why it happens: Vibration loosened bolts, T-slot nuts spun during tightening, or the load was heavier than expected.
Fix: Retighten bolts with a torque wrench. If they loosen again, add thread locker. For T-slot nuts that spin, try a nylon nut (it grips better) or wrap the nut in masking tape for extra friction.
Misaligned Extrusions
Why it happens: Rushing alignment, uneven floor, or bent extrusions (rare, but possible).
Fix: Loosen the joint, use a rubber mallet to tap into place, then retighten. For uneven floors, add shims under the base or use adjustable feet (another handy aluminum profile accessory).
Sagging Shelves
Why it happens: Too much weight, not enough support, or undersized extrusions (e.g., using 2020 instead of 3060 for heavy shelves).
Fix: Add a center support leg (3060 upright with a reinforced joint) or switch to 3060 crossbeams instead of 3030. For existing shelves, reinforce with angle brackets along the bottom.
Wrapping Up: Connections That Power Lean Systems
Connecting 3060 National Standard Profile A to other aluminum extrusions isn't just about bolts and brackets—it's about building the foundation for efficient, adaptable workspaces. Whether you're assembling a workbench, a material rack, or an entire production line, the right connection methods turn rigid metal beams into a dynamic toolkit that grows with your needs.
Remember the basics: start with strong, compatible accessories (like 90° aluminum profile connectors and T-slot nuts), follow the principles of load-bearing and alignment, and always build with reconfiguration in mind. Lean systems thrive on flexibility, and aluminum extrusions—when connected properly—deliver that flexibility in spades.
So the next time you're staring at a pile of extrusions and wondering how to put them together, take a deep breath. Grab your hex key, align those T-slots, and tighten that first bolt. You're not just building a structure—you're building a system that works as hard as your team does. And in the end, that's the real power of 3060 Profile A and aluminum extrusion profile: they don't just connect parts—they connect possibilities.