- Company Articles
- Products and Technology
- Product knowledge
- Custom Fabrication with 2040 EU Standard Aluminum Profile: Design Tips

Custom Fabrication with 2040 EU Standard Aluminum Profile: Design Tips
Related Product
2040 EU Standard Aluminum Profile
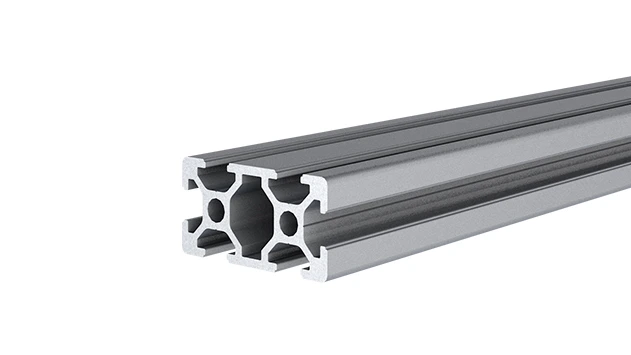
2040 is a 2.00 x 4.00CM fractional 20 series square extrusion T-slot profile with four open T-slots, two side with 2.00cm face, the other side with 4.00cm face. The profile has align-a-grooves to assist in aligning connecting profiles.
If you've ever dabbled in custom fabrication—whether building a workshop workbench, a material storage rack, or a small-scale conveyor system—you've likely encountered the challenge of finding materials that balance strength, flexibility, and ease of use. Enter the 2040 EU standard aluminum profile: a unsung hero in the world of DIY and industrial design. With its sleek 20x40mm dimensions, T-slot grooves, and compatibility with a vast array of accessories, this profile has become a go-to for makers, small businesses, and even large manufacturers looking to create tailored solutions without the hassle of welding or complex machining. In this article, we'll dive into why the 2040 aluminum profile stands out, and share practical design tips to help you bring your custom projects to life—from concept to assembly.
Understanding the Basics: What Makes 2040 Aluminum Profile Unique?
Before we jump into design tips, let's start with the fundamentals. Aluminum profiles, especially those meeting EU standards, are engineered for consistency and reliability. The "2040" in its name refers to its cross-sectional dimensions: 20mm in width and 40mm in height. This might seem unassuming, but those proportions strike a sweet spot between compactness and load-bearing capability. Unlike rigid steel or flimsy plastic, 2040 aluminum profile offers the best of both worlds: it's lightweight enough to maneuver by hand (perfect for solo projects) yet strong enough to support tools, materials, or even small machinery when properly assembled.
One of its most defining features is the T-slot design—longitudinal grooves running along the profile's length. These slots eliminate the need for drilling or welding; instead, you can slide bolts, nuts, or specialized accessories directly into the slots to secure components. This not only speeds up assembly but also allows for easy adjustments later. Need to add a shelf to your workbench? Just slide in a bracket. Want to reconfigure a material rack? Loosen a few bolts, rearrange, and tighten—no power tools required.
| Profile Type | Dimensions (mm) | Typical Load Capacity (kg/m) | Best For | Key Accessories |
|---|---|---|---|---|
| 2040 EU Standard | 20x40 | 80-120 | Workbenches, small racks, mobile trolleys | 90° aluminum profile connector, caster wheel, roller track |
| 3030 EU Standard | 30x30 | 120-180 | Heavy-duty shelving, machine frames | 45° aluminum profile connector, gusset brackets |
| 4040 EU Standard | 40x40 | 180-250 | Industrial conveyors, large storage systems | Three-way connectors, reinforced brackets |
Another advantage is its material composition. Most 2040 profiles are made from 6063-T5 aluminum alloy, known for its excellent corrosion resistance and mechanical strength. This makes the profile suitable for both indoor and semi-outdoor use—no need to worry about rust in a humid workshop or garage. Plus, its smooth, anodized finish adds a professional look, so your final project won't just be functional; it'll look polished too.
Design Tip 1: Start with Clear Project Goals and Load Requirements
Every successful fabrication project begins with a question: What problem am I solving? Whether you're building a workbench for your garage, a material rack for a warehouse, or a custom conveyor for a small production line, defining your goals upfront will guide every design decision—including how you use your 2040 aluminum profile.
Start by asking: What will the finished product do? A workbench might need to support power tools, while a material rack should hold boxes or components. How much weight will it need to bear? Don't guess here—miscalculating load can lead to wobbly structures or even failure. For example, a 2040 profile with a 1.5mm wall thickness can typically support 80-100 kg per meter when used horizontally, but this drops if the span between supports is too long. If your project requires heavier loads, consider adding cross-braces or upgrading to a thicker-walled 2040 variant (common options include 1.2mm, 1.5mm, and 2.0mm walls).
Let's take a practical example: building a workbench. If you plan to use it for light tasks like assembling small parts, a basic frame with 2040 profiles and a plywood top might suffice. But if you're using power tools like a drill press or sander, you'll need to reinforce the frame with additional supports (using 90° aluminum profile connectors to add vertical braces) and choose a thicker top material (like aluminum honeycomb panel for stability). By clarifying these goals early, you'll avoid over-engineering (wasting time and money on unnecessary materials) or under-building (ending up with a structure that can't handle daily use).

Design Tip 2: Leverage Modularity with Aluminum Profile Accessories
The true magic of 2040 aluminum profile lies in its compatibility with aluminum profile accessories. These small, often overlooked components turn a simple length of metal into a versatile building block. Think of them as the "Lego pieces" of fabrication—mix and match to create almost any structure you can imagine.
Let's break down the essentials: Connectors are the backbone of any assembly. 90° aluminum profile connectors are the most common, used to join profiles at right angles (perfect for building frames). For angled joints, 45° aluminum profile connectors work seamlessly, while three-way connectors let you branch out in multiple directions—ideal for building multi-tiered racks. Most connectors use set screws or bolts that tighten into the T-slots, ensuring a secure fit without damaging the profile.
Next, casters and wheels add mobility to static structures. If you're building a workbench or trolley that needs to move, opt for swivel stem caster wheels with brakes. Look for wheels rated for your project's total weight (including the structure itself and any materials it will hold). A good rule of thumb: choose casters with a load capacity 50% higher than your estimated maximum weight to account for uneven floors or sudden movements.
For projects involving material flow—like a small conveyor or a parts feeder— roller track is a game-changer. These tracks, which feature small wheels or balls, let materials glide smoothly from one point to another. Plastic roller track guide rails (available in yellow or grey) are affordable and lightweight, making them great for light parts. For heavier items, aluminum roller track with steel wheels offers more durability. Pair these with roller track placon mounts to attach the track to your 2040 frame—most mounts slide into the T-slots, so you can adjust the track height or angle with ease.
The beauty of these accessories is their interchangeability. Today's workbench can become tomorrow's material rack by swapping out the top for roller track and adding vertical supports with 45° connectors. This modularity is why 2040 profiles are beloved by small businesses—they grow with your needs without requiring a complete overhaul.
Design Tip 3: Optimize Space and Workflow with Smart Layout Planning
Even the strongest, most well-built structure will fall short if it doesn't fit your space or workflow. When designing with 2040 aluminum profile, take time to sketch your layout (even a rough drawing on graph paper helps) and consider how the finished project will interact with its environment.
Start with space constraints . Measure the area where the structure will live—doorways, ceiling height, and nearby equipment all matter. A workbench that's too wide might block a walkway, while a material rack that's too tall could hit overhead lighting. 2040 profiles excel here because they're easy to cut to length (using a miter saw or hacksaw with a metal-cutting blade), so you can tailor dimensions to your exact space. For example, if your workshop has a narrow aisle, a 60cm deep trolley built with 2040 profiles and caster wheels can slide through easily, whereas a wider design would get stuck.
Workflow optimization is equally important. If you're building a material rack for a production line, position it so that workers can grab parts without twisting or reaching—this reduces fatigue and speeds up tasks. For a workbench, arrange tools and supplies within arm's reach by adding side shelves or pegboards (attached via T-slot brackets). If you're using roller track to feed parts to the bench, angle the track slightly downward so parts glide to the worker, rather than requiring manual lifting.
Let's consider a real-world scenario: a small electronics assembly line. The team needs a way to move circuit boards from station to station. Using 2040 profiles, they build a low-profile conveyor with aluminum roller track (sloped at 5° for gravity feeding) and line the edges with aluminum guide rails to keep boards from slipping off. The conveyor is mounted on caster wheels, so it can be moved when the line needs reconfiguring. By aligning the conveyor with each workstation's height (adjustable via leveling feet attached to the 2040 frame), the team cuts down on and reaching, making the process smoother and more efficient. This isn't just about building a structure—it's about building one that works with the people using it.
Design Tip 4: Prioritize Precision and Alignment During Assembly
Aluminum profiles are forgiving, but even small misalignments can lead to wobbly structures or accessories that don't fit. Taking time to ensure precision during assembly will save you headaches later—and result in a finished project that looks and functions like a professional build.
Start by measuring twice, cutting once . Use a metal square to mark cut lines, and secure the profile in a vice to prevent bending during cutting. A miter saw with a carbide-tipped blade works best for clean, straight cuts, but a hacksaw will do if you're patient (just file down any burrs afterward). When joining profiles, use a spirit level to check for squareness—even a 1° misalignment over a 1-meter length can throw off the entire structure. For example, if you're building a rectangular frame, measure the diagonals; they should be equal if the corners are 90°. If not, adjust the frame until they match, then tighten the connectors.
Another pro tip: use temporary fasteners first . When assembling a complex structure, loosely tighten all bolts and connectors before fully securing them. This lets you (fine-tune) the alignment—shifting a profile a few millimeters to ensure the T-slots line up, or adjusting a roller track to be perfectly level. Once everything is aligned, go back and tighten the fasteners in a crisscross pattern (like tightening lug nuts on a car wheel) to distribute pressure evenly. This prevents warping and ensures all joints are secure.
Don't overlook the small details, either. For example, when attaching caster wheels to a trolley frame, make sure all four wheels are the same height—use adjustable leveling feet if your floor is uneven. When installing roller track, check that the wheels spin freely and that there are no gaps between sections (use roller track placon mount connectors to bridge gaps smoothly). These little steps add up to a structure that feels solid, operates smoothly, and lasts for years.
Design Tip 5: Finishing Touches That Elevate Functionality and Aesthetics
You've built the frame, added the accessories, and ensured everything is aligned—now it's time to add those final touches that turn a "good" project into a "great" one. These details might seem minor, but they enhance usability, safety, and even the overall look of your fabrication.
Safety first : Aluminum profiles have sharp edges, especially after cutting. Use deburring tools to smooth cut ends, and add plastic end caps to T-slots to prevent fingers from getting caught. If your project has moving parts (like roller track or casters), apply a light lubricant to wheels and hinges to reduce friction and noise. For workbenches or tables, add anti-slip pads to the top (or use a rubber mat) to keep tools and materials from sliding during use.
Aesthetics matter too . While function is key, a well-finished project is more enjoyable to use. Anodized 2040 profiles come in standard colors like silver, black, or gray, but you can also paint them (use a primer designed for aluminum) to match your workshop's decor. Cable management is another often-neglected area: use T-slot cable clips to route power cords or air hoses along the profile's grooves, keeping your workspace neat and reducing tripping hazards.
Finally, plan for future upgrades . Leave extra T-slots open for adding accessories later—a shelf, a tool holder, or even a second tier to your material rack. Drill holes in the profile (carefully, using a center punch to prevent slipping) if you need to mount non-T-slot accessories, but try to keep most connections within the T-slots for flexibility. For example, if you build a workbench today, you might want to add a monitor arm or a task light tomorrow; leaving T-slots free makes this easy.
Conclusion: Unlock Your Creativity with 2040 Aluminum Profile
The 2040 EU standard aluminum profile isn't just a material—it's a blank canvas for innovation. Its combination of strength, modularity, and ease of use makes it perfect for everything from simple DIY projects to industrial-grade fabrication. By starting with clear goals, leveraging accessories, optimizing layout, prioritizing precision, and adding thoughtful finishing touches, you can create custom structures that are tailored to your needs, adaptable to change, and built to last.
Whether you're a hobbyist building a garage workbench or a small business owner designing a production line, remember: the best projects are those that solve problems your way. With 2040 aluminum profile and the right design approach, there's no limit to what you can build. So grab a few profiles, some connectors, and start creating—your perfect custom structure is just a few T-slots away.