- Company Articles
- Products and Technology
- Product knowledge
- Custom Workbenches with 4080A EU Standard Aluminum Profile: Design Guide

Custom Workbenches with 4080A EU Standard Aluminum Profile: Design Guide
Related Product
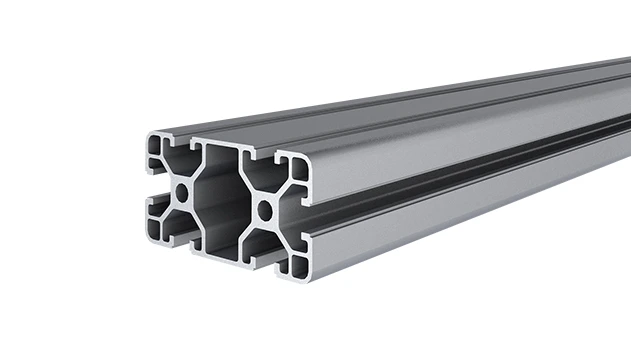
4080A EU Standard Aluminum Profile
4080A is a 4.00x8.00 CM fractional 40 series square extrusion T-slot profile with two side open T-slots, each side with 4.00cm face, two side with 8.00cm face. The profile has align-a-grooves to assist in aligning connecting profiles.
Walk into any workshop, factory floor, or lab, and you'll notice something crucial: the workbench isn't just a table. It's the silent backbone of productivity. A clunky, ill-fitting workbench slows you down, strains your back, and turns simple tasks into frustrating battles. But a custom-built one? It feels like an extension of your hands—supporting your workflow, keeping tools within reach, and adapting as your needs change. And when it comes to building that perfect workbench, there's one material that stands out: the 4080A EU standard aluminum profile. Let's dive into why this profile is a game-changer, how to design your own custom workbench, and why every detail—from the connectors to the caster wheels—matters.
Why 4080A Aluminum Profile? The Foundation of Smart Workbenches
First things first: What makes the 4080A EU standard aluminum profile so special? Let's break it down. The "4080" refers to its dimensions—40mm in width and 80mm in height. Unlike generic steel or wood, this isn't just a hunk of metal. It's an engineered extrusion, designed with precision T-slots running along its length. These slots are like the profile's superpower: they let you attach accessories, shelves, lights, or tool holders anywhere you need, without drilling holes or welding. Imagine building a workbench where you can add a monitor arm today, a parts bin tomorrow, and a power strip next week—all without reengineering the whole structure. That's the flexibility 4080A brings.
But it's not just about adaptability. Aluminum is naturally lightweight, so your workbench won't feel like a permanent fixture (unless you want it to be). Yet it's surprisingly strong—strong enough to support heavy machinery, stacks of materials, or even a technician leaning on it during a long shift. And let's not forget corrosion resistance: unlike steel, aluminum won't rust, making it ideal for damp environments or workshops where spills happen. For anyone tired of wobbly particleboard benches that warp after a year, 4080A is a breath of fresh air.
Pro Tip: The "EU standard" label matters. It ensures consistent dimensions and slot sizes across manufacturers, so accessories from different brands (like 90° aluminum profile connectors or end caps) will fit perfectly. No more guessing if that new shelf bracket will slide into the T-slot!
Designing Your Workbench: It's All About How You Work
Customization starts with a simple question: What do you do at your workbench? A mechanic rebuilding engines needs a sturdy surface and storage for wrenches. A lab technician handling sensitive equipment might prioritize ESD protection and clean, flat space. A hobbyist woodworker could want a vice mount and under-shelf storage for lumber. Your workbench should solve your unique pain points. Let's walk through the key design steps, with 4080A aluminum profile as the star.
1. Sizing: Getting the Height, Width, and Depth Right
Let's start with height—it's the most overlooked yet critical factor. Stand up straight, let your arms hang naturally, and bend your elbows to 90 degrees. The distance from the floor to your palms? That's your ideal workbench height. For most people, that's between 750mm and 900mm. Too low, and you'll hunch; too high, and your shoulders will ache. With 4080A, you can adjust this precisely by cutting the profile to length—no more settling for "one-size-fits-all" 762mm (30-inch) benches.
Width and depth depend on your space and tasks. A 1200mm width works for most workshops, but if you're tight on room, 900mm can still be functional. Depth is trickier: 600mm is standard, but if you're working with large parts (like automotive components), 800mm gives you elbow room. Remember: the 4080A profile is modular, so you can always add extensions later. Start with a core size that fits your current space, and leave room to grow.
2. Surface Matters: From Basic to Bulletproof
Your workbench's top surface takes the most abuse—scratches, spills, impacts. So choosing the right material here is non-negotiable. The 4080A frame can support almost anything, but here are the top picks:
- Aluminum Honeycomb Panels: Lightweight but rigid, these panels have a honeycomb core sandwiched between aluminum sheets. They're resistant to dents, easy to clean, and perfect for general use. Plus, they match the 4080A profile's industrial look.
- ESD Laminate: For electronics workshops, ESD (electrostatic discharge) protection is a must. ESD laminates prevent static buildup, keeping sensitive components safe. Pair this with an ESD workbench design (grounded through the aluminum frame) for full protection.
- Wooden Tops: Classic and forgiving, wood (like maple or beech) is gentle on tools and absorbs vibrations. It's a favorite for woodworkers or anyone who prefers a warmer feel. Just seal it well to resist spills!
No matter the surface, secure it to the 4080A frame using T-slot bolts or aluminum profile accessories like brackets. This way, if the top gets damaged, you can swap it out without rebuilding the entire bench.
3. Mobility vs. Stability: The Caster Wheel Dilemma
Do you need your workbench to stay put, or roll to where the action is? This is where caster wheels come in. If you're assembling products on the factory floor, mobile workbenches let you move materials directly to the assembly line. For a fixed lab setup, stability is key. The good news? 4080A handles both.
For mobile setups: Choose heavy-duty caster wheels with locking brakes. Look for wheels rated to support at least 50kg each (more if your bench will hold heavy tools). Mount them using aluminum foot bases bolted to the 4080A legs—this distributes weight evenly and prevents the profile from bending. Pro tip: Mix swivel and rigid casters (two swivel with brakes, two rigid) for better control when rolling.
For stationary workbenches: Swap casters for adjustable leveling feet. These threaded feet screw into the bottom of the 4080A legs, letting you tweak each corner to compensate for uneven floors. Even a small wobble can throw off precision work, so leveling feet are non-negotiable for tasks like soldering or measuring. And if you ever need to move the bench later? Just unscrew the feet and add casters—no tools required, thanks to those T-slots.

Building Your Workbench: From Sketch to Assembly
Now that we've covered the "why," let's get to the "how." Building a custom workbench with 4080A aluminum profile is surprisingly straightforward—no welding or advanced tools needed. Here's a step-by-step guide to make it painless.
Step 1: Plan Your Layout (Yes, Even a Rough Sketch Helps)
Grab a piece of paper or fire up a simple design app (like SketchUp). Draw the outline of your workbench, noting the height, width, and depth. Then, mark where you'll need storage: shelves above? Drawers below? A pegboard on the back? Don't forget power access—will you need a power strip along the back edge? A hole through the top for cords? Jotting these down now saves headaches later.
Pro tip: Measure twice, cut once. Literally. Measure your space, your tools, and even the largest item you'll place on the bench. There's nothing worse than building a 1200mm-wide bench only to realize your 1300mm tool chest won't fit next to it.
Step 2: Gather Your Materials and Aluminum Profile Accessories
Once your design is set, it's time to shop. Here's the core list you'll need:
- 4080A Aluminum Profile: Calculate the length for legs, rails, and crossbars. For a basic bench (1200mm wide x 600mm deep x 800mm high), you'll need 4 legs (800mm each), 2 front/back rails (1200mm each), 2 side rails (600mm each), and optional crossbars for stability.
- Connectors: These join the profile pieces. 90° aluminum profile connectors are the most common (for corners), but T-joints or 45° connectors work for angled designs. Get a few extras—you'll find uses for them.
- Surface Material: Cut to your bench's top dimensions (e.g., 1200mm x 600mm aluminum honeycomb panel).
- Adjustable Leveling Feet or Caster Wheels: One per leg (4 total).
- Fasteners: T-slot bolts, nuts, and washers. These slide into the profile's T-slots to attach accessories.
- Aluminum Profile Accessories: End caps (to cover sharp edges), T-slot rubber seal covers (to keep dust out of slots), and brackets for shelves or tool holders.
Most suppliers sell 4080A profile in standard lengths (e.g., 2m, 3m), so you may need to cut them to size. If you don't have a miter saw, many suppliers offer cutting services—just provide your measurements.
Step 3: Assemble the Frame—It's Like Building with Giant Tinker Toys
Here's where the fun begins. Lay out the profile pieces on a flat surface (the floor works). Start by connecting the legs to the front/back rails using 90° connectors. Slide the connector into the end of the rail, align it with the leg, and tighten the bolts with an Allen wrench. Repeat for all four corners, and suddenly you have a rectangular frame. Add crossbars between the legs (front to back, side to side) for rigidity—this prevents the bench from wobbling when you lean on it.
Once the frame is square, attach the leveling feet or caster wheels to the bottom of the legs. For leveling feet, screw them in until they're hand-tight, then adjust later when the bench is upright. For casters, use the aluminum foot bases—these bolt to the leg's T-slots, providing a sturdy mount for the wheel assembly.
Finally, place the surface on top of the frame. Secure it using T-slot bolts: drill small holes in the surface (if needed), slide bolts into the frame's T-slots, and tighten nuts from above. If you're using an aluminum honeycomb panel, you can even bolt through the panel into the T-slots—no pre-drilling required, thanks to the panel's rigidity.
Assembly Hack: Use a square to check the frame's corners as you build. A wobbly frame is hard to fix later! If the bench rocks after assembly, adjust the leveling feet until it sits flat—this takes 5 minutes and makes a world of difference in stability.
Taking It to the Next Level: Custom Features That Boost Productivity
A basic frame with a top is a great start, but the real magic of 4080A is in the extras. Let's explore features that turn a good workbench into a great one.
Storage: Shelves, Bins, and Racks That Grow With You
Cluttered workspaces kill efficiency. With 4080A, you can add storage exactly where you need it. For example:
- Under-Shelf Storage: Mount a shelf between the legs using aluminum profile connectors and short 4080A pieces. Perfect for toolboxes or bulk materials.
- Overhead Racks: Extend vertical profiles from the back of the bench, then add horizontal rails for hanging bins, paper towel holders, or even a small parts organizer. Use T-slot hooks to adjust positions as your tool collection grows.
- Side-Mounted Tool Holders: Slide tool hooks or magnetic strips into the T-slots on the bench's side rails. Keep frequently used tools (screwdrivers, pliers) within arm's reach, not buried in a drawer.
Ergonomics: Lighting, Power, and Comfort
Your body will thank you for these touches. Add an LED light bar above the bench by mounting it to overhead rails—position it to shine directly on your work surface, reducing eye strain. For power, install a T-slot power strip along the back rail; plug in your tools, soldering iron, or laptop, and keep cords organized with cable clips (also T-slot mounted, of course).
If you stand for long hours, consider adding a footrest bar across the front legs. It's a simple addition—just a short piece of 4080A profile mounted at ankle height—but it lets you shift your weight, reducing fatigue. And for those who alternate between sitting and standing? Look into height-adjustable legs (yes, 4080A works with electric or manual height adjusters) to transform your bench into a sit-stand workstation.
Specialty Add-Ons: For Labs, Workshops, and Beyond
Depending on your industry, you might need unique features. For electronics labs, add ESD wrist strap anchors (grounded through the aluminum frame) and static-dissipative bins. For mechanics, mount a vice to the corner using T-slot bolts—no need to drill into concrete. For artists, attach a paper roll holder to the side rail, or add a pegboard panel using aluminum profile accessories like brackets and screws.
Real-World Example: A Workbench Built for a Small Electronics Shop
Let's put this all together with a real scenario. Maria runs a small electronics repair shop, fixing phones and laptops. Her old workbench was a rickety wooden table with a single shelf—tools scattered, cords tangled, and no space for her microscope. Here's how she built her custom 4080A workbench:
- Size: 1500mm wide (to fit two workstations), 600mm deep, 850mm high (her ideal elbow height).
- Frame: 4080A profile with 90° connectors, reinforced with crossbars for stability.
- Surface: ESD laminate top, grounded via a wire from the frame to a grounding plug.
- Mobility: Two locking caster wheels (front) and two rigid casters (back)—she rolls it to the repair station, then locks the brakes.
- Storage: Under-shelf for toolboxes, overhead rail with small parts bins (sorted by component type), and a side-mounted magnetic strip for screwdrivers.
- Extras: LED light bar above the surface, T-slot power strip with USB ports, and a microscope arm mounted to the back rail via a T-slot bracket.
The result? Maria's repair time dropped by 20%—no more hunting for tools, no more bending to plug in devices, and her back pain vanished. "It's like the bench was designed for me," she says. "I can't imagine going back."
Maintaining Your Workbench: Keep It Looking and Working Like New
Your 4080A workbench is built to last, but a little care goes a long way. Here's how to keep it in top shape:
- Clean the T-Slots: Dust and debris can clog the slots, making it hard to add accessories. Use a small brush or compressed air to clean them monthly.
- Tighten Connectors: Over time, bolts can loosen from vibration. Check the connectors every few months and snug them with an Allen wrench—this prevents wobbling.
- Protect the Surface: Wipe up spills immediately, especially if you're using wood. For ESD surfaces, avoid harsh cleaners—mild soap and water work best.
- Lubricate Casters: If you have caster wheels, add a drop of oil to the axles yearly to keep them rolling smoothly.
With minimal effort, your workbench will outlast multiple jobs, moves, and even career changes. And if your needs evolve? Disassemble it, reconfigure the frame, and build something new—no waste, no hassle.
Why Settle for "Good Enough" When You Can Build "Perfect"?
At the end of the day, a workbench is more than just furniture. It's where ideas become reality, where problems get solved, and where hours turn into progress. The 4080A EU standard aluminum profile doesn't just let you build a workbench—it lets you build a workspace that grows with you, adapts to your challenges, and makes every task a little easier. Whether you're a hobbyist, a small business owner, or a factory manager, this isn't just an upgrade—it's an investment in your productivity, your comfort, and your peace of mind.
So why settle for a generic, one-size-fits-all bench? Grab a sketchpad, list your must-haves, and start designing. With 4080A aluminum profile, aluminum profile accessories, and a little creativity, you'll build a workbench that doesn't just support your work—it inspires it.