- Company Articles
- Products and Technology
- Product knowledge
- Customization Possibilities with 3030 National Standard Profile A: Cutting & Drilling Options

Customization Possibilities with 3030 National Standard Profile A: Cutting & Drilling Options
Related Product
3030 National Standard Profile A
Workbench, production line, logistic rack, warehouse rack Industry: Manufacturer workshop, Automobile, Electronic, Assembling, logistic
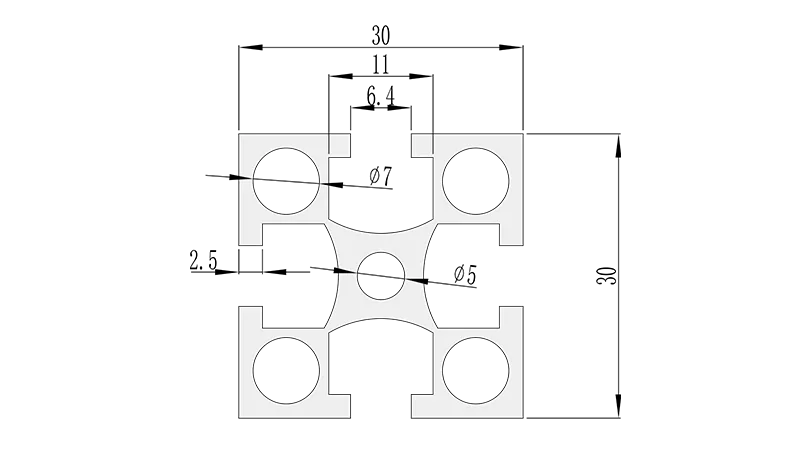
In the world of manufacturing, assembly lines, and workshop setups, one size rarely fits all. Whether you're running a small electronics workshop or managing a large-scale production facility, the ability to tailor equipment to your specific needs can make all the difference in efficiency, space utilization, and workflow. That's where aluminum profiles come into play—and today, we're zeroing in on a workhorse of the industry: the 3030 National Standard Profile A. If you've ever struggled with rigid, off-the-shelf solutions that just don't quite fit, this guide is for you. We're breaking down how cutting and drilling can transform this standard profile into a custom tool that works for your space, not against it.
What Exactly Is 3030 National Standard Profile A?
Let's start with the basics. The 3030 National Standard Profile A is a type of aluminum extrusion profile, designed with standardized dimensions to ensure consistency across applications. The "3030" refers to its cross-section: 30mm by 30mm, making it sturdy enough for light to medium-duty tasks while remaining lightweight. Think of it as the building block of modular systems—workbenches, material racks, machine guards, and even lean system setups often rely on this profile for its balance of strength and versatility.
What sets the "National Standard" part apart? It means manufacturers follow strict guidelines for tolerances, material thickness, and slot configurations (those T-slots you see running along the length). These slots are key—they let you attach accessories like brackets, shelves, or connectors without welding, making assembly and adjustments a breeze. But here's the catch: even with standardization, every workspace has unique demands. Maybe your workbench needs to fit into a 127cm gap instead of the standard 120cm. Or perhaps you need extra holes for cable management in a specific spot. That's where cutting and drilling come in.
Why Custom Cutting Matters: It's All About the Fit
Walk into any busy workshop, and you'll notice that the most efficient setups aren't just organized—they're tailored . A workbench that's an inch too long might block a walkway; a material rack that's too short could waste vertical space. Custom cutting lets you trim the 3030 Profile A to exact lengths, turning a generic aluminum profile into a component that fits your space like a glove.
Common Cutting Methods: Which One's Right for You?
Not all cuts are created equal. The method you choose depends on factors like precision requirements, volume, and budget. Let's break down the most popular options:
| Cutting Method | Best For | Pros | Cons |
|---|---|---|---|
| Circular Sawing | Small batches, on-site adjustments | Affordable, portable, suitable for most workshops | Requires steady hands; may leave minor burrs |
| Laser Cutting | High-precision projects, intricate designs | Extremely accurate (±0.1mm), clean edges, minimal burrs | More expensive; better for larger volumes or complex cuts |
| Waterjet Cutting | Thicker profiles or heat-sensitive materials | No heat distortion, cuts through thick aluminum easily | Slower than laser; higher water and abrasive costs |
For most small to medium businesses, circular sawing with a fine-tooth blade gets the job done. It's practical for one-off custom lengths—say, trimming a few profiles to build a custom workbench. Just be sure to use a blade designed for aluminum (carbide-tipped works best) to avoid chipping the edges. For larger projects, like outfitting an entire production line with matching racks, laser cutting might be worth the investment. The precision ensures every profile is identical, which is critical when assembling modular systems where alignment matters.
Factors to Consider When Cutting
Before firing up the saw, pause and ask: What's the end use? If the profile will be visible (like a workbench front), a clean, burr-free cut is a must—laser or waterjet might be better here. If it's hidden in a rack structure, minor imperfections won't matter as much. Also, think about tolerance: How precise do you need the length to be? A DIY workshop might aim for ±1mm, while aerospace or medical device setups could require ±0.1mm. And don't forget safety—aluminum dust can be flammable, so always wear eye protection and work in a well-ventilated area.
Drilling: Adding Functionality, One Hole at a Time
Cutting gets the profile to the right length, but drilling is what adds functionality. Those extra holes let you mount accessories, route cables, or attach the profile to walls, floors, or other components. The 3030 Profile A's T-slots are great for standard attachments, but sometimes you need a hole in a specific spot that a slot can't reach—like a vertical hole for a caster wheel mount or a horizontal hole to bolt two profiles at a 90° angle.
Types of Holes and Their Uses
Most drilling jobs fall into a few categories: through-holes (going all the way through the profile), tapped holes (threaded for screws or bolts), and counterbored holes (recessed to hide screw heads). Let's say you're building a mobile workbench using 3030 Profile A legs. You'll need to drill holes in the bottom of each leg to mount caster wheels—probably tapped holes so the caster bolts thread in securely. On the workbench top, you might drill through-holes to run power cords from tools down to the floor, keeping the surface clutter-free.
Tools and Techniques for Clean Drilling
Drilling aluminum is trickier than wood—it's a soft metal, so bits can grab and cause the material to warp if you're not careful. Start with a sharp, high-speed steel (HSS) or cobalt drill bit; dull bits will tear the metal instead of cutting it cleanly. For precision, use a drill press with a vice to hold the profile steady—freehand drilling is a recipe for off-center holes. Pro tip: Apply cutting fluid to reduce friction and heat, which helps the bit last longer and leaves a smoother hole.
If you're new to drilling aluminum, start small. Practice on scrap pieces of 3030 Profile A to get a feel for the speed (lower RPMs work better—around 1000-1500 RPM for 3mm bits). And always mark your hole locations with a center punch first; this prevents the drill bit from wandering when you start drilling. For tapped holes, use a tap and die set matched to your screw size—M5 or M6 are common for 3030 profiles. Take it slow here too; cross-threading a hole can ruin the profile.
Real-World Applications: From Workbenches to Lean Systems
Let's put this all together with a real example. Imagine a small automotive parts manufacturer that needs a new assembly station. Their old workbench is too low, and the material rack next to it doesn't hold enough components. They decide to build a custom setup using 3030 National Standard Profile A.
First, they measure the space: the workbench needs to be 150cm long, 60cm deep, and 90cm high (taller than standard to reduce bending). They cut four 90cm lengths for the legs and two 150cm lengths for the front and back rails. For the top, they cut a sheet of plywood to size, but to attach it to the frame, they drill holes through the 3030 profiles and secure the plywood with bolts. Next, the material rack: they need three shelves, each 120cm long, so they cut six vertical posts (180cm tall) and nine horizontal rails (120cm each). To assemble the rack, they drill holes at 60cm intervals on the vertical posts, then use brackets (aluminum profile accessories) to mount the shelves. The result? A workbench that fits the space perfectly and a material rack that holds twice as many parts as the old one—all thanks to custom cutting and drilling.
Accessorizing Your Custom Profile
Once you've cut and drilled your 3030 Profile A, the fun really begins: adding accessories. Aluminum profile accessories like end caps (to cover sharp edges), corner brackets (for 90° joints), and slot nuts (to secure bolts in T-slots) turn your cut and drilled profiles into a fully functional system. For example, after drilling holes in your workbench frame, you might add a tool rail using a 3030 Profile A cut to length, then slide in hooks for screwdrivers and pliers using slot nuts. It's this modularity that makes the 3030 Profile A so popular—custom cuts and holes let you mix and match accessories to create exactly what you need.
Troubleshooting Common Hiccups
Even with careful planning, customizing aluminum profiles can hit snags. Burrs after cutting? Use a deburring tool or sandpaper to smooth edges—rough spots can tear gloves or catch on wires. Drilled a hole in the wrong spot? If it's small, you might be able to drill a larger hole nearby and use a plug, but for critical structural holes, it's better to start fresh with a new profile (aluminum is affordable enough that this isn't a huge loss). Warping during cutting? Clamp the profile tightly to a workbench and support long lengths to prevent flexing.
Final Thoughts: The Power of Customization
At the end of the day, the 3030 National Standard Profile A is more than just a piece of aluminum—it's a blank canvas. Cutting and drilling transform it from a generic component into a solution that addresses your workspace's unique challenges. Whether you're building a single workbench or revamping an entire production line, taking the time to customize your profiles can boost efficiency, reduce waste, and make your setup feel intentional.
So the next time you look at a standard aluminum profile, remember: it's not set in stone. With the right tools, a little patience, and a clear vision of what you need, you can cut, drill, and assemble a system that works for you. After all, in manufacturing and workshop design, the best setups aren't just built—they're crafted .