- Company Articles
- Products and Technology
- Product knowledge
- Design Tips: Incorporating One Side Rotatory Chrome Parallel Lean Pipe Joints in Workstations

Design Tips: Incorporating One Side Rotatory Chrome Parallel Lean Pipe Joints in Workstations
Related Product
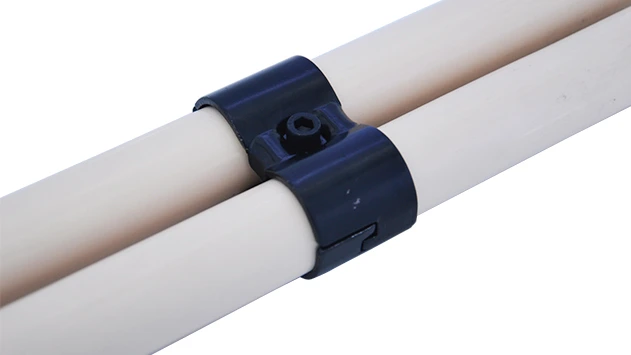
Parallel Lean Pipe Joint
Parallel lean pipe joint used for 2 pcs 28MM lean pipe connection in parallel direction to enhance frame structure, usually for heavy payload requirement for workbench. flow rack, hand trolley.
Walk into any well-run manufacturing facility, and you'll notice something common: workstations that feel less like rigid structures and more like extensions of the people using them. They adapt. They flow. They make the daily grind of assembly, packaging, or sorting feel just a little easier. But behind that seamless adaptability often lies a quiet hero: the right hardware. Today, we're diving into a component that's been quietly revolutionizing workstation design: the
one side rotatory chrome parallel lean pipe joint
. If you've ever wished your lean pipe workbench could bend without breaking, or your material rack could adjust on the fly without a complete rebuild, this one's for you.
What Even Is a One Side Rotatory Chrome Parallel Lean Pipe Joint?
Let's start with the basics. Lean pipe systems—those modular setups of pipes, joints, and accessories—are the backbone of flexible manufacturing. They're why you can build a workbench in the morning and reconfigure it into a turnover trolley by afternoon. But not all joints are created equal. Traditional fixed joints lock pipes into place at rigid angles, great for stability but lousy for adaptability. Enter the
one side rotatory chrome parallel lean pipe joint
.
Break it down: "One side rotatory" means exactly what it sounds like—one end of the joint rotates freely (within a range, usually 180 degrees or so), while the other end stays fixed. "Parallel" ensures that when you attach two pipes to it, they stay aligned in the same plane—no wonky, off-kilter structures here. And "chrome"? That's the finish, adding a layer of corrosion resistance and durability that's a must in busy shops where oil, coolant, or just plain grime are part of the daily scenery.
Picture this: You're assembling small electronics on a lean pipe workbench . One hour, you're working on a compact device that needs tools close to chest height. The next, you're switching to a bulkier component that requires your material bin to sit lower, closer to the roller track for easy loading. With a traditional joint, you'd be grabbing a wrench and rebolting. With a one side rotatory joint? A quick twist, and the pipe holding your tool rack swings into the perfect position. That's the magic—flexibility without sacrificing the structural integrity that keeps your workstation from wobbling mid-task.
Break it down: "One side rotatory" means exactly what it sounds like—one end of the joint rotates freely (within a range, usually 180 degrees or so), while the other end stays fixed. "Parallel" ensures that when you attach two pipes to it, they stay aligned in the same plane—no wonky, off-kilter structures here. And "chrome"? That's the finish, adding a layer of corrosion resistance and durability that's a must in busy shops where oil, coolant, or just plain grime are part of the daily scenery.
Picture this: You're assembling small electronics on a lean pipe workbench . One hour, you're working on a compact device that needs tools close to chest height. The next, you're switching to a bulkier component that requires your material bin to sit lower, closer to the roller track for easy loading. With a traditional joint, you'd be grabbing a wrench and rebolting. With a one side rotatory joint? A quick twist, and the pipe holding your tool rack swings into the perfect position. That's the magic—flexibility without sacrificing the structural integrity that keeps your workstation from wobbling mid-task.
5 Design Tips for Making the Most of These Joints
So, you're sold on the idea. Now how do you actually use these joints to build a workstation that's both flexible and functional? Let's walk through five actionable tips, drawn from years of tweaking and testing lean setups in real-world shops.
1. Start by Mapping Your Workflow (Yes, Actually Map It)
Before you even pick up a pipe cutter, grab a pencil and sketch your workflow. What tasks happen at this workstation? How often do tools, materials, or even the operator's position need to change? The rotatory feature is a superpower, but like any superpower, it's wasted if you don't know when to use it.
For example, if your workstation is used for kitting parts—gathering components into bins before they hit the assembly line—you might need material racks that swing out of the way when not in use. A one side rotatory joint here lets you tuck a material rack b (3 row and 3 floor) against the wall when it's empty, then swing it back into reach when it's time to restock. On the flip side, if the workstation is dedicated to a single, repetitive task (like screwing on caps), you might not need much rotation—save the rotatory joints for areas that truly need to adapt.
For example, if your workstation is used for kitting parts—gathering components into bins before they hit the assembly line—you might need material racks that swing out of the way when not in use. A one side rotatory joint here lets you tuck a material rack b (3 row and 3 floor) against the wall when it's empty, then swing it back into reach when it's time to restock. On the flip side, if the workstation is dedicated to a single, repetitive task (like screwing on caps), you might not need much rotation—save the rotatory joints for areas that truly need to adapt.
Pro Tip:
Use sticky notes to represent tools, bins, and operators on your sketch. Move them around to simulate different tasks. Any spot where a sticky note needs to "swing" or "tilt" is a candidate for a rotatory joint.
2. Balance Flexibility with "Set It and Forget It" Stability
Here's the catch with rotatory joints: too much movement can turn your workstation into a wobbly mess. Imagine stacking heavy parts on a shelf attached to a fully rotatory joint—one bump, and everything could come crashing down. The solution? Mix and match. Pair
one side rotatory chrome parallel lean pipe joints
with fixed joints to create a system that bends where it needs to and stays rock-solid where it doesn't.
For instance, build the main frame of your lean pipe workbench using fixed 90-degree joints—this keeps the legs and tabletop stable. Then, attach your adjustable components (like tool hangers or side shelves) using rotatory joints. That way, the bench itself never moves, but the accessories pivot to fit your needs. Think of it like a tree: the trunk (fixed joints) stays rooted, but the branches (rotatory joints) sway with the breeze (or, you know, your workflow changes).
Another trick: Use the "parallel" feature to your advantage. Since these joints keep pipes aligned, you can run two parallel pipes (say, along the back of your workbench) and attach a rotatory joint to both. This distributes weight evenly, so even when you swing a component out, the load is spread across two pipes instead of one—no sagging, no stress.
For instance, build the main frame of your lean pipe workbench using fixed 90-degree joints—this keeps the legs and tabletop stable. Then, attach your adjustable components (like tool hangers or side shelves) using rotatory joints. That way, the bench itself never moves, but the accessories pivot to fit your needs. Think of it like a tree: the trunk (fixed joints) stays rooted, but the branches (rotatory joints) sway with the breeze (or, you know, your workflow changes).
Another trick: Use the "parallel" feature to your advantage. Since these joints keep pipes aligned, you can run two parallel pipes (say, along the back of your workbench) and attach a rotatory joint to both. This distributes weight evenly, so even when you swing a component out, the load is spread across two pipes instead of one—no sagging, no stress.
3. Integrate with Other Components (They Don't Work Alone!)
A rotatory joint is only as good as the system it's part of. To truly unlock its potential, pair it with other lean components that enhance its strengths. Here are three must-try combinations:
Aluminum Profiles for a Sturdy Base: Lean pipes are great, but for heavier loads or more precise alignment, aluminum profile (like 4040 or 3030 series) makes an excellent frame. Attach your rotatory joints to aluminum profiles using compatible brackets, and you've got a setup that's both lightweight and rigid. For example, an aluminum profile frame with a rotatory joint-mounted tool board—strong enough to hold power tools, flexible enough to angle toward you when you need it.
Roller Tracks for Smooth Material Flow: If your workstation feeds into a production line, you're probably using roller track to slide bins or products along. Mount the roller track to a pipe that's attached via a rotatory joint, and suddenly you can adjust the track's angle to match the height of the next workstation. No more lifting heavy bins over a misaligned track—just tilt, slide, and go. Pro tip: Use roller track placon mount for aluminum profile flat brackets to secure the track to the pipe; they'll keep it from slipping even when rotated.
Caster Wheels for Mobility (Yes, Even with Rotatory Joints): Want to move your workstation entirely? Add caster wheel to the base. But here's the key: Use locking casters, and position them so that the workstation's center of gravity stays low—even when you've swung rotatory components out. A wobbly workstation on wheels is a hazard; a stable one with rotatory joints? A mobile productivity machine.
Aluminum Profiles for a Sturdy Base: Lean pipes are great, but for heavier loads or more precise alignment, aluminum profile (like 4040 or 3030 series) makes an excellent frame. Attach your rotatory joints to aluminum profiles using compatible brackets, and you've got a setup that's both lightweight and rigid. For example, an aluminum profile frame with a rotatory joint-mounted tool board—strong enough to hold power tools, flexible enough to angle toward you when you need it.
Roller Tracks for Smooth Material Flow: If your workstation feeds into a production line, you're probably using roller track to slide bins or products along. Mount the roller track to a pipe that's attached via a rotatory joint, and suddenly you can adjust the track's angle to match the height of the next workstation. No more lifting heavy bins over a misaligned track—just tilt, slide, and go. Pro tip: Use roller track placon mount for aluminum profile flat brackets to secure the track to the pipe; they'll keep it from slipping even when rotated.
Caster Wheels for Mobility (Yes, Even with Rotatory Joints): Want to move your workstation entirely? Add caster wheel to the base. But here's the key: Use locking casters, and position them so that the workstation's center of gravity stays low—even when you've swung rotatory components out. A wobbly workstation on wheels is a hazard; a stable one with rotatory joints? A mobile productivity machine.
4. Ergonomics First—Your Back (and Wrists) Will Thank You
Let's talk about the human element. A workstation that's "flexible" but leaves you with a sore neck by lunch isn't doing its job. The beauty of rotatory joints is that they let you tailor the workstation to the person using it, not the other way around.
For example, adjustable height: If two operators share a workstation—one 5'4" and one 6'2"—a fixed-height tool rack will be uncomfortable for one (or both). Instead, mount the rack on a pipe attached to a rotatory joint, paired with a gas spring or a simple locking mechanism. Each operator can twist the joint to set the rack at elbow height for them, then lock it in place. No more hunching or reaching.
Or consider angle adjustment. Assembly tasks that require fine motor skills (like soldering or wiring) often benefit from a slight tilt—less strain on the wrists. Attach your work surface to a rotatory joint, and you can angle it 10-15 degrees for precision work, then flatten it back out for tasks that need a stable, level surface. It's the difference between forcing your body into the workstation's shape and the workstation shaping itself to you.
For example, adjustable height: If two operators share a workstation—one 5'4" and one 6'2"—a fixed-height tool rack will be uncomfortable for one (or both). Instead, mount the rack on a pipe attached to a rotatory joint, paired with a gas spring or a simple locking mechanism. Each operator can twist the joint to set the rack at elbow height for them, then lock it in place. No more hunching or reaching.
Or consider angle adjustment. Assembly tasks that require fine motor skills (like soldering or wiring) often benefit from a slight tilt—less strain on the wrists. Attach your work surface to a rotatory joint, and you can angle it 10-15 degrees for precision work, then flatten it back out for tasks that need a stable, level surface. It's the difference between forcing your body into the workstation's shape and the workstation shaping itself to you.
5. Don't Skimp on Maintenance (Chrome Deserves Love Too)
That shiny chrome finish isn't just for looks—it's a protective barrier. But like any barrier, it needs a little care to stay effective. A rusty joint won't rotate smoothly, and a grimy one will stick when you need it to swing. Here's how to keep your joints in top shape:
Wipe Them Down Weekly: A quick pass with a damp cloth (mild soap if there's grease) removes dust and debris that can gunk up the rotation mechanism. Avoid harsh chemicals—they'll strip the chrome.
Lubricate the Rotating Axle: Every few months, put a drop of machine oil on the pivot point (check the manufacturer's specs—some joints are sealed and don't need it). This keeps the rotation smooth, even after heavy use.
Check for Loose Bolts: Rotation can vibrate bolts loose over time. Give the joint a gentle wiggle every week; if it shifts more than it should, tighten the set screws (usually with an Allen wrench). A little preventative maintenance beats having to replace a joint mid-shift.
Wipe Them Down Weekly: A quick pass with a damp cloth (mild soap if there's grease) removes dust and debris that can gunk up the rotation mechanism. Avoid harsh chemicals—they'll strip the chrome.
Lubricate the Rotating Axle: Every few months, put a drop of machine oil on the pivot point (check the manufacturer's specs—some joints are sealed and don't need it). This keeps the rotation smooth, even after heavy use.
Check for Loose Bolts: Rotation can vibrate bolts loose over time. Give the joint a gentle wiggle every week; if it shifts more than it should, tighten the set screws (usually with an Allen wrench). A little preventative maintenance beats having to replace a joint mid-shift.

Traditional vs. Rotatory: A Quick Comparison
Still on the fence about whether rotatory joints are right for your setup? Let's put them head-to-head with traditional fixed joints in a quick table.
| Feature | Traditional Fixed Joints | One Side Rotatory Chrome Parallel Joints |
|---|---|---|
| Flexibility | Low—angle is fixed once installed. | High—rotates on one side for on-the-fly adjustments. |
| Stability | Excellent—no movement means minimal wobble. | Very good—parallel design and fixed side prevent instability when used correctly. |
| Best For | Static workstations with unchanging workflows. | Dynamic setups where tasks, tools, or operators change regularly. |
| Installation Time | Faster (bolt and done). | Slightly longer (requires aligning rotating and fixed ends). |
| Maintenance | Low—no moving parts to lubricate. | Moderate—occasional lubrication and bolt checks needed. |
The takeaway? If your workstation never changes, stick with fixed joints. But if you're tired of rebuilding setups every time your workflow shifts, rotatory joints are worth the small extra effort.

Real-World Win: A Shop That Cut Changeover Time by 40%
Let's ground this in a real example. A mid-sized automotive parts manufacturer I worked with had a problem: their assembly line switched between two product lines daily, and reconfiguring the
lean pipe workbench
s took over an hour. Tools had to be moved, material racks repositioned, and bins shifted—all with wrenches and a lot of grumbling.
We swapped out 80% of their fixed joints for one side rotatory chrome parallel lean pipe joints , focusing on the workstations that saw the most frequent changes. Here's what happened:
- Changeover time dropped from 65 minutes to 39 minutes : No more unbolting—operators just rotated the tool racks and material bins into place and locked them. - Operator satisfaction spiked : One tech joked, "It's like the workstation finally listens to me now." Less frustration meant fewer mistakes and better morale. - Fewer parts damaged during changeover : Before, rushing to rebuild often led to bins being dropped or tools knocked over. With rotatory joints, adjustments were smooth and controlled.
The best part? They didn't have to replace their entire lean system—just the joints on the components that needed to move. It was a low-cost upgrade with a massive ROI.
We swapped out 80% of their fixed joints for one side rotatory chrome parallel lean pipe joints , focusing on the workstations that saw the most frequent changes. Here's what happened:
- Changeover time dropped from 65 minutes to 39 minutes : No more unbolting—operators just rotated the tool racks and material bins into place and locked them. - Operator satisfaction spiked : One tech joked, "It's like the workstation finally listens to me now." Less frustration meant fewer mistakes and better morale. - Fewer parts damaged during changeover : Before, rushing to rebuild often led to bins being dropped or tools knocked over. With rotatory joints, adjustments were smooth and controlled.
The best part? They didn't have to replace their entire lean system—just the joints on the components that needed to move. It was a low-cost upgrade with a massive ROI.
Common Mistakes to Avoid (Learn from Others' Headaches)
Even with the best tips, it's easy to slip up. Here are three mistakes I've seen shops make—and how to steer clear:
Mistake #1: Over-Rotating (Yes, That's a Thing) Just because the joint can rotate 180 degrees doesn't mean it should. Swinging a heavy component all the way out can strain the joint or throw off the workstation's balance. Stick to the rotation range you actually need, and use a stop bracket if necessary to limit movement.
Mistake #2: Ignoring Weight Limits Every joint has a weight rating—don't guess. If you're mounting a shelf that holds 50 lbs, check the joint's specs to make sure it can handle that, even when rotated. Overloading leads to bent pipes, stripped threads, or worse.
Mistake #3: Forgetting About Clearance You rotate a component out, and suddenly it's hitting the wall or another workstation. Measure twice, rotate once. Before finalizing your design, simulate the full rotation range with a mockup (cardboard tubes work!) to ensure nothing gets in the way.
Mistake #1: Over-Rotating (Yes, That's a Thing) Just because the joint can rotate 180 degrees doesn't mean it should. Swinging a heavy component all the way out can strain the joint or throw off the workstation's balance. Stick to the rotation range you actually need, and use a stop bracket if necessary to limit movement.
Mistake #2: Ignoring Weight Limits Every joint has a weight rating—don't guess. If you're mounting a shelf that holds 50 lbs, check the joint's specs to make sure it can handle that, even when rotated. Overloading leads to bent pipes, stripped threads, or worse.
Mistake #3: Forgetting About Clearance You rotate a component out, and suddenly it's hitting the wall or another workstation. Measure twice, rotate once. Before finalizing your design, simulate the full rotation range with a mockup (cardboard tubes work!) to ensure nothing gets in the way.
Wrapping Up: Flexibility That Feels Human
At the end of the day, lean manufacturing isn't just about efficiency—it's about respecting the people who make the work happen. A workstation that bends, adjusts, and adapts isn't just a productivity tool; it's a signal that you care about making the job easier. And
one side rotatory chrome parallel lean pipe joints
are one of the simplest ways to send that message.
Start small: Pick one workstation that's due for a refresh, swap out a few joints, and see how it feels. Chances are, you'll wonder how you ever worked without that little twist of flexibility. And who knows? You might just inspire your team to dream up even more ways to make the workstation work for them—not the other way around.
So grab your pipes, your joints, and that workflow sketch. Your flexible, future-ready workstation starts now.
Start small: Pick one workstation that's due for a refresh, swap out a few joints, and see how it feels. Chances are, you'll wonder how you ever worked without that little twist of flexibility. And who knows? You might just inspire your team to dream up even more ways to make the workstation work for them—not the other way around.
So grab your pipes, your joints, and that workflow sketch. Your flexible, future-ready workstation starts now.