- Company Articles
- Products and Technology
- Product knowledge
- Designing Material Racks with 4040A EU Standard Aluminum Profile: Best Practices

Designing Material Racks with 4040A EU Standard Aluminum Profile: Best Practices
Related Product
4040A EU Standard Aluminum Profile
4040A is a 4.00x4.00 CM fractional 40 series square extrusion T-slot profile with four open T-slots, each side with 4.00cm face.
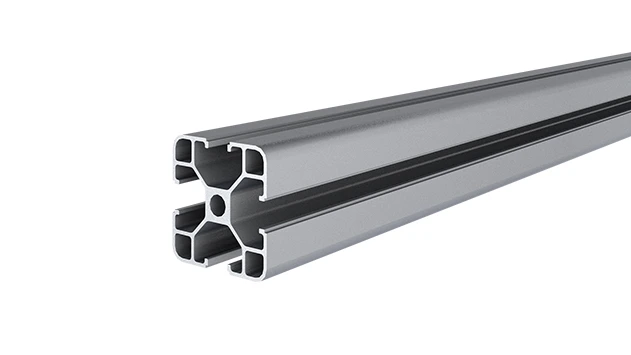
Walk into any well-run warehouse, factory, or production, and you'll quickly spot the unsung heroes keeping operations smooth: material racks. These structures aren't just metal frames—they're the backbone of organization, ensuring tools, parts, and products are easy to find, quick to access, and safely stored. But here's the thing: not all material racks are created equal. A poorly designed rack can turn a busy workspace into a maze of inefficiency, wasting time, space, and even risking workplace accidents. That's where the 4040A EU Standard Aluminum Profile comes in. Lightweight yet sturdy, endlessly adaptable, and built to last, it's the go-to choice for anyone serious about building a material rack that works as hard as your team does. Let's dive into how to design one right.
Why 4040A EU Standard Aluminum Profile? Let's Break It Down
Before we jump into design steps, let's talk about why this specific profile deserves a spot in your project. The 4040A isn't just another piece of aluminum—it's a product of EU engineering standards, meaning it's been tested for consistency, durability, and performance. At 40mm x 40mm, it strikes that sweet spot between size and versatility, making it ideal for material racks that need to handle everything from small components to heavier industrial parts.
First, aluminum itself is a game-changer. Unlike steel, it's lightweight, which means you can assemble and reconfigure the rack without needing a forklift or extra hands. But don't let the "lightweight" tag fool you—this stuff is tough. Aluminum resists corrosion, so even in humid warehouses or outdoor loading areas, your rack won't rust or weaken over time. And let's not forget the T-slot design. Those grooves running along the profile's length? They're like built-in connection points, letting you attach brackets, guide rails, roller tracks, and accessories without drilling or welding. It's modularity at its finest—swap parts, add layers, or re shape the rack as your needs change, no special tools required.
To put it simply: 4040A aluminum profile gives you the strength of steel, the flexibility of plastic, and the longevity of industrial-grade materials—all in one package.
Key Components: The Building Blocks of Your Material Rack
Designing a material rack with 4040A profile isn't just about the profile itself—it's about choosing the right accessories to turn that aluminum frame into a functional system. Let's walk through the must-have components and what to look for when picking them.
| Component | What It Does | Pro Tip for Selection |
|---|---|---|
| 4040A EU Standard Aluminum Profile | Forms the main structural frame (vertical posts, horizontal beams, shelves). | Opt for 3m or 6m lengths to minimize cutting; check load ratings (typically 200-300kg per linear meter for standard grades). |
| Aluminum Profile Accessories | Includes joints, brackets, end caps, and T-slot nuts. Joints connect profile segments at angles; brackets attach shelves or guide rails. | Use internal rotatory aluminum joints for corners that need slight adjustment; end caps protect against sharp edges and dust buildup. |
| Aluminum Guide Rail A & B | Guides items along shelves or roller tracks, preventing slips and ensuring smooth movement. | Guide Rail A works for lighter items (e.g., small parts bins); Guide Rail B, with its reinforced design, handles heavier loads (up to 50kg per linear meter). |
| Roller Track Placon Mount for Aluminum Profile Flat | Secures roller tracks to the 4040A profile, creating sliding shelves for easy item retrieval. | Ensure the mount's T-slot size matches your profile (40mm); choose "flat" mounts for flush, stable connections to horizontal beams. |
| Swivel Roller Balls (1 Inch) | Small, rotating balls embedded in shelves or tracks, letting items glide with minimal effort. | Use 1-inch balls for larger, heavier items (e.g., toolboxes); 0.5-inch balls work for smaller parts like electronics components. |
Think of these components as a team—each has a role, and choosing the right ones ensures your rack isn't just strong, but also tailored to your specific needs. For example, if you're storing fragile items, soft plastic roller track guide rails (yellow or grey) can prevent scratches, while steel wheels are better for industrial parts that need to withstand rough handling.

Step-by-Step Design: From Idea to Rack
Designing a material rack shouldn't feel like solving a puzzle. With a clear process, you can create a rack that fits your space, budget, and workflow. Let's break it down into actionable steps.
Step 1: Map Out Your Needs (No Guesswork Allowed)
Start by asking: What will this rack hold? How heavy are the items? How often will they be accessed? For example, if you're storing automotive parts, you'll need higher load capacities than if you're organizing office supplies. Measure the largest items—length, width, height—to ensure shelves are deep and tall enough. Don't forget space constraints: How much floor area do you have? Will the rack need to fit through doorways or around machinery? Sketch a quick layout (even on graph paper) to visualize dimensions.
Step 2: Choose Your 4040A Profile Configuration
Vertical posts: These are the "legs" of your rack. For stability, space them 80-120cm apart (wider spacing may require cross-bracing). Horizontal beams: Connect the posts to form shelves. For a 3-row rack, you'll need 3 horizontal beams per shelf level. Shelf levels: Decide how many floors you need—3 is standard for most warehouses, but adjust based on item height. Pro tip: Leave 15-20cm of clearance between shelf levels to make grabbing items easier.
Step 3: Add Guides, Tracks, and Roller Balls
Now, make the rack work for you. If items are slid in and out frequently, add roller tracks using roller track placon mount for aluminum profile flat—these mounts lock securely into the 4040A's T-slots, keeping tracks stable. Pair tracks with aluminum guide rail B for heavy items (like metal components) or plastic guide rails for lighter, delicate parts. For irregularly shaped items, swivel roller balls (1 inch) embedded in shelves let you pivot and position items without lifting.
Step 4: Assemble and Test (Yes, Test!)
Aluminum profiles are easy to assemble—no welding, just T-slot nuts and bolts. Start with the vertical posts, securing them to the floor with aluminum foot bases for stability. Then attach horizontal beams, followed by shelves, tracks, and guides. Once built, test it: Load the shelves with items (even slightly over your estimated weight) and check for wobbling or bending. Tighten joints if needed—better to fix it now than after it's in use.
Quick Note: Don't skip the "test load" step! A rack that looks stable might sag under real-world weight. Use sandbags or actual items you'll store to simulate daily use.
Real-World Example: Material Rack B (3 Row and 3 Floor)
Let's put all this into context with a common scenario: designing Material Rack B, a 3-row, 3-floor system used in electronics manufacturing to store circuit boards, small tools, and assembly parts. Here's how the 4040A profile makes it work.
Specs for Material Rack B
- Dimensions: 180cm (height) x 120cm (width) x 45cm (depth)
- Load Capacity: 150kg per shelf (total 450kg for 3 floors)
- Components Used: 4040A profiles (vertical posts: 180cm; horizontal beams: 120cm), Aluminum Guide Rail B (to prevent circuit boards from sliding), Roller Track Placon Mount for Aluminum Profile Flat (securing tracks to beams), Swivel Roller Balls 1 Inch (on middle shelf for easy tool access), Internal Rotatory Aluminum Joints (for stable 90° corners).
Why this setup works: The 3-row design maximizes horizontal space, while 3 floors keep items organized by frequency of use (top shelf for rarely used parts, middle for daily tools, bottom for heavy equipment). The 4040A posts and beams handle the 150kg per shelf load without bending, and the T-slot system lets the team add extra brackets or adjust shelf heights if they start storing larger components later. Plus, the aluminum construction means the rack is light enough to move (with casters, if needed) but tough enough to last in a busy factory environment.
Result? The manufacturing team reduced part retrieval time by 25%—no more digging through disorganized bins. And because the rack is modular, they've since added a small side shelf using leftover 4040A profiles and a few extra brackets. That's the beauty of aluminum profile design: it grows with your needs.
Maintenance: Keep Your Rack in Top Shape
A well-built material rack shouldn't need constant repairs, but a little maintenance goes a long way. Here's how to keep your 4040A aluminum profile rack working like new:
- Clean Regularly: Wipe down profiles with a damp cloth to remove dust and debris—this prevents buildup in T-slots, which can jam accessories. For greasy environments (like auto shops), use a mild degreaser, then dry thoroughly.
- Check Joints Quarterly: Tighten any loose bolts or joints. Aluminum expands and contracts slightly with temperature changes, so a quick once-over every few months keeps connections secure.
- Lubricate Moving Parts: Roller tracks and swivel balls need occasional lubrication (use silicone spray or light machine oil) to keep movement smooth. Avoid heavy greases—they attract dust.
- replace Worn Components: If a roller wheel cracks or a guide rail bends, swap it out ASAP. Most aluminum profile suppliers stock replacement parts, so you won't need to rebuild the entire rack.
Wrapping Up: Your Turn to Build
Designing a material rack with 4040A EU Standard Aluminum Profile isn't just about putting metal together—it's about creating a system that makes your workspace smarter, safer, and more efficient. By starting with clear needs, choosing the right components (like Aluminum Guide Rail B or Roller Track Placon Mounts), and following a step-by-step assembly process, you'll end up with a rack that's not just functional, but also adaptable to whatever the future brings.
Remember, the best material racks are the ones that fade into the background—you don't notice them until you need them, and when you do, they just work. With 4040A aluminum profile, that's exactly what you'll get: a reliable, long-lasting solution that lets your team focus on what matters most—getting the job done.
So grab your measuring tape, sketch out that layout, and start building. Your future self (and your workflow) will thank you.