- Company Articles
- Products and Technology
- Installation And Maintenance
- Disassembly & Reassembly of Four Way Straight Lean Pipe Joint for Line Reconfiguration

Disassembly & Reassembly of Four Way Straight Lean Pipe Joint for Line Reconfiguration
Related Product
Four Way Straight Lean Pipe Joint
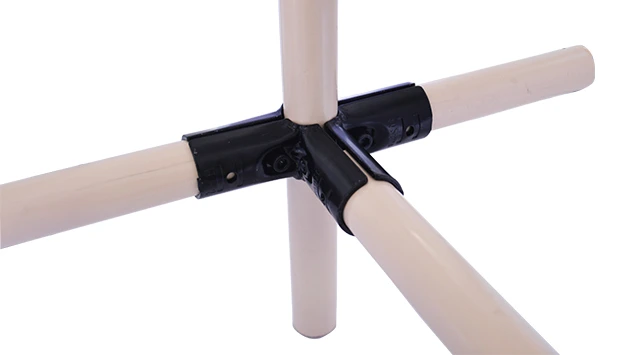
Four way lean pipe joint for 4 pcs 28MM lean pipe connection in straight angle, which used widely in workbench, flow rack, hand trolley frame connection.
It's a Tuesday morning on the factory floor, and Maria—your production supervisor—leans against the metal frame of the assembly line, frowning at her clipboard. The new product launch is two weeks away, and the current layout just isn't cutting it. Materials are piling up at Station 3, operators are stretching to reach tools across the workbench, and the bottleneck is slowing down the entire production assemble process. "We need to reconfigure," she says, nodding toward the maze of silver pipes and joints holding the line together. "Starting with that four-way connection by the conveyor."
If you've ever worked in manufacturing, you know the scene. Lean systems thrive on adaptability, but that adaptability hinges on the small, often overlooked components that hold everything together. Enter the four way straight lean pipe joint —a unassuming yet critical piece of hardware that's the backbone of flexible lean pipe structures. Whether you're rearranging a workbench, reconfiguring a flow rack, or overhauling an entire assembly line, knowing how to properly disassemble and reassemble this joint can mean the difference between a smooth transition and hours of frustration (not to mention a wobbly, unsafe setup).
In this guide, we'll walk through the ins and outs of handling the four way straight lean pipe joint—from understanding its role in your lean system to step-by-step disassembly, pro tips for reassembly, and real-world lessons learned from production floors just like yours. Let's dive in.
Understanding the Four Way Straight Lean Pipe Joint: The Unsung Hero of Lean Systems
Before we grab our wrenches, let's take a minute to appreciate what makes this joint so essential. At first glance, it might look like just another metal connector—but in the world of lean manufacturing, it's the Swiss Army knife of flexibility.
A standard four way straight lean pipe joint (often chrome-plated, as you'll find in most industrial settings) is a cylindrical or square metal component with four equally spaced ports, each designed to fit a lean pipe (typically 28mm in diameter for standard models). These ports are aligned at 90-degree angles, allowing you to connect four pipes in a cross or "T" shape—though "straight" here refers to the linear alignment of the ports, not the joint's overall shape. Think of it as the central hub where multiple sections of your lean structure meet: a workbench leg might connect to a shelf bracket, which connects to a material rack, all via this joint.
What makes it indispensable? Unlike fixed welding or rigid brackets, this joint lets you adjust, extend, or reposition pipes with minimal effort. Need to raise a workbench by 6 inches? Loosen the joint, slide the pipe up, retighten. Adding a new shelf for tools? Screw in an extra pipe to the fourth port. It's this modularity that keeps lean systems agile—perfect for adapting to new products, shifting demand, or process improvements.
But here's the catch: its simplicity is also its Achilles' heel. A poorly disassembled joint can bend pipes, strip threads, or warp the ports. A haphazardly reassembled one? It might hold for a day, but under the weight of boxes, tools, or constant operator use, it'll loosen—leading to wobbly structures, safety hazards, and yes, those dreaded production bottlenecks Maria was stressing about.
When to Disassemble: Signs Your Line Needs a Reconfiguration
Not every creak or misalignment calls for tearing apart your lean structure. But certain red flags mean it's time to grab your toolkit and start adjusting. Here are the most common scenarios where disassembly of a four way joint becomes necessary:
- Bottlenecks in Production Flow: If materials are stacking up at a workstation or operators are waiting for tools/parts, the layout likely isn't optimized. Reconfiguring the joint to shorten distances between stations can cut down on wait times.
- Safety Concerns: A joint that's loose (you can wiggle the pipes by hand) or showing signs of wear (rust, cracks, or stripped bolts) is a liability. Disassemble to inspect, clean, or replace components before someone gets hurt.
- New Product Introductions: Different products often require different workflows. A joint that once supported a small electronics assembly might need to hold heavier components for a new appliance line—calling for a sturdier setup.
- Efficiency Audits: After a lean audit, you might identify wasted motion (e.g., operators walking 10 feet for supplies). Reconfiguring the joint to bring tools closer can reduce steps and boost productivity.
For Maria's team, it was a mix of bottlenecks and new product needs. The existing joint setup forced operators to reach across a 4-foot gap to grab circuit boards from the flow rack—a motion that was slowing them down and increasing the risk of dropped parts. By repositioning the four way joint, they could shorten that gap to 2 feet, cutting down on wasted movement and making the line safer.

Tools You'll Need: Assembling Your "Joint Toolkit"
Disassembling and reassembling a four way joint isn't rocket science, but using the wrong tools can turn a 30-minute job into a 2-hour headache (and a damaged joint). Here's what you'll need, along with why each tool matters:
| Tool Name | Function | Pro Tip |
|---|---|---|
| Adjustable Wrench (8-10 inch) | Loosening/tightening the joint's locking bolts | Look for a wrench with a rubber grip—you'll be applying force, and slippery hands lead to stripped bolts. |
| Rubber Mallet | Gently tapping pipes loose from the joint (avoiding damage) | Never use a steel hammer—you'll dent the pipe or crack the joint's ports. |
| Thread Cleaner (Wire Brush or Tap) | Removing rust, debris, or old thread locker from bolt threads | A toothbrush works in a pinch for small debris, but a dedicated thread tap ensures clean, tight reassembly. |
| Torque Wrench (Optional but Recommended) | Ensuring bolts are tightened to the correct tension (typically 15-20 Nm for chrome-plated joints) | Over-tightening can warp the joint; under-tightening leads to looseness. A torque wrench takes the guesswork out. |
| Marker/Label Tape | Marking pipe positions before disassembly (to avoid misalignment later) | Color-code if you're working with multiple joints—e.g., red tape for "top pipe," blue for "left pipe." |
| Safety Glasses & Gloves | Protecting eyes from flying debris and hands from sharp edges/rust | Chrome-plated joints can have sharp burrs—leather gloves offer better grip than latex. |
Pro Tip: Keep a small container handy to hold bolts, washers, and small parts. There's nothing worse than losing a 5mm bolt in the sawdust on the factory floor mid-job.

Step-by-Step Disassembly: Taking It Apart Without Breaking It
Disassembling a four way joint is a lesson in patience. Rushing leads to mistakes, so take your time—especially if the joint has been in place for months (or years) and is caked in grease, dust, or rust. Here's how to do it right:
1. Prep the Area
Start by clearing the space around the joint. Remove any materials, tools, or debris from the workbench/rack to avoid tripping. If the joint is supporting a heavy load (e.g., a shelf with boxes), always unload it first. A 50-pound box falling on your foot is a surefire way to ruin the day (and your productivity).
Next, take photos of the joint from multiple angles. Even with marker labels, a visual reference helps during reassembly—especially if you're reconfiguring multiple joints at once. Maria's team learned this the hard way after disassembling three joints and forgetting which pipe went where. "We spent 45 minutes just trying to match the photo to the parts," she laughs.
2. Mark Pipe Positions
Grab your marker or label tape and mark each pipe where it enters the joint. For example, if the joint has pipes pointing north, south, east, and west, label them "N," "S," "E," "W" on both the pipe and the joint itself. This ensures you'll realign them correctly later—critical for maintaining the structure's stability.
Pro Tip: If you're reconfiguring the layout (e.g., moving the "north" pipe to a higher position), mark the new position on the pipe too. A quick "N-new: 6in up" saves confusion during reassembly.
3. Loosen the Locking Bolts
Most four way straight lean pipe joints have 2-4 locking bolts (one per port) that secure the pipes in place. These bolts are usually hexagonal and located on the side of the joint, perpendicular to the pipe. Using your adjustable wrench, turn each bolt counterclockwise to loosen it. Go slow—if the bolt is stuck (thanks to rust or thread locker), apply a few drops of penetrating oil (like WD-40) and let it sit for 5-10 minutes. Forcing a stuck bolt will strip the threads, rendering the joint useless.
Note: Some joints have "quick-release" levers instead of bolts—common in lightweight aluminum setups. These are simpler: just flip the lever up to release tension. But even with levers, check for stubbornness—dust or debris can jam the mechanism.
4. Detach the Pipes
Once the bolts are loose, it's time to remove the pipes. Start with the pipe that has the least tension—usually the one that's not supporting weight. Grip the pipe firmly with one hand and tap the joint gently with the rubber mallet (on the opposite side of the pipe) to loosen it. If it's still stuck, wiggle the pipe back and forth slightly while pulling—this breaks the seal between the pipe and joint.
Warning: Never pull with all your strength! If the pipe doesn't budge after a few taps, check if you missed a bolt (some joints have hidden bolts on the bottom). Forcing it can bend the pipe or crack the joint's port.
Repeat this process for the remaining pipes until the joint is free. Set the pipes aside (lean them against a stable surface to avoid rolling) and inspect the joint for damage—more on that next.
5. Clean and Inspect the Joint
Now that the joint is disassembled, take a minute to clean it. Wipe away grease and dust with a rag, then use the thread cleaner to remove rust or debris from the bolt holes and pipe ports. This is also your chance to inspect for wear:
- Cracks or Dents: A cracked joint is unsafe—replace it immediately. Dents in the ports can prevent pipes from seating properly.
- Stripped Threads: If the bolts spin without tightening/loosening, the threads are stripped. You can try helicoil inserts, but for critical joints, replacement is better.
- Rust: Surface rust is fine (clean it off with a wire brush), but deep rust that weakens the metal means it's time for a new joint.
Maria's team found a surprise during inspection: a tiny crack in one port of their joint. "We would've never noticed if we hadn't disassembled it," she says. "That crack could've given way under the weight of the circuit boards—disaster averted."
Reassembly: Putting It All Back Together (Sturdier Than Before)
Reassembly is where the magic happens—turning a pile of pipes and a joint into a stable, functional part of your lean system. The key here is precision: misaligned pipes or loose bolts will come back to haunt you. Follow these steps for a rock-solid setup:
1. Prep the Pipes and Joint
Before reassembly, clean the ends of the pipes with a rag to remove dirt or debris—this ensures a tight fit in the joint. If you're reusing the same joint, apply a thin layer of anti-seize lubricant to the bolt threads (this prevents rust and makes future disassembly easier). For new joints, skip the lubricant—most come pre-treated with a light coating.
If you're adjusting pipe lengths (e.g., cutting a pipe shorter for the new layout), now's the time. Use a pipe cutter (not a hacksaw—they leave rough edges) and deburr the cut end with a file to avoid sharp edges that could tear gloves or snag materials.
2. Align the Pipes Using Your Marks
Refer back to your labels and photos to position the pipes in the joint. Slide each pipe into its marked port until it hits the stop (most joints have an internal lip that prevents over-insertion). For stability, pipes should insert at least 1.5 inches into the joint—any less, and they'll wobble.
Pro Tip: If you're reconfiguring the layout (e.g., angling a pipe upward), use a level to ensure pipes are straight/vertical. A crooked pipe puts uneven stress on the joint, leading to premature wear.
3. Tighten the Bolts (The Right Way)
Here's where many people go wrong: tightening bolts in the wrong order. Always tighten in a cross pattern (e.g., north, south, east, west) to distribute pressure evenly. This prevents the joint from warping and ensures all pipes are secured equally.
Start by hand-tightening each bolt until it's snug, then use the adjustable wrench to give it a ¼-turn more. If you have a torque wrench, set it to 15-20 Nm (check the joint manufacturer's specs—some heavy-duty joints require more torque). Avoid over-tightening—this can strip threads or crack the joint.
Once tight, give each pipe a gentle tug to test stability. It should not move—if it does, loosen the bolt, reposition the pipe, and retighten.
4. Test the Structure
With the joint reassembled, it's time to test the entire structure. Load it with the materials/tools it will support during production (e.g., place boxes on the shelf, tools on the workbench) and check for wobbling. Walk around the structure and push gently on different sides—if it shifts, the joint (or another component) is loose.
For extra peace of mind, have an operator simulate their workflow. If they lean on the workbench or reach across it, does the joint hold? A stable joint shouldn't budge—even under normal use.
Pro Tips for Success: Lessons from the Factory Floor
After disassembling and reassembling dozens of four way joints, Maria's team has learned a thing or two. Here are their top tips to make the process smoother:
1. Use Thread Locker Sparingly
Thread locker (like Loctite) can prevent bolts from loosening over time, but a little goes a long way. Apply one drop to the bolt threads before tightening—too much can seep into the joint and make future disassembly nearly impossible.
2. Train Your Team
You don't need to be a mechanic to handle a joint, but basic training prevents mistakes. Hold a 15-minute workshop to walk operators through disassembly/reassembly—you'll save time when reconfigurations are needed.
3. Keep Spare Joints on Hand
Nothing kills momentum like discovering a cracked joint and having to wait for a replacement. Stock a few extra four way straight lean pipe joints in your maintenance closet—they're cheap insurance against downtime.
4. Document the Layout
After reassembly, update your line layout diagram to reflect the new configuration. Include measurements (e.g., "Joint A: 36 inches from floor") and photos—this helps next time you need to reconfigure.
Real-World Case Study: Reconfiguring for the New Product Launch
Let's circle back to Maria's team. Two weeks after reconfiguring the four way joint, the new product launch went off without a hitch. Here's how it played out:
The Problem: The existing assembly line had a 4-foot gap between the material rack and workstation, forcing operators to walk 8 steps round-trip for parts. This added 2 minutes per unit, leading to a bottleneck.
The Fix: Disassemble the four way joint connecting the material rack to the line, reposition the rack 2 feet closer, and reassemble the joint with shorter pipes. This cut the gap to 2 feet, eliminating the extra steps.
The Result: Operator movement decreased by 50%, and production speed increased by 12%—all because of a 30-minute joint reconfiguration. "We went from struggling to meet daily quotas to exceeding them," Maria says. "And the joint? It's still rock-solid three months later."
Troubleshooting Common Issues
Even with careful work, problems can pop up. Here's how to fix the most common reassembly headaches:
- Pipes Won't insert into the Joint: Check for debris in the port (clean it out) or a bent pipe (replace the pipe if bent). If the port is dented, use a round file to gently reshape it (be careful not to widen it too much).
- Joint is Wobbly After Reassembly: Pipes are likely misaligned. Disassemble, realign using your marks, and retighten bolts in a cross pattern.
- Bolts Keep Stripping: The threads are damaged. replace the joint or use helicoil inserts (for non-critical applications).
- Pipes Slip Out During Use: Bolts are under-tightened. Use a torque wrench to ensure proper tension, or apply thread locker to prevent loosening.
Conclusion: The Joint That Keeps Your Lean System Moving
At the end of the day, the four way straight lean pipe joint is more than just a piece of metal—it's the glue that holds your lean system together. When you take the time to disassemble and reassemble it properly, you're not just fixing a joint; you're investing in the flexibility, safety, and efficiency of your entire production line.
So the next time Maria (or your supervisor) says, "We need to reconfigure," you'll be ready. Grab your wrench, mark your pipes, and remember: patience and precision make all the difference. After all, a well-built lean system isn't just about the big machines—it's about the small joints that let you adapt, grow, and keep production assemble moving forward.
Now go out there and build something better.