- Company Articles
- Products and Technology
- Installation And Maintenance
- DIY Guide: Installing Lean Pipe Clamp B Chrome Without Professional Help

DIY Guide: Installing Lean Pipe Clamp B Chrome Without Professional Help
Related Product
Lean Pipe Clamp B Chrome
Lean pipe clamp is used for turnover trolley, workbench, flowrack adjust the frame or fix some accessory.
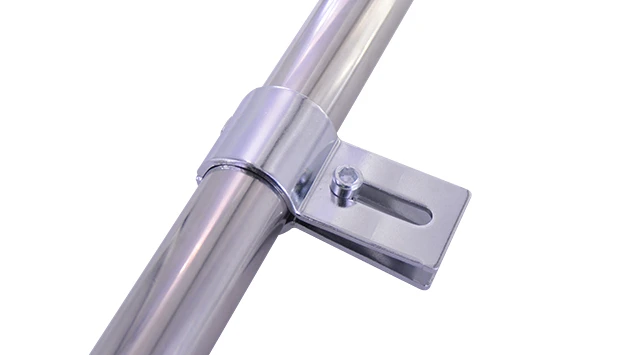
Ever walked into a workshop, garage, or manufacturing space and thought, "I wish I could organize my tools/parts/materials that efficiently"? Chances are, what caught your eye was a lean pipe system—those versatile, modular structures made from pipes and joints that keep everything within arm's reach. And at the heart of many of those systems are components like the lean pipe clamp B chrome. These clamps are the unsung heroes that hold the whole setup together, ensuring stability while keeping the design flexible enough to adapt to your needs.
But here's the thing: hiring a professional to install these systems can cost a pretty penny. Between labor fees and markups on parts, you might end up spending far more than necessary. The good news? Installing a lean pipe clamp B chrome yourself is totally doable—even if you're not a seasoned DIYer. With a little patience, the right tools, and this step-by-step guide, you'll be building custom workbenches, flow racks, or storage solutions in no time. Let's dive in.
Why Bother Installing It Yourself?
Before we get our hands dirty, let's talk about why DIYing this project is worth your time. First off, cost savings . Professional installation can add 50-100% to the total project cost—money you could spend on better tools, more materials, or that fancy new tool chest you've been eyeing. Second, customization . When you do it yourself, you're not limited to pre-designed "one-size-fits-all" setups. Need a workbench that's exactly 36 inches tall to match your height? A flow rack with extra shelves for bulky parts? You call the shots. Third, empowerment . There's something incredibly satisfying about standing back and thinking, "I built that." Plus, if you ever need to tweak or expand the system later, you'll already know how it all works.
And let's not forget: lean pipe systems are designed to be user-friendly. The lean pipe clamp B chrome, in particular, is engineered for easy assembly—no welding, no specialized training, just a few simple tools and a willingness to learn. So grab your gloves, and let's get started.
Tools and Materials: Gather Your Supplies
Before you start, you'll need to round up a few tools and materials. Don't worry—most of these are probably already in your toolbox. If not, they're easy to find at hardware stores or online suppliers (we'll mention a few key materials, like the lean pipe clamp B chrome itself, that you'll need to source from a lean pipe supplier).
| Item | Purpose | Notes |
|---|---|---|
| Lean Pipe Clamp B Chrome | Secures pipes to joints or other components | Chrome-plated for corrosion resistance; ensure it fits your pipe diameter (typically 28mm) |
| Lean Pipe Joint | Connects pipes at angles (90°, 45°, straight, etc.) | Choose based on your structure (e.g., 90° for corners, straight for extensions) |
| Aluminum Profile | Creates flat surfaces (workbench tops, shelves) | Lightweight, durable, and compatible with T-slot accessories |
| Caster Wheel | Adds mobility to structures (optional) | Opt for brake-equipped wheels for stability; check weight capacity |
| Adjustable Wrench | Tightening clamp screws and joint fasteners | 10-inch size works best for most lean pipe components |
| Measuring Tape | Ensuring pipes and profiles are cut to correct length | Retractable 25-foot tape with lock for precision |
| Level | Keeping structures straight and even | 2-foot bubble level for checking horizontal/vertical alignment |
| Rubber Mallet | Gently tapping joints into place without damage | Avoid metal hammers to prevent scratches on chrome or pipes |
| Marker/Pencil | Marking pipe positions and clamp placement | Fine-tip marker for lines on pipes |
| Clean Cloth | Removing dust/oil from pipes and clamps | Microfiber cloths prevent lint residue |
| Thread Locker (Optional) | Prevents screws from loosening over time | Use medium-strength (blue) for adjustable setups; avoid permanent (red) if you plan to reconfigure |
Pro tip: Lay out all your materials on a flat surface before starting. This way, you can double-check that you have everything you need—and avoid mid-project trips to the store.
Step-by-Step Installation: Let's Build Something Great
Now that you have your tools and materials, it's time to start installing. We'll walk through the process of attaching a lean pipe clamp B chrome to a pipe, connecting it to a lean pipe joint, and even integrating it into a simple structure (like a mini workbench) with aluminum profile and caster wheels. Let's take it one step at a time.
Step 1: Prepare Your Workspace
First things first: set yourself up for success with a clean, organized workspace. Clear a flat surface (a table, workbench, or even the floor) where you can lay out your pipes and parts. If you're working on the floor, put down a drop cloth or old towel to protect both your materials (no scratches on that chrome finish!) and your flooring.
Next, measure the area where your final structure will go. Let's say you're building a small workbench for your garage. Measure the length, width, and height you want, and jot those numbers down. This will help you cut your pipes to the right size later (if needed). For now, just focus on getting the clamp installed—we'll assemble the full structure once the clamps are secure.
Pro tip: If you're new to this, start small. A simple 2-foot by 2-foot frame will teach you the basics without overwhelming you. You can always expand later!
Step 2: Inspect Your Lean Pipe Clamp B Chrome and Parts
Before you start tightening anything, take a minute to inspect your lean pipe clamp B chrome. Check for any defects: cracks in the metal, rough edges, or chipped chrome (though a little scuffing is normal—chrome is durable, but shipping can be tough). The clamp should have a smooth, even finish, and the screw threads should be clean and free of debris.
Next, look at your lean pipe joint. Most joints are made of metal (often zinc-plated or chrome) and have holes where the pipes fit. Make sure the joint's holes are the right size for your pipe—most lean pipes are 28mm in diameter, but double-check the specs from your supplier. If the hole is too small, the pipe won't fit; too large, and the joint will be loose.
Finally, wipe down your pipe with a clean cloth. Dust, oil, or grease can prevent the clamp from gripping properly, so you want the surface to be as clean as possible. A quick wipe with rubbing alcohol (if it's really grimy) will do the trick, but water and a cloth usually work fine.
Step 3: Mark Where the Clamp Will Go
Now, take your pipe and decide where to place the clamp. Let's say you're attaching a vertical pipe to a horizontal pipe (a common setup for workbench legs). The clamp will go at the intersection point. Use your marker to draw a small line around the pipe where the clamp's edge will sit. This ensures the clamp is centered and aligned—no wobbly structures here!
If you're using a lean pipe joint (like a 90° elbow joint), slide the joint onto the horizontal pipe first, then position it where you want the vertical pipe to connect. The clamp will secure the vertical pipe to the joint. Mark the vertical pipe where it meets the joint's hole—this is where the clamp will go.
Take a step back and double-check your marks. Use a level to make sure the lines are straight (if you're working with vertical and horizontal pipes). A few extra seconds here will save you from having to redo the whole thing later.
Step 4: Attach the Lean Pipe Clamp B Chrome to the Pipe
Okay, here's the moment you've been waiting for: installing the clamp. Slide the lean pipe clamp B chrome onto the pipe, aligning its edge with the mark you drew. The clamp should fit snugly but not so tight that you can't move it slightly (you'll want to adjust it once the joint is in place). Most clamps have two halves connected by a hinge, with a screw or bolt that tightens them together. Open the clamp, place it around the pipe, and close it so the screw holes line up.
Now, take your adjustable wrench and start tightening the screw. Turn it clockwise until you feel resistance, but don't overtighten yet—you'll need to adjust the position once the joint is attached. The goal here is to hold the clamp in place while you connect it to the joint.
If your clamp has a "tooth" or grip pad inside (many do), make sure it's facing the pipe. This tooth digs into the pipe slightly, preventing slippage. If it's facing the wrong way, the clamp won't hold as well—so double-check that!
Pro tip: If the screw is hard to turn, apply a tiny drop of lubricant (like WD-40) to the threads. Just don't get any on the pipe itself—that will defeat the grip pad's purpose.
Step 5: Connect the Clamp to the Lean Pipe Joint
Now it's time to bring in the lean pipe joint. Let's say you're using a 90° straight lean pipe joint (a common choice for corners). Slide the joint onto the horizontal pipe (the one without the clamp) until it's positioned where you marked earlier. Then, take the vertical pipe (with the clamp already on it) and insert its end into the joint's perpendicular hole. You might need to wiggle it a bit to get it fully seated—don't force it! If it's stuck, check that the pipe is clean and the joint isn't bent.
Once the vertical pipe is in the joint, adjust the clamp so it sits flush against the joint. The clamp's outer edge should line up with the joint's surface—this ensures the weight is distributed evenly, preventing stress on the clamp or pipe. Now, grab your wrench again and tighten the clamp's screw slowly . Turn it a quarter-turn, then check the alignment. If the pipe starts to twist, loosen the screw slightly, realign, and try again.
How tight is tight enough? You should be able to grip the vertical pipe and try to twist it—if it moves, tighten the screw a bit more. If the pipe stays solid, you're good. Overtightening can strip the threads or even bend the clamp, so go slow.
Step 6: Add Aluminum Profile (For a Workbench Top, Shelf, or Surface)
Now that you've got the basic frame (two pipes connected by a clamp and joint), let's add a functional surface using aluminum profile. Aluminum profiles are lightweight, strong, and easy to cut to size, making them perfect for workbench tops or shelves. Plus, they come with T-slots that let you attach accessories like tool holders or bins later.
Measure the length of the surface you want (e.g., a 3-foot workbench top). Cut the aluminum profile to that length using a hacksaw or miter saw (if you don't have a saw, many suppliers will cut it for you if you ask). Then, position the profile on top of your horizontal pipes. To attach it, you can use additional lean pipe clamps (smaller ones work best) or T-slot nuts and bolts that fit into the profile's slots.
Place a clamp every 12-18 inches along the profile to ensure it's secure. Tighten each clamp just like you did earlier—snug but not overly tight. Once all clamps are in place, use your level to check that the profile is flat. If it's wobbly, adjust the clamps until the bubble is centered.
Now you've got a basic workbench frame with a solid top! Pat yourself on the back—you're halfway there.
Step 7: Add Mobility with Caster Wheels (Optional)
Want your new structure to roll around? Adding caster wheels is easier than you think. Start by flipping your frame upside down so the bottom pipes are facing up. Then, attach caster wheel mounts (small plates with holes) to the bottom corners using—you guessed it—more lean pipe clamps or bolts. Most caster wheels come with their own mounting hardware, so follow the instructions that came with yours.
Once the mounts are secure, screw the caster wheels into place. Make sure at least two of the wheels have brakes—this will keep your structure from rolling away when you're using it. Test the wheels by gently pushing the frame—they should roll smoothly without wobbling. If a wheel is stuck, check that the mount is tight and the wheel isn't bent.
Pro tip: For heavier structures (like a workbench loaded with tools), use heavy-duty caster wheels with a higher weight capacity. Look for wheels rated for at least 50 pounds each—four of them will handle 200 pounds easily.
Step 8: Test the Structure and Make Adjustments
You're almost done! Now it's time to test your handiwork. Stand the structure upright (if you added caster wheels, lock the brakes first). Gently shake it—does it wobble? If yes, check the clamps and joints. Are any screws loose? Tighten them. Is a pipe misaligned? Loosen the clamp, realign the pipe, and retighten.
If you built a workbench, place a few heavy objects on top (a toolbox, a bag of bolts, etc.) to test the weight capacity. The aluminum profile should hold without bending, and the clamps shouldn't slip. If something feels off, don't ignore it—better to fix it now than have the whole thing collapse later.
Once you're happy with the stability, take a step back and admire your work. You just installed a lean pipe clamp B chrome and built a functional structure—all without paying a pro. Nice job!
Troubleshooting: Common Issues and How to Fix Them
Even the best DIYers run into hiccups. Here are some common problems you might encounter and how to solve them:
- The clamp keeps slipping: This is usually due to a dirty pipe or a loose screw. Wipe the pipe again with a clean cloth, then tighten the clamp screw in small increments. If it still slips, check if the grip pad is intact—if it's worn or missing, you might need a new clamp.
- The lean pipe joint won't align with the clamp: Sometimes, pipes are slightly bent (it happens!). Loosen the clamp, wiggle the pipe until the joint lines up, then retighten. If the pipe is badly bent, replace it—safety first!
- The aluminum profile is wobbly: Add more clamps along the profile (space them 6-12 inches apart instead of 18). You can also use angle brackets (small metal L-shapes) between the profile and pipes for extra support.
- The caster wheels don't roll smoothly: Check for debris stuck in the wheels (dust, hair, small rocks). Clean them out with a toothpick or compressed air. If the wheels are still stiff, apply a drop of oil to the axles.
- The chrome finish is scratched: Minor scratches are normal and won't affect performance. For deeper scratches, touch them up with chrome paint (available at auto parts stores) to prevent rust.
Customization Ideas: Make It Your Own
Now that you've mastered the basics, let's talk about how to customize your setup. The beauty of lean pipe systems is their flexibility—here are a few ideas to spark your creativity:
Build a Flow Rack for Parts or Materials
Flow racks are perfect for assembly lines or workshops where you need parts to "flow" to the next station. To build one, attach roller track to your aluminum profile using clamps. The rollers let bins or boxes glide forward as you take items from the front, keeping everything organized and accessible.
Create a Height-Adjustable Workstation
Tired of hunching over a low workbench? Use adjustable lean pipe joints (yes, they exist!) to raise or lower your aluminum profile top. Just loosen the joint screws, adjust the height, and retighten. Perfect for both sitting and standing work.
Add Accessories Galore
The T-slots in aluminum profiles are like blank canvases. Attach tool hooks, pegboards, label holders, or even small drawers using T-slot nuts and bolts. You can also add bins for screws, washers, or other small parts—no more digging through messy drawers!
Real-World Example: Sarah's Garage Workshop Makeover
Let's meet Sarah, a hobby woodworker who wanted to organize her garage workshop without breaking the bank. She had a pile of tools, wood scraps, and hardware bins scattered everywhere, making it hard to find anything. After researching lean pipe systems, she decided to DIY a workbench using lean pipe clamp B chrome, aluminum profile, and caster wheels.
Sarah started with a 4-foot by 2-foot frame, using 28mm lean pipes and 90° joints. She attached aluminum profile to the top for a smooth work surface and added caster wheels so she could roll the bench out of the way when parking her car. To keep her tools organized, she added a shelf below the top using more aluminum profile and clamps, and hung tool hooks from the sides.
"The best part was how easy the clamp was to install," Sarah said. "I was worried I'd need special tools, but all I used was a wrench and a level. Now I can find my drill bits in seconds, and the bench rolls right where I need it. Total cost? Under $200—way cheaper than buying a pre-made workbench!"
Sarah's story isn't unique. With a little creativity and the right parts, you can transform any space into an organized, efficient area.
You've Got This! Start Your DIY Project Today
Installing a lean pipe clamp B chrome might seem intimidating at first, but as you've seen, it's all about taking it step by step. With the right tools, a little patience, and this guide, you can build custom lean pipe systems that fit your space, your budget, and your needs. Whether you're organizing a workshop, garage, office, or even a craft room, the possibilities are endless.
So what are you waiting for? Grab your lean pipe clamp B chrome, lean pipe joint, aluminum profile, and caster wheels (or whatever parts you need), and start building. And when you're done, take a moment to enjoy the fruits of your labor—you've earned it.
Happy building!