- Company Articles
- Products and Technology
- Installation And Maintenance
- DIY Installation of Roller Track Placon Mount Center Support Bracket: Tools You'll Need

DIY Installation of Roller Track Placon Mount Center Support Bracket: Tools You'll Need
Related Product
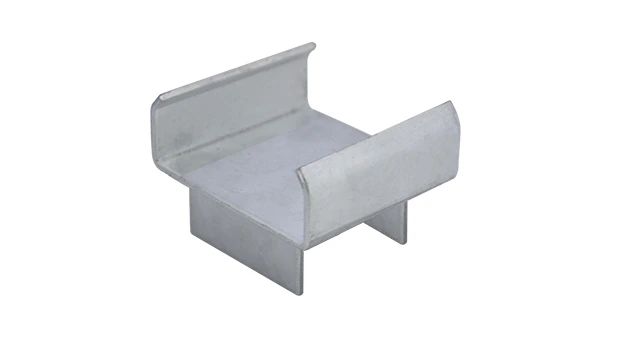
Roller Track Placon Mount Center Support Bracket
Roller track placon mount work as a connector for roller track and pipe or aluminum profile in rack syetem, it is a necessary parts in rack system which widely used in industrial plant and logistic,warehouse storage.
Ever walked through a busy factory floor and noticed how smoothly materials glide from one workstation to another? Chances are, there's a well-installed roller track system behind that efficiency. For small manufacturers, startups, or even seasoned teams looking to tweak their workflow, installing a roller track placon mount center support bracket yourself can be a game-changer. Not only does it cut down on installation costs, but it also gives you the flexibility to adjust your setup as production needs change—perfect for embracing that "sustainable improvement" vibe we all love in lean manufacturing.
But let's be real: DIY projects can feel daunting if you don't know where to start. That's why we're breaking down everything you need to know—from the tools in your toolbox to the pro tips that'll make the process feel like a breeze. Whether you're setting up a new lean pipe workbench or upgrading an existing flow rack, this guide will help you get that support bracket locked in tight and ready to boost your team's productivity.
Why Bother with a Center Support Bracket, Anyway?
First off, let's talk about why this bracket matters. Roller tracks are workhorses in manufacturing—they carry everything from small components to heavy assemblies across production assemble lines. Over time, the weight of constant use can cause the track to sag, especially in longer sections. That's where the center support bracket comes in: it's the unsung hero that keeps the track level, prevents jams, and ensures materials flow like they should. Think of it as the backbone of your roller track system—without it, you're risking slowdowns, damaged parts, or even safety hazards.
And not just any bracket will do. The roller track placon mount center support bracket we're focusing on here is designed to play nice with aluminum profile systems—the same lightweight, durable frames you'll find in modern workstations and flow racks. Its modular design means it can adapt to different track sizes, and since it's made from high-grade aluminum, it's built to handle the daily grind without rusting or bending. Plus, since it's part of a lean system, you can easily reposition it later if you decide to rearrange your workspace. No wasted parts, no extra costs—just smart, sustainable design.
Before You Start: The Golden Rule of DIY Installations
Here's a quick reality check: even the best tools won't save you if you skip the prep work. Before you dive into installation, take 10 minutes to: 1) measure your roller track length to confirm how many brackets you need (hint: most pros recommend one center bracket for every 1.5 meters of track), 2) check that your aluminum profile rails are clean and free of dents (a quick wipe with a cloth works wonders), and 3) lay out all your parts on a flat surface (like your lean pipe workbench ) so you don't have to hunt for screws mid-project. Trust us, this little prep step will save you from a lot of "where did I put that washer?" moments later.

The Toolkit: What You'll Need (and Why)
You don't need a garage full of fancy equipment for this job, but having the right tools will make the difference between a wobbly bracket and a rock-solid setup. Below's a breakdown of the must-haves, plus why each one matters. We've even thrown in some pro recommendations to help you pick tools that'll last beyond this project.
| Tool Name | Why You Need It | Pro Tip |
|---|---|---|
| Phillips Head Screwdriver (Magnetic) | Most placon mount brackets use Phillips screws to attach to aluminum profiles. The magnetic tip keeps tiny screws from falling into hard-to-reach gaps. | Go for a screwdriver with a rubber grip—your hand will thank you after 10+ screws. |
| Hex Key Set (Allen Wrenches) | Many aluminum profile accessories (like T-slot nuts) require hex keys for a snug fit. Look for a set with both metric and standard sizes—you'll use them for other lean system projects too. | Invest in a folding hex key set to avoid losing individual wrenches in your toolbox. |
| Tape Measure (10ft/3m minimum) | Precision is key! You'll need to measure the exact midpoint of your roller track to place the bracket correctly. A retractable tape with clear markings works best. | Opt for a tape with a locking mechanism—no more struggling to hold the measurement while marking. |
| Level (2ft/60cm spirit level) | Ever installed a shelf that tilted to one side? Yeah, we don't want that here. A level ensures the bracket sits perfectly horizontal, so materials glide evenly. | Choose a level with both horizontal and vertical vials—handy for future workstation builds. |
| Rubber Mallet | Sometimes, placon mounts need a gentle tap to seat fully into the aluminum profile grooves. A rubber mallet prevents dents or scratches on your shiny new parts. | A 16-ounce mallet is heavy enough for the job without overdoing it. |
| Cordless Drill (with Phillips and hex bits) | For larger setups or if you're installing multiple brackets, a drill speeds up screw tightening. Just be careful not to over-tighten—you don't want to strip the threads! | Set your drill to a low torque setting to avoid damaging the aluminum profile. |
| Marker or Pencil | You'll need to mark where the bracket sits on the aluminum profile. A fine-tip marker works on metal, but a pencil is easier to erase if you make a mistake. | Sharpened pencil > dull marker—crisper lines mean more accurate placement. |
| Wire Brush or Sandpaper (80-grit) | If your aluminum profile has any rust spots or rough edges, a quick scrub with a wire brush or sandpaper ensures the bracket mounts flush. | Focus on the T-slot areas—debris here can prevent the placon mount from locking in. |
Pro Insight:
If you're new to working with aluminum profiles, grab a sample piece first to practice attaching the bracket. It's like test-driving a car before buying—you'll get a feel for how the parts fit together without stressing over the "real" installation.

Step-by-Step Installation: Let's Get That Bracket On!
Now that your tools are lined up and your workspace is prepped, let's walk through the installation step by step. We'll assume you're mounting the bracket to a standard 40-series aluminum profile (the most common in lean systems), but the process is similar for other sizes. Take your time, and remember: measure twice, drill once!
Step 1: Find the "Sweet Spot" for Placement
Start by measuring the length of your roller track. Let's say it's 3 meters long—your center bracket should go right in the middle, at 1.5 meters. Use your tape measure to mark this point on both sides of the aluminum profile rail that will support the track. Double-check the measurement with your level (hold it horizontally along the rail) to make sure your marks are straight—even a tiny offset can throw off the track's balance later.
Pro move: If you're installing multiple brackets (for extra-long tracks), space them evenly. For example, a 4.5-meter track would get brackets at 1.5m, 3m, and 4.5m. This keeps the weight distributed evenly—no sagging allowed!
Step 2: Prep the Aluminum Profile T-Slots
Aluminum profiles have those handy T-shaped slots that let you attach brackets anywhere along the rail. But before you slide in the placon mount, give the slots a quick clean. Grab your wire brush or sandpaper and gently scrub away any dust, grease, or metal shavings. If there's stubborn grime, a damp cloth (wrung out!) works too—just dry the rail thoroughly to prevent water spots.
Why bother? Clean slots mean the placon mount's locking tabs will seat securely, so the bracket won't wiggle loose when heavy boxes roll over it. Think of it like cleaning the grooves in a puzzle before fitting the pieces together—everything clicks better when it's clean.
Step 3: Slide the Placon Mount into Position
Take your roller track placon mount center support bracket and line up its mounting tabs with the T-slots on the aluminum profile. Hold it at a slight angle (about 30 degrees) and slide it into the slot until it reaches your earlier mark. Once it's in place, rotate the bracket until it's perpendicular to the rail—you'll feel it "lock" into position as the tabs catch the slot edges.
Stuck? Give it a gentle tap with your rubber mallet (on the flat part of the bracket, not the tabs!) to help it seat. Avoid hitting too hard—aluminum is strong, but you don't want to bend the tabs.
Step 4: Secure the Bracket with Screws
Now it's time to grab your screws and screwdriver (or drill). Most brackets come with pre-drilled holes that align with the T-slots. insert a T-slot nut into the profile (it should slide in from the end if the bracket is in the way) and line it up with the bracket's hole. Then, drive the screw through the bracket and into the nut—tighten until it's snug, but not so much that the bracket warps. Repeat this for all mounting holes (most brackets have 2-4 screws for stability).
Pro tip: If you're using a drill, start with your hand first—screw it in a few turns manually to avoid cross-threading, then switch to the drill to finish. This little trick saves you from stripping the nut, which is a huge headache to fix.
Step 5: Attach the Roller Track to the Bracket
With the center support bracket secured to the aluminum profile, it's time to mount the roller track itself. Most roller tracks have pre-drilled holes that match the bracket's top plate. Line up the track with the bracket, insert the provided bolts (usually M6 or M8, depending on track size), and hand-tighten them with a hex key. Then, use your level to check if the track is straight—hold the level along the top of the track and adjust the bolts if one side is higher than the other.
Once it's level, fully tighten the bolts with your hex key or drill (again, low torque!). Give the track a gentle shake—if it moves, double-check the bolts. A solid track feels steady, even when you push on it firmly.
Step 6: Test, Adjust, and Celebrate!
You're almost done! Grab a test item (like a box of parts similar to what you'll run on the track) and slide it along the roller track. It should glide smoothly without sticking or tilting. If it catches, check two things: 1) Is the track level? Use your level again to confirm. 2) Are the bracket screws tight enough? Loose brackets can cause the track to dip in the middle.
Make adjustments as needed—tighten a screw here, shim a low spot there (with a small aluminum washer if necessary). Once the test run goes off without a hitch, step back and admire your handiwork. You just installed a critical part of your lean system—high-five!
Oops! Common Mistakes (and How to Fix Them)
Even the most careful DIYers hit snags. Here are the top issues we've seen and how to troubleshoot them like a pro:
Mistake #1: The Bracket Wiggles in the T-Slot
Why it happens: Either the T-slots were dirty, or the placon mount wasn't seated all the way. Fix: Loosen the screws, slide the bracket out, clean the slots again, and reinsert with a firmer tap from the rubber mallet. Tighten the screws until you feel resistance—you should need a little elbow grease, but don't overdo it.
Mistake #2: The Roller Track Dips in the Middle
Why it happens: The bracket is placed too far from the center, or the aluminum profile is bent (unlikely, but possible with heavy impacts). Fix: Measure the track length again and reposition the bracket to the true midpoint. If the profile is bent, gently straighten it with a rubber mallet (support the back with a block of wood to avoid kinking).
Mistake #3: Screws Strip When Tightening
Why it happens: Using the wrong screwdriver size or over-tightening with a drill. Fix: If the screw head is stripped, use a rubber band between the screwdriver and screw for extra grip to remove it. replace with a new screw, and this time, use a manual screwdriver for better control.
Keep It Rolling: Maintaining Your Roller Track Bracket
Installing the bracket is just the start—keeping it in top shape ensures it lasts for years. Here's how to maintain it with minimal effort:
- Monthly check: Tighten any loose screws with your hex key or screwdriver. Vibration from daily use can slowly loosen them, so a quick once-over prevents bigger issues.
- Quarterly clean: Wipe down the bracket and aluminum profile with a dry cloth to remove dust. For greasy environments (like auto parts assembly), use a mild degreaser (avoid harsh chemicals—they can damage the aluminum finish).
- When reconfiguring: Since this is a lean system, you might want to move the bracket later. Simply loosen the screws, slide it to the new position, and retighten. No need to buy new parts—just reuse what you have. That's the beauty of modular design!
Lean Hack:
Keep a small toolkit near your roller track system (a zip-top bag with a hex key, screwdriver, and rubber mallet) so your team can tighten screws or adjust the bracket on the fly. It's all about empowering your team to make quick improvements—lean manufacturing at its finest!
Wrapping Up: You've Got This!
Installing a roller track placon mount center support bracket might seem intimidating at first, but with the right tools and a little patience, it's totally doable. Whether you're setting up a new production assemble line or upgrading an old flow rack, this bracket is a small part that makes a big difference in keeping your workflow smooth and efficient.
And remember, you're not alone in this. Lean systems are all about community and shared knowledge—if you hit a snag, reach out to the pros who design these parts. They've seen it all and can offer tips tailored to your specific setup (think unique lean solution for your industry, like medical device manufacturing or 3C assembly).
So grab your toolbox, round up your team, and start building that more efficient workspace. Your future self (and your production numbers) will thank you.