- Company Articles
- Products and Technology
- Installation And Maintenance
- Extending Lean Pipe Clamp Chrome Lifespan: Maintenance Best Practices

Extending Lean Pipe Clamp Chrome Lifespan: Maintenance Best Practices
Related Product
Lean Pipe Clamp Chrome
Lean pipe clamp is used for rack system hang monitor or other panel for workbenck, flowrack in production daily use.
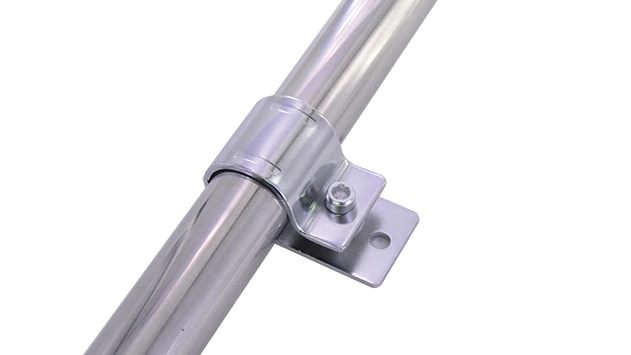
Walk through any bustling manufacturing plant, warehouse, or assembly line, and you'll notice a silent but critical backbone holding everything together: lean pipe systems. These modular setups—composed of pipes, joints, and clamps—are the unsung heroes of efficient workflows, supporting everything from workbenches and material racks to conveyors and turnover trolleys. At the heart of these systems lies a small but mighty component: the lean pipe clamp chrome. Sleek, durable, and designed to withstand the rigors of daily use, these clamps keep pipes securely connected, ensuring stability and safety across operations. But like any hardworking tool, they don't last forever—unless you know how to take care of them. In this guide, we'll dive into the art of maintaining lean pipe clamp chrome, exploring common threats to their lifespan, actionable maintenance routines, and pro tips to keep them functioning like new for years.
Understanding Lean Pipe Clamp Chrome: More Than Just a Connector
Before we jump into maintenance, let's take a moment to appreciate what makes lean pipe clamp chrome so essential. These clamps are not just metal pieces—they're precision-engineered components designed to bridge lean pipes (often aluminum, stainless steel, or plastic-coated) with lean pipe joints, creating rigid yet flexible structures. The "chrome" in their name refers to the chromium plating applied to their surface, a choice that serves three critical purposes: corrosion resistance, reduced friction, and a smooth, professional finish. Unlike unplated or painted clamps, chrome-plated versions stand up better to moisture, oils, and industrial chemicals, making them ideal for high-humidity environments or areas where spills are common.
But chrome plating is more than just a protective layer—it's a partner to the clamp's base material, typically steel or aluminum. Together, they form a durable bond that resists wear from repeated tightening, loosening, and vibration. Think of it like a shield: the chrome keeps the elements out, while the base material provides strength. When maintained properly, this duo can last for years, even in heavy-use settings. However, when neglected, the chrome can chip, peel, or corrode, exposing the underlying metal and putting the entire structure at risk of instability.
Common Threats to Your Clamp Chrome's Lifespan
To protect your lean pipe clamp chrome, you first need to understand what's working against it. Let's break down the most common enemies:
1. Corrosion: The Silent Eater
Corrosion is public enemy number one for any metal component, and chrome-plated clamps are no exception. While chrome is resistant to rust, it's not impervious. Humidity, condensation, and exposure to chemicals (like cleaning agents, oils, or coolants) can slowly break down the plating. Even something as simple as a spilled soda or a damp cloth left on a clamp overnight can start the process. You'll notice it first as tiny, discolored spots (often brown or green) on the chrome surface—these are early signs of rust forming beneath the plating. If left unchecked, the spots grow, the chrome begins to peel, and eventually, the clamp weakens to the point of failure.
2. Wear and Tear: The Cost of Daily Use
Every time you adjust a clamp, tighten a bolt, or bump a pipe, you're putting stress on the chrome plating. Over time, this repeated friction can scratch or wear away the chrome, especially in areas where the clamp meets the pipe or lean pipe joint. For example, if a clamp is frequently loosened and retightened during reconfigurations, the threads or contact points may develop thin, almost invisible scratches. These scratches act as entry points for moisture and debris, accelerating corrosion and reducing the clamp's grip strength.
3. Improper Installation: A Recipe for Premature Failure
Even the best clamps can fail if installed incorrectly. Over-tightening is a common culprit: when operators crank down too hard on the clamp, they risk warping the metal or cracking the chrome plating. Under-tightening is just as bad—loose clamps vibrate during use, causing the chrome to rub against the pipe and wear thin. Misalignment is another issue: if the pipe isn't perfectly straight before clamping, the clamp may sit at an angle, putting uneven pressure on the chrome and leading to cracks over time.
4. Contamination: Grit, Grime, and Grease
Manufacturing floors are dirty places. Dust, metal shavings, grease, and even small debris can accumulate on clamp surfaces, especially in hard-to-reach crevices between the clamp and pipe. This gunk doesn't just look unsightly—it traps moisture, speeds up corrosion, and creates friction that wears down the chrome. For example, a layer of grease on a clamp may seem harmless, but when mixed with dust, it forms a gritty paste that acts like sandpaper every time the clamp moves.

The Maintenance Playbook: Daily, Weekly, and Monthly Routines
Now that we know what we're up against, let's outline a proactive maintenance plan to keep your lean pipe clamp chrome in top shape. Think of this as a "care calendar"—small, consistent actions that add up to big results.
Pro Tip:
Consistency is key! Even 5 minutes of daily maintenance can extend a clamp's lifespan by 2–3 years. Set a schedule, assign responsibilities, and make it part of your team's daily workflow.
Daily Checks: Quick Wins for Longevity
Daily maintenance doesn't have to be time-consuming—focus on visual inspections and simple cleaning. Start by walking the production floor and scanning all visible lean pipe clamps. Look for: discoloration (spots, streaks, or cloudiness on the chrome), looseness (clamps that wiggle when touched), and debris buildup (dust, grease, or shavings around the clamp). For each clamp, use a clean microfiber cloth to wipe away surface dust and fingerprints—this prevents particles from scratching the chrome during use. Pay extra attention to clamps near conveyor belts, workbenches, or material racks, as these areas tend to accumulate more debris.
If you spot a loose clamp, tighten it gently with a wrench—remember, "snug but not overly tight" is the rule. Over-tightening is a common mistake here; if you hear a "creak" or feel resistance beyond a firm twist, stop. For clamps with visible moisture (e.g., from condensation or spills), dry them immediately with a cloth to prevent water spots, which can etch the chrome over time.
Weekly Deep Dives: Targeted Cleaning and Lubrication
Once a week, set aside 30–60 minutes for more thorough maintenance. Start by repeating the daily visual inspection, but this time, use a flashlight to check hard-to-see areas, like the gap between the clamp and pipe or the threads of the tightening bolt. For clamps with caked-on grease or grime, mix a mild, pH-neutral detergent (like dish soap) with warm water and use a soft-bristled brush (an old toothbrush works great) to scrub the surface. Avoid abrasive cleaners (e.g., steel wool, scouring pads) or harsh chemicals (bleach, ammonia)—these will scratch or strip the chrome.
After cleaning, rinse the clamp with a damp cloth (no soaking!) and dry it completely. Then, apply a small amount of silicone-based lubricant to the clamp's moving parts, such as the bolt threads or pivot points. Silicone lubricants are ideal here because they don't degrade chrome plating and repel moisture. A little goes a long way—wipe away excess lubricant with a cloth to prevent dust buildup. This step is especially important for clamps that are adjusted frequently, as it reduces friction and wear.
Monthly Inspections: Preventive Care for Long-Term Health
Monthly maintenance is all about prevention. Grab a torque wrench (set to the manufacturer's recommended torque—usually 15–20 Nm for most lean pipe clamps) and check the tightness of every clamp. This ensures even pressure and prevents over-tightening. While you're at it, inspect the chrome plating for signs of damage: chips, peeling, or deep scratches. If you find any, mark the clamp with a tag or note its location—these will need closer attention or replacement down the line.
Next, check for compatibility with other components. For example, if your lean pipe system uses aluminum profile accessories or stainless steel pipe series, ensure the clamps are properly aligned with these parts. Mismatched or misaligned components can cause uneven stress on the clamp, leading to premature failure. Finally, review your maintenance logs (yes, keep logs!) to spot patterns—Are clamps near a particular machine failing more often? Is corrosion worse in humid areas? Use this data to adjust your maintenance plan (e.g., adding extra checks in high-moisture zones).
Seasonal Overhauls: Going the Extra Mile
Every 3–6 months, consider a seasonal overhaul for critical clamps (those holding heavy loads, supporting safety barriers, or in high-traffic areas). Remove the clamps from the pipes, disassemble them if possible (check the manufacturer's instructions first), and clean all parts individually. Inspect the base metal (under the chrome) for signs of rust—if you see any, the clamp may need to be replaced. Reassemble with fresh lubricant and retighten to the correct torque. This deep clean removes hidden debris and gives you a chance to catch issues before they escalate.
The Maintenance Schedule at a Glance
| Frequency | Key Tasks | Tools Needed | Why It Matters |
|---|---|---|---|
| Daily | Visual inspection for discoloration, looseness, debris; wipe with microfiber cloth; tighten loose clamps. | Microfiber cloth, flashlight, basic wrench. | Catches early signs of damage; prevents debris buildup. |
| Weekly | Deep cleaning with mild detergent and soft brush; dry thoroughly; lubricate moving parts with silicone-based lube. | Soft-bristled brush, pH-neutral detergent, silicone lubricant, cloth. | Removes stubborn grime; reduces friction and corrosion risk. |
| Monthly | Torque check with wrench; inspect chrome for chips/scratches; check alignment with aluminum profile accessories/stainless steel pipe series. | Torque wrench, inspection checklist, marker/tags. | Ensures even pressure; identifies long-term wear patterns. |
| Seasonal (3–6 months) | Disassemble (if possible); clean all parts; inspect base metal for rust; reassemble with fresh lubricant. | Screwdriver (for disassembly), parts tray, lubricant. | Removes hidden debris; extends lifespan of critical clamps. |
Troubleshooting Common Chrome Clamp Issues
Even with the best maintenance, issues can pop up. Here's how to diagnose and fix the most common problems:
Problem 1: Chrome Peeling or Chipping
**Signs:** Flaky, peeling chrome; silver or gray spots (exposed base metal).
**Causes:** Harsh chemicals, over-tightening, impact damage, or manufacturing defects.
**Fix:** Small chips can be treated with a clear nail polish (to seal the area and prevent corrosion). For large or widespread peeling, replace the clamp—exposed metal will rust quickly, weakening the clamp.
Problem 2: Stiff or Stuck Clamps
**Signs:** Clamp won't loosen or tighten; bolt is seized.
**Causes:** Rust in threads, dried lubricant, or debris buildup.
**Fix:** Apply a penetrating oil (like WD-40) to the threads and let it sit for 10–15 minutes. Tap the bolt gently with a hammer to break up rust, then try loosening again. Once free, clean and relubricate the threads with silicone lube.
Problem 3: Corrosion Spots
**Signs:** Brown, green, or black spots on the chrome.
**Causes:** Moisture, chemical exposure, or trapped debris.
**Fix:** Mix equal parts white vinegar and water, dip a cloth in the solution, and gently rub the spot. The acidity will dissolve light rust. For stubborn spots, use a chrome polish (follow the manufacturer's instructions). Rinse and dry thoroughly, then apply a thin layer of car wax to protect the area.
Problem 4: Loose Connections Despite Tightening
**Signs:** Clamp tightens but loosens again after use; structure wobbles.
**Causes:** Worn threads, damaged lean pipe joint, or misaligned pipes.
**Fix:** Check the pipe and joint for damage—if the pipe is bent or the joint is cracked, replace those first. If the clamp's threads are stripped, replace the clamp. For misaligned pipes, loosen all nearby clamps, straighten the pipe, and retighten in sequence.
Storage and Handling: Protecting Clamps When They're Not in Use
Maintenance doesn't stop when clamps are removed from the line. Proper storage and handling of spare or unused clamps are just as important. Start by designating a clean, dry storage area—avoid damp basements, garages with poor ventilation, or areas near chemicals. Store clamps in a toolbox or on a shelf, and avoid stacking heavy items on top of them, as this can bend or warp the metal.
When transporting clamps (e.g., from storage to the production floor), use a padded container to prevent impacts. Chrome plating is durable, but a hard drop can chip or crack it. If you're storing clamps for an extended period (months or more), apply a light coat of silicone lubricant to all surfaces and wrap them in a clean cloth to keep dust off. This extra step ensures they're ready to use when you need them.
Real-World Results: How Maintenance Boosts Bottom Lines
Still not convinced that maintenance is worth the effort? Consider this example from a mid-sized automotive parts manufacturer. Before implementing a clamp maintenance program, the plant was replacing lean pipe clamp chrome every 6–8 months, at a cost of $15–$20 per clamp. With over 500 clamps in use, this added up to $7,500–$10,000 annually in replacement costs, not to mention downtime from clamp failures (which averaged 2 hours per month).
After training the team on daily, weekly, and monthly maintenance routines, the plant saw dramatic improvements. Clamp lifespan increased to 2–3 years, cutting replacement costs by 75%. Downtime from clamp failures dropped to zero, and operators reported fewer headaches with loose or stuck clamps. The total savings? Over $30,000 in the first year alone—proof that a little maintenance goes a long way.
Final Thoughts: Invest in Maintenance, Reap the Rewards
Lean pipe clamp chrome may be small, but their impact on your operations is huge. By understanding their role, identifying common threats, and implementing a consistent maintenance routine, you can extend their lifespan, reduce costs, and keep your lean pipe systems running smoothly. Remember: maintenance isn't an expense—it's an investment in reliability, safety, and productivity. Whether you're a floor manager, a maintenance technician, or an operator, take pride in caring for these critical components. Your bottom line (and your sanity during busy shifts) will thank you.
So, the next time you walk past a lean pipe structure, take a moment to inspect the clamps. A quick wipe, a gentle tighten, or a drop of lubricant today could save you from a costly breakdown tomorrow. Here's to clamps that last—and systems that thrive!