- Company Articles
- Products and Technology
- Installation And Maintenance
- Flexible Production Lines: 2020 National Standard Profile Installation Tutorial

Flexible Production Lines: 2020 National Standard Profile Installation Tutorial
Related Product
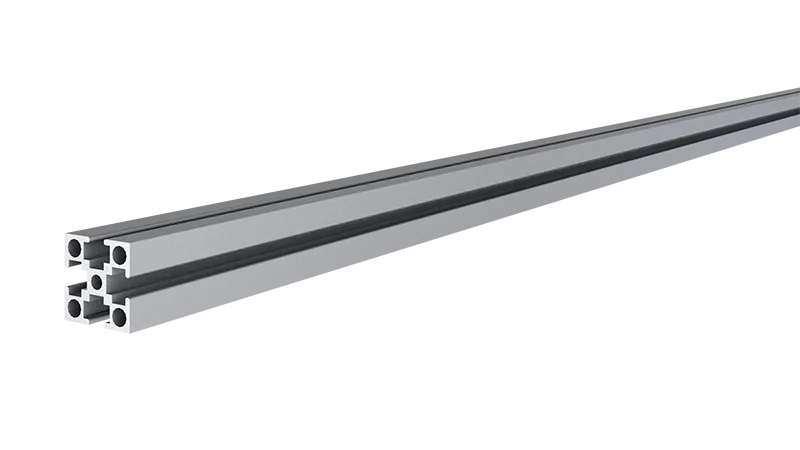
2020 National Standard Profile
45° external bending joint, used for 45° external connection of two aluminum pipes.
In today's fast-paced manufacturing world, flexibility isn't just a buzzword—it's the cornerstone of staying competitive. Whether you're running a small workshop or a large-scale production facility, the ability to adapt your workspace quickly can mean the difference between meeting tight deadlines and falling behind. That's where flexible production lines come in, and at the heart of many of these setups lies a critical component: the 2020 National Standard Profile. Lightweight, durable, and endlessly customizable, this aluminum profile has become a go-to choice for teams looking to build workbenches, material racks, and flow systems that grow with their needs. In this guide, we'll walk you through everything you need to know to install a 2020 National Standard Profile-based production line, from gathering tools to troubleshooting common hiccups. Let's dive in.
Understanding the 2020 National Standard Profile
Before we pick up a wrench, let's take a moment to get familiar with the star of the show: the 2020 National Standard Profile. If you've ever seen those sleek, silver aluminum rails with T-shaped slots running along their length, you're already halfway there. This profile gets its name from its dimensions—20mm in width and 20mm in height—making it compact enough for tight spaces but sturdy enough to handle daily wear and tear. What really sets it apart, though, is its modularity. Thanks to those T-slots, you can attach almost any accessory imaginable—connectors, brackets, shelves, even roller tracks—without drilling holes or welding. That means if your production needs change next month, you can disassemble and reconfigure the entire setup in hours, not days.
Made from high-grade aluminum alloy, the 2020 profile strikes a perfect balance between strength and weight. It won't rust, it's easy to clean, and it's light enough to move around with a helper, but strong enough to support tools, materials, and even small machinery. Compare that to traditional steel frames, which are heavy, prone to corrosion, and nearly impossible to modify without cutting torches or power tools, and it's easy to see why this profile has become a favorite among manufacturers. Plus, it pairs seamlessly with a wide range of aluminum profile accessories—think end caps to smooth out sharp edges, rubber strips to dampen noise, and corner codes to reinforce joints—so you can tailor every inch of your setup to your workflow.
Pre-Installation Preparation: Tools, Safety, and Components
Like any project, installing a flexible production line starts with preparation. Rushing into assembly without the right tools or a clear plan is a recipe for frustration (and possibly a wobbly workbench). Let's break down what you'll need to get started.
Tools You'll Need
You don't need a fully stocked machine shop, but a few basic tools will make the process much smoother. Here's a quick checklist:
| Tool | Use |
|---|---|
| Allen wrench set (metric) | Tightening T-slot bolts and connectors |
| Tape measure (at least 3m) | Measuring profile lengths and ensuring alignment |
| Spirit level (1m or longer) | Checking if frames and workbenches are straight/level |
| Rubber mallet | Gently tapping profiles into connectors without damaging them |
| Deburring tool | Smoothing rough edges on cut profiles (if cutting to length) |
| Pencil or marker | Marking cut lines or bolt positions |
| Work gloves | Protecting hands from sharp edges |
| Safety goggles | Shielding eyes from metal shavings (if cutting profiles) |
Safety First
Aluminum profiles might look harmless, but their edges can be sharp—especially if they've just been cut. Always wear work gloves when handling them, and if you're trimming profiles to length with a saw, slip on safety goggles to keep metal shavings out of your eyes. It's also a good idea to clear your workspace of clutter before starting; a clean area reduces trips and makes it easier to lay out components. Finally, if you're assembling something tall (like a material rack), have a helper spot you to prevent tipping.
Checking Your Components
Before you start screwing things together, lay out all your components and double-check that you have everything you need. At minimum, you'll likely have:
- 2020 National Standard Profile rails (cut to your desired lengths, or uncut if you'll trim them on-site)
- Aluminum profile connectors (90° angle codes, 45° brackets, or T-joints, depending on your design)
- T-slot bolts and nuts (these slide into the profile's slots to attach accessories)
- End caps (to cover exposed ends of profiles)
- Workbench surface (plywood, MDF, or aluminum honeycomb panel—more on this later)
- Roller track (if building a flow system for materials)
- Caster wheels (for mobile setups)
Pro tip: Lay out all components on the floor in the shape of your final design before tightening any bolts. This gives you a chance to spot missing parts or design flaws early—like realizing you need an extra bracket to support a heavy shelf—saving you time later.

Step-by-Step Installation Guide
Now that we're prepped and ready, let's start building. We'll walk through assembling a basic setup: a workbench with a roller track for material flow and caster wheels for mobility. Feel free to adapt these steps to your specific needs—add shelves, extra roller tracks, or tool holders as required.
Step 1: Assemble the Frame with 2020 National Standard Profile
The frame is the backbone of your setup, so we'll start here. Let's assume we're building a workbench that's 1200mm long, 600mm deep, and 800mm tall (a standard height for most workbenches). You'll need four vertical profiles for the legs (800mm each), two horizontal profiles for the front and back (1200mm each), and two horizontal profiles for the sides (600mm each). If your profiles aren't pre-cut, measure and mark the lengths with a pencil, then use a hacksaw or miter saw to cut them. (Pro tip: Wrap masking tape around the profile before cutting to reduce splintering.)
Once your profiles are cut, it's time to connect them. For the corners, we'll use 90° aluminum profile connectors (also called angle codes). Slide a T-slot nut into the end of one horizontal profile, then align the connector with the end of a vertical profile. insert a bolt through the connector's hole and into the T-slot nut, then tighten it with an Allen wrench—snug, but not so tight that you strip the threads. Repeat this for all four corners until you have a rectangular frame. Now, stand the frame up and use your spirit level to check if it's square. If one corner is higher than the others, loosen the bolts slightly and tap the frame gently with a rubber mallet until the bubble in the level is centered. Once it's square, tighten all bolts fully.
For extra stability, add diagonal braces across the back and sides using shorter profile pieces and 45° connectors. This might seem like overkill, but trust us—when you're leaning on the workbench or placing heavy tools on it, those braces will prevent the frame from wobbling. Attach them the same way: slide T-slot nuts into the main frame profiles, align the braces, bolt them in, and tighten.
Step 2: Mount the Workbench Surface
With the frame sturdy and square, it's time to add the workbench top. For this, you'll need a flat surface—plywood (18mm thick is ideal), MDF, or an aluminum honeycomb panel (lightweight and resistant to scratches). Cut the surface to match the frame's length and depth (1200mm x 600mm in our example). To attach it, use L-shaped brackets that fit into the T-slots of the frame's top rails. Space the brackets evenly—about every 300mm—to distribute weight, then place the workbench surface on top. Drill pilot holes through the brackets into the surface, then secure it with wood screws (if using plywood/MDF) or sheet metal screws (if using aluminum). Give the surface a gentle shake to make sure it's secure—no wobbles allowed!
If you're using the workbench for electronics or delicate components, consider adding a (ESD) mat on top—but that's optional. The key here is to ensure the surface is level and flush with the frame, so materials glide smoothly if you're using it with a roller track later.
Step 3: Install Roller Track for Material Flow
Now, let's add functionality: a roller track to move materials from one end of the workbench to the other. Roller tracks are game-changers for assembly lines—they let gravity do the work, reducing strain on workers and speeding up production. For this, you'll need a length of roller track (matching your workbench length) and roller track placon mounts to attach it to the 2020 profile frame.
Start by positioning the roller track along the back edge of the workbench (or wherever you want materials to flow). Use a tape measure to ensure it's straight, then mark where the placon mounts will go—one at each end and one in the middle for support. Slide T-slot nuts into the workbench frame's side rails, align the placon mounts, and bolt them in. Now, place the roller track onto the mounts and secure it with the included screws. Give the rollers a spin with your finger—they should turn smoothly without sticking. If a roller is jammed, check for debris or misalignment and adjust the mounts as needed. Finally, test it with a sample part (like a plastic bin or a small box)—it should glide from one end to the other with minimal effort.
Step 4: Attach Caster Wheels for Mobility
If you want your workbench to move around the shop (say, to reposition it for a new project), caster wheels are a must. Choose heavy-duty caster wheels with brakes—you don't want the bench rolling away while you're working! Most caster wheels come with mounting plates that fit into the T-slots of the 2020 profile legs. Simply slide T-slot nuts into the bottom of each vertical leg, align the caster's mounting plate, bolt it on, and repeat for all four legs. Make sure the wheels are facing the same direction (all swiveling, or two fixed and two swiveling for better control) and that the brakes engage properly. Once they're on, push the bench around to test—should roll smoothly, and the brakes should lock it firmly in place.
Adding the Finishing Touches: Aluminum Profile Accessories
Your basic setup is now functional, but why stop there? Aluminum profile accessories are where you can really make the workbench your own. Let's cover a few must-haves:
- End caps: Pop these onto the exposed ends of profiles to eliminate sharp edges—no more scraped knuckles!
- T-slot rubber strips: Slide these into the T-slots to reduce noise when tools or materials are placed on the bench, and to keep dust out of the slots.
- Tool hooks: Attach these to the side rails to hang pliers, screwdrivers, or power cords, keeping your work surface clutter-free.
- Shelves: Add a lower shelf using extra profiles and brackets for storing supplies—just make sure to reinforce it with braces if you're putting heavy items on it.
These small additions might seem minor, but they add up to a workspace that's safer, more organized, and tailored to how you actually work. Plus, since they're all T-slot compatible, you can add or remove them anytime.
Troubleshooting Common Issues
Even with careful planning, you might run into a few snags during installation. Here's how to fix the most common problems:
Frame Wobbles or Leans
If your frame feels unstable, the first thing to check is the bolts—they might have loosened during assembly. Tighten all connectors with an Allen wrench, then use your spirit level to see if the frame is square. If one leg is shorter than the others (it happens!), try adding a shim under it or adjusting the caster wheels (if using them). If the wobble is in the middle, add diagonal braces—they work wonders for rigidity.
Roller Track Jams
A jammed roller track is usually caused by misalignment or debris. First, check if the track is level—if it's tilted to one side, materials will catch on the rollers. Loosen the placon mounts, adjust the track until it's straight, and retighten. If there's dust or small bits of material in the rollers, wipe them down with a dry cloth. For stubborn jams, a drop of lubricating oil on the roller axles (sparingly!) can help.
Caster Wheels Stick or Won't Swivel
Sticky casters are often due to dirt in the swivel mechanism. Flip the bench onto its side (with help!) and wipe the caster bases clean with a cloth. If they still stick, add a tiny amount of lubricant to the swivel bearings. If the wheels themselves are wobbly, check if the mounting bolts are tight—loose bolts can cause the wheel to tilt.
Maintenance Tips to Keep Your Setup Running Smoothly
Your 2020 National Standard Profile setup is built to last, but a little maintenance goes a long way. Here's how to keep it in top shape:
- Inspect monthly: Check all bolts and connectors for looseness—tighten any that have worked their way loose.
- Clean roller tracks weekly: Wipe down rollers with a dry cloth to prevent dust buildup.
- Lubricate moving parts: Every few months, add a drop of oil to caster swivels and roller axles.
- replace worn parts: If a caster wheel starts to squeak or a roller stops turning, swap it out—most aluminum profile accessories are inexpensive and easy to replace.
Wrapping Up: Your Flexible Future Awaits
Installing a flexible production line with 2020 National Standard Profile might seem daunting at first, but as you've seen, it's a project that's well within reach for anyone with basic tools and a little patience. The beauty of this system is that it grows with you—today's workbench can become tomorrow's material rack, and next month's assembly line. By choosing aluminum profile accessories and components that work together seamlessly, you're not just building a workspace—you're building a foundation for adaptability.
Whether you're a small business owner looking to streamline your shop or a production manager tasked with scaling operations, the 2020 National Standard Profile offers a level of flexibility that traditional setups can't match. So go ahead—gather your tools, lay out your design, and start building. Before you know it, you'll have a production line that's not just efficient, but ready for whatever the future throws at it. Happy building!